您好,登录后才能下订单哦!
memcache 分为服务端和客户端。服务端用来存放缓存,客户端用来操作缓存。
因此,可以使用 Nginx 直接访问 Memcache,并用$uri 和$args 等 Nginx 内置变量设定缓存 key规则,这样,当缓存命中时,Nginx 可以跳过通过 fastcgi 和 PHP 通信的过程,直接从 memcache中获取数据并返回。
OpenResty是一个基于 Nginx 与 Lua 的高性能 Web 平台,其内部集成了大量精良的 Lua 库、第三方模块以及大多数的依赖项。用于方便地搭建能够处理超高并发、扩展性极高的动态 Web 应用、Web 服务和动态网关。
1.下载openresty的压缩包,opwnresty中含有自身的nginx,因此不需要额外安装nginx
[root@server2 ~]# tar zxf openresty-1.11.2.3.tar.gz
[root@server2 ~]# cd openresty-1.11.2.3
[root@server2 openresty-1.11.2.3]# yum install gcc-c++ -y
[root@server2 openresty-1.11.2.3]# yum install pcre-devel -y
[root@server2 openresty-1.11.2.3]# yum install openssl-devel -y
[root@server2 openresty-1.11.2.3]# ./configure
[root@server2 openresty-1.11.2.3]# gmake
[root@server2 openresty-1.11.2.3]# gmake install
[root@server2 openresty-1.11.2.3]# cd /usr//local/openresty/nginx/conf/
2.更改配置文件
[root@server2 conf]# vim nginx.conf
###########################################
18 http {
19 upstream memcache { ##nginx 模块中,uosteam 主要用于完成数据的接收,处理,转发
20 server 127.0.0.1:11211; ##设置默认端口号
21 }
52 location /memc {
53 internal; ##只接受内部访问,不接收外部 http 请求
54 memc_connect_timeout 100ms;
55 memc_send_timeout 100ms;
56 memc_read_timeout 100ms;
57 set $memc_key $query_string; ##使用 Nginx 内置的$query_string 来作为 key
58 set $memc_exptime 300; ##缓存失效时间
59 memc_pass memcache;
60 } ##将请求的 URL 和后端服务返回的有效结果组成 key-value 存入 memcache服务
72 location ~ \.php$ {
73 set $key $uri$args;
74 srcache_fetch GET /memc $key;
##注册一个输入拦截器到 location,这个配置将在location 进入时被执行
75 srcache_store PUT /memc $key;
##注册一个输出拦截器到 location,当 location执行完成并输出时会被执行
76 root html;
77 fastcgi_pass 172.0.0.60:9000;
78 fastcgi_index index.php;
79 include fastcgi.conf;
80 }##为“~ \.php$”配置缓存,表示所有以“.php”结尾的请求都会结果被缓存
}
##当所请求的 uri 以“.php”结尾时,首先到 memcache 中查询有没有以$uri$args 为 key 的数据,如果有则直接返回;否则,执行 location 的逻辑,如果返回的 http 状态码为 200,则在输出前以$uri$args 为 key,将输入结果存入 memcache
###########################################
[root@server2 conf]# /usr/local/openresty/nginx/sbin/nginx -t
[root@server2 conf]# /usr/local/openresty/nginx/sbin/nginx -s reload
[root@server2 conf]# /etc/init.d/httpd start
##注意:http与nginx的端口号都为80,因此需要修改http的端口号
[root@server2 html]# /etc/init.d/iptables stop
[root@server2 html]# yum install memcached -y
测试:
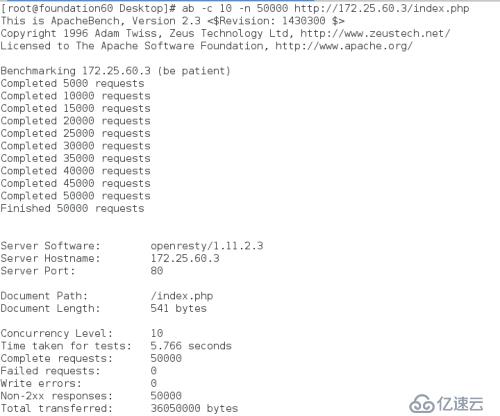
1.开启memcached,在物理机中进行压力测试
[root@server2 conf]# /etc/init.d/memcached start
[root@foundation60 Desktop]# ab -c 10 -n 50000 http://172.25.60.3/index.php
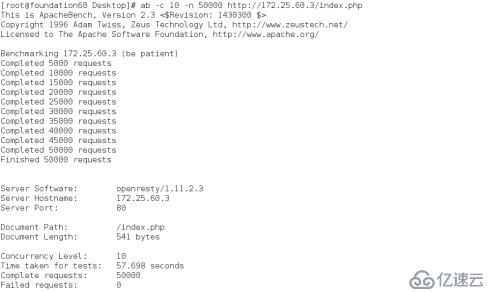
2.关闭memcached,在物理机中进行压力测试
[root@server2 conf]# /etc/init.d/memcached stop
[root@foundation60 Desktop]# ab -c 10 -n 50000 http://172.25.60.3/index.php
免责声明:本站发布的内容(图片、视频和文字)以原创、转载和分享为主,文章观点不代表本网站立场,如果涉及侵权请联系站长邮箱:is@yisu.com进行举报,并提供相关证据,一经查实,将立刻删除涉嫌侵权内容。