您好,登录后才能下订单哦!
这篇文章将为大家详细讲解有关SpringBoot应用是如何启动的,文章内容质量较高,因此小编分享给大家做个参考,希望大家阅读完这篇文章后对相关知识有一定的了解。
SpringBoot项目通过SpringApplication.run(App.class, args)来启动:
@Configuration
public class App {
 public static void main(String[] args) {
 SpringApplication.run(App.class, args);
 }
}接下来,通过源码来看看SpringApplication.run()方法的执行过程。如果对源码不感兴趣,直接下拉到文章末尾,看启动框图。
1、调用SpringApplication类的静态方法
 public static ConfigurableApplicationContext run(Object source, String... args) {
  return run(new Object[] { source }, args);
 }
 public static ConfigurableApplicationContext run(Object[] sources, String[] args) {
  return new SpringApplication(sources).run(args);
 }
2、SpringApplication对象初始化
public SpringApplication(Object... sources) {
  initialize(sources);
 }
 @SuppressWarnings({ "unchecked", "rawtypes" })
 private void initialize(Object[] sources) {
  if (sources != null && sources.length > 0) {
   this.sources.addAll(Arrays.asList(sources));
  }
  // 判断是否为WEB环境
  this.webEnvironment = deduceWebEnvironment();
  // 找到META-INF/spring.factories中ApplicationContextInitializer所有实现类,并将其实例化
  setInitializers((Collection) getSpringFactoriesInstances(
    ApplicationContextInitializer.class));
  // 找到META-INF/spring.factories中ApplicationListener所有实现类,并将其实例化
  setListeners((Collection) getSpringFactoriesInstances(ApplicationListener.class));
  // 获取当前main方法类对象,即测试类中的App实例
  this.mainApplicationClass = deduceMainApplicationClass();
 }
对象初始化过程中,使用到了getSpringFactoriesInstances方法:
 private <T> Collection<? extends T> getSpringFactoriesInstances(Class<T> type) {
  return getSpringFactoriesInstances(type, new Class<?>[] {});
 }
 private <T> Collection<? extends T> getSpringFactoriesInstances(Class<T> type,
   Class<?>[] parameterTypes, Object... args) {
  ClassLoader classLoader = Thread.currentThread().getContextClassLoader();
  // Use names and ensure unique to protect against duplicates
  // 读取META-INF/spring.factories指定接口的实现类
  Set<String> names = new LinkedHashSet<String>(
    SpringFactoriesLoader.loadFactoryNames(type, classLoader));
  List<T> instances = createSpringFactoriesInstances(type, parameterTypes,
    classLoader, args, names);
  AnnotationAwareOrderComparator.sort(instances);
  return instances;
 }
 @SuppressWarnings("unchecked")
 private <T> List<T> createSpringFactoriesInstances(Class<T> type,
   Class<?>[] parameterTypes, ClassLoader classLoader, Object[] args,
   Set<String> names) {
  List<T> instances = new ArrayList<T>(names.size());
  for (String name : names) {
   try {
    Class<?> instanceClass = ClassUtils.forName(name, classLoader);
    Assert.isAssignable(type, instanceClass);
    Constructor<?> constructor = instanceClass.getConstructor(parameterTypes);
    T instance = (T) constructor.newInstance(args);
    instances.add(instance);
   }
   catch (Throwable ex) {
    throw new IllegalArgumentException(
      "Cannot instantiate " + type + " : " + name, ex);
   }
  }
  return instances;
 }
 // 读取META-INF/spring.factories文件
 public static List<String> loadFactoryNames(Class<?> factoryClass, ClassLoader classLoader) {
  String factoryClassName = factoryClass.getName();
  try {
   Enumeration<URL> urls = (classLoader != null ? classLoader.getResources(FACTORIES_RESOURCE_LOCATION) :
     ClassLoader.getSystemResources(FACTORIES_RESOURCE_LOCATION));
   List<String> result = new ArrayList<String>();
   while (urls.hasMoreElements()) {
    URL url = urls.nextElement();
    Properties properties = PropertiesLoaderUtils.loadProperties(new UrlResource(url));
    String factoryClassNames = properties.getProperty(factoryClassName);
    result.addAll(Arrays.asList(StringUtils.commaDelimitedListToStringArray(factoryClassNames)));
   }
   return result;
  }
  catch (IOException ex) {
   throw new IllegalArgumentException("Unable to load [" + factoryClass.getName() +
     "] factories from location [" + FACTORIES_RESOURCE_LOCATION + "]", ex);
  }
 }
META-INF/spring.factories文件内容,spring boot版本1.3.6.RELEASE # PropertySource Loaders org.springframework.boot.env.PropertySourceLoader=\ org.springframework.boot.env.PropertiesPropertySourceLoader,\ org.springframework.boot.env.YamlPropertySourceLoader # Run Listeners org.springframework.boot.SpringApplicationRunListener=\ org.springframework.boot.context.event.EventPublishingRunListener # Application Context Initializers org.springframework.context.ApplicationContextInitializer=\ org.springframework.boot.context.ConfigurationWarningsApplicationContextInitializer,\ org.springframework.boot.context.ContextIdApplicationContextInitializer,\ org.springframework.boot.context.config.DelegatingApplicationContextInitializer,\ org.springframework.boot.context.web.ServerPortInfoApplicationContextInitializer # Application Listeners org.springframework.context.ApplicationListener=\ org.springframework.boot.builder.ParentContextCloserApplicationListener,\ org.springframework.boot.context.FileEncodingApplicationListener,\ org.springframework.boot.context.config.AnsiOutputApplicationListener,\ org.springframework.boot.context.config.ConfigFileApplicationListener,\ org.springframework.boot.context.config.DelegatingApplicationListener,\ org.springframework.boot.liquibase.LiquibaseServiceLocatorApplicationListener,\ org.springframework.boot.logging.ClasspathLoggingApplicationListener,\ org.springframework.boot.logging.LoggingApplicationListener # Environment Post Processors org.springframework.boot.env.EnvironmentPostProcessor=\ org.springframework.boot.cloud.CloudFoundryVcapEnvironmentPostProcessor,\ org.springframework.boot.env.SpringApplicationJsonEnvironmentPostProcessor
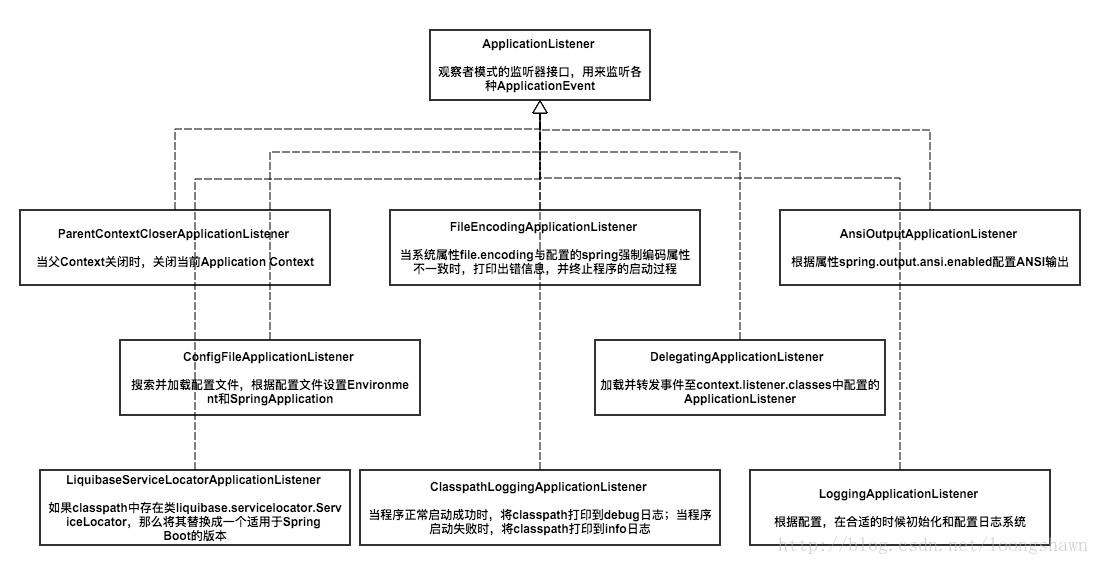
ApplicationListener接口是Spring框架的事件监听器,其作用可理解为SpringApplicationRunListener发布通知事件时,由ApplicationListener负责接收。SpringApplicationRunListener接口的实现类就是EventPublishingRunListener,其在SpringBoot启动过程中,负责注册ApplicationListener监听器,在不同时间节点发布不同事件类型,如果有ApplicationListener实现类监听了该事件,则接收处理。
public interface SpringApplicationRunListener {
 /**
  * 通知监听器,SpringBoot开始启动
  */
 void started();
 /**
  * 通知监听器,环境配置完成
  */
 void environmentPrepared(ConfigurableEnvironment environment);
 /**
  * 通知监听器,ApplicationContext已创建并初始化完成
  */
 void contextPrepared(ConfigurableApplicationContext context);
 /**
  * 通知监听器,ApplicationContext已完成IOC配置
  */
 void contextLoaded(ConfigurableApplicationContext context);
 /**
  * 通知监听器,SpringBoot开始完毕
  */
 void finished(ConfigurableApplicationContext context, Throwable exception);
}
附图为ApplicationListener监听接口实现类,每个类对应了一种事件。

3、SpringApplication核心run方法
/**
  * Run the Spring application, creating and refreshing a new
  * {@link ApplicationContext}.
  * @param args the application arguments (usually passed from a Java main method)
  * @return a running {@link ApplicationContext}
  */
 public ConfigurableApplicationContext run(String... args) {
  // 任务执行时间监听,记录起止时间差
  StopWatch stopWatch = new StopWatch();
  stopWatch.start();
  ConfigurableApplicationContext context = null;
  configureHeadlessProperty();
  // 启动SpringApplicationRunListener监听器
  SpringApplicationRunListeners listeners = getRunListeners(args);
  listeners.started();
  try {
   ApplicationArguments applicationArguments = new DefaultApplicationArguments(
     args);
   // 创建并刷新ApplicationContext
   context = createAndRefreshContext(listeners, applicationArguments);
   afterRefresh(context, applicationArguments);
   // 通知监听器,应用启动完毕
   listeners.finished(context, null);
   stopWatch.stop();
   if (this.logStartupInfo) {
    new StartupInfoLogger(this.mainApplicationClass)
      .logStarted(getApplicationLog(), stopWatch);
   }
   return context;
  }
  catch (Throwable ex) {
   handleRunFailure(context, listeners, ex);
   throw new IllegalStateException(ex);
  }
 }
这里,需要看看createAndRefreshContext()方法是如何创建并刷新ApplicationContext。
private ConfigurableApplicationContext createAndRefreshContext(
   SpringApplicationRunListeners listeners,
   ApplicationArguments applicationArguments) {
  ConfigurableApplicationContext context;
  // Create and configure the environment
  // 创建并配置运行环境,WebEnvironment与StandardEnvironment选其一
  ConfigurableEnvironment environment = getOrCreateEnvironment();
  configureEnvironment(environment, applicationArguments.getSourceArgs());
  listeners.environmentPrepared(environment);
  if (isWebEnvironment(environment) && !this.webEnvironment) {
   environment = convertToStandardEnvironment(environment);
  }
  // 是否打印Banner,就是启动程序时出现的图形
  if (this.bannerMode != Banner.Mode.OFF) {
   printBanner(environment);
  }
  // Create, load, refresh and run the ApplicationContext
  // 创建、装置、刷新、运行ApplicationContext
  context = createApplicationContext();
  context.setEnvironment(environment);
  postProcessApplicationContext(context);
  applyInitializers(context);
  // 通知监听器,ApplicationContext创建完毕
  listeners.contextPrepared(context);
  if (this.logStartupInfo) {
   logStartupInfo(context.getParent() == null);
   logStartupProfileInfo(context);
  }
  // Add boot specific singleton beans
  context.getBeanFactory().registerSingleton("springApplicationArguments",
    applicationArguments);
  // Load the sources
  // 将beans载入到ApplicationContext容器中
  Set<Object> sources = getSources();
  Assert.notEmpty(sources, "Sources must not be empty");
  load(context, sources.toArray(new Object[sources.size()]));
  // 通知监听器,beans载入ApplicationContext完毕
  listeners.contextLoaded(context);
  // Refresh the context
  refresh(context);
  if (this.registerShutdownHook) {
   try {
    context.registerShutdownHook();
   }
   catch (AccessControlException ex) {
    // Not allowed in some environments.
   }
  }
  return context;
 }
其中利用createApplicationContext()来实例化ApplicationContext对象,即DEFAULT_WEB_CONTEXT_CLASS 、DEFAULT_CONTEXT_CLASS两个对象其中一个。
protected ConfigurableApplicationContext createApplicationContext() {
  Class<?> contextClass = this.applicationContextClass;
  if (contextClass == null) {
   try {
    contextClass = Class.forName(this.webEnvironment
      ? DEFAULT_WEB_CONTEXT_CLASS : DEFAULT_CONTEXT_CLASS);
   }
   catch (ClassNotFoundException ex) {
    throw new IllegalStateException(
      "Unable create a default ApplicationContext, "
        + "please specify an ApplicationContextClass",
      ex);
   }
  }
  return (ConfigurableApplicationContext) BeanUtils.instantiate(contextClass);
}postProcessApplicationContext(context)、applyInitializers(context)均为初始化ApplicationContext工作。
SpringBoot启动过程分析就先到这里,过程中关注几个对象:
ApplicationContext:Spring高级容器,与BeanFactory类似。
SpringApplicationRunListener:SprintBoot启动监听器,负责向ApplicationListener注册各类事件。
Environment:运行环境。
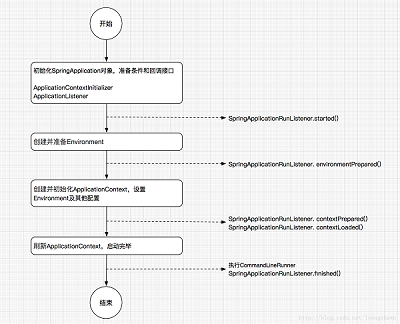
4、启动过程框图

关于SpringBoot应用是如何启动的就分享到这里了,希望以上内容可以对大家有一定的帮助,可以学到更多知识。如果觉得文章不错,可以把它分享出去让更多的人看到。
免责声明:本站发布的内容(图片、视频和文字)以原创、转载和分享为主,文章观点不代表本网站立场,如果涉及侵权请联系站长邮箱:is@yisu.com进行举报,并提供相关证据,一经查实,将立刻删除涉嫌侵权内容。