您好,登录后才能下订单哦!
怎么在Android应用中实现一个抽屉效果?很多新手对此不是很清楚,为了帮助大家解决这个难题,下面小编将为大家详细讲解,有这方面需求的人可以来学习下,希望你能有所收获。
实现原理
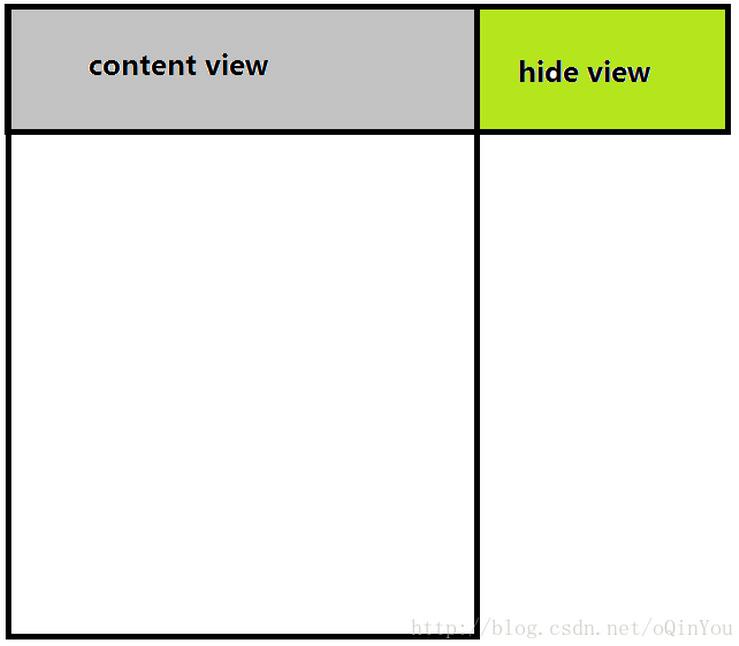
其实单就一个SwipeLayout的实现原理来讲的话,还是很简单的,实际上单个SwipeLayout隐藏抽屉状态时,应该是这样的:

也就是说,最初的隐藏状态,实际上是将hide view区域layout到conten view的右边,达到隐藏效果,而后显示则是根据拖拽的x值变化来动态的layout 2个view,从而达到一个滑动抽屉效果。
当然,直接重写view的onTouchEvent来动态的layout 2个view是可以实现我们需要的效果的,但是有更好的方法来实现,就是同过ViewDragHelper。
ViewDragHelper是google官方提供的一个专门用于手势分析处理的类,关于ViewDragHelper的基本使用,网上有一大堆的资源。具体的ViewDragHelper介绍以及基本使用方法,本文就不重复造轮子了,此处推荐鸿洋大神的一篇微博:Android ViewDragHelper完全解析 自定义ViewGroup神器。
具体实现
下面我们开始具体的实现。
布局比较简单,这里就不贴代码了,最后会贴上本demo的完整代码地址。
首先我们实现一个继承FrameLayout的自定义SwipeLauout,重写onFinishInflate方法:
这里我们只允许SwipeLayout设置2个子View,ContentLayout是继承LinearLayout的自定义layout,后面会讲到这个,此处先略过;
 @Override
 protected void onFinishInflate() {
  super.onFinishInflate();
  if (getChildCount() != 2) {
   throw new IllegalStateException("Must 2 views in SwipeLayout");
  }
  contentView = getChildAt(0);
  hideView = getChildAt(1);
  if (contentView instanceof ContentLayout)
   ((ContentLayout) contentView).setSwipeLayout(this);
  else {
   throw new IllegalStateException("content view must be an instanceof FrontLayout");
  }
 }
接着重写onSizeChanged,onLayout,onInterceptTouchEvent方法:
 @Override
 protected void onSizeChanged(int w, int h, int oldw, int oldh) {
  super.onSizeChanged(w, h, oldw, oldh);
  hideViewHeight = hideView.getMeasuredHeight();
  hideViewWidth = hideView.getMeasuredWidth();
  contentWidth = contentView.getMeasuredWidth();
 }

 @Override
 protected void onLayout(boolean changed, int left, int top, int right,
       int bottom) {
  // super.onLayout(changed, left, top, right, bottom);
  contentView.layout(0, 0, contentWidth, hideViewHeight);
  hideView.layout(contentView.getRight(), 0, contentView.getRight()
    + hideViewWidth, hideViewHeight);
 }

 @Override
 public boolean onInterceptTouchEvent(MotionEvent ev) {
  boolean result = viewDragHelper.shouldInterceptTouchEvent(ev);
  //  Log.e("SwipeLayout", "-----onInterceptTouchEvent-----");
  return result;
 }
然后是比较关键的,重写onTouchEvent方法以及ViewDragHelper.Callback回调,我们定了一个enum来判断SwipeLayout的三种状态。在onViewPositionChanged中,有2种方法实现content view和hide view的伴随移动,一种是直接offset view的横向变化量,还有一种就是直接通过layout的方式,两种方式都可以。
 public enum SwipeState {
  Open, Swiping, Close;
 }
 @Override
 public boolean onTouchEvent(MotionEvent event) {
  //  Log.e("SwipeLayout", "-----onTouchEvent-----");
  switch (event.getAction()) {
   case MotionEvent.ACTION_DOWN:
    downX = event.getX();
    downY = event.getY();
    break;
   case MotionEvent.ACTION_MOVE:
    // 1.获取x和y方向移动的距离
    float moveX = event.getX();
    float moveY = event.getY();
    float delatX = moveX - downX;// x方向移动的距离
    float delatY = moveY - downY;// y方向移动的距离

    if (Math.abs(delatX) > Math.abs(delatY)) {
     // 表示移动是偏向于水平方向,那么应该SwipeLayout应该处理,请求listview不要拦截
     this.requestDisallowInterceptTouchEvent(true);
    }

    // 更新downX,downY
    downX = moveX;
    downY = moveY;
    break;
   case MotionEvent.ACTION_UP:

    break;
  }
  viewDragHelper.processTouchEvent(event);
  return true;
 }

 private ViewDragHelper.Callback callback = new ViewDragHelper.Callback() {
  @Override
  public boolean tryCaptureView(View child, int pointerId) {
   return child == contentView || child == hideView;
  }

  @Override
  public int getViewHorizontalDragRange(View child) {
   return hideViewWidth;
  }

  @Override
  public int clampViewPositionHorizontal(View child, int left, int dx) {
   if (child == contentView) {
    if (left > 0)
     left = 0;
    if (left < -hideViewWidth)
     left = -hideViewWidth;
   } else if (child == hideView) {
    if (left > contentWidth)
     left = contentWidth;
    if (left < (contentWidth - hideViewWidth))
     left = contentWidth - hideViewWidth;
   }
   return left;
  }

  @Override
  public void onViewPositionChanged(View changedView, int left, int top,
           int dx, int dy) {
   super.onViewPositionChanged(changedView, left, top, dx, dy);
   if (changedView == contentView) {
    // 如果手指滑动deleteView,那么也要讲横向变化量dx设置给contentView
    hideView.offsetLeftAndRight(dx);
   } else if (changedView == hideView) {
    // 如果手指滑动contentView,那么也要讲横向变化量dx设置给deleteView
    contentView.offsetLeftAndRight(dx);
   }

   //   if (changedView == contentView) {
   //    // 手动移动deleteView
   //    hideView.layout(hideView.getLeft() + dx,
   //      hideView.getTop() + dy, hideView.getRight() + dx,
   //      hideView.getBottom() + dy);
   //   } else if (hideView == changedView) {
   //    // 手动移动contentView
   //    contentView.layout(contentView.getLeft() + dx,
   //      contentView.getTop() + dy, contentView.getRight() + dx,
   //      contentView.getBottom() + dy);
   //   }
   //实时更新当前状态
   updateSwipeStates();
   invalidate();
  }

  @Override
  public void onViewReleased(View releasedChild, float xvel, float yvel) {
   super.onViewReleased(releasedChild, xvel, yvel);
   //根据用户滑动速度处理开关
   //xvel: x方向滑动速度
   //yvel: y方向滑动速度
   //   Log.e("tag", "currentState = " + currentState);
   //   Log.e("tag", "xvel = " + xvel);
   if (xvel < -200 && currentState != SwipeState.Open) {
    open();
    return;
   } else if (xvel > 200 && currentState != SwipeState.Close) {
    close();
    return;
   }

   if (contentView.getLeft() < -hideViewWidth / 2) {
    // 打开
    open();
   } else {
    // 关闭
    close();
   }
  }
 };
open(),close()实现
 public void open() {
  open(true);
 }

 public void close() {
  close(true);
 }

 /**
  * 打开的方法
  *
  * @param isSmooth 是否通过缓冲动画的形式设定view的位置
  */
 public void open(boolean isSmooth) {
  if (isSmooth) {
   viewDragHelper.smoothSlideViewTo(contentView, -hideViewWidth,
     contentView.getTop());
   ViewCompat.postInvalidateOnAnimation(SwipeLayout.this);
  } else {
   contentView.offsetLeftAndRight(-hideViewWidth);//直接偏移View的位置
   hideView.offsetLeftAndRight(-hideViewWidth);//直接偏移View的位置
   //   contentView.layout(-hideViewWidth, 0, contentWidth - hideViewWidth, hideViewHeight);//直接通过坐标摆放
   //   hideView.layout(contentView.getRight(), 0, hideViewWidth, hideViewHeight);//直接通过坐标摆放
   invalidate();
  }
 }

 /**
  * 关闭的方法
  *
  * @param isSmooth true:通过缓冲动画的形式设定view的位置
  *     false:直接设定view的位置
  */
 public void close(boolean isSmooth) {
  if (isSmooth) {
   viewDragHelper.smoothSlideViewTo(contentView, 0, contentView.getTop());
   ViewCompat.postInvalidateOnAnimation(SwipeLayout.this);
  } else {
   contentView.offsetLeftAndRight(hideViewWidth);
   hideView.offsetLeftAndRight(hideViewWidth);
   invalidate();
   //contentView.layout(0, 0, contentWidth, hideViewHeight);//直接通过坐标摆放
   //hideView.layout(contentView.getRight(), 0, hideViewWidth, hideViewHeight);//直接通过坐标摆放
  }
 }
此上基本实现了单个SwipeLayout的抽屉滑动效果,但是将此SwipeLayout作为一个item布局设置给一个listView的时候,还需要做许多的判断。
由于listView的重用机制,我们这里并未针对listview做任何处理,所以一旦有一个item的SwipeLayout的状态是打开状态,不可避免的其它也必然有几个是打开状态,所以我们这里需要根据检测listView的滑动,当listView滑动时,关闭SwipeLayout。既然需要在外部控制SwipeLayout的开关,我们先定义一个SwipeLayoutManager用于管理SwipeLayout的控制。
public class SwipeLayoutManager {
 //记录打开的SwipeLayout集合
 private HashSet<SwipeLayout> mUnClosedSwipeLayouts = new HashSet<SwipeLayout>();

 private SwipeLayoutManager() {
 }

 private static SwipeLayoutManager mInstance = new SwipeLayoutManager();

 public static SwipeLayoutManager getInstance() {
  return mInstance;
 }

 /**
  * 将一个没有关闭的SwipeLayout加入集合
  * @param layout
  */
 public void add(SwipeLayout layout) {
  mUnClosedSwipeLayouts.add(layout);
 }

 /**
  * 将一个没有关闭的SwipeLayout移出集合
  * @param layout
  */
 public void remove(SwipeLayout layout){
  mUnClosedSwipeLayouts.remove(layout);
 }

 /**
  * 关闭已经打开的SwipeLayout
  */
 public void closeUnCloseSwipeLayout() {
  if(mUnClosedSwipeLayouts.size() == 0){
   return;
  }

  for(SwipeLayout l : mUnClosedSwipeLayouts){
   l.close(true);
  }
  mUnClosedSwipeLayouts.clear();
 }

 /**
  * 关闭已经打开的SwipeLayout
  */
 public void closeUnCloseSwipeLayout(boolean isSmooth) {
  if(mUnClosedSwipeLayouts.size() == 0){
   return;
  }

  for(SwipeLayout l : mUnClosedSwipeLayouts){
   l.close(isSmooth);
  }
  mUnClosedSwipeLayouts.clear();
 }
}
这样就可以监听listView的滑动,然后在listView滑动的时候,关闭所有的抽屉View。
 listView.setOnScrollListener(new OnScrollListener() {
   @Override
   public void onScrollStateChanged(AbsListView view, int scrollState) {
    swipeLayoutManager.closeUnCloseSwipeLayout();
   }

   @Override
   public void onScroll(AbsListView view, int firstVisibleItem, int visibleItemCount, int totalItemCount) {
   }
  });
考虑到大多数时候,在我们打开抽屉View和关闭抽屉View的时候,外部需要知道SwipeLayout的状态值,所以我们需要在SwipeLayout中增加几个接口,告诉外部当前SwipeLayout的状态值:
SwipeLayout.java
----------------
 private void updateSwipeStates() {
  SwipeState lastSwipeState = currentState;
  SwipeState swipeState = getCurrentState();

  if (listener == null) {
   try {
    throw new Exception("please setOnSwipeStateChangeListener first!");
   } catch (Exception e) {
    e.printStackTrace();
   }
   return;
  }

  if (swipeState != currentState) {
   currentState = swipeState;
   if (currentState == SwipeState.Open) {
    listener.onOpen(this);
    // 当前的Swipelayout已经打开,需要让Manager记录
    swipeLayoutManager.add(this);
   } else if (currentState == SwipeState.Close) {
    listener.onClose(this);
    // 说明当前的SwipeLayout已经关闭,需要让Manager移除
    swipeLayoutManager.remove(this);
   } else if (currentState == SwipeState.Swiping) {
    if (lastSwipeState == SwipeState.Open) {
     listener.onStartClose(this);
    } else if (lastSwipeState == SwipeState.Close) {
     listener.onStartOpen(this);
     //hideView准备显示之前,先将之前打开的的SwipeLayout全部关闭
     swipeLayoutManager.closeUnCloseSwipeLayout();
     swipeLayoutManager.add(this);
    }
   }
  } else {
   currentState = swipeState;
  }
 }

 /**
  * 获取当前控件状态
  *
  * @return
  */
 public SwipeState getCurrentState() {
  int left = contentView.getLeft();
  //  Log.e("tag", "contentView.getLeft() = " + left);
  //  Log.e("tag", "hideViewWidth = " + hideViewWidth);
  if (left == 0) {
   return SwipeState.Close;
  }

  if (left == -hideViewWidth) {
   return SwipeState.Open;
  }
  return SwipeState.Swiping;
 }
 private OnSwipeStateChangeListener listener;

 public void setOnSwipeStateChangeListener(
   OnSwipeStateChangeListener listener) {
  this.listener = listener;
 }

 public View getContentView() {
  return contentView;
 }

 public interface OnSwipeStateChangeListener {
  void onOpen(SwipeLayout swipeLayout);

  void onClose(SwipeLayout swipeLayout);

  void onStartOpen(SwipeLayout swipeLayout);

  void onStartClose(SwipeLayout swipeLayout);
 }
然后接下来是写一个为listView设置的SwipeAdapter
SwipeAdapter.java
------------
public class SwipeAdapter extends BaseAdapter implements OnSwipeStateChangeListener {
 private Context mContext;
 private List<String> list;
 private MyClickListener myClickListener;
 private SwipeLayoutManager swipeLayoutManager;

 public SwipeAdapter(Context mContext) {
  super();
  this.mContext = mContext;
  init();
 }

 private void init() {
  myClickListener = new MyClickListener();
  swipeLayoutManager = SwipeLayoutManager.getInstance();
 }

 public void setList(List<String> list){
  this.list = list;
  notifyDataSetChanged();
 }

 @Override
 public int getCount() {
  return list.size();
 }

 @Override
 public Object getItem(int position) {
  return list.get(position);
 }

 @Override
 public long getItemId(int position) {
  return position;
 }

 @Override
 public View getView(final int position, View convertView, ViewGroup parent) {
  if (convertView == null) {
   convertView = UIUtils.inflate(R.layout.list_item_swipe);
  }
  ViewHolder holder = ViewHolder.getHolder(convertView);

  holder.tv_content.setText(list.get(position));
  holder.tv_overhead.setOnClickListener(myClickListener);
  holder.tv_overhead.setTag(position);
  holder.tv_delete.setOnClickListener(myClickListener);
  holder.tv_delete.setTag(position);
  holder.sv_layout.setOnSwipeStateChangeListener(this);
  holder.sv_layout.setTag(position);

  holder.sv_layout.getContentView().setOnClickListener(new View.OnClickListener() {
   @Override
   public void onClick(View v) {
    ToastUtils.showToast("item click : " + position);
    swipeLayoutManager.closeUnCloseSwipeLayout();
   }
  });

  return convertView;
 }

 static class ViewHolder {
  TextView tv_content, tv_overhead, tv_delete;
  SwipeLayout sv_layout;

  public ViewHolder(View convertView) {
   tv_content = (TextView) convertView.findViewById(R.id.tv_content);
   tv_overhead = (TextView) convertView.findViewById(R.id.tv_overhead);
   tv_delete = (TextView) convertView.findViewById(R.id.tv_delete);
   sv_layout = (SwipeLayout) convertView.findViewById(R.id.sv_layout);
  }

  public static ViewHolder getHolder(View convertView) {
   ViewHolder holder = (ViewHolder) convertView.getTag();
   if (holder == null) {
    holder = new ViewHolder(convertView);
    convertView.setTag(holder);
   }
   return holder;
  }
 }

 class MyClickListener implements View.OnClickListener {
  @Override
  public void onClick(View v) {
   Integer position = (Integer) v.getTag();
   switch (v.getId()) {
    case R.id.tv_overhead:
     //ToastUtils.showToast("position : " + position + " overhead is clicked.");
     }
     break;
    case R.id.tv_delete:
     //ToastUtils.showToast("position : " + position + " delete is clicked.");
     }
     break;
    default:
     break;
   }
  }
 }

 @Override
 public void onOpen(SwipeLayout swipeLayout) {
  //ToastUtils.showToast(swipeLayout.getTag() + "onOpen.");
 }

 @Override
 public void onClose(SwipeLayout swipeLayout) {
  //ToastUtils.showToast(swipeLayout.getTag() + "onClose.");
 }

 @Override
 public void onStartOpen(SwipeLayout swipeLayout) {
  //   ToastUtils.showToast("onStartOpen.");
 }

 @Override
 public void onStartClose(SwipeLayout swipeLayout) {
  //   ToastUtils.showToast("onStartClose.");
 }
}
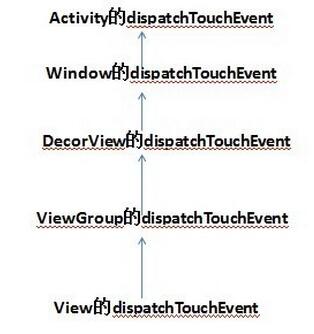
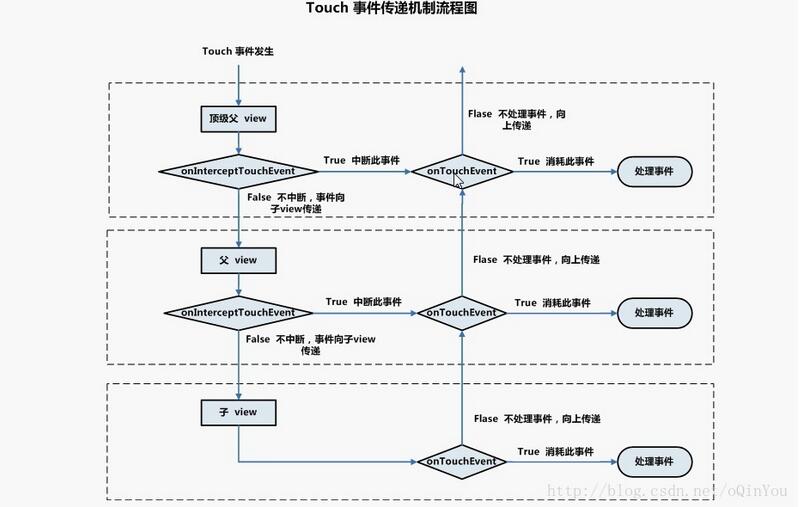
此时已经基本实现了我们需要的大部分功能了,但是当我们滑动的时候,又发现新的问题,我们的SwipeLayout和listview滑动判断有问题。由于前面我们仅仅是将touch拦截事件简简单单的丢给了viewDragHelper.shouldInterceptTouchEvent(ev)来处理,导致SwipeLayout和listview拦截touch事件时的处理存在一定的问题,这里我们要提到一个知识点:Android view事件的传递。
(1)首先由Activity分发,分发给根View,也就是DecorView(DecorView为整个Window界面的最顶层View)
(2)然后由根View分发到子的View
view事件拦截如下图所示:

view事件的消费如下图所示:

注:以上2张图借鉴网上总结的比较经典的图
所以这里我们就要谈到一开始出现的ContentLayout,主要重写了onInterceptTouchEvent和onTouchEvent。
public class ContentLayout extends LinearLayout {
 SwipeLayoutInterface mISwipeLayout;

 public ContentLayout(Context context) {
  super(context);
 }

 public ContentLayout(Context context, AttributeSet attrs) {
  super(context, attrs);
 }

 public ContentLayout(Context context, AttributeSet attrs, int defStyleAttr) {
  super(context, attrs, defStyleAttr);
 }

 public void setSwipeLayout(SwipeLayoutInterface iSwipeLayout) {
  this.mISwipeLayout = iSwipeLayout;
 }

 @Override
 public boolean onInterceptTouchEvent(MotionEvent ev) {
//  Log.e("ContentLayout", "-----onInterceptTouchEvent-----");
  if (mISwipeLayout.getCurrentState() == SwipeState.Close) {
   return super.onInterceptTouchEvent(ev);
  } else {
   return true;
  }
 }

 @Override
 public boolean onTouchEvent(MotionEvent ev) {
//  Log.e("ContentLayout", "-----onTouchEvent-----");
  if (mISwipeLayout.getCurrentState() == SwipeState.Close) {
   return super.onTouchEvent(ev);
  } else {
   if (ev.getActionMasked() == MotionEvent.ACTION_UP) {
    mISwipeLayout.close();
   }
   return true;
  }
 }
}
另外由于在ContentLayout中需要拿到父View SwipeLayout的开关状态以及控制SwipeLayout的关闭,因此在再写一个接口,用于ContentLayout获取SwipeLayout的开关状态以及更新SwipeLayout。
public interface SwipeLayoutInterface {

 SwipeState getCurrentState();

 void open();

 void close();
}
然后接着的是完善SwipeLayout的onInterceptTouchEvent,我们在这里增加一个GestureDetectorCompat处理手势识别:
 private void init(Context context) {
  viewDragHelper = ViewDragHelper.create(this, callback);
  mGestureDetector = new GestureDetectorCompat(context, mOnGestureListener);
  swipeLayoutManager = SwipeLayoutManager.getInstance();
 }

 private SimpleOnGestureListener mOnGestureListener = new SimpleOnGestureListener() {
  @Override
  public boolean onScroll(MotionEvent e1, MotionEvent e2, float distanceX, float distanceY) {
   // 当横向移动距离大于等于纵向时,返回true
   return Math.abs(distanceX) >= Math.abs(distanceY);
  }
 };
  @Override
 public boolean onInterceptTouchEvent(MotionEvent ev) {
  boolean result = viewDragHelper.shouldInterceptTouchEvent(ev) & mGestureDetector.onTouchEvent(ev);
  //  Log.e("SwipeLayout", "-----onInterceptTouchEvent-----");
  return result;
 }
如此下来,整个View不管是上下拖动,还是SwipeLayout的开关滑动,都已经实现完成了。最后增加对应overhead,delete以及item的点击事件,此处完善SwipeAdapter的代码之后如下。
 class MyClickListener implements View.OnClickListener {
  @Override
  public void onClick(View v) {
   Integer position = (Integer) v.getTag();
   switch (v.getId()) {
    case R.id.tv_overhead:
     //ToastUtils.showToast("position : " + position + " overhead is clicked.");
     swipeLayoutManager.closeUnCloseSwipeLayout(false);
     if(onSwipeControlListener != null){
      onSwipeControlListener.onOverhead(position, list.get(position));
     }
     break;
    case R.id.tv_delete:
     //ToastUtils.showToast("position : " + position + " delete is clicked.");
     swipeLayoutManager.closeUnCloseSwipeLayout(false);
     if(onSwipeControlListener != null){
      onSwipeControlListener.onDelete(position, list.get(position));
     }
     break;
    default:
     break;
   }
  }
 }

 private OnSwipeControlListener onSwipeControlListener;

 public void setOnSwipeControlListener(OnSwipeControlListener onSwipeControlListener){
  this.onSwipeControlListener = onSwipeControlListener;
 }

 /**
  * overhead 和 delete点击事件接口
  */
 public interface OnSwipeControlListener{
  void onOverhead(int position, String itemTitle);

  void onDelete(int position, String itemTitle);
 }
最后贴上MainActivity代码,此处通过OnSwipeControlListener接口回调实现item的删除和置顶:
public class MainActivity extends Activity implements OnSwipeControlListener {
 private ListView listView;
 private List<String> list = new ArrayList<String>();
 private SwipeLayoutManager swipeLayoutManager;
 private SwipeAdapter swipeAdapter;

 protected void onCreate(Bundle savedInstanceState) {
  super.onCreate(savedInstanceState);
  setContentView(R.layout.activity_main);

  initData();
  initView();
 }

 private void initData() {
  for (int i = 0; i < 50; i++) {
   list.add("content - " + i);
  }
 }

 private void initView() {
  swipeLayoutManager = SwipeLayoutManager.getInstance();
  swipeAdapter = new SwipeAdapter(this);
  swipeAdapter.setList(list);

  listView = (ListView) findViewById(R.id.list_view);

  listView.setAdapter(swipeAdapter);
  listView.setOnScrollListener(new OnScrollListener() {
   @Override
   public void onScrollStateChanged(AbsListView view, int scrollState) {
    swipeLayoutManager.closeUnCloseSwipeLayout();
   }

   @Override
   public void onScroll(AbsListView view, int firstVisibleItem, int visibleItemCount, int totalItemCount) {
   }
  });

  swipeAdapter.setOnSwipeControlListener(this);
 }

 @Override
 public void onOverhead(int position, String itemTitle) {
  setItemOverhead(position, itemTitle);
 }

 @Override
 public void onDelete(int position, String itemTitle) {
  removeItem(position, itemTitle);
 }

 /**
  * 设置item置顶
  *
  * @param position
  * @param itemTitle
  */
 private void setItemOverhead(int position, String itemTitle) {
  // ToastUtils.showToast("position : " + position + " overhead.");
  ToastUtils.showToast("overhead ---" + itemTitle + "--- success.");
  String newTitle = itemTitle;
  list.remove(position);//删除要置顶的item
  list.add(0, newTitle);//根据adapter传来的Title数据在list 0位置插入title字符串,达到置顶效果
  swipeAdapter.setList(list);//重新给Adapter设置list数据并更新
  UIUtils.runOnUIThread(new Runnable() {
   @Override
   public void run() {
    listView.setSelection(0);//listview选中第0项item
   }
  });
 }

 /**
  * 删除item
  *
  * @param position
  * @param itemTitle
  */

 private void removeItem(int position, String itemTitle) {
  //  ToastUtils.showToast("position : " + position + " delete.");
  ToastUtils.showToast("delete ---" + itemTitle + "--- success.");
  list.remove(position);
  swipeAdapter.setList(list);//重新给Adapter设置list数据并更新
 }
}
至此整个demo基本完成,本次完成的功能基本能够直接放到项目中使用。其实最麻烦的地方就在于view的touch事件拦截和处理,不过将本demo的log打开看一下对比之后,也就能够理解整个传递过程了。
看完上述内容是否对您有帮助呢?如果还想对相关知识有进一步的了解或阅读更多相关文章,请关注亿速云行业资讯频道,感谢您对亿速云的支持。
免责声明:本站发布的内容(图片、视频和文字)以原创、转载和分享为主,文章观点不代表本网站立场,如果涉及侵权请联系站长邮箱:is@yisu.com进行举报,并提供相关证据,一经查实,将立刻删除涉嫌侵权内容。