жӮЁеҘҪпјҢзҷ»еҪ•еҗҺжүҚиғҪдёӢи®ўеҚ•е“ҰпјҒ
жң¬зҜҮж–Үз« дёәеӨ§е®¶еұ•зӨәдәҶеҰӮдҪ•еңЁAndroidеә”з”ЁдёӯдҪҝз”ЁAlertDialogе®һзҺ°дёҖдёӘеҜ№иҜқжЎҶпјҢеҶ…е®№з®ҖжҳҺжүјиҰҒ并且容жҳ“зҗҶи§ЈпјҢз»қеҜ№иғҪдҪҝдҪ зңјеүҚдёҖдә®пјҢйҖҡиҝҮиҝҷзҜҮж–Үз« зҡ„иҜҰз»Ҷд»Ӣз»ҚеёҢжңӣдҪ иғҪжңүжүҖ收иҺ·гҖӮ
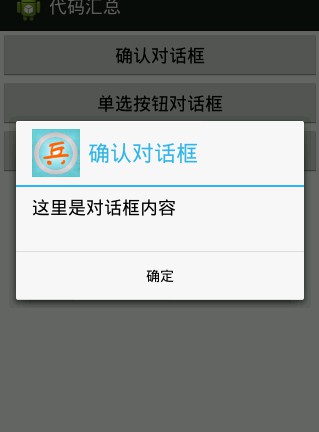
дёҖгҖҒзЎ®е®ҡеҜ№иҜқжЎҶ
AlertDialog.Builder builder = new AlertDialog.Builder(this);
builder.setTitle("зЎ®и®ӨеҜ№иҜқжЎҶ");
builder.setIcon(R.drawable.icon_72);
builder.setMessage("иҝҷйҮҢжҳҜеҜ№иҜқжЎҶеҶ…е®№");
builder.setPositiveButton("зЎ®е®ҡ", new DialogInterface.OnClickListener() {
@Override
public void onClick(DialogInterface arg0, int arg1) {
// TODO Auto-generated method stub
Toast.makeText(AlertDialog_text.this, "зӮ№еҮ»дәҶзЎ®е®ҡжҢүй’®", 1).show();
}
});
AlertDialog dialog = builder.create();
dialog.show(); //жҳҫзӨәгҖҒ
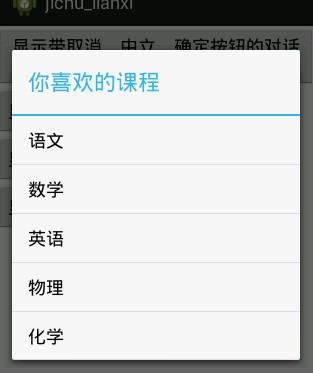
дәҢгҖҒжҷ®йҖҡеҲ—иЎЁ
final String[] items = new String[]{"иҜӯж–Ү","ж•°еӯҰ","иӢұиҜӯ","зү©зҗҶ","еҢ–еӯҰ"}; //еҲ—иЎЁйЎ№
Builder alertdialog = new AlertDialog.Builder(this);
alertdialog.setTitle("дҪ е–ңж¬ўзҡ„иҜҫзЁӢ").setItems(items, new DialogInterface.OnClickListener() {
@Override
public void onClick(DialogInterface dialog, int which) {
// TODO Auto-generated method stub
Toast.makeText(AlertDialog_lianxi.this, items[which], Toast.LENGTH_SHORT).show();
}
});
alertdialog.create().show(); //еҲӣе»әжҳҫзӨәеҲ—иЎЁ
дёүгҖҒеҚ•йҖүеҲ—иЎЁ
final String[] items_fruit = new String[]{"иӢ№жһң","йҰҷи•ү","ж©ҳеӯҗ","иҘҝз“ң","жўЁ"};
Builder alerdialog = new AlertDialog.Builder(this);
//и®ҫзҪ®еҲ—иЎЁж Үйўҳ
alerdialog.setTitle("дҪ е–ңж¬ўзҡ„ж°ҙжһң");
//и®ҫзҪ®еҚ•йҖүеҲ—иЎЁ
alerdialog.setSingleChoiceItems(items_fruit, 0, new DialogInterface.OnClickListener() {
@Override
public void onClick(DialogInterface dialog, int which) {
// TODO Auto-generated method stub
Toast.makeText(AlertDialog_lianxi.this, items_fruit[which], Toast.LENGTH_SHORT).show();
}
});
//и®ҫзҪ®еҸ–ж¶ҲжҢү钮并且и®ҫзҪ®е“Қеә”дәӢ件
alerdialog.setNegativeButton("еҸ–ж¶Ҳ", new DialogInterface.OnClickListener() {
@Override
public void onClick(DialogInterface dialog, int which) {
// TODO Auto-generated method stub
//еҸ–ж¶ҲжҢүй’®е“Қеә”дәӢ件
}
});
//ж·»еҠ зЎ®е®ҡжҢүй’® 并且и®ҫзҪ®е“Қеә”дәӢ件
alerdialog.setPositiveButton("зЎ®е®ҡ", new DialogInterface.OnClickListener() {
@Override
public void onClick(DialogInterface dialog, int which) {
// TODO Auto-generated method stub
//зЎ®е®ҡжҢүй’®е“Қеә”дәӢ件
}
});
alerdialog.create().show();//еҲӣе»әжҳҫзӨәеҲ—иЎЁ
еӣӣгҖҒеӨҡйҖүеҲ—иЎЁ
final String[] items_fruit1 = new String[]{"иӢ№жһң","йҰҷи•ү","ж©ҳеӯҗ","иҘҝз“ң","жўЁ"}; //и®ҫзҪ®йЎ№
final boolean[] items_fruit_selected = new boolean[]{true,false,false,false,false};
Builder alerdialog1 = new AlertDialog.Builder(this);
//и®ҫзҪ®еҲ—иЎЁж Үйўҳ
alerdialog1.setTitle("дҪ е–ңж¬ўзҡ„ж°ҙжһң");
//и®ҫзҪ®еӨҡйҖүеҲ—иЎЁ
alerdialog1.setMultiChoiceItems(items_fruit1, items_fruit_selected, new DialogInterface.OnMultiChoiceClickListener() {
@Override
public void onClick(DialogInterface dialog, int which, boolean isChecked) {
// TODO Auto-generated method stub
items_fruit_selected[which] = isChecked;
}
});
//и®ҫзҪ®еҸ–ж¶ҲжҢү钮并且и®ҫзҪ®е“Қеә”дәӢ件
alerdialog1.setNegativeButton("еҸ–ж¶Ҳ", new DialogInterface.OnClickListener() {
@Override
public void onClick(DialogInterface dialog, int which) {
// TODO Auto-generated method stub
//еҸ–ж¶ҲжҢүй’®е“Қеә”дәӢ件
}
});
//ж·»еҠ зЎ®е®ҡжҢүй’® 并且и®ҫзҪ®е“Қеә”дәӢ件,е°ҶйҖүжӢ©зҡ„йЎ№жҳҫзӨә
alerdialog1.setPositiveButton("зЎ®е®ҡ", new DialogInterface.OnClickListener() {
@Override
public void onClick(DialogInterface dialog, int which) {
// TODO Auto-generated method stub
//зЎ®е®ҡжҢүй’®е“Қеә”дәӢ件
StringBuilder stringBuilder = new StringBuilder();
for(int i=0;i<items_fruit_selected.length;i++)
{
if(items_fruit_selected[i] == true)
{
stringBuilder.append(items_fruit1[i]+"гҖҒ");
}
}
Toast.makeText(AlertDialog_lianxi.this, stringBuilder.toString(), Toast.LENGTH_SHORT).show();
}
});
alerdialog1.create().show();//еҲӣе»әжҳҫзӨәеҲ—иЎЁ

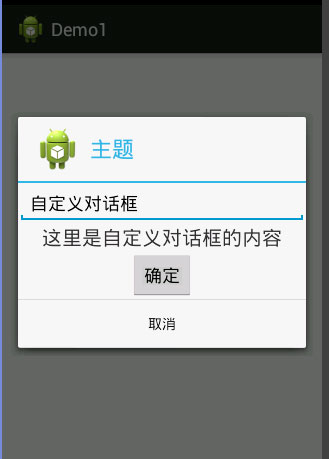
5гҖҒиҮӘе®ҡд№үеёғеұҖеҜ№иҜқжЎҶ

еҜ№иҜқжЎҶеёғеұҖж–Ү件
<?xml version="1.0" encoding="utf-8"?> <LinearLayout xmlns:android="http://schemas.android.com/apk/res/android" android:layout_width="match_parent" android:layout_height="match_parent" android:gravity="center_horizontal" android:orientation="vertical" > <EditText android:layout_width="match_parent" android:layout_height="wrap_content" android:editable="false" android:text="иҮӘе®ҡд№үеҜ№иҜқжЎҶ"/> <TextView android:layout_width="wrap_content" android:layout_height="wrap_content" android:text="иҝҷйҮҢжҳҜиҮӘе®ҡд№үеҜ№иҜқжЎҶзҡ„еҶ…е®№" android:textSize="20dp" /> <Button android:layout_width="wrap_content" android:layout_height="wrap_content" android:text="зЎ®е®ҡ" /> </LinearLayout> layout_dialog
package com.example.demo1;
import android.app.Activity;
import android.app.AlertDialog;
import android.content.DialogInterface;
import android.os.Bundle;
import android.view.LayoutInflater;
import android.view.View;
import android.view.View.OnClickListener;
import android.widget.Button;
public class MainActivity extends Activity {
private Button btn_openDialog;
private View view;
@Override
protected void onCreate(Bundle savedInstanceState) {
super.onCreate(savedInstanceState);
setContentView(R.layout.activity_main);
btn_openDialog = (Button) findViewById(R.id.id_submit);
btn_openDialog.setOnClickListener(new OnClickListener() {
@Override
public void onClick(View v) {
// TODO Auto-generated method stub
view = LayoutInflater.from(MainActivity.this).inflate(R.layout.layout_dialog, null);
AlertDialog dialog = new AlertDialog.Builder(MainActivity.this)
.setTitle("дё»йўҳ")
.setIcon(R.drawable.ic_launcher)
.setView(view)
.setPositiveButton("еҸ–ж¶Ҳ", new DialogInterface.OnClickListener() {
@Override
public void onClick(DialogInterface dialog, int which) {
// TODO Auto-generated method stub
}
})
.create();
dialog.show();
}
});
}
}
MainActivity.classдёҠиҝ°еҶ…е®№е°ұжҳҜеҰӮдҪ•еңЁAndroidеә”з”ЁдёӯдҪҝз”ЁAlertDialogе®һзҺ°дёҖдёӘеҜ№иҜқжЎҶпјҢдҪ 们еӯҰеҲ°зҹҘиҜҶжҲ–жҠҖиғҪдәҶеҗ—пјҹеҰӮжһңиҝҳжғіеӯҰеҲ°жӣҙеӨҡжҠҖиғҪжҲ–иҖ…дё°еҜҢиҮӘе·ұзҡ„зҹҘиҜҶеӮЁеӨҮпјҢж¬ўиҝҺе…іжіЁдәҝйҖҹдә‘иЎҢдёҡиө„и®Ҝйў‘йҒ“гҖӮ
е…ҚиҙЈеЈ°жҳҺпјҡжң¬з«ҷеҸ‘еёғзҡ„еҶ…е®№пјҲеӣҫзүҮгҖҒи§Ҷйў‘е’Ңж–Үеӯ—пјүд»ҘеҺҹеҲӣгҖҒиҪ¬иҪҪе’ҢеҲҶдә«дёәдё»пјҢж–Үз« и§ӮзӮ№дёҚд»ЈиЎЁжң¬зҪ‘з«ҷз«ӢеңәпјҢеҰӮжһңж¶үеҸҠдҫөжқғиҜ·иҒ”зі»з«ҷй•ҝйӮ®з®ұпјҡis@yisu.comиҝӣиЎҢдёҫжҠҘпјҢ并жҸҗдҫӣзӣёе…іиҜҒжҚ®пјҢдёҖз»ҸжҹҘе®һпјҢе°Ҷз«ӢеҲ»еҲ йҷӨж¶үе«ҢдҫөжқғеҶ…е®№гҖӮ
жӮЁеҘҪпјҢзҷ»еҪ•еҗҺжүҚиғҪдёӢи®ўеҚ•е“ҰпјҒ