您好,登录后才能下订单哦!
继续练习自定义View。。毕竟熟才能生巧。一直觉得小米的时钟很精美,那这次就搞它~这次除了练习自定义View,还涉及到使用Camera和Matrix实现3D效果。
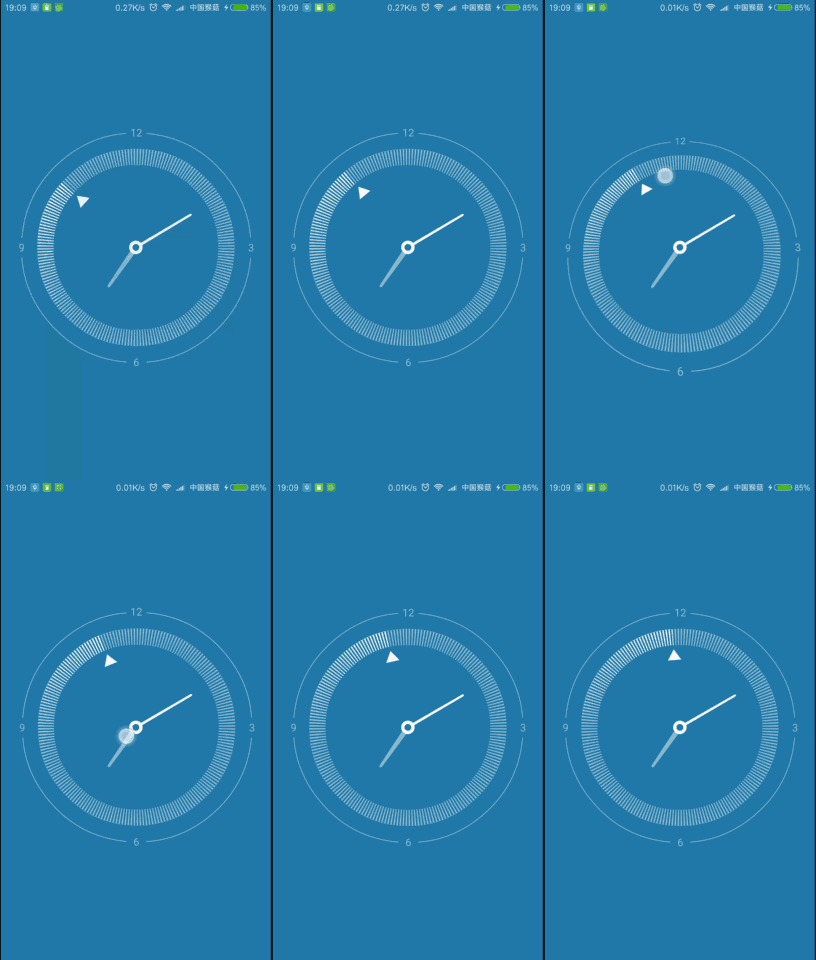
一个这样的效果,在绘制的时候最好选择一个方向一步一步的绘制,这里我选择由外到内、由深到浅的方向来绘制,代码步骤如下:
1、首先老一套~新建attrs.xml文件,编写自定义属性如时钟背景色、亮色(用于分针、秒针、渐变终止色)、暗色(圆弧、刻度线、时针、渐变起始色),新建MiClockView继承View,重写构造方法,获取自定义属性值,初始化Paint、Path以及画圆、弧需要的RectF等东东,重写onMeasure计算宽高,这里不再啰嗦~刚开始学自定义View的同学建议从我的前几篇博客看起
2、由于onSizeChanged方法在构造方法、onMeasure之后,又在onDraw之前,此时已经完成全局变量初始化,也得到了控件的宽高,所以可以在这个方法中确定一些与宽高有关的数值,比如这个View的半径啊、padding值等,方便绘制的时候计算大小和位置:
@Override
protected void onSizeChanged(int w, int h, int oldw, int oldh) {
  super.onSizeChanged(w, h, oldw, oldh);
  //宽和高分别去掉padding值,取min的一半即表盘的半径
  mRadius = Math.min(w - getPaddingLeft() - getPaddingRight(),
      h - getPaddingTop() - getPaddingBottom()) / 2;
  //加一个默认的padding值,为了防止用camera旋转时钟时造成四周超出view大小
  mDefaultPadding = 0.12f * mRadius;//根据比例确定默认padding大小
  //为了适配控件大小match_parent、wrap_content、精确数值以及padding属性
  mPaddingLeft = mDefaultPadding + w / 2 - mRadius + getPaddingLeft();
  mPaddingTop = mDefaultPadding + h / 2 - mRadius + getPaddingTop();
  mPaddingRight = mPaddingLeft;
  mPaddingBottom = mPaddingTop;
  mScaleLength = 0.12f * mRadius;//根据比例确定刻度线长度
  mScaleArcPaint.setStrokeWidth(mScaleLength);//刻度盘的弧宽
  mScaleLinePaint.setStrokeWidth(0.012f * mRadius);//刻度线的宽度
  //梯度扫描渐变,以(w/2,h/2)为中心点,两种起止颜色梯度渐变
  //float数组表示,[0,0.75)为起始颜色所占比例,[0.75,1}为起止颜色渐变所占比例
  mSweepGradient = new SweepGradient(w / 2, h / 2,
      new int[]{mDarkColor, mLightColor}, new float[]{0.75f, 1});
}
3、准备工作做的差不多了,那就开始绘制,根据方向我先确定最外层的小时时间文本的位置及其旁边的四个弧:
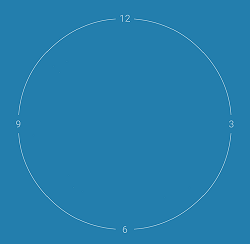
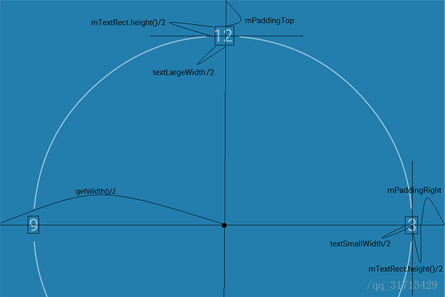
注意两位数字的宽度和一位数的宽度是不一样的,在计算的时候一定要注意
  String timeText = "12";
  mTextPaint.getTextBounds(timeText, 0, timeText.length(), mTextRect);
  int textLargeWidth = mTextRect.width();//两位数字的宽
  mCanvas.drawText("12", getWidth() / 2 - textLargeWidth / 2, mPaddingTop + mTextRect.height(), mTextPaint);
  timeText = "3";
  mTextPaint.getTextBounds(timeText, 0, timeText.length(), mTextRect);
  int textSmallWidth = mTextRect.width();//一位数字的宽
  mCanvas.drawText("3", getWidth() - mPaddingRight - mTextRect.height() / 2 - textSmallWidth / 2,
      getHeight() / 2 + mTextRect.height() / 2, mTextPaint);
  mCanvas.drawText("6", getWidth() / 2 - textSmallWidth / 2, getHeight() - mPaddingBottom, mTextPaint);
  mCanvas.drawText("9", mPaddingLeft + mTextRect.height() / 2 - textSmallWidth / 2,
      getHeight() / 2 + mTextRect.height() / 2, mTextPaint);
我计算文本的宽高一般采用的方法是,new一个Rect,然后再绘制时调用
mTextPaint.getTextBounds(timeText, 0, timeText.length(), mTextRect);
将这个文本的范围赋值给这个mTextRect,此时mTextRect.width()就是这段文本的宽,mTextRect.height()就是这段文本的高。
画文本旁边的四个弧:
mCircleRectF.set(mPaddingLeft + mTextRect.height() / 2 + mCircleStrokeWidth / 2,
    mPaddingTop + mTextRect.height() / 2 + mCircleStrokeWidth / 2,
    getWidth() - mPaddingRight - mTextRect.height() / 2 + mCircleStrokeWidth / 2,
    getHeight() - mPaddingBottom - mTextRect.height() / 2 + mCircleStrokeWidth / 2);
for (int i = 0; i < 4; i++) {
  mCanvas.drawArc(mCircleRectF, 5 + 90 * i, 80, false, mCirclePaint);
}
计算圆弧外接矩形的范围别忘了加上圆弧线宽的一半
4、再往里是刻度盘,画这个刻度盘的思路是现在底层画一个mScaleLength宽度的圆,并设置SweepGradient渐变,上面再画一圈背景色的刻度线。获得SweepGradient的Matrix对象,通过不断旋转mGradientMatrix的角度实现刻度盘的旋转效果:
/**
 * 画一圈梯度渲染的亮暗色渐变圆弧,重绘时不断旋转,上面盖一圈背景色的刻度线
 */
private void drawScaleLine() {
  mScaleArcRectF.set(mPaddingLeft + 1.5f * mScaleLength + mTextRect.height() / 2,
      mPaddingTop + 1.5f * mScaleLength + mTextRect.height() / 2,
      getWidth() - mPaddingRight - mTextRect.height() / 2 - 1.5f * mScaleLength,
      getHeight() - mPaddingBottom - mTextRect.height() / 2 - 1.5f * mScaleLength);

  //matrix默认会在三点钟方向开始颜色的渐变,为了吻合
  //钟表十二点钟顺时针旋转的方向,把秒针旋转的角度减去90度
  mGradientMatrix.setRotate(mSecondDegree - 90, getWidth() / 2, getHeight() / 2);
  mSweepGradient.setLocalMatrix(mGradientMatrix);
  mScaleArcPaint.setShader(mSweepGradient);
  mCanvas.drawArc(mScaleArcRectF, 0, 360, false, mScaleArcPaint);
  //画背景色刻度线
  mCanvas.save();
  for (int i = 0; i < 200; i++) {
    mCanvas.drawLine(getWidth() / 2, mPaddingTop + mScaleLength + mTextRect.height() / 2,
        getWidth() / 2, mPaddingTop + 2 * mScaleLength + mTextRect.height() / 2, mScaleLinePaint);
    mCanvas.rotate(1.8f, getWidth() / 2, getHeight() / 2);
  }
  mCanvas.restore();
}
这里有一个全局变量mSecondDegree,即秒针旋转的角度,需要根据当前时间动态获取:
/**
 * 获取当前 时分秒 所对应的角度
 * 为了不让秒针走得像老式挂钟一样僵硬,需要精确到毫秒
 */
private void getTimeDegree() {
  Calendar calendar = Calendar.getInstance();
  float milliSecond = calendar.get(Calendar.MILLISECOND);
  float second = calendar.get(Calendar.SECOND) + milliSecond / 1000;
  float minute = calendar.get(Calendar.MINUTE) + second / 60;
  float hour = calendar.get(Calendar.HOUR) + minute / 60;
  mSecondDegree = second / 60 * 360;
  mMinuteDegree = minute / 60 * 360;
  mHourDegree = hour / 12 * 360;
}
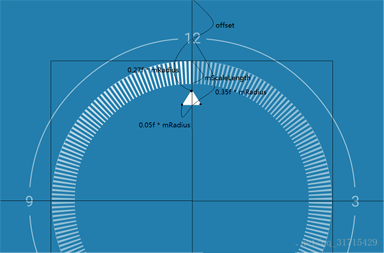
5、然后就是画秒针,用Path绘制一个指向12点钟的三角形,通过不断旋转画布实现秒针的旋转:
/**
 * 画秒针,根据不断变化的秒针角度旋转画布
 */
private void drawSecondHand() {
  mCanvas.save();
  mCanvas.rotate(mSecondDegree, getWidth() / 2, getHeight() / 2);
  mSecondHandPath.reset();
  float offset = mPaddingTop + mTextRect.height() / 2;
  mSecondHandPath.moveTo(getWidth() / 2, offset + 0.27f * mRadius);
  mSecondHandPath.lineTo(getWidth() / 2 - 0.05f * mRadius, offset + 0.35f * mRadius);
  mSecondHandPath.lineTo(getWidth() / 2 + 0.05f * mRadius, offset + 0.35f * mRadius);
  mSecondHandPath.close();
  mSecondHandPaint.setColor(mLightColor);
  mCanvas.drawPath(mSecondHandPath, mSecondHandPaint);
  mCanvas.restore();
}
6、看实现图,时针在分针之下并且比分针颜色浅,那我就先画时针,仍然是Path,并且针头为圆弧状,那么就用二阶贝赛尔曲线,路径为moveTo( A),lineTo(B),quadTo(C,D),lineTo(E),close.
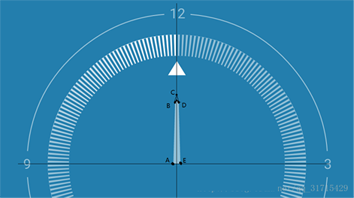
/**
 * 画时针,根据不断变化的时针角度旋转画布
 * 针头为圆弧状,使用二阶贝塞尔曲线
 */
private void drawHourHand() {
  mCanvas.save();
  mCanvas.rotate(mHourDegree, getWidth() / 2, getHeight() / 2);
  mHourHandPath.reset();
  float offset = mPaddingTop + mTextRect.height() / 2;
  mHourHandPath.moveTo(getWidth() / 2 - 0.02f * mRadius, getHeight() / 2);
  mHourHandPath.lineTo(getWidth() / 2 - 0.01f * mRadius, offset + 0.5f * mRadius);
  mHourHandPath.quadTo(getWidth() / 2, offset + 0.48f * mRadius,
      getWidth() / 2 + 0.01f * mRadius, offset + 0.5f * mRadius);
  mHourHandPath.lineTo(getWidth() / 2 + 0.02f * mRadius, getHeight() / 2);
  mHourHandPath.close();
  mCanvas.drawPath(mHourHandPath, mHourHandPaint);
  mCanvas.restore();
}
7、然后是分针,按照时针的思路:

/**
 * 画分针,根据不断变化的分针角度旋转画布
 */
private void drawMinuteHand() {
  mCanvas.save();
  mCanvas.rotate(mMinuteDegree, getWidth() / 2, getHeight() / 2);
  mMinuteHandPath.reset();
  float offset = mPaddingTop + mTextRect.height() / 2;
  mMinuteHandPath.moveTo(getWidth() / 2 - 0.01f * mRadius, getHeight() / 2);
  mMinuteHandPath.lineTo(getWidth() / 2 - 0.008f * mRadius, offset + 0.38f * mRadius);
  mMinuteHandPath.quadTo(getWidth() / 2, offset + 0.36f * mRadius,
      getWidth() / 2 + 0.008f * mRadius, offset + 0.38f * mRadius);
  mMinuteHandPath.lineTo(getWidth() / 2 + 0.01f * mRadius, getHeight() / 2);
  mMinuteHandPath.close();
  mCanvas.drawPath(mMinuteHandPath, mMinuteHandPaint);
  mCanvas.restore();
}
8、最后由于path是close的,所以干脆画两个圆盖在上面:

/**
 * 画指针的连接圆圈,盖住指针path在圆心的连接线
 */
private void drawCoverCircle() {
  mCanvas.drawCircle(getWidth() / 2, getHeight() / 2, 0.05f * mRadius, mSecondHandPaint);
  mSecondHandPaint.setColor(mBackgroundColor);
  mCanvas.drawCircle(getWidth() / 2, getHeight() / 2, 0.025f * mRadius, mSecondHandPaint);
}
9、终于画完了,onDraw部分就是这样
@Override
protected void onDraw(Canvas canvas) {
  mCanvas = canvas;
  getTimeDegree();
  drawTimeText();
  drawScaleLine();
  drawSecondHand();
  drawHourHand();
  drawMinuteHand();
  drawCoverCircle();
  invalidate();
}
绘制的时候,尤其是像这样圆形view,灵活运用
canvas.save();
canvas.rotate(mDegree, mCenterX, mCenterY);
<!-- draw something -->
canvas.restore();
这一套组合拳可以减少不少三角函数、角度弧度相关的计算。
10、辣么接下来就是如何实现触摸使钟表3D旋转
借助Camera类和Matrix类,在构造方法中:
Matrix mCameraMatrix = new Matrix();
Camera mCamera = new Camera();
/**
 * 设置3D时钟效果,触摸矩阵的相关设置、照相机的旋转大小
 * 应用在绘制图形之前,否则无效
 *
 * @param rotateX 绕X轴旋转的大小
 * @param rotateY 绕Y轴旋转的大小
 */
private void setCameraRotate(float rotateX, float rotateY) {
  mCameraMatrix.reset();
  mCamera.save();
  mCamera.rotateX(mCameraRotateX);//绕x轴旋转角度
  mCamera.rotateY(mCameraRotateY);//绕y轴旋转角度
  mCamera.getMatrix(mCameraMatrix);//相关属性设置到matrix中
  mCamera.restore();
  //camera在view左上角那个点,故旋转默认是以左上角为中心旋转
  //故在动作之前pre将matrix向左移动getWidth()/2长度,向上移动getHeight()/2长度
  mCameraMatrix.preTranslate(-getWidth() / 2, -getHeight() / 2);
  //在动作之后post再回到原位
  mCameraMatrix.postTranslate(getWidth() / 2, getHeight() / 2);
  mCanvas.concat(mCameraMatrix);//matrix与canvas相关联
}
这段代码除了camera的旋转、平移、缩放之类的操作之外,剩下的代码一般是固定的
全局变量mCameraRotateX和mCameraRotateY应该与此时手指触摸坐标相关联动态获取:
@Override
public boolean onTouchEvent(MotionEvent event) {
  switch (event.getAction()) {
    case MotionEvent.ACTION_DOWN:
      getCameraRotate(event);
      break;
    case MotionEvent.ACTION_MOVE:
      //根据手指坐标计算camera应该旋转的大小
      getCameraRotate(event);
      break;
  }
  return true;
}
Camera的坐标系和View的坐标系是不一样的
View坐标系是二维的,原点在屏幕左上角,右为x轴正方向,下为y轴正方向;而Camera坐标系是三维的,原点在屏幕左上角,右为x轴正方向,上为y轴正方向,屏幕向里为z轴正方向
/**
 * 获取camera旋转的大小
 * 注意view坐标与camera坐标方向的转换
 */
private void getCameraRotate(MotionEvent event) {
  float rotateX = -(event.getY() - getHeight() / 2);
  float rotateY = (event.getX() - getWidth() / 2);
  //求出此时旋转的大小与半径之比
  float percentX = rotateX / mRadius;
  float percentY = rotateY / mRadius;
  if (percentX > 1) {
    percentX = 1;
  } else if (percentX < -1) {
    percentX = -1;
  }
  if (percentY > 1) {
    percentY = 1;
  } else if (percentY < -1) {
    percentY = -1;
  }
  //最终旋转的大小按比例匀称改变
  mCameraRotateX = percentX * mMaxCameraRotate;
  mCameraRotateY = percentY * mMaxCameraRotate;
}
11、最后在onTouchEvent中松开手指时加一个复原并晃动的动画
case MotionEvent.ACTION_UP:
  //松开手指,时钟复原并伴随晃动动画
  ValueAnimator animX = getShakeAnim(mCameraRotateX, 0);
  animX.addUpdateListener(new ValueAnimator.AnimatorUpdateListener() {
    @Override
    public void onAnimationUpdate(ValueAnimator valueAnimator) {
      mCameraRotateX = (float) valueAnimator.getAnimatedValue();
    }
  });
  ValueAnimator animY = getShakeAnim(mCameraRotateY, 0);
  animY.addUpdateListener(new ValueAnimator.AnimatorUpdateListener() {
    @Override
    public void onAnimationUpdate(ValueAnimator valueAnimator) {
      mCameraRotateY = (float) valueAnimator.getAnimatedValue();
    }
  });
  break;
/**
 * 使用OvershootInterpolator完成时钟晃动动画
 */
private ValueAnimator getShakeAnim(float start, float end) {
  ValueAnimator anim = ValueAnimator.ofFloat(start, end);
  anim.setInterpolator(new OvershootInterpolator(10));
  anim.setDuration(500);
  anim.start();
  return anim;
}
终于写完了,这个MiClockView适配也做的差不多了,时间也是同步的手机时间,一般可以拿来就用了~
demo下载地址:http://xiazai.jb51.net/201701/yuanma/MiClockView_jb51.rar
以上就是本文的全部内容,希望对大家的学习有所帮助,也希望大家多多支持亿速云。
免责声明:本站发布的内容(图片、视频和文字)以原创、转载和分享为主,文章观点不代表本网站立场,如果涉及侵权请联系站长邮箱:is@yisu.com进行举报,并提供相关证据,一经查实,将立刻删除涉嫌侵权内容。