您好,登录后才能下订单哦!
密码登录
登录注册
点击 登录注册 即表示同意《亿速云用户服务条款》
系统:CentOS Linux release 7.3.1611 (Core) 最小安装
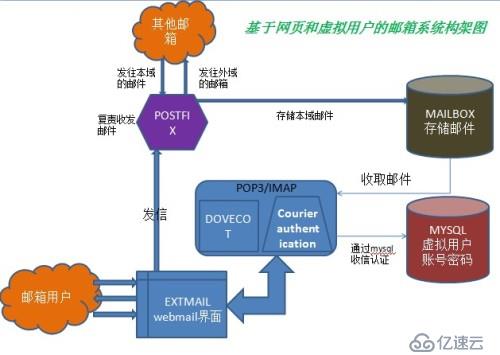
软件:postfix-3.2.0+MySQL-5.6.36(最好选择5.1版本)+Nginx+dovecot-1:2.2.10+courier-authlib-0.66.2
1 setenforce 0
      8    systemctl stop firewalld
   9   vi /etc/selinux/config
   10  yum install -y wget
   11  wget http://dev.mysql.com/get/mysql-community-release-el7-5.noarch.rpm
   12  rpm -ivh mysql-community-release-el7-5.noarch.rpm
   13  wget http://dl.fedoraproject.org/pub/epel/epel-release-latest-7.noarch.rpm
   14  rpm -ivh epel-release-latest-7.noarch.rpm
   15  yum install nginx vim gcc gcc-c++ openssl openssl-devel db4-devel ntpdate mysql mysql-devel mysql-server bzip2 php-mysql cyrus-sasl-md5 perl-GD perl-DBD-MySQL perl-GD perl-CPAN perl-CGI perl-CGI-Session cyrus-sasl-lib cyrus-sasl-plain cyrus-sasl cyrus-sasl-devel libtool-ltdl-devel telnet mail libicu-devel
16 yum remove postfix -y
17 userdel postfix
18 groupdel postdrop
19 groupadd -g 2525 postfix
20 useradd -g postfix -u 2525 -s /sbin/nologin -M postfix
21 groupadd -g 2526 postdrop
22 useradd -g postdrop -u 2526 -s /sbin/nologin -M postdrop
25 yum install lrzsz
27 tar zxvf postfix-3.2.0.tar.gz
28 cd postfix-3.2.0
29 make makefiles 'CCARGS=-DHAS_MYSQL -I/usr/include/mysql -DUSE_SASL_AUTH -DUSE_CYRUS_SASL -I/usr/include/sasl -DUSE_TLS ' 'AUXLIBS=-L/usr/lib64/mysql -lmysqlclient -lz -lrt -lm -L/usr/lib64/sasl2 -lsasl2 -lssl -lcrypto'
30 make
31 make install
注意:tempdir: [/root/postfix-3.0.1] /tmp/extmail 这一项要更改,其他项默认
32 chown -R postfix:postdrop /var/spool/postfix
33 chown -R postfix:postdrop /var/lib/postfix/
34 chown root /var/spool/postfix
35 chown -R root /var/spool/postfix/pid
36 vi /etc/postfix/main.cf
myhostname = mail.everyoo.com //设置主机名
mydomain = everyoo.com //指定域名
myorigin = $mydomain //指明发件人所在的域名
inet_interfaces = //all指定postfix系统监听的网络接口
mydestination = $myhostname, localhost.$mydomain, localhost,$mydomain //指定postfix接收邮件时收件人的域名 [使用虚拟域需要禁用]
mynetworks_style = host //指定信任网段类型
mynetworks = 192.168.1.0/24, 127.0.0.0/8 //指定信任的客户端
relay_domains = $mydestination //指定允许中转邮件的域名
alias_maps = hash:/etc/aliases //设置邮件的别名
37 yum install -y dovecot dovecot-mysql
38 cd /etc/dovecot/
39 vi dovecot.conf
protocols = imap pop3
!include conf.d/*.conf
listen = *
base_dir = /var/run/dovecot/
40 cd conf.d/
41 vi 10-auth.conf
disable_plaintext_auth = no
42 vi 10-mail.conf
mail_location = maildir:~/Maildir
mail_location = maildir:/var/mailbox/%d/%n/Maildir
mail_privileged_group = mail
43 vi 10-ssl.conf
ssl = no
44 vi 10-logging.conf
log_path = /var/log/dovecot.log
info_log_path = /var/log/dovecot.info
45 cp auth-sql.conf.ext auth-sql.conf
46 vi auth-sql.conf
args = /etc/dovecot/dovecot-sql.conf.ext 中.ext去掉,一共两处
47 vi /etc/dovecot-mysql.conf
driver = mysql
connect = host=localhost dbname=extmail user=extmail password=extmail
default_pass_scheme = CRYPT
password_query = SELECT username AS user,password AS password FROM mailbox WHERE username = '%u'
user_query = SELECT maildir, uidnumber AS uid, gidnumber AS gid FROM mailbox WHERE username = '%u'
48 cd ~
49 wget https://sourceforge.net/projects/courier/files/authlib/0.66.2/courier-authlib-0.66.2.tar.bz2
54 wget https://sourceforge.net/projects/courier/files/courier-unicode/1.2/courier-unicode-1.2.tar.bz2
55 tar xf courier-unicode-1.2.tar.bz2 先安装这个软件,再courier-authlib,不然会报错
56 cd courier-unicode-1.2
57 ./configure
58 make && make install
59 cd ..
60 cd courier-authlib-0.66.2
61 ./configure --prefix=/usr/local/courier-authlib --sysconfdir=/etc --without-authpam --without-authshadow --without-authvchkpw --without-authpgsql --with-authmysql --with-mysql-libs=/usr/lib64/mysql --with-mysql-includes=/usr/include/mysql --with-redhat --with-authmysqlrc=/etc/authmysqlrc --with-authdaemonrc=/etc/authdaemonrc --with-mailuser=postfix
62 make && makeinstall
63 make install
64 chmod 755 /usr/local/courier-authlib/var/spool/authdaemon
65 cp /etc/authdaemonrc.dist /etc/authdaemonrc
66 cp /etc/authmysqlrc.dist /etc/authmysqlrc
67 vi /etc/authdaemonrc
authmodulelist="authmysql"
authmodulelistorig="authmysql"
69 mv /etc/authmysqlrc /etc/authmysqlrc.bak
70 vi /etc/authmysqlrc
MYSQL_SERVER localhost
MYSQL_USERNAME extmail
MYSQL_PASSWORD extmail
MYSQL_SOCKET /var/lib/mysql/mysql.sock
MYSQL_PORT 3306
MYSQL_DATABASE extmail
MYSQL_USER_TABLE mailbox
MYSQL_CRYPT_PWFIELD password
DEFAULT_DOMAIN test.com
MYSQL_UID_FIELD '2525'
MYSQL_GID_FIELD '2525'
MYSQL_LOGIN_FIELD username
MYSQL_HOME_FIELD concat('/var/mailbox/',homedir)
MYSQL_NAME_FIELD name
MYSQL_MAILDIR_FIELD concat('/var/mailbox/',maildir)
71 cp courier-authlib.sysvinit /etc/init.d/courier-authlib
72 chmod +x /etc/init.d/courier-authlib
73 chkconfig --add courier-authlib
74 chkconfig courier-authlib on
75 echo "/usr/local/courier-authlib/lib/courier-authlib" >> /etc/ld.so.conf.d/courier-authlib.conf
76 ldconfig
77 service courier-authlib start
78 vi /usr/lib64/sasl2/smtpd.conf
pwcheck_method: authdaemond
log_level: 3
mech_list: PLAIN LOGIN
authdaemond_path:/usr/local/courier-authlib/var/spool/authdaemon/socket
79 vi /etc/postfix/main.cf
##postfix支持SMTP##
smtpd_sasl_auth_enable = yes
smtpd_sasl_local_domain = ''
smtpd_recipient_restrictions = permit_mynetworks,permit_sasl_authenticated,reject_unauth_destination
broken_sasl_auth_clients=yes
smtpd_client_restrictions = permit_sasl_authenticated
smtpd_sasl_security_options = noanonymous
##postfix支持虚拟用户##
virtual_mailbox_base = /var/mailbox
virtual_mailbox_maps = mysql:/etc/postfix/mysql_virtual_mailbox_maps.cf
virtual_mailbox_domains = mysql:/etc/postfix/mysql_virtual_domains_maps.cf
virtual_alias_domains =
virtual_alias_maps = mysql:/etc/postfix/mysql_virtual_alias_maps.cf
virtual_uid_maps = static:2525
virtual_gid_maps = static:2525
virtual_transport = virtual
80 cd ~
81 rz
82 mkdir -p /var/www/extsuite
83 tar xf extmail-1.2.tar.gz -C /var/www/extsuite/
84 mv /var/www/extsuite/extmail-1.2/ /var/www/extsuite/extmail
85 cd /var/www/extsuite/extmail
86 cp webmail.cf.default webmail.cf
87 vi webmail.cf
SYS_SESS_DIR = /tmp/extmail
SYS_UPLOAD_TMPDIR = /tmp/extmail/upload
SYS_USER_LANG = zh_CN
SYS_MIN_PASS_LEN = 8
SYS_MAILDIR_BASE = /var/mailbox
SYS_MYSQL_USER = extmail
SYS_MYSQL_PASS = extmail
SYS_MYSQL_DB = extmail
SYS_MYSQL_HOST = localhost
SYS_MYSQL_SOCKET = /var/lib/mysql/mysql.sock
SYS_MYSQL_TABLE = mailbox
SYS_MYSQL_ATTR_USERNAME = username
SYS_MYSQL_ATTR_DOMAIN = domain
SYS_MYSQL_ATTR_PASSWD = password
SYS_AUTHLIB_SOCKET = /usr/local/courier-authlib/var/spool/authdaemon/socket
88 mkdir -p /tmp/extmail/upload
89 chown -R postfix.postfix /tmp/extmail/
90 cd ~
91 tar xf extman-1.1.tar.gz -C /var/www/extsuite/
92 cd /var/www/extsuite/
93 mv extman-1.1/ extman
94 cd extman/
95 cp webman.cf.default webman.cf
96 chown -R postfix.postfix /var/www/extsuite/extman/cgi/
97 chown -R postfix.postfix /var/www/extsuite/extmail/cgi/
98 cd docs/
99 vi extmail.sql注意把TYPE该为ENGINE 共有5处
ps:这个步骤很关键,MySQL版本不要选最新5.7,我之前测试n回,修改了type和password字段导入后,导致extam登陆无法认证!!!所以最好的版本应该是5.1之前的!特此提醒大家,别走冤枉路!!
以下是初次配置mysql,并设置密码
100 service mysql start
101 mysql
102 mysql -uroot -p
103 mysql -uroot < extmail.sql 报错:
ERROR 1364 (HY000) at line 31: Field 'ssl_cipher' doesn't have a default value
105 vi /etc/my.cnf
#sql_mode=NO_ENGINE_SUBSTITUTION,STRICT_TRANS_TABLES 注释该行!!
106 service mysqld restart
107 mysql -uroot -p < extmail.sql
108 mysql -uroot -p < init.sql
109 mysql -uroot -p 查看是否导入
110 cd /var/www/extsuite/extman/docs/
111 cp mysql_virtual_* /etc/postfix/
112 mkdir /tmp/extman
113 chown -R postfix.postfix /tmp/extman/
114 cd ~
115 service postfix restart
116 vi /etc/init.d/postfix
太长了,详见:http://mysky0708.blog.51cto.com/474802/1925221
117 chmod +x /etc/init.d/postfix
118 chkconfig --add postfix
119 chkconfig postfix on
120 service postfix start
121 service dovecot start
122 ss -tnluo | grep :25
123 ps aux | grep dovecot
125 service saslauthd start
126 ps aux | grep saslauthd
以下是测试步骤,十分重要!!!
127 /usr/local/courier-authlib/sbin/authtest -s login postmaster@extmail.org extmail
128 mkdir /var/mailbox
129 chown -R postfix.postfix /var/mailbox/
130 printf "postmaster@extmail.org" | openssl base64
131 printf "extmail" | openssl base64
132 telnet localhost 25
Trying ::1...
telnet: connect to address ::1: Connection refused
Trying 127.0.0.1...
Connected to localhost.
Escape character is '^]'.
220 mail.daen.com ESMTP Postfix
auth login
334 VXNlcm5hbWU6
cG9zdG1hc3RlckBleHRtYWlsLm9yZw==
334 UGFzc3dvcmQ6
ZXh0bWFpbA==
235 2.7.0 Authentication successful //成功
quit
221 2.0.0 Bye
Connection closed by foreign host.
133 vi /var/www/extsuite/extmail/dispatch-init
SU_UID=postfix
SU_GID=postfix
134 /var/www/extsuite/extmail/dispatch-init start
Starting extmail FCGI server...
135 /var/www/extsuite/extman/daemon/cmdserver -v -d
loaded ok
136 vi /etc/nginx/conf.d/extmail.conf
server {
listen 8080;
server_name mail.everyoo.com;
index index.html index.htm index.php index.cgi;
root /var/www/extsuite/extmail/html/;
location /extmail/cgi/ {
fastcgi_pass 127.0.0.1:8888;
fastcgi_index index.cgi;
fastcgi_param SCRIPT_FILENAME /var/www/extsuite/extmail/cgi/$fastcgi_script_name;
include fcgi.conf;
}
location /extmail/ {
alias /var/www/extsuite/extmail/html/;
}
location /extman/cgi/ {
fastcgi_pass 127.0.0.1:8888;
fastcgi_index index.cgi;
fastcgi_param SCRIPT_FILENAME /var/www/extsuite/extman/cgi/$fastcgi_script_name;
include fcgi.conf;
}
location /extman/ {
alias /var/www/extsuite/extman/html/;
}
access_log /var/log/extmail_access.log;
}
137 vi /etc/nginx/fcgi.conf
fastcgi_param GATEWAY_INTERFACE CGI/1.1;
fastcgi_param SERVER_SOFTWARE nginx;
fastcgi_param QUERY_STRING $query_string;
fastcgi_param REQUEST_METHOD $request_method;
fastcgi_param CONTENT_TYPE $content_type;
fastcgi_param CONTENT_LENGTH $content_length;
fastcgi_param SCRIPT_NAME $fastcgi_script_name;
fastcgi_param REQUEST_URI $request_uri;
fastcgi_param DOCUMENT_ROOT $document_root;
fastcgi_param SERVER_PROTOCOL $server_protocol;
fastcgi_param REMOTE_ADDR $remote_addr;
fastcgi_param REMOTE_PORT $remote_port;
fastcgi_param SERVER_ADDR $server_addr;
fastcgi_param SERVER_PORT $server_port;
fastcgi_param SERVER_NAME $server_name;
138 wget http://www.cpan.org/authors/id/M/MH/MHARNISCH/Unix-Syslog-1.1.tar.gz
此软件不安装就会提示 unix::syslog not found,pleases install it first!
139 tar xf Unix-Syslog-1.1.tar.gz
141 cd Unix-Syslog-1.1
142 perl Makefile.PL
143 make && make install
144 make install
145 setenforce 0
146 systemctl stop firewalld
147 service nginx start
148 service nginx status
登陆地址测试:extman的登录账户为root@extmail.org密码为extmail*123*
149 cd ~
经测试,其他功能可用,只有日志图形不显示,解决如下
152 yum -y install perl-Time-HiRes perl-Time-HiRes-Value perl-File-Tail rrdtool rrdtool-perl
155 yum install libpng
157 /var/www/extsuite/extman/addon/mailgraph_ext/mailgraph-init start 启动失败,解决如下:
158 mkdir /usr/local/mailgraph_ext
159 cp /var/www/extsuite/extman/addon/mailgraph_ext/mailgraph_ext.pl /usr/local/mailgraph_ext/
160 cp /var/www/extsuite/extman/addon/mailgraph_ext/qmonitor.pl /usr/local/mailgraph_ext/
161 /var/www/extsuite/extman/addon/mailgraph_ext/mailgraph-init start
164 /var/www/extsuite/extman/addon/mailgraph_ext/qmonitor.pl start &
OK!!再刷新测试!!再配置虚拟用户权限分配管理!
我参考了以下两篇文章:
http://blog.csdn.net/skykingf/article/details/45478651
http://charlie928.blog.51cto.com/3741218/1433169
http://lxsym.blog.51cto.com/1364623/498913/
免责声明:本站发布的内容(图片、视频和文字)以原创、转载和分享为主,文章观点不代表本网站立场,如果涉及侵权请联系站长邮箱:is@yisu.com进行举报,并提供相关证据,一经查实,将立刻删除涉嫌侵权内容。