您好,登录后才能下订单哦!
密码登录
登录注册
点击 登录注册 即表示同意《亿速云用户服务条款》
这篇文章将为大家详细讲解有关如何实现Mybatis Plus代码生成器,小编觉得挺实用的,因此分享给大家做个参考,希望大家阅读完这篇文章后可以有所收获。
1. 前言
对于写Crud的老司机来说时间非常宝贵,一些样板代码写不但费时费力,而且枯燥无味。经常有小伙伴问我,胖哥你怎么天天那么有时间去搞新东西,透露一下秘诀呗。

好吧,今天就把Mybatis-plus的代码生成器分享出来,让你也成为一个优秀的时间管理大师。
2. 基本依赖
以Spring Boot和MySQL为例,你需要下面这些依赖:
<!-- lombok 如果不使用 需要修改代码生成器的相关配置 -->
<dependency>
 <groupId>org.projectlombok</groupId>
 <artifactId>lombok</artifactId>
 <scope>compile</scope>
</dependency>
<!-- 连接池 你可以使用其它替换掉 -->
<dependency>
 <groupId>com.zaxxer</groupId>
 <artifactId>HikariCP</artifactId>
</dependency>
<!-- mysql -->
<dependency>
 <groupId>mysql</groupId>
 <artifactId>mysql-connector-java</artifactId>
</dependency>
<!-- mybatis plus starter -->
<dependency>
 <groupId>com.baomidou</groupId>
 <artifactId>mybatis-plus-boot-starter</artifactId>
</dependency>
<!-- mybatis plus 生成器模块 -->
<dependency>
 <groupId>com.baomidou</groupId>
 <artifactId>mybatis-plus-generator</artifactId>
 <scope>compile</scope>
 <optional>true</optional>
</dependency>
<!-- 引入freemarker包 作为代码生成器引擎 -->
<dependency>
 <groupId>org.springframework.boot</groupId>
 <artifactId>spring-boot-starter-freemarker</artifactId>
 <scope>compile</scope>
 <optional>true</optional>
</dependency>
然后配置好你的数据库,确保数据库连接通讯畅通。
3. 定制代码生成器
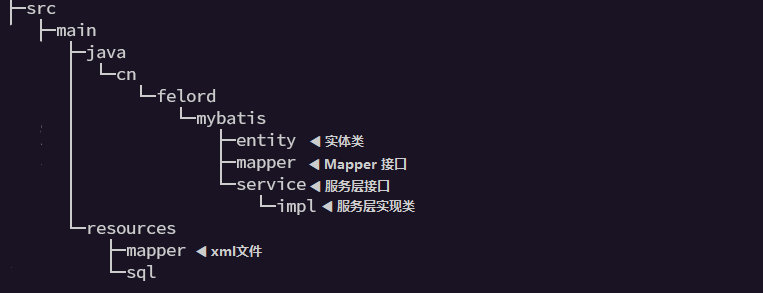
这里我期望生成的目录结构是这样的:
于是我花了点时间定制了一些生成器的配置,代码如下,就是这么硬核!
package cn.felord.mybatis.util;

import com.baomidou.mybatisplus.annotation.DbType;
import com.baomidou.mybatisplus.annotation.IdType;
import com.baomidou.mybatisplus.core.toolkit.StringPool;
import com.baomidou.mybatisplus.generator.AutoGenerator;
import com.baomidou.mybatisplus.generator.InjectionConfig;
import com.baomidou.mybatisplus.generator.config.*;
import com.baomidou.mybatisplus.generator.config.po.TableInfo;
import com.baomidou.mybatisplus.generator.config.rules.NamingStrategy;
import com.baomidou.mybatisplus.generator.engine.FreemarkerTemplateEngine;

import java.util.ArrayList;
import java.util.List;
import java.util.Optional;


/**
 * 代码生成器配置
 *
 * @author felord
 * @since 10 :39 2018/9/9
 */
public class CodeGenerator {
 private String dbUrl;
 private String userName;
 private String password;
 private String dir;
 private String xmlDir;
 private String packageName;

 private CodeGenerator() {
 }

 /**
 * The type Config builder.
 */
 public static class ConfigBuilder {

 private String dbUrl;
 private String userName;
 private String password;
 private String dir;
 private String xmlDir;
 private String packageName;


 /**
  * Db url config builder.
  *
  * @param dbUrl the db url
  * @return the config builder
  */
 public ConfigBuilder dbUrl(final String dbUrl) {
  this.dbUrl = dbUrl;
  return this;
 }

 /**
  * User name config builder.
  *
  * @param userName the user name
  * @return the config builder
  */
 public ConfigBuilder userName(final String userName) {
  this.userName = userName;
  return this;
 }

 /**
  * Password config builder.
  *
  * @param password the password
  * @return the config builder
  */
 public ConfigBuilder password(final String password) {
  this.password = password;
  return this;
 }

 /**
  * Dir config builder.
  *
  * @param dir the dir
  * @return the config builder
  */
 public ConfigBuilder dir(final String dir) {
  this.dir = dir;
  return this;
 }

 /**
  * Dir config builder.
  *
  * @param xmlDir the dir
  * @return the config builder
  */
 public ConfigBuilder xmlDir(final String xmlDir) {
  this.xmlDir = xmlDir;
  return this;
 }

 /**
  * Package name config builder.
  *
  * @param packageName the package name
  * @return the config builder
  */
 public ConfigBuilder packageName(final String packageName) {
  this.packageName = packageName;
  return this;
 }

 /**
  * Build code generator.
  *
  * @return the code generator
  */
 public CodeGenerator build() {
  CodeGenerator generator = new CodeGenerator();

  generator.dbUrl = Optional.of(this.dbUrl).get();
  generator.userName = Optional.of(this.userName).get();
  generator.password = Optional.of(this.password).get();
  generator.dir = Optional.of(this.dir).get();
  generator.xmlDir = Optional.of(this.xmlDir).get();
  generator.packageName = Optional.of(this.packageName).get();
  return generator;
 }
 }


 /**
 * Code.
 *
 * @param tableNames the table names
 */
 public void code(String... tableNames) {
 codingMysql(true, false, true, this.dbUrl, this.userName, this.password, this.dir, this.xmlDir, this.packageName, tableNames);
 }

 /**
 *
 * 生成器核心部分
 *
 * @param serviceNameStartWithI 是否前缀I
 * @param createController 是否生成controller
 * @param useLombok  是否使用 lombok
 * @param dbUrl   数据库连接
 * @param username  用户名称
 * @param password  密码
 * @param outDir  输出目录
 * @param xmlDir  xml 文件目录
 * @param packageName  包路径
 * @param tableNames  表名称
 */
 private static void codingMysql(boolean serviceNameStartWithI,
     boolean createController,
     boolean useLombok,
     String dbUrl,
     String username,
     String password,
     String outDir,
     String xmlDir,
     String packageName,
     String... tableNames) {
 GlobalConfig config = new GlobalConfig();
 DataSourceConfig dataSourceConfig = new DataSourceConfig();
// 数据库类型 这里使用 mysql
 dataSourceConfig.setDbType(DbType.MYSQL)
  .setUrl(dbUrl)
  .setUsername(username)
  .setPassword(password)
//  驱动名称 这里使用mysql
  .setDriverName("com.mysql.jdbc.Driver");

 // 自定义xml输出路径
 InjectionConfig cfg = new InjectionConfig() {
  @Override
  public void initMap() {
  // to do nothing
  }
 };
 List<FileOutConfig> focList = new ArrayList<>();
// 你也可以定制 xml 的模板
 focList.add(new FileOutConfig("/templates/mapper.xml.ftl") {
  @Override
  public String outputFile(TableInfo tableInfo) {
  // 自定义xml文件的路径
  return xmlDir + "/mapper/" + tableInfo.getMapperName() + StringPool.DOT_XML;
  }
 });
 cfg.setFileOutConfigList(focList);


// 策略配置项
 StrategyConfig strategyConfig = new StrategyConfig();
 strategyConfig
  .setCapitalMode(false)
//  是否使用 lombok
  .setEntityLombokModel(useLombok)
//  下划线转驼峰
  .setNaming(NamingStrategy.underline_to_camel)
  //修改替换成你需要的表名,多个表名传数组
  .setInclude(tableNames);
// 使用 AR 模式
 config.setActiveRecord(true)
//  设置头注释的 author
  .setAuthor("system")
//  项目输出路径
  .setOutputDir(outDir)
//  是否覆盖已经生成的同名文件
  .setFileOverride(true)
//  雪花算法生成id
  .setIdType(IdType.ASSIGN_ID)
//  是否使用缓存
  .setEnableCache(false)
//  是否生成 xml 中的 基础 resultMap
  .setBaseResultMap(true);
 if (!serviceNameStartWithI) {
//  Service 层的 通用格式后缀
  config.setServiceName("%sService");
 }
//  实体类包名
 PackageConfig packageConfig = new PackageConfig().setParent(packageName).setEntity("entity");
 TemplateConfig templateConfig = new TemplateConfig().setXml(null);
// 这里选择不生成 controller 实际上 生成的大多不符合我们需要 到服务层就行了
 if (!createController) {
  templateConfig.setController(null);
 }
// 整合起来运行
 new AutoGenerator()
  .setGlobalConfig(config)
  .setTemplateEngine(new FreemarkerTemplateEngine())
  .setDataSource(dataSourceConfig)
  .setStrategy(strategyConfig)
  .setPackageInfo(packageConfig)
  .setCfg(cfg)
  .setTemplate(templateConfig)
  .execute();
 }

}
如果我生成的目录结构能够满足你的需要,那就巧了,直接拿去用;如果不满足需要,你可以按照注释的说明进行微调。18年搞的用了好几年,没出过什么乱子。
4. 代码生成器的使用
使用起来非常简单,确保数据库能够使用JDBC连接成功,写个main方法,配置一下,跑起来就是了:
/**
 * @author felord.cn
 * @since 11:34
 **/
public class AutoCoding {
 public static void main(String[] args) {

//   maven 工程 main 包的全路径
  final String mainDir = "C:\\IdeaProjects\\bc-recyling\\src\\main\\";

  CodeGenerator.ConfigBuilder builder = new CodeGenerator.ConfigBuilder();

  CodeGenerator codeGenerator = builder
//    数据库连接
    .dbUrl("jdbc:mysql://localhost:3306/test")
//    账户
    .userName("root")
//    密码
    .password("123456")
    // 生成类位置
    .dir(mainDir + "java")
    // 生成xml 位置
    .xmlDir(mainDir + "resources")
    // 包引用路径
    .packageName("cn.felord.mybatis")
    .build();

  //根据表生成后台代码
  codeGenerator.code("user_info");


 }
}
然后代码就生成了,是不是非常的好用?恭喜你获得了 时间管理大师 荣誉称号。
切记不要炫耀,否则需求加倍。
关于如何实现Mybatis Plus代码生成器就分享到这里了,希望以上内容可以对大家有一定的帮助,可以学到更多知识。如果觉得文章不错,可以把它分享出去让更多的人看到。
免责声明:本站发布的内容(图片、视频和文字)以原创、转载和分享为主,文章观点不代表本网站立场,如果涉及侵权请联系站长邮箱:is@yisu.com进行举报,并提供相关证据,一经查实,将立刻删除涉嫌侵权内容。