您好,登录后才能下订单哦!
密码登录
登录注册
点击 登录注册 即表示同意《亿速云用户服务条款》
这篇文章主要讲解了opencv如何实现矩形检测,内容清晰明了,对此有兴趣的小伙伴可以学习一下,相信大家阅读完之后会有帮助。
#include "cv.h"
#include "highgui.h"
#include <stdio.h>
#include <math.h>
#include <string.h>
//////////////////////////////////////////////////////////////////
//函数功能:用向量来做COSα=两向量之积/两向量模的乘积求两条线段夹角
//输入: 线段3个点坐标pt1,pt2,pt0,最后一个参数为公共点
//输出: 线段夹角,单位为角度
//////////////////////////////////////////////////////////////////
double angle( CvPoint* pt1, CvPoint* pt2, CvPoint* pt0 )
{
double dx1 = pt1->x - pt0->x;
double dy1 = pt1->y - pt0->y;
double dx2 = pt2->x - pt0->x;
double dy2 = pt2->y - pt0->y;
double angle_line = (dx1*dx2 + dy1*dy2)/sqrt((dx1*dx1 + dy1*dy1)*(dx2*dx2 + dy2*dy2) + 1e-10);//余弦值
return acos(angle_line)*180/3.141592653;
}
//////////////////////////////////////////////////////////////////
//函数功能:采用多边形检测,通过约束条件寻找矩形
//输入: img 原图像
// storage 存储
// minarea,maxarea 检测矩形的最小/最大面积
// minangle,maxangle 检测矩形边夹角范围,单位为角度
//输出: 矩形序列
//////////////////////////////////////////////////////////////////
CvSeq* findSquares4( IplImage* img, CvMemStorage* storage ,int minarea, int maxarea, int minangle, int maxangle)
{
CvSeq* contours;//边缘
int N = 6; //阈值分级
CvSize sz = cvSize( img->width & -2, img->height & -2 );
IplImage* timg = cvCloneImage( img );//拷贝一次img
IplImage* gray = cvCreateImage( sz, 8, 1 ); //img灰度图
IplImage* pyr = cvCreateImage( cvSize(sz.width/2, sz.height/2), 8, 3 ); //金字塔滤波3通道图像中间变量
IplImage* tgray = cvCreateImage( sz, 8, 1 ); ;
CvSeq* result;
double s, t;
CvSeq* squares = cvCreateSeq( 0, sizeof(CvSeq), sizeof(CvPoint), storage );
cvSetImageROI( timg, cvRect( 0, 0, sz.width, sz.height ));
//金字塔滤波
cvPyrDown( timg, pyr, 7 );
cvPyrUp( pyr, timg, 7 );
//在3个通道中寻找矩形
for( int c = 0; c < 3; c++ ) //对3个通道分别进行处理
{
cvSetImageCOI( timg, c+1 );
cvCopy( timg, tgray, 0 ); //依次将BGR通道送入tgray
for( int l = 0; l < N; l++ )
{
//不同阈值下二值化
cvThreshold( tgray, gray, (l+1)*255/N, 255, CV_THRESH_BINARY );
cvFindContours( gray, storage, &contours, sizeof(CvContour),CV_RETR_LIST, CV_CHAIN_APPROX_SIMPLE, cvPoint(0,0) );
while( contours )
{ //多边形逼近
result = cvApproxPoly( contours, sizeof(CvContour), storage,CV_POLY_APPROX_DP, cvContourPerimeter(contours)*0.02, 0 );
//如果是凸四边形并且面积在范围内
if( result->total == 4 && fabs(cvContourArea(result,CV_WHOLE_SEQ)) > minarea && fabs(cvContourArea(result,CV_WHOLE_SEQ)) < maxarea && cvCheckContourConvexity(result) )
{
s = 0;
//判断每一条边
for( int i = 0; i < 5; i++ )
{
if( i >= 2 )
{ //角度
t = fabs(angle( (CvPoint*)cvGetSeqElem( result, i ),(CvPoint*)cvGetSeqElem( result, i-2 ),(CvPoint*)cvGetSeqElem( result, i-1 )));
s = s > t ? s : t;
}
}
//这里的S为直角判定条件 单位为角度
if( s > minangle && s < maxangle )
for( int i = 0; i < 4; i++ )
cvSeqPush( squares,(CvPoint*)cvGetSeqElem( result, i ));
}
contours = contours->h_next;
}
}
}
cvReleaseImage( &gray );
cvReleaseImage( &pyr );
cvReleaseImage( &tgray );
cvReleaseImage( &timg );
return squares;
}
//////////////////////////////////////////////////////////////////
//函数功能:画出所有矩形
//输入: img 原图像
// squares 矩形序列
// wndname 窗口名称
//输出: 图像中标记矩形
//////////////////////////////////////////////////////////////////
void drawSquares( IplImage* img, CvSeq* squares ,const char* wndname)
{
CvSeqReader reader;
IplImage* cpy = cvCloneImage( img );
CvPoint pt[4];
int i;
cvStartReadSeq( squares, &reader, 0 );
for( i = 0; i < squares->total; i += 4 )
{
CvPoint* rect = pt;
int count = 4;
memcpy( pt, reader.ptr, squares->elem_size );
CV_NEXT_SEQ_ELEM( squares->elem_size, reader );
memcpy( pt + 1, reader.ptr, squares->elem_size );
CV_NEXT_SEQ_ELEM( squares->elem_size, reader );
memcpy( pt + 2, reader.ptr, squares->elem_size );
CV_NEXT_SEQ_ELEM( squares->elem_size, reader );
memcpy( pt + 3, reader.ptr, squares->elem_size );
CV_NEXT_SEQ_ELEM( squares->elem_size, reader );
//cvPolyLine( cpy, &rect, &count, 1, 1, CV_RGB(0,255,0), 3, CV_AA, 0 );
cvPolyLine( cpy, &rect, &count, 1, 1, CV_RGB(rand()&255,rand()&255,rand()&255), 1, CV_AA, 0 );//彩色绘制
}
cvShowImage( wndname, cpy );
cvReleaseImage( &cpy );
}
int main()
{
CvCapture* capture = cvCreateCameraCapture(0);
IplImage* img0 = 0;
CvMemStorage* storage = 0;
int c;
const char* wndname = "Square Detection Demo"; //窗口名称
storage = cvCreateMemStorage(0);
cvNamedWindow( wndname, 1 );
while (true)
{
img0 = cvQueryFrame(capture);
drawSquares( img0, findSquares4( img0, storage, 100, 2000, 80, 100), wndname );
cvClearMemStorage( storage ); //清空存储
c = cvWaitKey(10);
if( c == 27 )
break;
}
cvReleaseImage( &img0 );
cvClearMemStorage( storage );
cvDestroyWindow( wndname );
return 0;
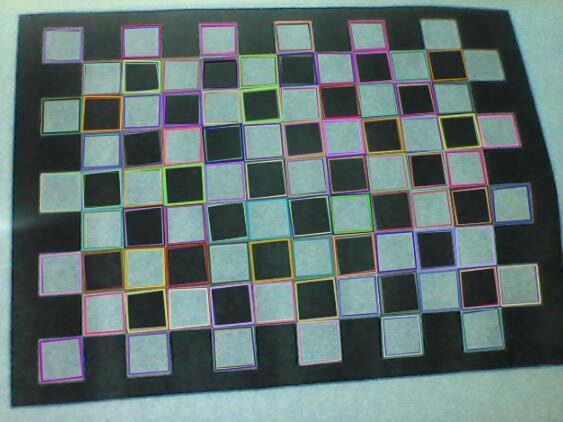
}效果:

看完上述内容,是不是对opencv如何实现矩形检测有进一步的了解,如果还想学习更多内容,欢迎关注亿速云行业资讯频道。
免责声明:本站发布的内容(图片、视频和文字)以原创、转载和分享为主,文章观点不代表本网站立场,如果涉及侵权请联系站长邮箱:is@yisu.com进行举报,并提供相关证据,一经查实,将立刻删除涉嫌侵权内容。