您好,登录后才能下订单哦!
容器级虚拟化,不再为每一个虚拟机创建单独的内核,而是通过在宿主机的内核上将6种资源通过内核机制(namespaces)隔离出来,每一个namespace就是一个单独的容器。
Linux领域的容器技术,就是靠内核级的6个namespaces、chroot和Cgroups共同实现的。
隔离用户空间,将进程与其他进程隔离开来。
| namesapce | 系统调用参数 | 隔离内容 | 内核版本 |
|---|---|---|---|
| Mount | CLONE_NEWNW | 挂载点(文件系统) | 2.4.19 |
| UTS | CLONE_NEWUTS | 主机名和域名 | 2.6.19 |
| IPC | CLONE_NEWIPC | 信号量、消息队列和共享内存 | 2.6.19 |
| PID | CLONE_NEWPID | 进程编号 | 2.6.24 |
| Network | CLONE_NEWNET | 网络设备、网络栈、端口等 | 2.6.29 |
| User | CLONE_NEWUSER | 用户和用户组 | 3.8 |
最后一个是在内核的3.8版本才加入到内核中的。所以要想很好的使用容器技术,内核版本需要在3.8之后,也就是需要Centos7。
容器化技术的隔离机制是靠namespaces实现,而容器化的资源分配靠的是在内核级通过CGroups机制实现。它会把系统级的资源分成多个组,然后把每一个组内的资源量指派分配到特定的namespace的进程上去。
cgroups,资源限制,限制进程占用的CPU和内存:
CPU属于可压缩资源。内存属于非可压缩资源,绝对不允许越界。
Docker三大编排工具:
Compose是单机版。Swarm是集群管理工具。
以上这些可能都用不到,因为最流行的还是下面这个。
kubernetes:简称K8s,Google开源的一个容器编排引擎。
k8s需要作为一个单独的主题,另外再去学习的工具,这里只是把工具的名称引出来。
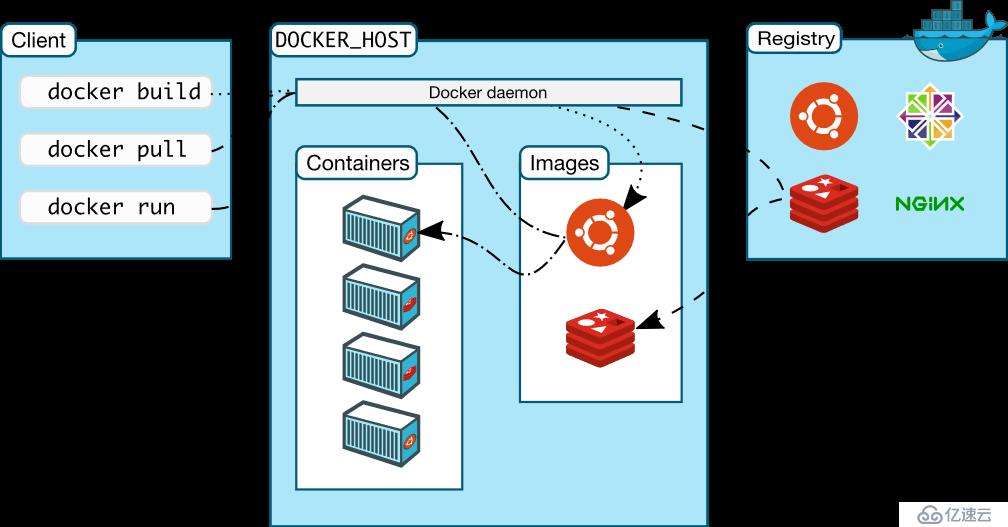
Docker架构如下,有3个部分组成。
这里有Client端和Server端(DOCKER_HOST),所以这是一个C/S架构的应用程序。
Docker deamon运行为守护进程。所以运行后这台主机就变成了守护进程服务器。
Docker daemon 监听UNIX套接字或网络接口。默认只监听本地的UNIX套接字。
Images 镜像,可以从registries下载镜像。所有镜像都是只读的。
Containers 容器,启动容器时是基于镜像来启动。
客户端是用户操作Docker的主要方式。docker命令使用Docker API,客户端可以与多个daemon进行通信。
Docker的镜像仓库。
Docker Hub(https://hub.docker.com/ ),官方提供的镜像仓库,在国外。建议使用国内镜像。
在Centos7上使用yum安装docker。
CentOS官方源就有docker,注意这里用的名称是docker:
$ yum info docker
已加载插件:fastestmirror
Loading mirror speeds from cached hostfile
 * base: mirrors.aliyun.com
 * extras: mirrors.aliyun.com
 * updates: mirrors.163.com
可安装的软件包
名称    :docker
架构    :x86_64
时期       :2
版本    :1.13.1
发布    :96.gitb2f74b2.el7.centos
大小    :18 M
源    :extras/7/x86_64
简介    : Automates deployment of containerized applications
网址    :https://github.com/docker/docker
协议    : ASL 2.0
描述    : Docker is an open-source engine that automates the deployment of any
         : application as a lightweight, portable, self-sufficient container that will
         : run virtually anywhere.
         :
         : Docker containers can encapsulate any payload, and will run consistently on
         : and between virtually any server. The same container that a developer builds
         : and tests on a laptop will run at scale, in production*, on VMs, bare-metal
         : servers, OpenStack clusters, public instances, or combinations of the above.

$
但是这个的版本太低了,所以不使用CentOS的源。
现在Docker软件主要有两个版本:
Docker另外还有一个开源的版本Moby,这个也是从原先的docker项目继承过来,是社区维护的。而Docker-CE是Docoker公司维护的开源项目。
这里添加阿里的镜像源,这个是社区版Docker-CE:
$ wget -P /etc/yum.repos.d/ http://mirrors.aliyun.com/docker-ce/linux/centos/docker-ce.repo检查版本信息,注意这里用的名称是docker-ce:
$ yum info docker-ce
已加载插件:fastestmirror
Loading mirror speeds from cached hostfile
 * base: mirrors.aliyun.com
 * extras: mirrors.aliyun.com
 * updates: mirrors.aliyun.com
可安装的软件包
名称    :docker-ce
架构    :x86_64
时期       :3
版本    :18.09.7
发布    :3.el7
大小    :19 M
源    :docker-ce-stable/x86_64
简介    : The open-source application container engine
网址    :https://www.docker.com
协议    : ASL 2.0
描述    : Docker is is a product for you to build, ship and run any application as a
         : lightweight container.
         :
         : Docker containers are both hardware-agnostic and platform-agnostic. This means
         : they can run anywhere, from your laptop to the largest cloud compute instance and
         : everything in between - and they don't require you to use a particular
         : language, framework or packaging system. That makes them great building blocks
         : for deploying and scaling web apps, databases, and backend services without
         : depending on a particular stack or provider.

$上面显示的最新版本信息是18.09.7,由于docker一般还要配合容器编排工具使用,现在最流行的就是k8s。而k8s还不一定支持最新版本,所以具体要安装那个版本,还得确认一下版本的依赖关系。
查询k8s对docker版本的依赖关系,可以到Github的k8s的项目中,项目地址:
https://github.com/kubernetes/kubernetes
查询版本的CHANGELOG,比如这个文件CHANGELOG-1.15.md。文件内容比较多,直接搜索“Docker version”:
The list of validated docker versions remains unchanged.
The current list is 1.13.1, 17.03, 17.06, 17.09, 18.06, 18.09. (#72823, #72831)
这里就安装一个不是最新的18.06版本。
查询可用版本:
$ yum list docker-ce --showduplicates | expand
已加载插件:fastestmirror
Loading mirror speeds from cached hostfile
 * base: mirrors.aliyun.com
 * extras: mirrors.aliyun.com
 * updates: mirrors.aliyun.com
可安装的软件包
docker-ce.x86_64            17.03.0.ce-1.el7.centos             docker-ce-stable
docker-ce.x86_64            17.03.1.ce-1.el7.centos             docker-ce-stable
docker-ce.x86_64            17.03.2.ce-1.el7.centos             docker-ce-stable
docker-ce.x86_64            17.03.3.ce-1.el7                    docker-ce-stable
docker-ce.x86_64            17.06.0.ce-1.el7.centos             docker-ce-stable
docker-ce.x86_64            17.06.1.ce-1.el7.centos             docker-ce-stable
docker-ce.x86_64            17.06.2.ce-1.el7.centos             docker-ce-stable
docker-ce.x86_64            17.09.0.ce-1.el7.centos             docker-ce-stable
docker-ce.x86_64            17.09.1.ce-1.el7.centos             docker-ce-stable
docker-ce.x86_64            17.12.0.ce-1.el7.centos             docker-ce-stable
docker-ce.x86_64            17.12.1.ce-1.el7.centos             docker-ce-stable
docker-ce.x86_64            18.03.0.ce-1.el7.centos             docker-ce-stable
docker-ce.x86_64            18.03.1.ce-1.el7.centos             docker-ce-stable
docker-ce.x86_64            18.06.0.ce-3.el7                    docker-ce-stable
docker-ce.x86_64            18.06.1.ce-3.el7                    docker-ce-stable
docker-ce.x86_64            18.06.2.ce-3.el7                    docker-ce-stable
docker-ce.x86_64            18.06.3.ce-3.el7                    docker-ce-stable
docker-ce.x86_64            3:18.09.0-3.el7                     docker-ce-stable
docker-ce.x86_64            3:18.09.1-3.el7                     docker-ce-stable
docker-ce.x86_64            3:18.09.2-3.el7                     docker-ce-stable
docker-ce.x86_64            3:18.09.3-3.el7                     docker-ce-stable
docker-ce.x86_64            3:18.09.4-3.el7                     docker-ce-stable
docker-ce.x86_64            3:18.09.5-3.el7                     docker-ce-stable
docker-ce.x86_64            3:18.09.6-3.el7                     docker-ce-stable
docker-ce.x86_64            3:18.09.7-3.el7                     docker-ce-stable
$
expand 命令的效果只是让输出更加紧凑一点,把制表符换成空格。
安装指定版本:
yum install docker-ce-18.06.0.ce-3.el7启动和验证
启动服务、开机启动,查看版本信息:
$ systemctl start docker.service
$ systemctl enable docker.service
Created symlink from /etc/systemd/system/multi-user.target.wants/docker.service to /usr/lib/systemd/system/docker.service.
$ docker version
Client:
 Version:           18.06.0-ce
 API version:       1.38
 Go version:        go1.10.3
 Git commit:        0ffa825
 Built:             Wed Jul 18 19:08:18 2018
 OS/Arch:           linux/amd64
 Experimental:      false

Server:
 Engine:
  Version:          18.06.0-ce
  API version:      1.38 (minimum version 1.12)
  Go version:       go1.10.3
  Git commit:       0ffa825
  Built:            Wed Jul 18 19:10:42 2018
  OS/Arch:          linux/amd64
  Experimental:     false
$这里能分别看到Client端和Server端各自的版本。Docker是用Go语言开发的,这里有显示Go的版本。另外还有平台的版本linux/amd64,这个之后使用或下载其他组件时,遇到有平台相关的版本兼容性问题,可以根据这个选择对应的版本。
默认的镜像仓库在国外,最好使用在国内的官方镜像站点。这里列出了几个:
阿里云的不能直接使用,因为需要注册,效果应该会很不错。
docker-cn虽然是官方的,但是加速效果也很差。大概是不了解国情。
网易和中科大的都可以使用。
使用配置文件/etc/docker/daemon.json,如果目录或文件没有,就手动创建。在配置文件中添加如下内容:
{
    "registry-mirrors": ["http://hub-mirror.c.163.com", "https://registry.docker-cn.com"]
}
这里的配置使用的是JSON格式。要是配置生效,需要重启服务。
上面只是使用了一个配置项,完整的配置项信息可以查看官方的文档:
https://docs.docker.com/engine/reference/commandline/dockerd/#Daemon-configuration-file
应该是所有的配置项都在这里了,之后需要的时候可以再来查阅。
不使用任何参数执行 docker 打印的帮助信息如下:
$ docker

Usage:  docker [OPTIONS] COMMAND

A self-sufficient runtime for containers

Options:
      --config string      Location of client config files (default "/root/.docker")
  -D, --debug              Enable debug mode
  -H, --host list          Daemon socket(s) to connect to
  -l, --log-level string   Set the logging level ("debug"|"info"|"warn"|"error"|"fatal") (default "info")
      --tls                Use TLS; implied by --tlsverify
      --tlscacert string   Trust certs signed only by this CA (default "/root/.docker/ca.pem")
      --tlscert string     Path to TLS certificate file (default "/root/.docker/cert.pem")
      --tlskey string      Path to TLS key file (default "/root/.docker/key.pem")
      --tlsverify          Use TLS and verify the remote
  -v, --version            Print version information and quit

Management Commands:
  config      Manage Docker configs
  container   Manage containers
  image       Manage images
  network     Manage networks
  node        Manage Swarm nodes
  plugin      Manage plugins
  secret      Manage Docker secrets
  service     Manage services
  stack       Manage Docker stacks
  swarm       Manage Swarm
  system      Manage Docker
  trust       Manage trust on Docker images
  volume      Manage volumes

Commands:
  attach      Attach local standard input, output, and error streams to a running container
  build       Build an image from a Dockerfile
  commit      Create a new image from a container's changes
  cp          Copy files/folders between a container and the local filesystem
  create      Create a new container
  diff        Inspect changes to files or directories on a container's filesystem
  events      Get real time events from the server
  exec        Run a command in a running container
  export      Export a container's filesystem as a tar archive
  history     Show the history of an image
  images      List images
  import      Import the contents from a tarball to create a filesystem image
  info        Display system-wide information
  inspect     Return low-level information on Docker objects
  kill        Kill one or more running containers
  load        Load an image from a tar archive or STDIN
  login       Log in to a Docker registry
  logout      Log out from a Docker registry
  logs        Fetch the logs of a container
  pause       Pause all processes within one or more containers
  port        List port mappings or a specific mapping for the container
  ps          List containers
  pull        Pull an image or a repository from a registry
  push        Push an image or a repository to a registry
  rename      Rename a container
  restart     Restart one or more containers
  rm          Remove one or more containers
  rmi         Remove one or more images
  run         Run a command in a new container
  save        Save one or more images to a tar archive (streamed to STDOUT by default)
  search      Search the Docker Hub for images
  start       Start one or more stopped containers
  stats       Display a live stream of container(s) resource usage statistics
  stop        Stop one or more running containers
  tag         Create a tag TARGET_IMAGE that refers to SOURCE_IMAGE
  top         Display the running processes of a container
  unpause     Unpause all processes within one or more containers
  update      Update configuration of one or more containers
  version     Show the Docker version information
  wait        Block until one or more containers stop, then print their exit codes

Run 'docker COMMAND --help' for more information on a command.
$ 这里有 Management Commands 和 Commands。docker有很多子命令,早期的docker是Commands风格的,每一个子命令都是单独的。现在命令多了,为这些子命令分了很多组进行管理,这个就是Management Commands。所以两种命令风格效果是一样的。比如,下面两个命令是一样的:
docker run
docker container run
建议尽量使用 Management Commands 的命令。
Go 命令的调用流程
这里是题外话,这么好的命令行界面,好奇是具体怎么做的。
使用了golang命令行库cobra:https://github.com/spf13/cobra。
具体可以看下这篇文章的分析:https://www.jianshu.com/p/9900ec52f2c1
有一点可能需要注意,Docker的设计是Client-Server模式的,平时我们用的docker这个命令被分散到 https://github.com/docker/cli 这个仓库去了。
之前使用docker version命令,查看了版本信息,这个使用docker info命令可以查看更详细的信息:
$ docker system info
Containers: 0  // 总的容器数量
 Running: 0    // 运行状态的容器数量
 Paused: 0     // 暂停状态的容器数量
 Stopped: 0    // 停止状态的容器数量
Images: 0      // 镜像的数量
Server Version: 18.06.0-ce  // 服务器版本
Storage Driver: overlay2    // 存储驱动后端
 Backing Filesystem: xfs
 Supports d_type: true
 Native Overlay Diff: true
Logging Driver: json-file
Cgroup Driver: cgroupfs
Plugins:  // 插件
 Volume: local
 Network: bridge host macvlan null overlay
 Log: awslogs fluentd gcplogs gelf journald json-file logentries splunk syslog
Swarm: inactive
Runtimes: runc
Default Runtime: runc
Init Binary: docker-init
containerd version: d64c661f1d51c48782c9cec8fda7604785f93587
runc version: 69663f0bd4b60df09991c08812a60108003fa340
init version: fec3683
Security Options:  // 安全选项
 seccomp
  Profile: default
Kernel Version: 3.10.0-957.el7.x86_64  // 内核版本
Operating System: CentOS Linux 7 (Core)
OSType: linux
Architecture: x86_64
CPUs: 1
Total Memory: 908.2MiB
Name: Docker
ID: HB7V:B35V:AGQR:Z4JM:WLZ3:T53Y:DXAD:R3HE:OIMS:ODXL:QKDB:MQES
Docker Root Dir: /var/lib/docker
Debug Mode (client): false
Debug Mode (server): false
Registry: https://index.docker.io/v1/
Labels:
Experimental: false
Insecure Registries:
 127.0.0.0/8
Registry Mirrors:  // 镜像加速器
 http://hub-mirror.c.163.com/
 https://registry.docker-cn.com/
Live Restore Enabled: false

$
以上部分信息,我用类似注释的方式在对应的行里加了说明。
查看容器可以使用的网络:
$ docker network ls
NETWORK ID          NAME                DRIVER              SCOPE
39cd19b7d266        bridge              bridge              local
d086953087bb        host                host                local
fa0c7f1fb6ca        none                null                local
$
容器网络的内容也是需要单独展开的,这里只是演示一下网络命令。
可以使用命令来搜索镜像:docker search。这个命令不属于任何一个Management Commands,所以就直接这么用:
$ docker search nginx命令的输出结果贴出来不是很好看,下面是利用--format参数,输出完整的JSON格式的内容:
$ docker search nginx --limit 5 --format '{{json .}}'
{"Description":"Official build of Nginx.","IsAutomated":"false","IsOfficial":"true","Name":"nginx","StarCount":"11680"}
{"Description":"Automated Nginx reverse proxy for docker con…","IsAutomated":"true","IsOfficial":"false","Name":"jwilder/nginx-proxy","StarCount":"1627"}
{"Description":"Container running Nginx + PHP-FPM capable of…","IsAutomated":"true","IsOfficial":"false","Name":"richarvey/nginx-php-fpm","StarCount":"726"}
{"Description":"Bitnami nginx Docker Image","IsAutomated":"true","IsOfficial":"false","Name":"bitnami/nginx","StarCount":"69"}
{"Description":"NGINX Ingress Controller for Kubernetes","IsAutomated":"false","IsOfficial":"false","Name":"nginx/nginx-ingress","StarCount":"20"}
这里不但获取了所有的字段的内容,还有每个字段的字段名。
现在还可以调整--format参数,自定义输出的格式:
$ docker search nginx --limit 5 --format '{{.Name}}\t{{.Description}}\t{{.StarCount}}\t{{.IsOfficial | printf "%q"}}\t{{.IsAutomated | printf "%q"}}'
nginx   Official build of Nginx.        11680   "[OK]"  ""
jwilder/nginx-proxy     Automated Nginx reverse proxy for docker con…   1627    ""      "[OK]"
richarvey/nginx-php-fpm Container running Nginx + PHP-FPM capable of…   726     ""      "[OK]"
bitnami/nginx   Bitnami nginx Docker Image      69      ""      "[OK]"
nginx/nginx-ingress     NGINX Ingress Controller for Kubernetes 20      ""      ""
$
默认输出的内容如果太长,会被阶段,比如Description字段。这时可以使用--no-trunc参数,阻止内容被截断。
不过搜索的结构没有详细的tag信息,所以这个命令没太大用处。要搜索镜像就直接上 hub.docker.com 查。
Docker Hub 搜索镜像
使用浏览器访问docker hub: https://hub.docker.com/
在首页搜索框内输入要搜索的镜像名称,比如“hello-world”。进入后,点击TAGS标签,可以查看这个镜像的不同的版本。
其他镜像仓库
除了Docker Hub官方的镜像仓库以外,还有其他镜像仓库,比如Quay:https://quay.io/
首先要在本地创建镜像,可以去镜像仓库获取。
把镜像从镜像仓库拖(pull)下来:
$ docker image pull hello-world
Using default tag: latest
latest: Pulling from library/hello-world
1b930d010525: Pull complete
Digest: sha256:6540fc08ee6e6b7b63468dc3317e3303aae178cb8a45ed3123180328bcc1d20f
Status: Downloaded newer image for hello-world:latest
$
如果不指定tag,默认就是latest。
查看就是ls:
$ docker image ls
REPOSITORY          TAG                 IMAGE ID            CREATED             SIZE
hello-world         latest              fce289e99eb9        6 months ago        1.84kB
$
这里的 IMAGE ID 是镜像的唯一标识。指定镜像的时候可以使用 REPOSITORY 和 TAG,不过本地镜像可以没有这两个属性。但是一定会有 IMAGE ID,通过 IMAGE ID 也可以指明镜像。
上面显示的ID只是一部分,可以使用--no-trunc参数查看完整的:
$ docker image ls --no-trunc --format '{{.Repository}}:{{.Tag}} {{.ID}}'
hello-world:latest sha256:fce289e99eb9bca977dae136fbe2a82b6b7d4c372474c9235adc1741675f587e
$
在指明镜像的时候,使用完整的或者部分ID都是可以的。
如果下错了,或者不用了,也可以删除。命令是docker image rm,或者也可以用docker rmi。
注意,这里不是docker rm,这个命令操作的容器,对应的命令是docker container rm。
这也是建议使用 Management Commands 命令的原因,明确指定要做哪一类的操作。这样在需要操作 image 的时候不会因为误操作而对 container 执行了命令。
先看下一帮助命令,下面是所有容器相关的子命令:
$ docker container --help

Usage:  docker container COMMAND

Manage containers

Commands:
  attach      Attach local standard input, output, and error streams to a running container
  commit      Create a new image from a container's changes
  cp          Copy files/folders between a container and the local filesystem
  create      Create a new container
  diff        Inspect changes to files or directories on a container's filesystem
  exec        Run a command in a running container
  export      Export a container's filesystem as a tar archive
  inspect     Display detailed information on one or more containers
  kill        Kill one or more running containers
  logs        Fetch the logs of a container
  ls          List containers
  pause       Pause all processes within one or more containers
  port        List port mappings or a specific mapping for the container
  prune       Remove all stopped containers
  rename      Rename a container
  restart     Restart one or more containers
  rm          Remove one or more containers
  run         Run a command in a new container
  start       Start one or more stopped containers
  stats       Display a live stream of container(s) resource usage statistics
  stop        Stop one or more running containers
  top         Display the running processes of a container
  unpause     Unpause all processes within one or more containers
  update      Update configuration of one or more containers
  wait        Block until one or more containers stop, then print their exit codes

Run 'docker container COMMAND --help' for more information on a command.
$
主要命令说明:
执行 docker container run --help 查看命令运行的格式:
docker container run [OPTIONS] IMAGE [COMMAND] [ARG...]启动容器时执行的命令
[COMMAND] 是可选的,指定启动容器时运行的命令。
[ARG...] 是像命令传递的参数。
Docker的容器是为了运行单个程序的。就是单个进程,不过容器内部也是可以同时运行多个进程的。
每个镜像都有定义默认要运行的程序。基于一个镜像启动容器的时,如果没有指定命令,就执行镜像默认指定的程序。
当然也可以手动指定镜像启动时运行的命令,就是上面的[COMMAND]参数。
启动容器时的选项
[OPTIONS] 是一大堆run命令的参数。下面挑几个重要的说:
这里来实际的运行个容器,并进行各种操作。
busybox的镜像非常小,它并不是一个系统发行版。最初这个工具是为了在一张软盘上创建一个可引导的 GNU/Linux 系统,这可以用作安装盘和急救盘。它是一个集成了三百多个最常用Linux命令和工具的软件。
直接启动
直接将镜像启动为容器:
$ docker container run --name bx0 busybox
$ docker container ls
CONTAINER ID        IMAGE               COMMAND             CREATED             STATUS              PORTS               NAMES
$
此时ls也看不到这个容器,不过容器并没有被删除而只是出于停止状态。默认只显示运行状态的容器,这里需要加上-a参数:
$ docker container ls -a
CONTAINER ID        IMAGE               COMMAND             CREATED             STATUS                     PORTS               NAMES
3a9b8eb31e01        busybox             "sh"                7 minutes ago       Exited (0) 7 minutes ago                       bx0
$
这里注意一下 COMMAND 字段的值,这个是容器启动时运行的命令。启动容器的时候没有指定,这里就是默认的命令。
这次启动容器显然是有问题的,先把这个容器删除了,然后继续往下看:
$ docker container rm bx0启动并开启终端
这次启动时加上 -it 参数,分配一个 shell 终端:,
$ docker run --name bx1 -it busybox
/ # ls
bin   dev   etc   home  proc  root  sys   tmp   usr   var
/ # ls bin
最后的一条命令 ls bin 可以看到很多命令。这些命令就是 busybox 支持的命令。
现在是一个 shell 的交互式接口,可以直接运行命令,先看下 ps 命令:
/ # ps
PID   USER     TIME  COMMAND
    1 root      0:00 sh
   10 root      0:00 ps
/ #
可以看到 sh 命令的 PID 是1。PID为1的进程是init
Docker 容器启动时,默认会把容器内部第一个进程,也就是pid=1的程序,作为docker容器是否正在运行的依据,如果 docker 容器pid=1的进程挂了,那么docker容器便会直接退出。
此时如果退出shell,那么这个容器也就关闭了。第一次启动容器时,没有开启终端,其实就是启动了一个 sh 命令,然后就退出终端了。所以启动后容器就是停止状态的。
/ # exit
$ docker container ls -a --format '{{.Names}}: {{.Status}}'
bx1: Exited (126) 4 minutes ago
$
再次启动容器
容器已经创建好了,这次直接 start 就可以了:
$ docker container start bx1
bx1
$ docker container ls -a --format '{{.Names}}: {{.Status}}'
bx1: Up 2 seconds
$
但是现在并没有进入到终端。
用 attach 命令就可以再次进入终端:
$ docker container attach bx1
/ # ps
PID   USER     TIME  COMMAND
    1 root      0:00 sh
    6 root      0:00 ps
/ #
还可以在 start 的时候直接加上 -ai 参数,效果也是一样的:
/ # exit
$ docker container start bx1 -ai
/ #
exec 命令
最后还有一种方法,不用进入宿主机,直接在宿主机上对容器发送命令,并在宿主机上得到命令的结果:
$ docker container start bx1
bx1
$ docker container exec bx1 ps
PID   USER     TIME  COMMAND
    1 root      0:00 sh
    6 root      0:00 ps
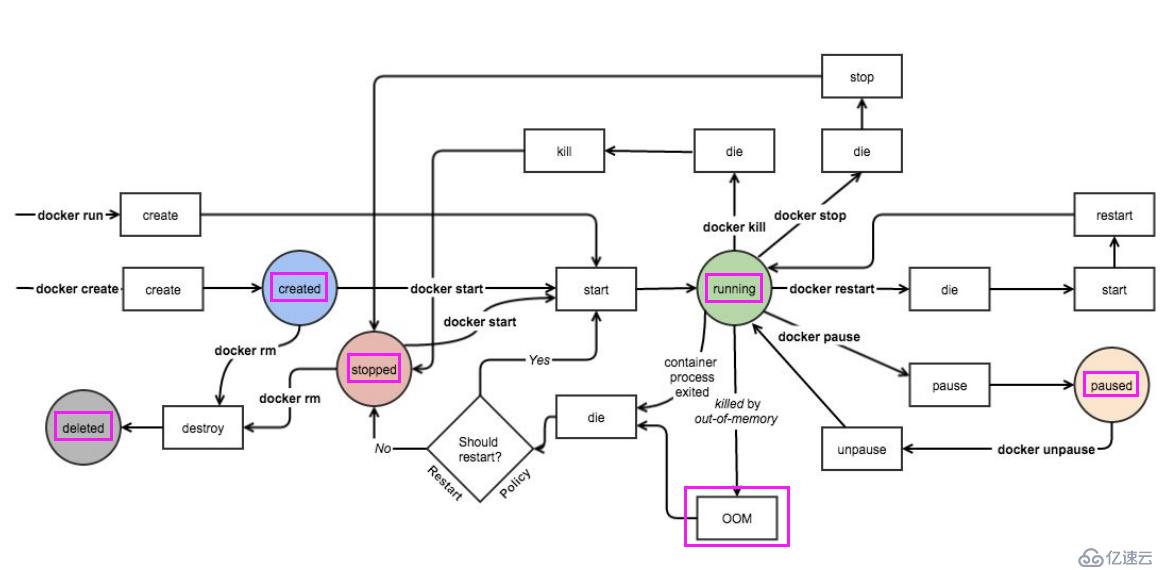
$ 这里有张图,描述了容器的各个常用命令和容器状态的转换:
图里有个OOM(Out Of Memory)内存不足,是内存使用过多。OOM状态的容器会被kill掉,来保证系统的可持续运行。OOM被kill之后就看容器的机制,是否会自动重启,否则就进入stopped状态。
免责声明:本站发布的内容(图片、视频和文字)以原创、转载和分享为主,文章观点不代表本网站立场,如果涉及侵权请联系站长邮箱:is@yisu.com进行举报,并提供相关证据,一经查实,将立刻删除涉嫌侵权内容。