您好,登录后才能下订单哦!
这篇文章主要介绍Redhat6.4如何安装Oracle10.2.0.5 64位数据库,文中介绍的非常详细,具有一定的参考价值,感兴趣的小伙伴们一定要看完!
实验环境:
操作系统:Redhat 6.4 64位
数据库:Oracle10.2.0.1 64位安装包 + Oracle10.2.0.5 64位升级包
一、安装前环境准备
1、安装Redhat6.4操作系统
操作系统的具体安装在这里我就不再说了
2、安装介质的准备
Oracle10.2.0.1的安装包:10201_database_linux_x86_64.cpio.gz
Oracle10.2.0.5的升级包:p8202632_10205_Linux-x86-64.zip
3、软硬件环境检查
(1)内存和交换空间检查
[root@seiang10g ~]# grep MemTotal /proc/meminfo
MemTotal: 2726460 kB
[root@seiang10g ~]# grep SwapTotal /proc/meminfo
SwapTotal: 2736120 kB
[root@seiang10g ~]# free -m
total used free shared buffers cached
Mem: 2662 1753 909 0 19 1510
-/+ buffers/cache: 222 2440
Swap: 2671 0 2671
(2)磁盘空间检查
[root@seiang10g ~]# df -h
Filesystem Size Used Avail Use% Mounted on
/dev/mapper/vg_seiang10g-lv_root
47G 4.2G 40G 10% /
tmpfs 1.4G 72K 1.4G 1% /dev/shm
/dev/sda1 485M 37M 423M 9% /boot
/dev/sr0 3.5G 3.5G 0 100% /mnt/dvd
(3)CPU及系统架构检查
[root@seiang10g ~]# grep "model name" /proc/cpuinfo
model name : Intel(R) Xeon(R) CPU X3430 @ 2.40GHz
[root@seiang10g ~]# uname -a
Linux seiang10g.comsys.com 2.6.32-358.el6.x86_64 #1 SMP Tue Jan 29 11:47:41 EST 2013 x86_64 x86_64 x86_64 GNU/Linux
(4)必须安装包的检查
[root@ seiang10g database]# firefox welcome.html
官方文档要求如下:

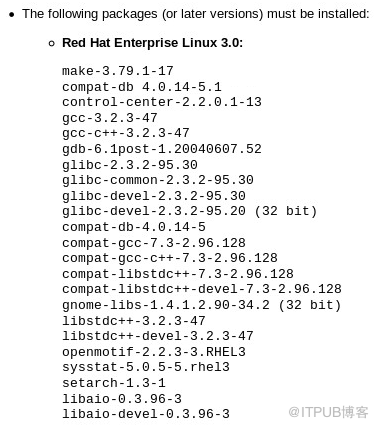
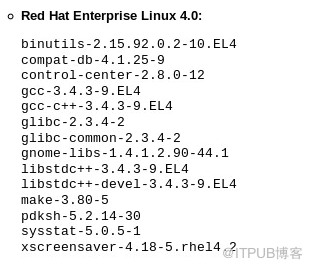
从文档中可以看出Oracle 10g只支持到Red Hat Enterprise Linux 4.0,并没有明确表示支持Red Hat Enterprise Linux 6.0以上的版本. 这是因为Oracle官方并没有在4以后的版本测试过Oracle 10g。根据要求,安装相应的安装包。
[root@seiang10g ~]# yum install binutils* compat* control-center* gcc* glibc* gnome-libs* libstdc* make* sysstat* xscreensaver* unixODBC* lib*
4、环境准备
(1)创建组和用户
[root@seiang10g ~]# groupadd oinstall
[root@seiang10g ~]# groupadd dba
[root@seiang10g ~]# useradd -g oinstall -G dba oracle
[root@seiang10g ~]# passwd oracle
Changing password for user oracle.
New password:
BAD PASSWORD: it is based on a dictionary word
BAD PASSWORD: is too simple
Retype new password:
passwd: all authentication tokens updated successfully
(2)创建相关目录
[root@seiang10g ~]# mkdir -p /u01/app/oracle
[root@seiang10g ~]# chown -R oracle:oinstall /u01/app/oracle
[root@seiang10g ~]# chmod -R 775 /u01/app/oracle
(3)配置Linux内核参数及环境限制
[root@seiang10g ~]# vim /etc/sysctl.conf
kernel.shmall = 4294967296
kernel.shmall = 2097152
kernel.shmmax = 2147483648
kernel.shmmni = 4096
kernel.sem = 250 32000 100 128
fs.file-max = 65536
net.ipv4.ip_local_port_range = 1024 65000
net.core.rmem_default = 262144
net.core.rmem_max = 262144
net.core.wmem_default = 262144
net.core.wmem_max = 262144
[root@seiang10g ~]# vim /etc/security/limits.conf
oracle soft nproc 2047
oracle hard nproc 16384
oracle soft nofile 1024
oracle hard nofile 65536
[root@seiang10g ~]# vi /etc/pam.d/login
session required /lib/security/pam_limits.so
session required pam_limits.so
(4)修改Oracle用户环境变量
[oracle@seiang10g ~]$ vim .bash_profile
# .bash_profile
# Get the aliases and functions
if [ -f ~/.bashrc ]; then
. ~/.bashrc
fi
# User specific environment and startup programs
PATH=$PATH:$HOME/bin
export PATH
export ORACLE_SID=seiang
export ORACLE_BASE=/u01/app/oracle
export ORACLE_HOME=$ORACLE_BASE/product/10.2/dbhome_1
export ORACLE_OWNER=oracle
export PATH=$ORACLE_HOME/bin:$PATH
umask 022
(5)禁用SELinux和关闭防火墙
[root@seiang10g ~]# vim /etc/selinux/config
# This file controls the state of SELinux on the system.
# SELINUX= can take one of these three values:
# enforcing - SELinux security policy is enforced.
# permissive - SELinux prints warnings instead of enforcing.
# disabled - No SELinux policy is loaded.
SELINUX=disabled
# SELINUXTYPE= can take one of these two values:
# targeted - Targeted processes are protected,
# mls - Multi Level Security protection.
SELINUXTYPE=targeted
[root@seiang10g ~]# service iptables stop
iptables: Flushing firewall rules: [ OK ]
iptables: Setting chains to policy ACCEPT: filter [ OK ]
iptables: Unloading modules: [ OK ]
[root@seiang10g ~]# service iptables status
iptables: Firewall is not running.
[root@seiang10g ~]# chkconfig iptables off
[root@seiang10g ~]# chkconfig iptables --list
iptables 0:off 1:off 2:off 3:off 4:off 5:off 6:off
(6)修改/etc/hosts文件
[root@seiang10g ~]# vim /etc/hosts
127.0.0.1 localhost localhost.localdomain localhost4 localhost4.localdomain4
::1 localhost localhost.localdomain localhost6 localhost6.localdomain6
10.1.1.47 seiang10g.comsys.com seiang10g
二、安装Oracle软件
1、解压安装包
[root@seiang10g software]# gunzip 10201_database_linux_x86_64.cpio.gz
[root@seiang10g software]# cpio -idmv < 10201_database_linux_x86_64.cpio
[root@seiang10g software]# unzip p8202632_10205_Linux-x86-64.zip
解压出来的目录为database和Disk1
[oracle@seiang10g ~]$ cd /u01/software/database/
[oracle@seiang10g database]$ ll
total 36
drwxrwxr-x 9 94110 42424 4096 Oct 20 2005 doc
drwxr-xr-x 5 94110 42424 4096 Oct 23 2005 install
drwxr-xr-x 2 94110 42424 4096 Oct 23 2005 response
-rwxr-xr-x 1 94110 42424 1326 Oct 23 2005 runInstaller
drwxrwxr-x 9 94110 42424 12288 Oct 23 2005 stage
-rw-rw-r-- 1 94110 42424 5416 Oct 20 2005 welcome.html
2、执行./runInstaller
[oracle@seiang10g database]$ export DISPLAY=10.1.1.123:0.0
报错信息1:
[oracle@seiang10g database]$ ./runInstaller
Starting Oracle Universal Installer...
Checking installer requirements...
Checking operating system version: must be redhat-3, SuSE-9, SuSE-10, redhat-4, redhat-5, redhat-6, UnitedLinux-1.0, asianux-1, asianux-2, asianux-3, enterprise-4, enterprise-5 or SuSE-11
Passed
All installer requirements met.
Preparing to launch Oracle Universal Installer from /tmp/OraInstall2017-07-11_10-49-36AM. Please wait ...[oracle@seiang10g Disk1]$ Oracle Universal Installer, Version 10.2.0.5.0 Production
Copyright (C) 1999, 2010, Oracle. All rights reserved.
Exception java.lang.UnsatisfiedLinkError: /tmp/OraInstall2017-07-11_10-49-36AM/jre/1.4.2/lib/i386/libawt.so: libXp.so.6: cannot open shared object file: No such file or directory occurred..
java.lang.UnsatisfiedLinkError: /tmp/OraInstall2017-07-11_10-49-36AM/jre/1.4.2/lib/i386/libawt.so: libXp.so.6: cannot open shared object file: No such file or directory
at java.lang.ClassLoader$NativeLibrary.load(Native Method)
at java.lang.ClassLoader.loadLibrary0(Unknown Source)
at java.lang.ClassLoader.loadLibrary(Unknown Source)
at java.lang.Runtime.loadLibrary0(Unknown Source)
at java.lang.System.loadLibrary(Unknown Source)
at sun.security.action.LoadLibraryAction.run(Unknown Source)
at java.security.AccessController.doPrivileged(Native Method)
at sun.awt.NativeLibLoader.loadLibraries(Unknown Source)
错误原因:
一般是却少libXp的包
解决办法:
[root@seiang10g Packages]# rpm -qa libXp*
[root@seiang10g Packages]# yum install libXp*
报错信息2:
[oracle@seiang10g database]$ ./runInstaller
Starting Oracle Universal Installer...
Checking installer requirements...
Checking operating system version: must be redhat-3, SuSE-9, SuSE-10, redhat-4, redhat-5, redhat-6, UnitedLinux-1.0, asianux-1, asianux-2, asianux-3, enterprise-4, enterprise-5 or SuSE-11
Passed
All installer requirements met.
Preparing to launch Oracle Universal Installer from /tmp/OraInstall2017-07-11_10-57-11AM. Please wait ...[oracle@seiang10g Disk1]$ Oracle Universal Installer, Version 10.2.0.5.0 Production
Copyright (C) 1999, 2010, Oracle. All rights reserved.
Exception java.lang.UnsatisfiedLinkError: /tmp/OraInstall2017-07-11_10-57-11AM/jre/1.4.2/lib/i386/libawt.so: libXtst.so.6: cannot open shared object file: No such file or directory occurred..
java.lang.UnsatisfiedLinkError: /tmp/OraInstall2017-07-11_10-57-11AM/jre/1.4.2/lib/i386/libawt.so: libXtst.so.6: cannot open shared object file: No such file or directory
at java.lang.ClassLoader$NativeLibrary.load(Native Method)
at java.lang.ClassLoader.loadLibrary0(Unknown Source)
at java.lang.ClassLoader.loadLibrary(Unknown Source)
at java.lang.Runtime.loadLibrary0(Unknown Source)
at java.lang.System.loadLibrary(Unknown Source)
错误原因:
一般是却少libXtst的包
解决办法:
[root@seiang10g Packages]# rpm -qa libXtst*
[root@seiang10g Packages]# yum install libXtst*
报错信息3:
[oracle@seiang10g database]$ ./runInstaller
Starting Oracle Universal Installer...
Checking installer requirements...
Checking operating system version: must be redhat-3, SuSE-9, SuSE-10, redhat-4, redhat-5, redhat-6, UnitedLinux-1.0, asianux-1, asianux-2, asianux-3, enterprise-4, enterprise-5 or SuSE-11
Passed
All installer requirements met.
Preparing to launch Oracle Universal Installer from /tmp/OraInstall2017-07-11_11-00-09AM. Please wait ...[oracle@seiang10g Disk1]$ Oracle Universal Installer, Version 10.2.0.5.0 Production
Copyright (C) 1999, 2010, Oracle. All rights reserved.
Can't connect to X11 window server using '10.1.1.123:0.0' as the value of the DISPLAY variable.
10.1.1.123:0.0
10.1.1.123:0.0
OUI-10025:Unable to start an interactive install session because of the following error:Can't connect to X11 window server using '10.1.1.123:0.0' as the value of the DISPLAY variable. The DISPLAY environment variable should be set to :, where the is usually '0.0'.
OUI-10026:Depending on the Unix Shell, you can use one of the following commands as examples to set the DISPLAY environment variable:
- For csh: % setenv DISPLAY 192.168.1.128:0.0
- For sh, ksh and bash: $ DISPLAY=192.168.1.128:0.0; export DISPLAY
Use the following command to see what shell is being used:
echo $SHELL
Use the following command to view the current DISPLAY environment variable setting:
echo $DISPLAY
- Make sure that client users are authorized to connect to the X Server.
OUI-10027:To enable client users to access the X Server, open an xterm, dtterm or xconsole as the user that started the session and type the following command:
% xhost +
To test that the DISPLAY environment variable is set correctly, run a X11 based program that comes with the native operating system such as 'xclock':
%
If you are not able to run xclock successfully, please refer to your PC-X Server or OS vendor for further assistance.
Typical path for 'xclock': '/usr/X11R6/bin/xclock'
出现这个错误是由于当前用户不是oracle或者环境变量设置的不正确导致的,因为每次都是用oracle用户解压,安装,没有遇到这个问题,所以也没有仔细研究过这个错误。经过在网上查询相关的资料找到了出错的原因:
可以参考一下http://blog.sina.com.cn/s/blog_73582d750100ppto.html(链接内容如下:)
cause:
X-Windows emulation is not yet correctly configured or is being mis-used.
solution:
1.Make sure that "DISPLAY” is set properly as either:
:0.0
or
:0.0
note:In this example, ip_address/hostnameis the host name or IP address of
the system that you want to use to display Oracle Universal Installer (your
workstation or PC).
eg.[root@rac1 ~]# xhost +
access control disabled, clients can connect from any host
[root@rac1 ~]# su - oracle
[oracle@rac1 ~]$ export DISPLAY=192.16.2.98:0.0
[oracle@rac1 ~]$ cd database/
[oracle@rac1 database]$ ./runInstaller
Starting Oracle Universal Installer...
Checking installer requirements...
Checking operating system version: must be redhat-3, SuSE-9, redhat-4,
UnitedLinux-1.0, asianux-1 or asianux-2
Passed
All installer requirements met.
Preparing to launch Oracle Universal Installer from
/tmp/OraInstall2009-03-05_03-36-28PM. Please wait ...[oracle@rac1 database]$
Oracle Universal Installer, Version 10.2.0.1.0 Production
Copyright (C) 1999, 2005, Oracle. All rights reserved.
2. Oracle Customer Support has seen
instances where use of the UNIX/Linux “su” command, even “su - oracle” has
caused this “Can't connect to X11 window server” error. Therefore, please be
sure that you are LOGGED ON as the oracle account. Log directly into the
install session. Do not use any variety of “su”.
use oracle log on , not "su - oracle"
eg. [oracle@rac1 database]$ ./runInstaller
3.Oracle Customer Support has seen instances where the incorrect “ulimit” setting for number of files (aka “-n”, aka “nofiles”) has caused this “Can't connect to X11 window server” error. Therefore, please be sure that your values for “nofiles” in the output of “ulimit -a” is at least 65536.
备注:前2个办法只需要满足其中一个就可以避免这个错误了:直接用oracle登陆,不能su - oracle or 设置display=ip_address_that you want to use to display Oracle Universal Installer:0.0
通过直接使用oracle用户登录解决了上面所产生的问题;
下面开始oracle10.2.0.1;
[oracle@seiang10g database]$ ./runInstaller
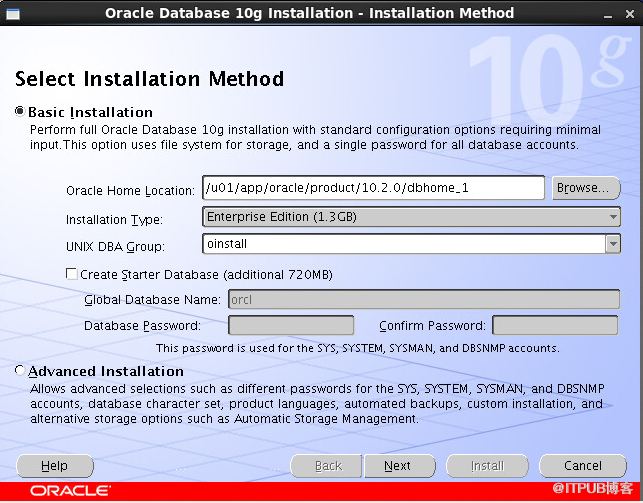
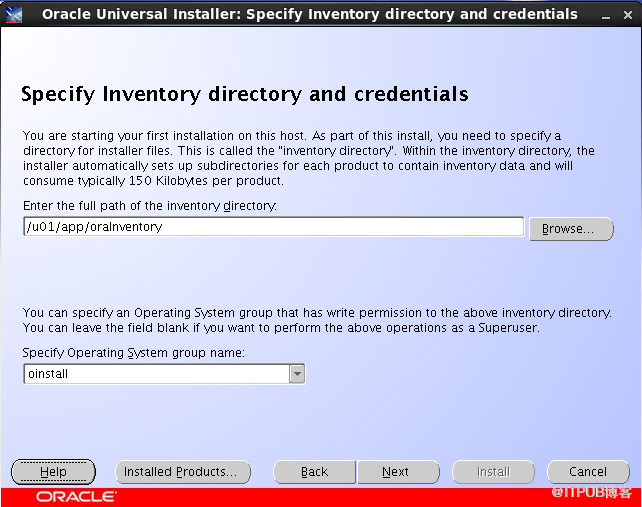
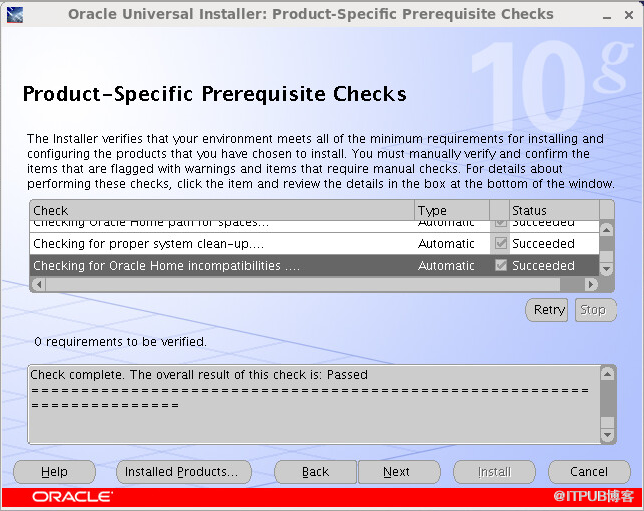

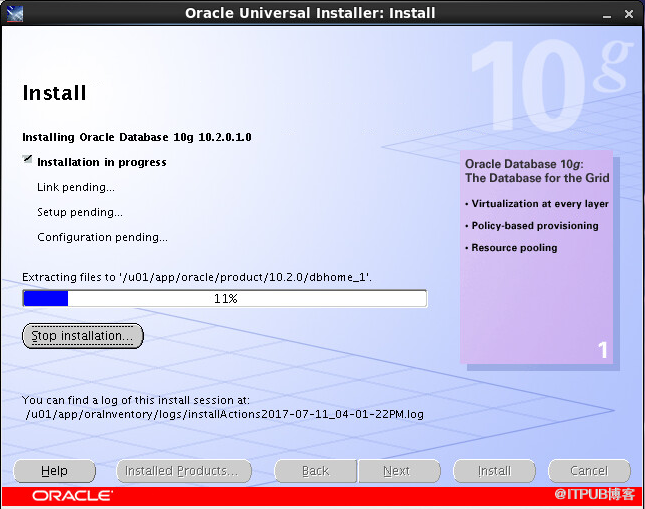
在安装到83%的时候报如下错误
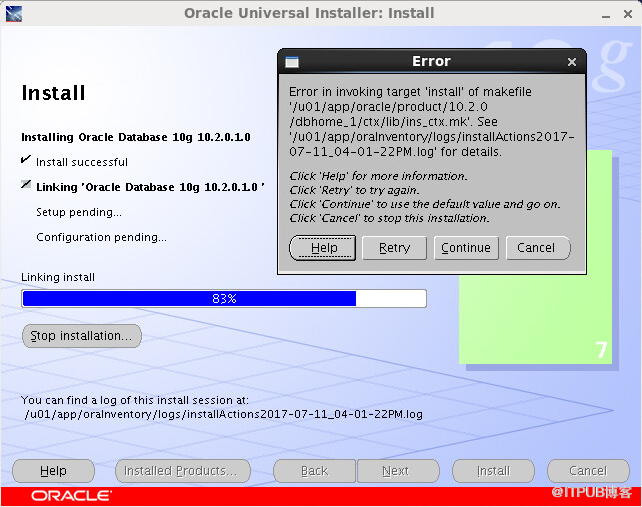
在安装到83%的时候,报如上错误:进入持续运行状态之后,在link步骤Oracle终止操作,报错说link失败,然后查看安装的所产生的日志信息:
[root@seiang10g ~]# tail -60 /u01/app/oraInventory/logs/installActions2017-07-11_04-01-22PM.log
INFO: mv ctxlc /u01/app/oracle/product/10.2.0/dbhome_1/bin/ctxlc
INFO: chmod 751 /u01/app/oracle/product/10.2.0/dbhome_1/bin/ctxlc
INFO: gcc -m32 -o ctxhx -L/u01/app/oracle/product/10.2.0/dbhome_1/ctx//lib32/ -L/u01/app/oracle/product/10.2.0/dbhome_1/lib32/ -L/u01/app/oracle/product/10.2.0/dbhome_1/lib32/stubs/ /u01/app/oracle/product/10.2.0/dbhome_1/ctx/lib/ctxhx.o -L/u01/app/oracle/product/10.2.0/dbhome_1/ctx/lib/ -ldl -lm -lctxhx -Wl,-rpath,/u01/app/oracle/product/10.2.0/dbhome_1/ctx/lib -lsnls10 -lnls10 -lcore10 -lsnls10 -lnls10 -lcore10 -lsnls10 -lnls10 -lxml10 -lcore10 -lunls10 -lsnls10 -lnls10 -lcore10 -lnls10 `cat /u01/app/oracle/
INFO: product/10.2.0/dbhome_1/lib/sysliblist`
INFO: /usr/bin/ld: crt1.o: No such file: No such file or directory
collect2: ld returned 1 exit status
INFO: make: *** [ctxhx] Error 1
INFO: End output from spawned process.
INFO: ----------------------------------
INFO: Exception thrown from action: make
Exception Name: MakefileException
Exception String: Error in invoking target 'install' of makefile '/u01/app/oracle/product/10.2.0/dbhome_1/ctx/lib/ins_ctx.mk'.
See '/u01/app/oraInventory/logs/installActions2017-07-11_04-01-22PM.log' for details.
Exception Severity: 1
报错原因:
查询后,发现是安装依赖包的问题glibc-devel。在32bit环境下,我们使用rpm直接安装或者yum安装时,只安装32bit版本就可以了。但是在64bit环境下,是需要将两个版本的均进行安装。这个过程中是需要严格遵守文档对安装包的要求。
解决方法:
[root@seiang10g Packages]# yum install glibc*
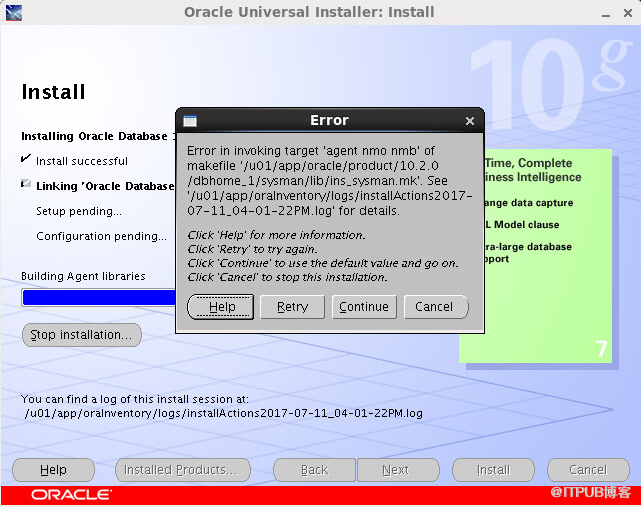
Retry之后又出现上面的报错信息,然后查看相关安装日志:
INFO: make[1]: Leaving directory `/u01/app/oracle/product/10.2.0/dbhome_1/sysman/lib'
INFO: make[1]: *** [/u01/app/oracle/product/10.2.0/dbhome_1/sysman/lib/libnmemso.so] Error 1
make: *** [libnmemso] Error 2
INFO: End output from spawned process.
INFO: ----------------------------------
INFO: Exception thrown from action: make
Exception Name: MakefileException
Exception String: Error in invoking target 'agent nmo nmb' of makefile '/u01/app/oracle/product/10.2.0/dbhome_1/sysman/lib/ins_sysman.mk'.
See '/u01/app/oraInventory/logs/installActions2017-07-11_04-01-22PM.log' for details.
Exception Severity: 1
点击continue;
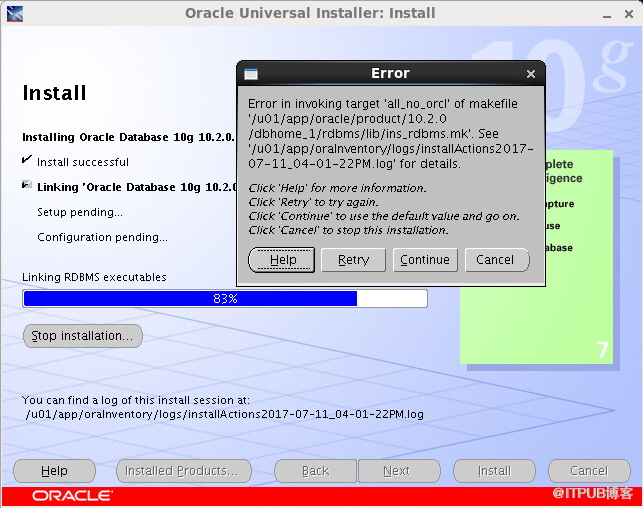
INFO: make[1]: Leaving directory `/u01/app/oracle/product/10.2.0/dbhome_1/rdbms/lib'
INFO: make[1]: *** [/u01/app/oracle/product/10.2.0/dbhome_1/rdbms/lib/extproc32] Error 1
make: *** [extproc32] Error 2
INFO: End output from spawned process.
INFO: ----------------------------------
INFO: Exception thrown from action: make
Exception Name: MakefileException
Exception String: Error in invoking target 'all_no_orcl' of makefile '/u01/app/oracle/product/10.2.0/dbhome_1/rdbms/lib/ins_rdbms.mk'.
See '/u01/app/oraInventory/logs/installActions2017-07-11_04-01-22PM.log' for details.
Exception Severity: 1
点击continue;
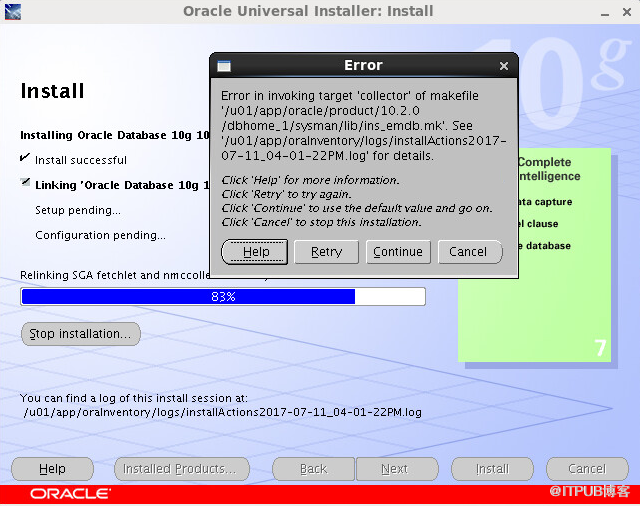
INFO: make[1]: Leaving directory `/u01/app/oracle/product/10.2.0/dbhome_1/sysman/lib'
INFO: make[1]: *** [/u01/app/oracle/product/10.2.0/dbhome_1/sysman/lib/nmccollector] Error 1
make: *** [nmccollector] Error 2
INFO: End output from spawned process.
INFO: ----------------------------------
INFO: Exception thrown from action: make
Exception Name: MakefileException
Exception String: Error in invoking target 'collector' of makefile '/u01/app/oracle/product/10.2.0/dbhome_1/sysman/lib/ins_emdb.mk'.
See '/u01/app/oraInventory/logs/installActions2017-07-11_04-01-22PM.log' for details.
Exception Severity: 1
这个问题是比较复杂的,笔者查询了很多资料也没有一个确切的回应。最后在网络上检索到一位前辈的解决之道。
首先点击ignore跳过步骤,后面就可以直接完成runInstaller脚本执行。在$ORACLE_HOME/bin目录下,修改oracle文件为oracle.bin。
创建文件oracle在相同目录,内容如下:
#!/bin/bash
export DISABLE_HUGETLBFS=1
exec $ORACLE_HOME/bin/oracle.bin $@
EOF
保存后使用chmod a+x oracle命令对文件进行权限修改。经过这种策略修改之后,Oracle后续的dbca过程创建数据库执行正常。
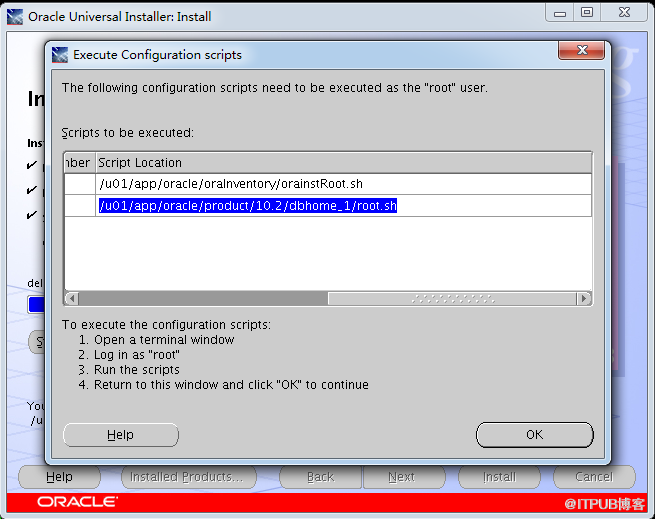
[root@seiang10g ~]# /u01/app/oracle/oraInventory/orainstRoot.sh
Changing permissions of /u01/app/oracle/oraInventory to 770.
Changing groupname of /u01/app/oracle/oraInventory to oinstall.
The execution of the script is complete
[root@seiang10g ~]# /u01/app/oracle/product/10.2.0/dbhome_1/root.sh
Running Oracle10 root.sh script...
The following environment variables are set as:
ORACLE_OWNER= oracle
ORACLE_HOME= /u01/app/oracle/product/10.2.0/dbhome_1
Enter the full pathname of the local bin directory: [/usr/local/bin]:
Copying dbhome to /usr/local/bin ...
Copying oraenv to /usr/local/bin ...
Copying coraenv to /usr/local/bin ...
Creating /etc/oratab file...
Entries will be added to the /etc/oratab file as needed by
Database Configuration Assistant when a database is created
Finished running generic part of root.sh script.
Now product-specific root actions will be performed.

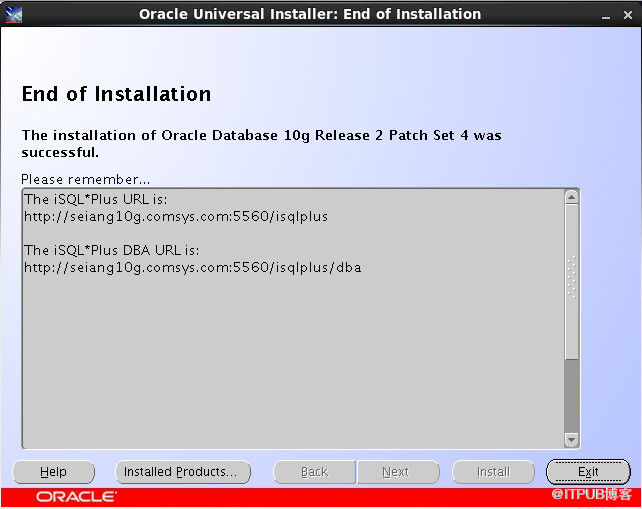
三、安装Oracle10.2.0.5.0
安装升级Oracle10.2.0.5是为了后面数据库运行的稳定,避免出现诸多的bug


如果在环境检查的时候出现这个问题,如下所示:
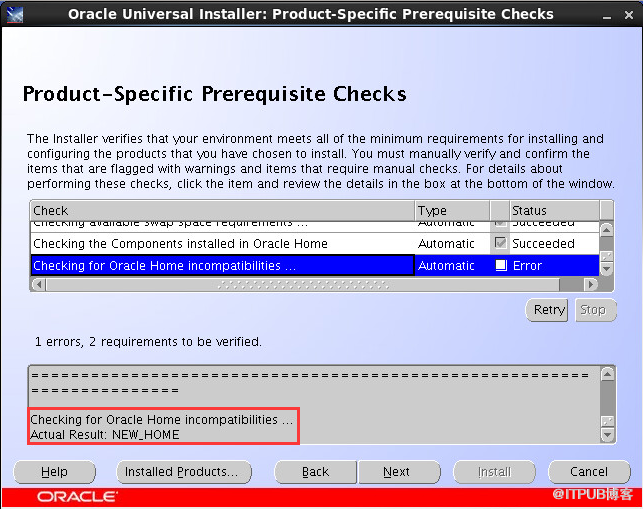
环境检查中具体的报错信息如下所示:
Checking for Oracle Home incompatibilities ...
Actual Result: NEW_HOME
Check complete. The overall result of this check is: Failed <<<<
Problem: This software can only be installed into an existing Oracle Database 10g Oracle Home.
Recommendation: Choose an existing Oracle Database 10g Oracle Home for installing this software.
原因是由于oracle10.2.0.5是升级包,必须要在已有的数据库前提下进行安装,报错的原因是没有已经存在的数据库
正确的情况下:
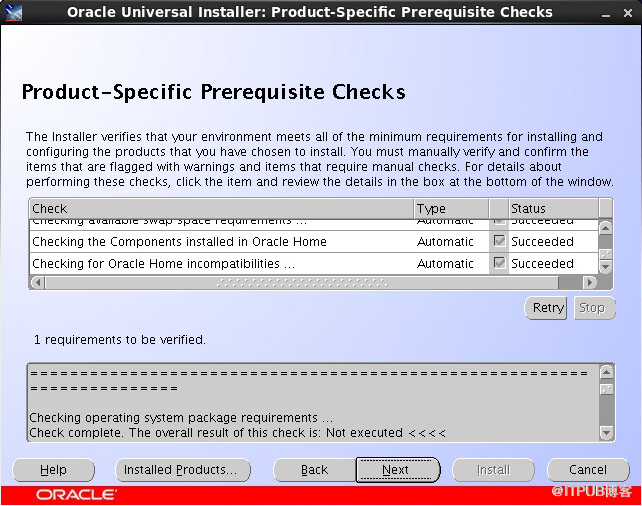
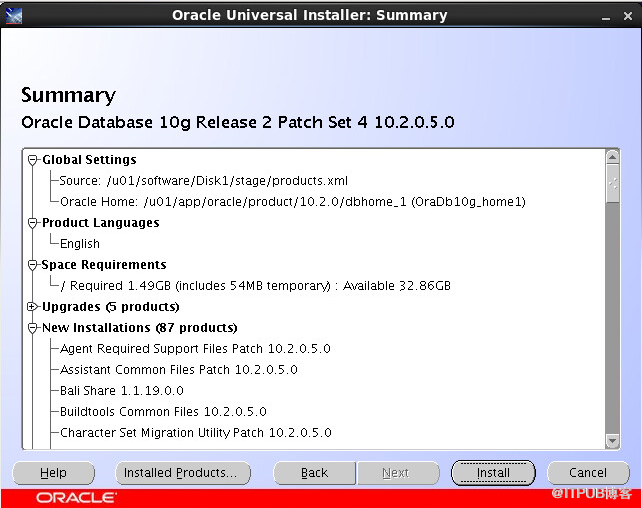
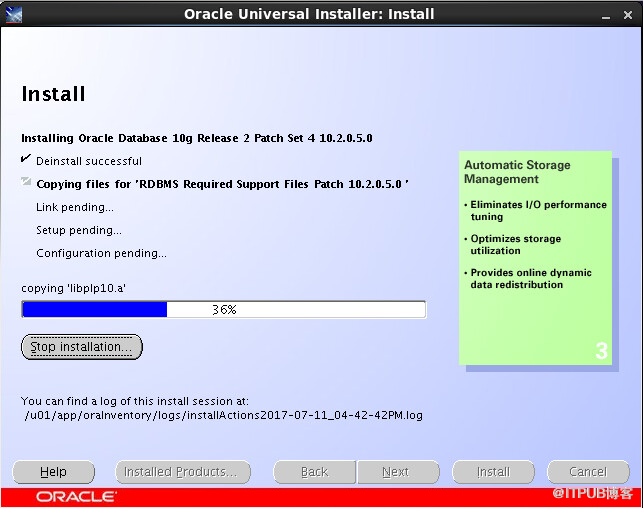
安装进度完成后也需要执行一个脚本,注意这里执行的时候设计到覆盖重写的问题,全部选择YES
[root@seiang10g ~]# /u01/app/oracle/product/10.2.0/dbhome_1/root.sh
Running Oracle 10g root.sh script...
The following environment variables are set as:
ORACLE_OWNER= oracle
ORACLE_HOME= /u01/app/oracle/product/10.2.0/dbhome_1
Enter the full pathname of the local bin directory: [/usr/local/bin]:
The file "dbhome" already exists in /usr/local/bin. Overwrite it? (y/n)
[n]: y
Copying dbhome to /usr/local/bin ...
The file "oraenv" already exists in /usr/local/bin. Overwrite it? (y/n)
[n]: y
Copying oraenv to /usr/local/bin ...
The file "coraenv" already exists in /usr/local/bin. Overwrite it? (y/n)
[n]: y
Copying coraenv to /usr/local/bin ...
Entries will be added to the /etc/oratab file as needed by
Database Configuration Assistant when a database is created
Finished running generic part of root.sh script.
Now product-specific root actions will be performed.
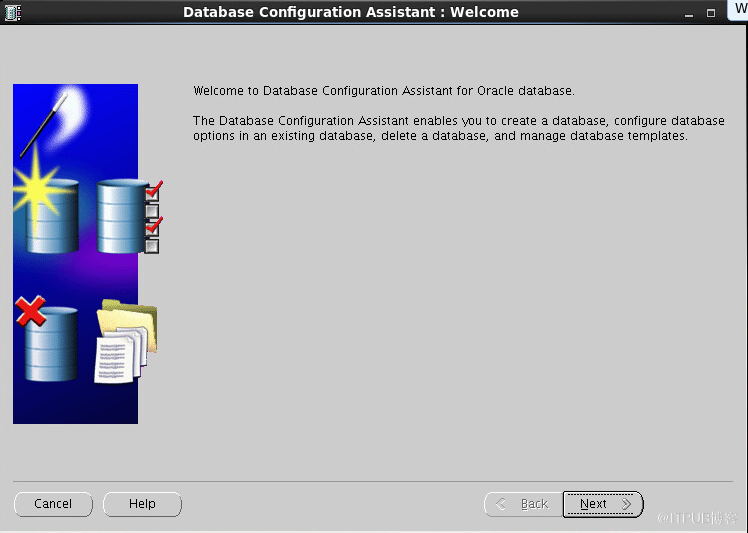
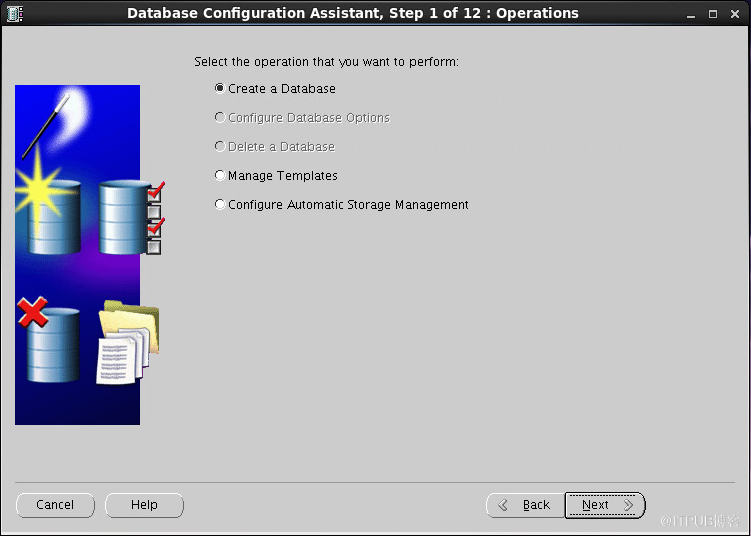
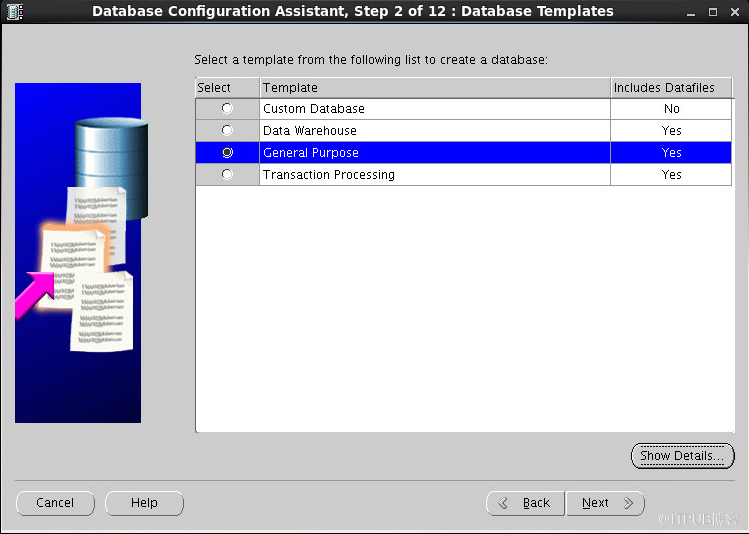
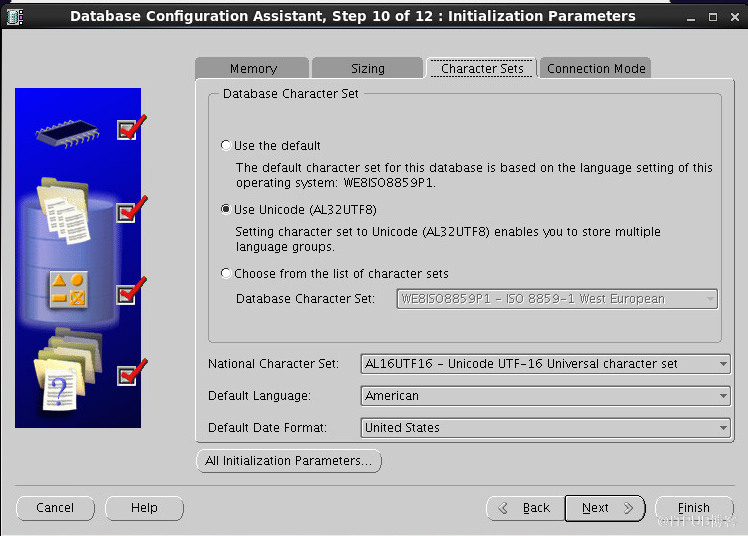
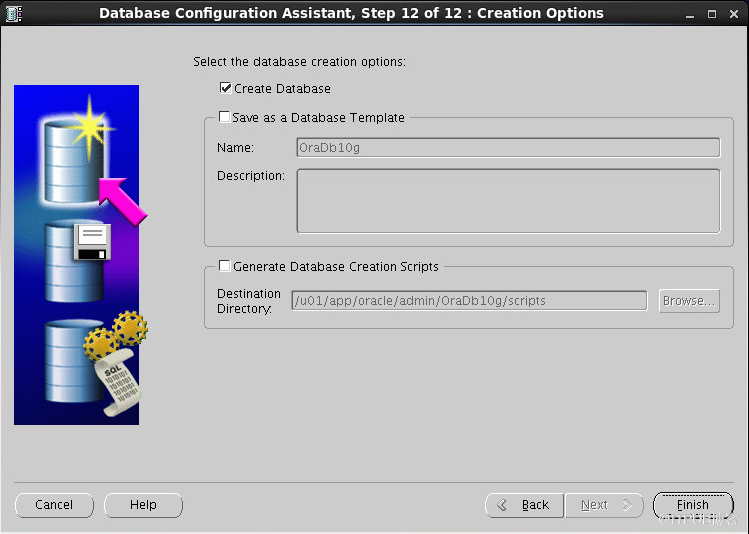
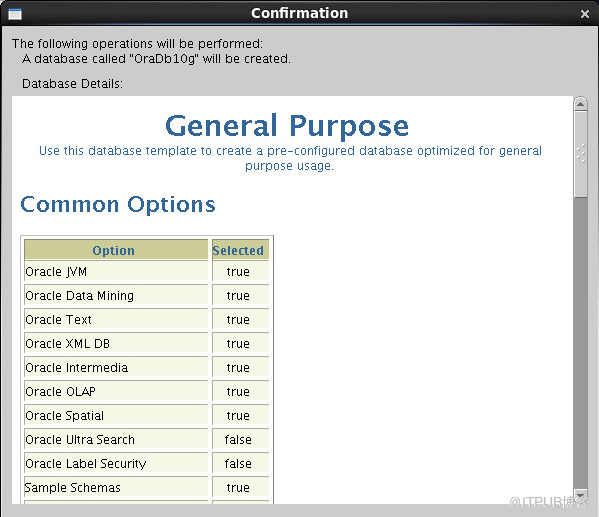
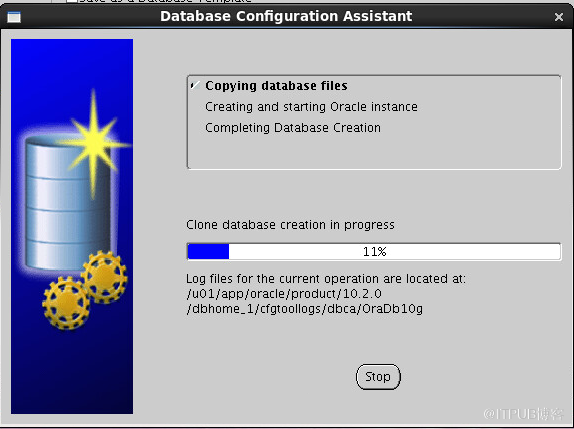
四、创建数据库
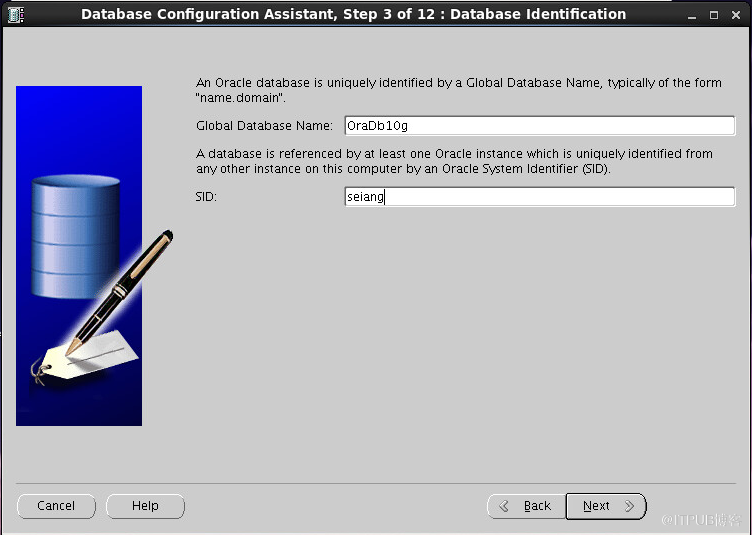
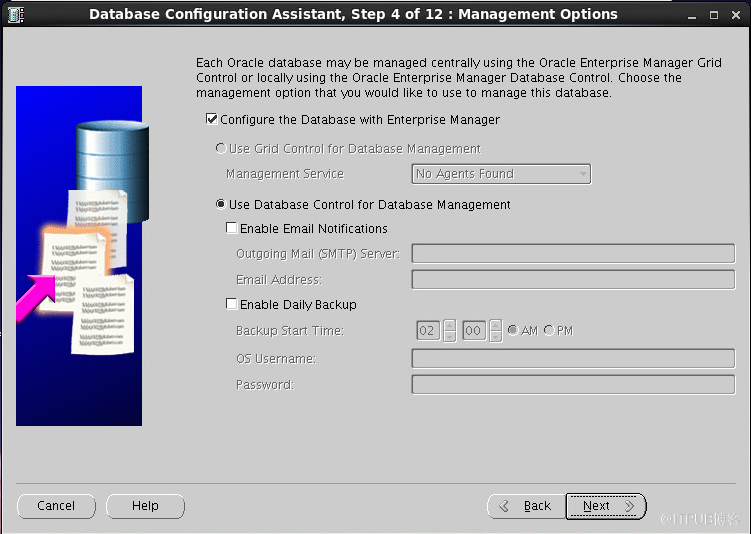
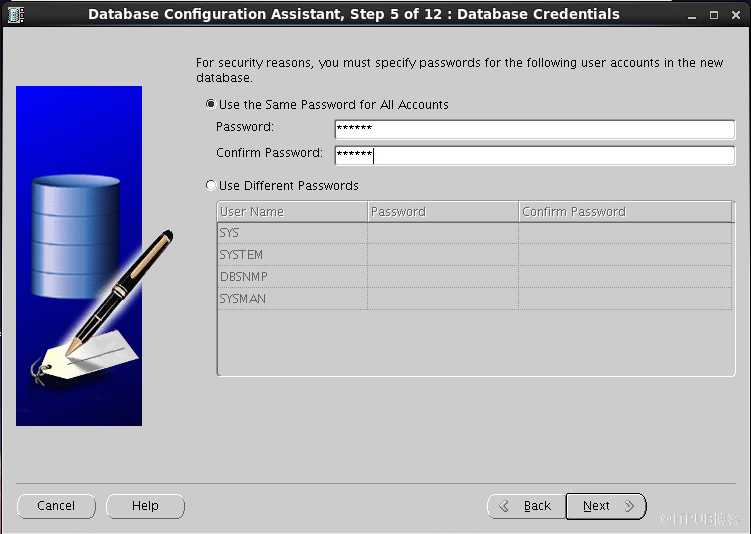
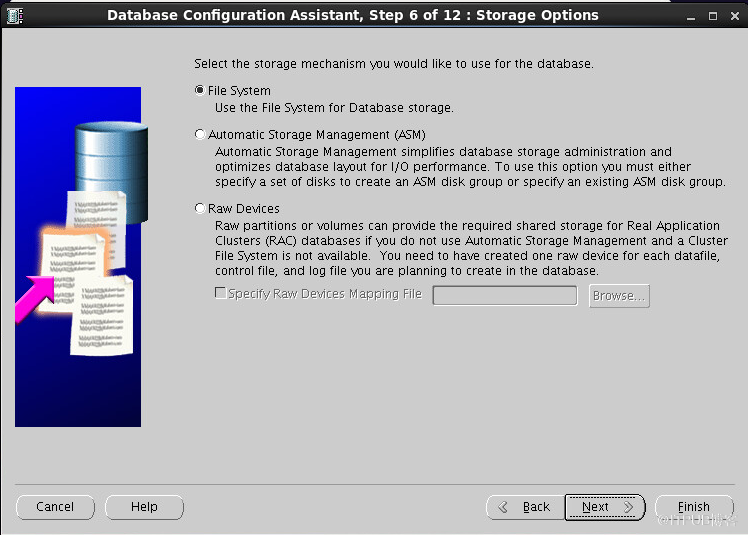
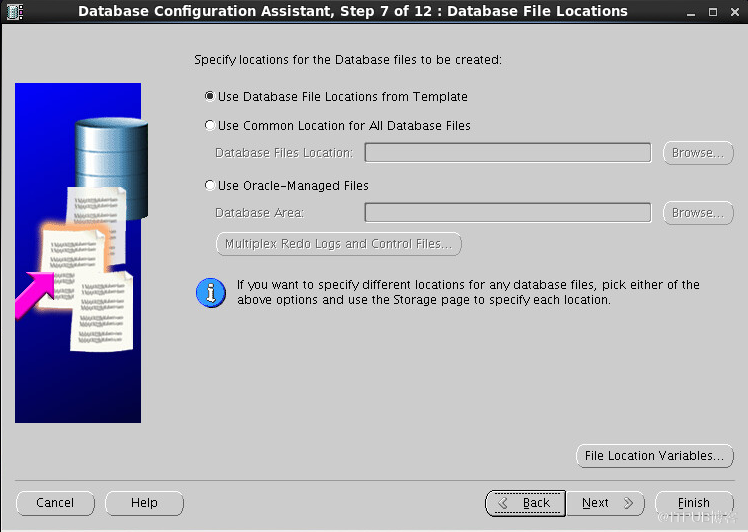
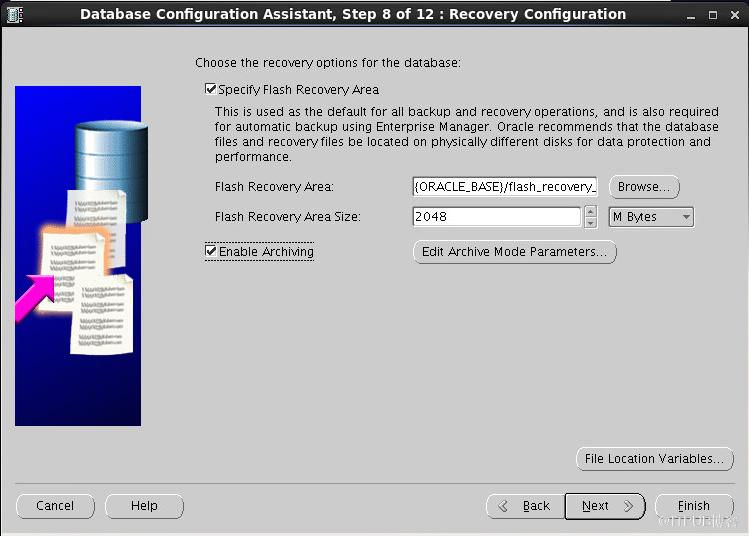
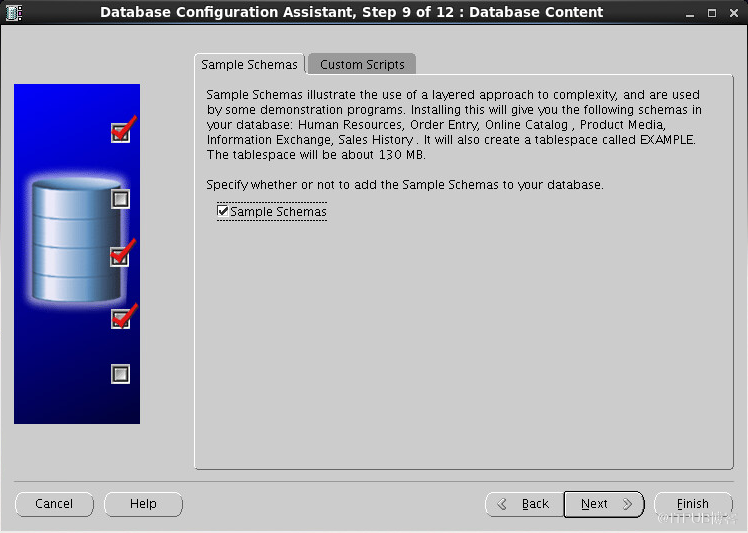
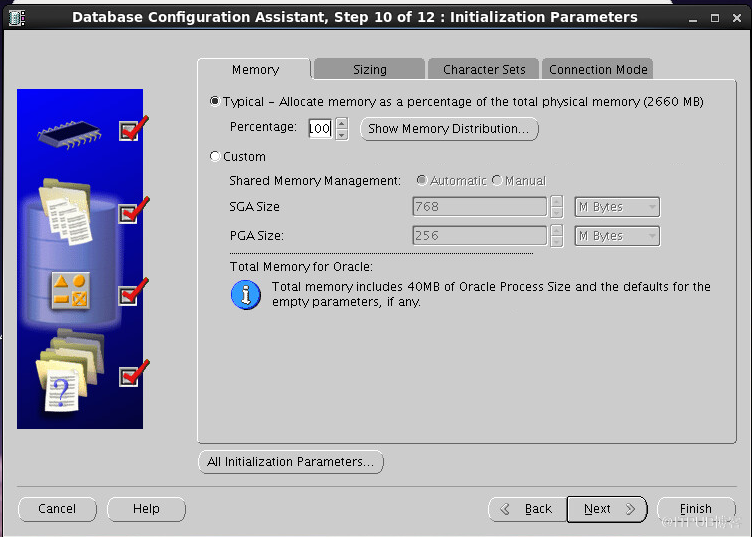

以上是“Redhat6.4如何安装Oracle10.2.0.5 64位数据库”这篇文章的所有内容,感谢各位的阅读!希望分享的内容对大家有帮助,更多相关知识,欢迎关注亿速云行业资讯频道!
免责声明:本站发布的内容(图片、视频和文字)以原创、转载和分享为主,文章观点不代表本网站立场,如果涉及侵权请联系站长邮箱:is@yisu.com进行举报,并提供相关证据,一经查实,将立刻删除涉嫌侵权内容。