您好,登录后才能下订单哦!
密码登录
登录注册
点击 登录注册 即表示同意《亿速云用户服务条款》
本篇文章给大家主要讲的是关于MySQL数据库实现远程同步的工具alibaba otter的内容,感兴趣的话就一起来看看这篇文章吧,相信看完MySQL数据库实现远程同步的工具alibaba otter对大家多少有点参考价值吧。
[root@wallet01 ~]# tar zxvf zookeeper-3.4.14.tar.gz -C /usr/local/
[root@wallet01 ~]# cd /usr/local/zookeeper-3.4.14/conf
[root@wallet01 conf]# mv zoo_sample.cfg zoo.cfg
[root@wallet01 conf]# vi log4j.properties
log4j.rootLogger=INFO,ROLLINGFILE
[root@wallet01 ~]# cd /usr/local/zookeeper-3.4.14/bin
[root@wallet01 bin]# vi zkEnv.sh
if [ "x${ZOO_LOG_DIR}" = "x" ]
then
ZOO_LOG_DIR="/usr/local/zookeeper-3.4.14/logs"
fi
if [ "x${ZOO_LOG4J_PROP}" = "x" ]
then
ZOO_LOG4J_PROP="INFO,ROLLINGFILE"
fi
[root@wallet01 ~]# mkdir -p /usr/local/zookeeper-3.4.14/logs
[root@wallet01 ~]# vi /etc/profile
PATH=$PATH:/usr/local/zookeeper-3.4.14/bin
[root@wallet01 ~]# zkServer.sh start
ZooKeeper JMX enabled by default
Using config: /usr/local/zookeeper-3.4.14/bin/../conf/zoo.cfg
Starting zookeeper ... STARTED
[root@wallet01 ~]# zkServer.sh status
ZooKeeper JMX enabled by default
Using config: /usr/local/zookeeper-3.4.14/bin/../conf/zoo.cfg
Mode: standalone
[root@wallet01 ~]# yum install -y nc
[root@wallet01 ~]# wget https://raw.github.com/alibaba/otter/master/manager/deployer/src/main/resources/sql/otter-manager-schema.sql --no-check-certificate
[root@wallet01 ~]# mysql -uroot -pabcd.1234
mysql> source otter-manager-schema.sql
mysql> create user otter@'%' identified by "otter";
Query OK, 0 rows affected (0.08 sec)
mysql> grant all on otter.* to otter@'%'
Query OK, 0 rows affected (0.00 sec)
[root@wallet01 ~]# mkdir -p /usr/local/manager
[root@wallet01 ~]# tar zxvf manager.deployer-4.2.17.tar.gz -C /usr/local/manager
[root@wallet01 ~]# cd /usr/local/manager/conf/
[root@wallet01 conf]# vi otter.properties
## otter manager domain name
otter.domainName = 192.168.40.34
## otter manager http port
otter.port = 8080
## otter manager database config
otter.database.driver.class.name = com.mysql.jdbc.Driver
otter.database.driver.url = jdbc:mysql://127.0.0.1:3306/otter
otter.database.driver.username = otter
otter.database.driver.password = otter
## otter communication port
otter.communication.manager.port = 1099
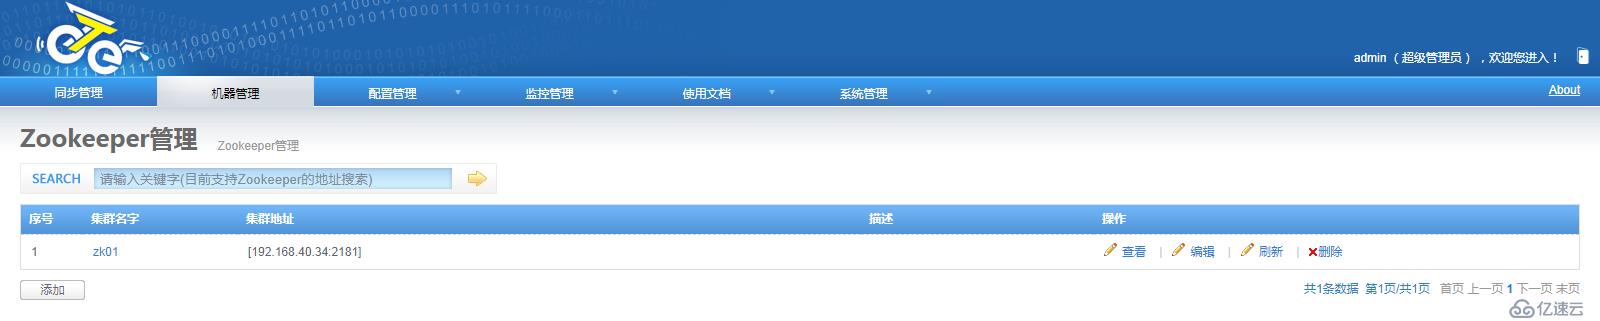
## default zookeeper address
otter.zookeeper.cluster.default = 192.168.40.34:2181
## default zookeeper sesstion timeout = 60s
otter.zookeeper.sessionTimeout = 60000
[root@wallet01 ~]# cd /usr/local/manager/bin
[root@wallet01 bin]# ./startup.sh
[root@wallet01 ~]# cd /usr/local/manager/logs
[root@wallet01 logs]# cat manager.log
2018-11-19 10:29:26.146 [] INFO com.alibaba.otter.manager.deployer.OtterManagerLauncher - ## start the manager server.
2018-11-19 10:29:49.427 [] INFO com.alibaba.otter.manager.deployer.JettyEmbedServer - ##Jetty Embed Server is startup!
2018-11-19 10:29:49.427 [] INFO com.alibaba.otter.manager.deployer.OtterManagerLauncher - ## the manager server is running now ......
[root@wallet02 ~]# mkdir -p /usr/local/node
[root@wallet02 ~]# tar zxvf node.deployer-4.2.17.tar.gz -C /usr/local/node
[root@wallet02 ~]# cd /usr/local/node/conf/
[root@wallet02 conf]# echo 1 > nid
[root@wallet02 conf]# vi otter.properties
## otter arbitrate & node connect manager config
otter.manager.address = 192.168.40.34:1099
[root@wallet02 ~]# cd /usr/local/node/bin
[root@wallet02 bin]# ./startup.sh
[root@wallet02 ~]# cd /usr/local/node/logs/node
[root@wallet02 node]# cat node.log
2018-11-19 10:58:09.830 [main] INFO com.alibaba.otter.node.deployer.OtterLauncher - INFO ## the otter server is running now ......
[root@wallet02 ~]# mysql -uroot -pabcd.1234
mysql> create user otter@'%' identified by "otter";
Query OK, 0 rows affected (0.08 sec)
mysql> grant replication slave,replication client on *.* to otter@'%';
Query OK, 0 rows affected (0.02 sec)
mysql> grant all on tpcc.* to otter@'%';
Query OK, 0 rows affected (0.03 sec)
[root@wallet03 ~]# mkdir -p /usr/local/node
[root@wallet03 ~]# tar zxvf node.deployer-4.2.17.tar.gz -C /usr/local/node
[root@wallet03 ~]# cd /usr/local/node/conf
[root@wallet03 conf]# echo 2 > nid
[root@wallet03 conf]# vi otter.properties
## otter arbitrate & node connect manager config
otter.manager.address = 192.168.40.34:1099
[root@wallet03 ~]# cd /usr/local/node/bin
[root@wallet03 bin]# ./startup.sh
[root@wallet03 ~]# cd /usr/local/node/logs/node
[root@wallet03 node]# cat node.log
2018-11-19 10:58:09.830 [main] INFO com.alibaba.otter.node.deployer.OtterLauncher - INFO ## the otter server is running now ......
[root@wallet03 ~]# mysql -uroot -pabcd.1234
mysql> create user otter@'%' identified by "otter";
Query OK, 0 rows affected (0.08 sec)
mysql> grant replication slave,replication client on *.* to otter@'%';
Query OK, 0 rows affected (0.02 sec)
mysql> grant all on tpcc.* to otter@'%';
Query OK, 0 rows affected (0.03 sec)默认用户名:admin 默认密码:admin


[root@wallet02 ~]# mysql -uroot -pabcd.1234
mysql> show master status;
+------------------+-----------+--------------+------------------+-------------------+
| File             | Position  | Binlog_Do_DB | Binlog_Ignore_DB | Executed_Gtid_Set |
+------------------+-----------+--------------+------------------+-------------------+
| mysql-bin.000005 | 100046965 |              |                  |                   |
+------------------+-----------+--------------+------------------+-------------------+
1 row in set (0.00 sec)

mysql> select unix_timestamp(now());
+-----------------------+
| unix_timestamp(now()) |
+-----------------------+
|            1556009946 |
+-----------------------+
1 row in set (0.00 sec)

{"journalName":"mysql-bin.000005","position":100046965,"timestamp":1556009946};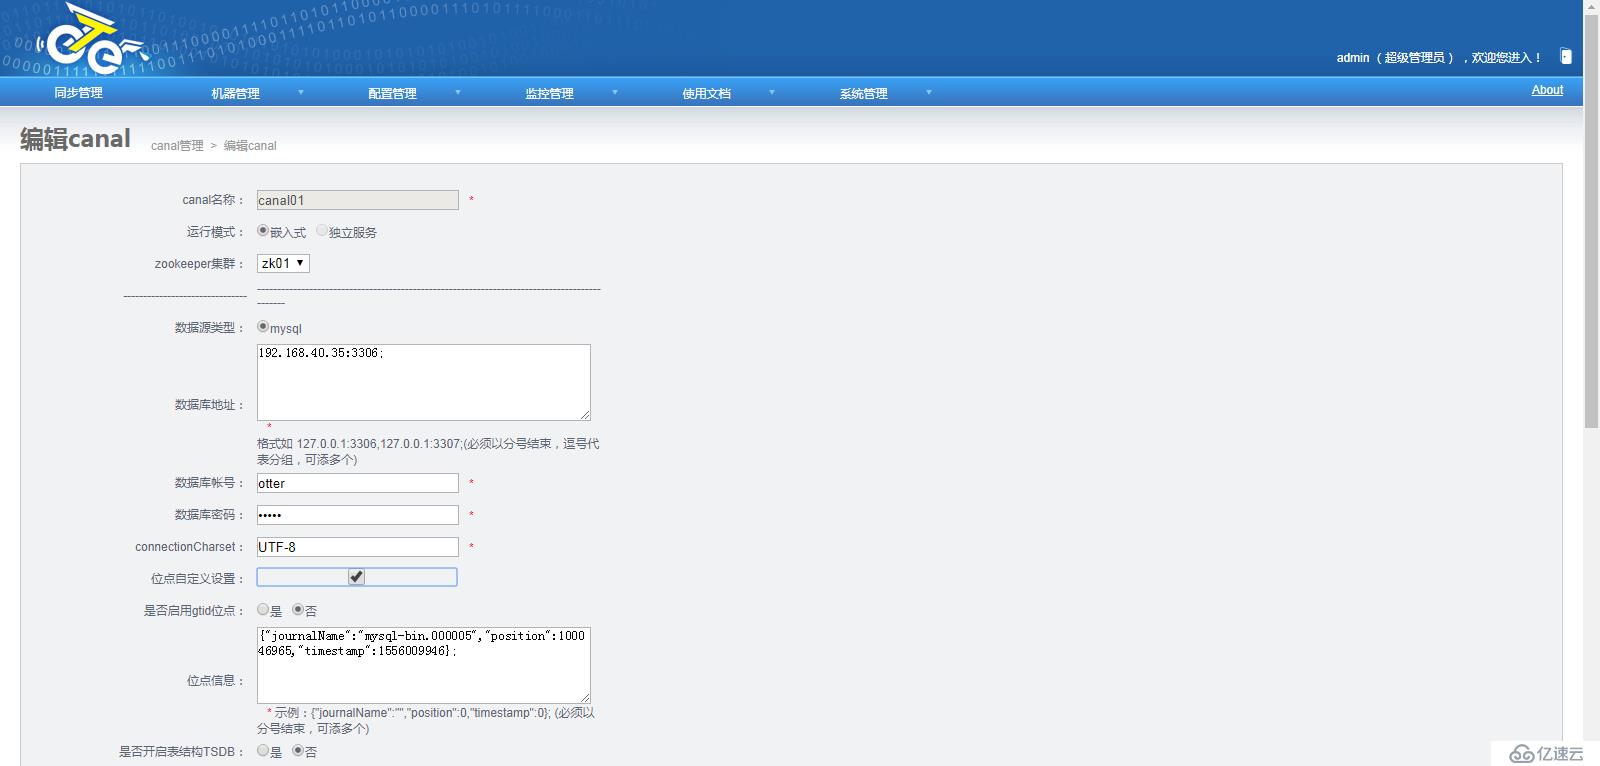


以上关于MySQL数据库实现远程同步的工具alibaba otter详细内容,对大家有帮助吗?如果想要了解更多相关,可以继续关注我们的行业资讯板块。
免责声明:本站发布的内容(图片、视频和文字)以原创、转载和分享为主,文章观点不代表本网站立场,如果涉及侵权请联系站长邮箱:is@yisu.com进行举报,并提供相关证据,一经查实,将立刻删除涉嫌侵权内容。