您好,登录后才能下订单哦!
这篇文章主要为大家展示了“docker中如何实现容器虚拟化网络”,内容简而易懂,条理清晰,希望能够帮助大家解决疑惑,下面让小编带领大家一起研究并学习一下“docker中如何实现容器虚拟化网络”这篇文章吧。

docker安装后,自动会有
[root@master chenzx]# docker network ls
NETWORK ID          NAME                DRIVER              SCOPE
74997b46b6c7        bridge              bridge              local
ae048711b7aa        host                host                local
77190e2a8be4        none                null                local
说明:
bridge:表示桥接网络,但并非物理桥,它会在宿主机上创建一个纯粹的docker0软交换机(ifconfig可以看到),这个docker0也可以当网卡使用。也就是说这个docker0 同时扮演二层的交换机设备,同时也扮演二层的网卡设备。如果你不给docker0地址,那么docker0就只是交换机;如果你给docker0个ip地址,那么这个docker0既能当交换机、又能当网卡。之后我们在这个宿主机上创建的容器,会自动创建一对网卡,一个放在容器上,一个放在docker0桥这个虚拟交换机上。另外通过ifconfig命令还能看到vetha1a84f这样的网卡,这就是每个启动起来的容器(docker ps看)对应的一对网卡,一半在容器里面,另一半就在宿主机上,并插在docker0桥上。需要通过brctl命令来看。
 [root@master chenzx]#yum -y install bridge-utils

 [root@master chenzx]# brctl show
bridge name	bridge id		STP enabled	interfaces
docker0		8000.024221ea33da	no		vetha1a84fa
[root@master chenzx]# ip link show
1: lo: <LOOPBACK,UP,LOWER_UP> mtu 65536 qdisc noqueue state UNKNOWN mode DEFAULT qlen 1
    link/loopback 00:00:00:00:00:00 brd 00:00:00:00:00:00
2: ens192: <BROADCAST,MULTICAST,UP,LOWER_UP> mtu 1500 qdisc pfifo_fast state UP mode DEFAULT qlen 1000
    link/ether 00:50:56:a2:56:4a brd ff:ff:ff:ff:ff:ff
3: docker0: <BROADCAST,MULTICAST,UP,LOWER_UP> mtu 1500 qdisc noqueue state UP mode DEFAULT
    link/ether 02:42:21:ea:33:da brd ff:ff:ff:ff:ff:ff
5: vetha1a84fa@if4: <BROADCAST,MULTICAST,UP,LOWER_UP> mtu 1500 qdisc noqueue master docker0 state UP mode DEFAULT
    link/ether 2a:cc:7c:a9:75:3e brd ff:ff:ff:ff:ff:ff link-netnsid 0
docker0桥默认是nat桥,每生成一个容器,会自动产生一条iptables规则:
[root@master chenzx]# iptables -t nat  -vnL
Chain PREROUTING (policy ACCEPT 32550 packets, 2318K bytes)
 pkts bytes target     prot opt in     out     source               destination
    5   324 DOCKER     all  --  *      *       0.0.0.0/0            0.0.0.0/0            ADDRTYPE match dst-type LOCAL
Chain INPUT (policy ACCEPT 2486 packets, 502K bytes)
 pkts bytes target     prot opt in     out     source               destination
Chain OUTPUT (policy ACCEPT 44775 packets, 2700K bytes)
 pkts bytes target     prot opt in     out     source               destination
    0     0 DOCKER     all  --  *      *       0.0.0.0/0           !127.0.0.0/8          ADDRTYPE match dst-type LOCAL
Chain POSTROUTING (policy ACCEPT 44775 packets, 2700K bytes)
 pkts bytes target     prot opt in     out     source               destination
    0     0 MASQUERADE  all  --  *      !docker0  172.17.0.0/16        0.0.0.0/0
    0     0 MASQUERADE  tcp  --  *      *       172.17.0.2           172.17.0.2           tcp dpt:443
    0     0 MASQUERADE  tcp  --  *      *       172.17.0.2           172.17.0.2           tcp dpt:80
Chain DOCKER (2 references)
 pkts bytes target     prot opt in     out     source               destination
    0     0 RETURN     all  --  docker0 *       0.0.0.0/0            0.0.0.0/0
    0     0 DNAT       tcp  --  !docker0 *       0.0.0.0/0            0.0.0.0/0            tcp dpt:443 to:172.17.0.2:443
    0     0 DNAT       tcp  --  !docker0 *       0.0.0.0/0            0.0.0.0/0            tcp dpt:80 to:172.17.0.2:80
看POSTROUTING链,从任何地址进来(in * ),只要不是从docker0出去(!docker0),源地址来自172.17.0.0/16,无论到达任何主机(0.0.0.0),我们都要做地址伪装(MASQUERADE),即自动snat。其意思就是自动在物理机上选择一个地址当做源地址。所以docker0桥默认就是nat桥。
[root@master chenzx]# docker inspect 容器名字 //可以看容器详细信息
bridge的缺点:
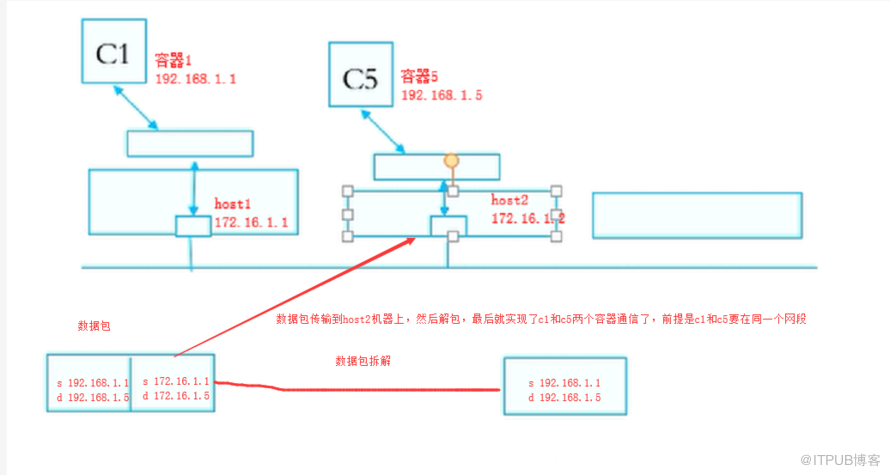
一个物理机1上的容器,想要被另外一个物理机2访问,只能访问1号物理机上的宿主机ip+容器映射出来的端口。一个物理机只能有一个80端口,所以有多个容器都有80端口时,就不好办了。这时用overlay networkd来解决。
[root@master chenzx]# docker network inspect bridge
[
    {
        "Name": "bridge",
        "Id": "74997b46b6c7f3a130942bce4e26a9f1b691eb96b497aa7b5bec3d68405eeb70",
        "Created": "2019-06-25T05:32:31.482091683-04:00",
        "Scope": "local",
        "Driver": "bridge",
        "EnableIPv6": false,
        "IPAM": {
            "Driver": "default",
            "Options": null,
            "Config": [
                {
                    "Subnet": "172.17.0.0/16",
                    "Gateway": "172.17.0.1"
                }
            ]
        },
        "Internal": false,
        "Attachable": false,
        "Ingress": false,
        "ConfigFrom": {
            "Network": ""
        },
        "ConfigOnly": false,
        "Containers": {
            "1877cad503409040e026e1e7194751f0f23a627d9aa572aebfdc54ab679ec102": {
                "Name": "xenodochial_galois",
                "EndpointID": "4336bb5aef3245eab6d79a5f67d51c8bd684b6e03ec34a60445cd5ab0ed65b4a",
                "MacAddress": "02:42:ac:11:00:02",
                "IPv4Address": "172.17.0.2/16",
                "IPv6Address": ""
            }
        },
        "Options": {
            "com.docker.network.bridge.default_bridge": "true",
            "com.docker.network.bridge.enable_icc": "true",
            "com.docker.network.bridge.enable_ip_masquerade": "true",
            "com.docker.network.bridge.host_binding_ipv4": "0.0.0.0",
            "com.docker.network.bridge.name": "docker0",
            "com.docker.network.driver.mtu": "1500"
        },
        "Labels": {}
    }
][root@master chenzx]# docker network ls NETWORK ID NAME DRIVER SCOPE 74997b46b6c7 bridge bridge local ae048711b7aa host host local 77190e2a8be4 none null local
host表示让容器使用宿主机的网络名称空间。
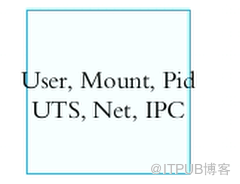
一个容器(包含一个虚拟机、一个实体机)有如下六大名称空间:

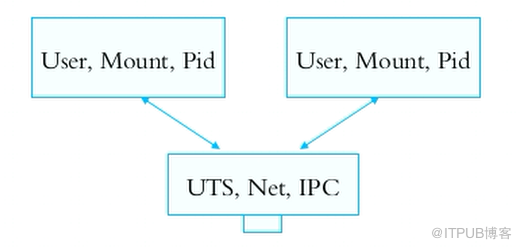
但是我们可以让每个容器共用一个宿主机的网络空间,这就是host:

用ip netns(network name space)管理网络名称空间时,只有网络名称空间是隔离的,其他名称空间(USER用户、IPC、Mount问阿金系统、UTS主机等)都是共享的
[root@master chenzx]# ip netns add r1
[root@master chenzx]# ip netns add r2
[root@master chenzx]# ip netns list
r2
r1
[root@master chenzx]# ip netns exec  r1 ifconfig -a
lo: flags=8<LOOPBACK>  mtu 65536
        loop  txqueuelen 1  (Local Loopback)
        RX packets 0  bytes 0 (0.0 B)
        RX errors 0  dropped 0  overruns 0  frame 0
        TX packets 0  bytes 0 (0.0 B)
        TX errors 0  dropped 0 overruns 0  carrier 0  collisions 0
看到网络名称空间中只有一个网卡设备叫lo。
我们也可以用ip link创建一对网卡:
[root@master chenzx]# ip link add name veth2.1 type veth peer name veth2.2
[root@master chenzx]# ip link show
1: lo: <LOOPBACK,UP,LOWER_UP> mtu 65536 qdisc noqueue state UNKNOWN mode DEFAULT qlen 1
    link/loopback 00:00:00:00:00:00 brd 00:00:00:00:00:00
2: ens192: <BROADCAST,MULTICAST,UP,LOWER_UP> mtu 1500 qdisc pfifo_fast state UP mode DEFAULT qlen 1000
    link/ether 00:50:56:a2:56:4a brd ff:ff:ff:ff:ff:ff
3: docker0: <BROADCAST,MULTICAST,UP,LOWER_UP> mtu 1500 qdisc noqueue state UP mode DEFAULT
    link/ether 02:42:21:ea:33:da brd ff:ff:ff:ff:ff:ff
5: vetha1a84fa@if4: <BROADCAST,MULTICAST,UP,LOWER_UP> mtu 1500 qdisc noqueue master docker0 state UP mode DEFAULT
    link/ether 2a:cc:7c:a9:75:3e brd ff:ff:ff:ff:ff:ff link-netnsid 0
6: veth2.2@veth2.1: <BROADCAST,MULTICAST,M-DOWN> mtu 1500 qdisc noop state DOWN mode DEFAULT qlen 1000
    link/ether 36:a6:f8:b4:d0:c6 brd ff:ff:ff:ff:ff:ff
7: veth2.1@veth2.2: <BROADCAST,MULTICAST,M-DOWN> mtu 1500 qdisc noop state DOWN mode DEFAULT qlen 1000
    link/ether de:b7:a4:16:2b:c1 brd ff:ff:ff:ff:ff:ff
veth2.1@veth2.2 表示veth2.1的另一半是veth2.2,这两头都在我们的宿主机上。
下面我们把网络设备移动到另外一个名称空间中。
[root@master chenzx]# ip link set dev veth2.2 netns r1
上面表示把网络设备veth2.2移动到r1网络名称空间中。注意,一个设备只能属于一个名称空间。
[root@master chenzx]# ip link show
1: lo: <LOOPBACK,UP,LOWER_UP> mtu 65536 qdisc noqueue state UNKNOWN mode DEFAULT qlen 1
    link/loopback 00:00:00:00:00:00 brd 00:00:00:00:00:00
2: ens192: <BROADCAST,MULTICAST,UP,LOWER_UP> mtu 1500 qdisc pfifo_fast state UP mode DEFAULT qlen 1000
    link/ether 00:50:56:a2:56:4a brd ff:ff:ff:ff:ff:ff
3: docker0: <BROADCAST,MULTICAST,UP,LOWER_UP> mtu 1500 qdisc noqueue state UP mode DEFAULT
    link/ether 02:42:21:ea:33:da brd ff:ff:ff:ff:ff:ff
5: vetha1a84fa@if4: <BROADCAST,MULTICAST,UP,LOWER_UP> mtu 1500 qdisc noqueue master docker0 state UP mode DEFAULT
    link/ether 2a:cc:7c:a9:75:3e brd ff:ff:ff:ff:ff:ff link-netnsid 0
7: veth2.1@if6: <BROADCAST,MULTICAST> mtu 1500 qdisc noop state DOWN mode DEFAULT qlen 1000
    link/ether de:b7:a4:16:2b:c1 brd ff:ff:ff:ff:ff:ff link-netnsid 1
上面看到宿主机上网卡设备veth2.2已经没有了。
[root@master chenzx]# ip netns exec r1 ifconfig -a
lo: flags=8<LOOPBACK>  mtu 65536
        loop  txqueuelen 1  (Local Loopback)
        RX packets 0  bytes 0 (0.0 B)
        RX errors 0  dropped 0  overruns 0  frame 0
        TX packets 0  bytes 0 (0.0 B)
        TX errors 0  dropped 0 overruns 0  carrier 0  collisions 0
veth2.2: flags=4098<BROADCAST,MULTICAST>  mtu 1500
        ether 36:a6:f8:b4:d0:c6  txqueuelen 1000  (Ethernet)
        RX packets 0  bytes 0 (0.0 B)
        RX errors 0  dropped 0  overruns 0  frame 0
        TX packets 0  bytes 0 (0.0 B)
        TX errors 0  dropped 0 overruns 0  carrier 0  collisions 0
上面看到r1名称空间中有veth2.2这个网卡设备了。
下面我们把r1名称空间中的veth2.2改名为eth0:
[root@master chenzx]# ip netns exec r1 ip link set dev veth2.2 name eth0
[root@master chenzx]# ip netns exec r1 ifconfig -a
eth0: flags=4098<BROADCAST,MULTICAST>  mtu 1500
        ether 36:a6:f8:b4:d0:c6  txqueuelen 1000  (Ethernet)
        RX packets 0  bytes 0 (0.0 B)
        RX errors 0  dropped 0  overruns 0  frame 0
        TX packets 0  bytes 0 (0.0 B)
        TX errors 0  dropped 0 overruns 0  carrier 0  collisions 0
lo: flags=8<LOOPBACK>  mtu 65536
        loop  txqueuelen 1  (Local Loopback)
        RX packets 0  bytes 0 (0.0 B)
        RX errors 0  dropped 0  overruns 0  frame 0
        TX packets 0  bytes 0 (0.0 B)
        TX errors 0  dropped 0 overruns 0  carrier 0  collisions 0
下面我们把宿主机上的veth2.1网卡激活:
[root@master chenzx]# ifconfig veth2.1 10.1.0.1/24 up
[root@master chenzx]# ifconfig veth2.1
veth2.1: flags=4099<UP,BROADCAST,MULTICAST>  mtu 1500
        inet 10.1.0.1  netmask 255.255.255.0  broadcast 10.1.0.255
        ether de:b7:a4:16:2b:c1  txqueuelen 1000  (Ethernet)
        RX packets 0  bytes 0 (0.0 B)
        RX errors 0  dropped 0  overruns 0  frame 0
        TX packets 0  bytes 0 (0.0 B)
        TX errors 0  dropped 0 overruns 0  carrier 0  collisions 0
下面我们把宿主机上网卡veth2.1的另一半网卡veth2.2(目前该名为eth0,并在r1网络名称空间中)也给激活:
[root@master chenzx]#  ip netns exec r1 ifconfig eth0 10.1.0.2/24 up
[root@master chenzx]#  ip netns exec r1 ifconfig
eth0: flags=4163<UP,BROADCAST,RUNNING,MULTICAST>  mtu 1500
        inet 10.1.0.2  netmask 255.255.255.0  broadcast 10.1.0.255
        inet6 fe80::34a6:f8ff:feb4:d0c6  prefixlen 64  scopeid 0x20<link>
        ether 36:a6:f8:b4:d0:c6  txqueuelen 1000  (Ethernet)
        RX packets 17  bytes 1026 (1.0 KiB)
        RX errors 0  dropped 0  overruns 0  frame 0
        TX packets 8  bytes 648 (648.0 B)
        TX errors 0  dropped 0 overruns 0  carrier 0  collisions 0
在宿主机上ping r1网络名称空间中的eth0设备,是可以通信了:
[root@master chenzx]# ping 10.1.0.2
PING 10.1.0.2 (10.1.0.2) 56(84) bytes of data.
64 bytes from 10.1.0.2: icmp_seq=1 ttl=64 time=0.071 ms
64 bytes from 10.1.0.2: icmp_seq=2 ttl=64 time=0.032 ms
64 bytes from 10.1.0.2: icmp_seq=3 ttl=64 time=0.056 ms
下面我们把宿主机上的veth2.1这块网卡移动到r2网络名称空间中
[root@master chenzx]# ip link set dev veth2.1 netns r2
[root@master chenzx]# ifconfig //发现宿主机上已经没有veth2.1这块网卡了
[root@master chenzx]# ip netns exec r2 ifconfig veth2.1 10.1.0.3/24 up
[root@master chenzx]# ip netns exec r2 ifconfig
veth2.1: flags=4163<UP,BROADCAST,RUNNING,MULTICAST>  mtu 1500
        inet 10.1.0.3  netmask 255.255.255.0  broadcast 10.1.0.255
        inet6 fe80::dcb7:a4ff:fe16:2bc1  prefixlen 64  scopeid 0x20<link>
        ether de:b7:a4:16:2b:c1  txqueuelen 1000  (Ethernet)
        RX packets 13  bytes 1026 (1.0 KiB)
        RX errors 0  dropped 0  overruns 0  frame 0
        TX packets 29  bytes 1982 (1.9 KiB)
        TX errors 0  dropped 0 overruns 0  carrier 0  collisions 0
下面我们去r2网络名称空间中,去ping r1中的网卡地址,发现是通的:
[root@master chenzx]# ip netns exec r2 ping 10.1.0.2
PING 10.1.0.2 (10.1.0.2) 56(84) bytes of data.
64 bytes from 10.1.0.2: icmp_seq=1 ttl=64 time=0.066 ms
64 bytes from 10.1.0.2: icmp_seq=2 ttl=64 time=0.036 ms
64 bytes from 10.1.0.2: icmp_seq=3 ttl=64 time=0.028 ms

[root@master chenzx]# docker run --name t1 -it --network none --rm busybox:latest
/ # ifconfig -a
lo        Link encap:Local Loopback
          inet addr:127.0.0.1  Mask:255.0.0.0
          UP LOOPBACK RUNNING  MTU:65536  Metric:1
          RX packets:0 errors:0 dropped:0 overruns:0 frame:0
          TX packets:0 errors:0 dropped:0 overruns:0 carrier:0
          collisions:0 txqueuelen:1
          RX bytes:0 (0.0 B)  TX bytes:0 (0.0 B)
/ # exit
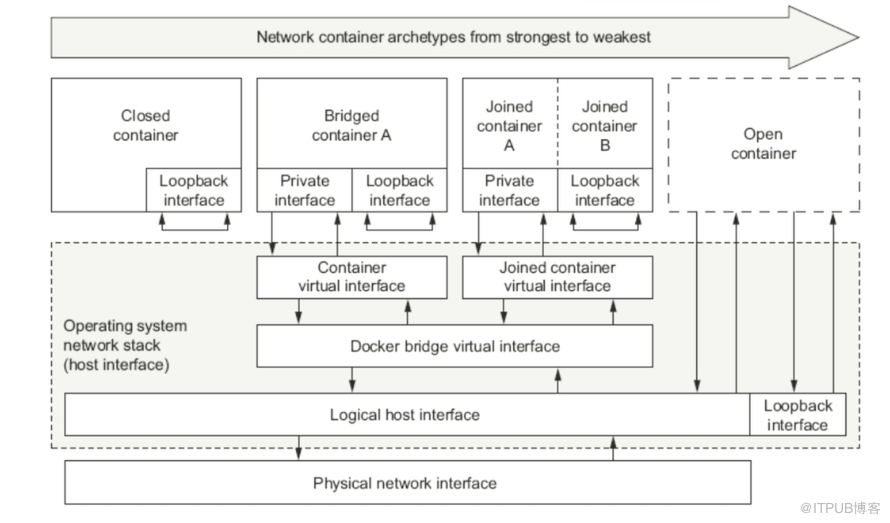
看到,上面我们创建的容器只有lo,没有任何网卡,这就是封闭式网络模型
[root@master chenzx]# docker run --name t1 -it --rm busybox:latest
Unable to find image 'busybox:latest' locally
latest: Pulling from library/busybox
8e674ad76dce: Pull complete
Digest: sha256:c94cf1b87ccb80f2e6414ef913c748b105060debda482058d2b8d0fce39f11b9
Status: Downloaded newer image for busybox:latest
WARNING: IPv4 forwarding is disabled. Networking will not work.
/ #
/ # ifconfig
eth0      Link encap:Ethernet  HWaddr 02:42:AC:11:00:03
          inet addr:172.17.0.3  Bcast:172.17.255.255  Mask:255.255.0.0
          UP BROADCAST RUNNING MULTICAST  MTU:1500  Metric:1
          RX packets:8 errors:0 dropped:0 overruns:0 frame:0
          TX packets:0 errors:0 dropped:0 overruns:0 carrier:0
          collisions:0 txqueuelen:0
          RX bytes:648 (648.0 B)  TX bytes:0 (0.0 B)
lo        Link encap:Local Loopback
          inet addr:127.0.0.1  Mask:255.0.0.0
          UP LOOPBACK RUNNING  MTU:65536  Metric:1
          RX packets:0 errors:0 dropped:0 overruns:0 frame:0
          TX packets:0 errors:0 dropped:0 overruns:0 carrier:0
          collisions:0 txqueuelen:1
          RX bytes:0 (0.0 B)  TX bytes:0 (0.0 B)
说明: --rm表示容器关闭就自动删除了。
看到,默认创建的容器有ip 172.17.0.3,说明是bridge模型,和宿主机上的docker0交换机一个网段。
创建容器时,直接指定主机名:
[root@master chenzx]# docker run --name t1 -it --network bridge -h t1  --rm busybox:latest
WARNING: IPv4 forwarding is disabled. Networking will not work.
/ # hostname
t1
/ # cat /etc/resolv.conf  //看到用的是宿主机的DNS
nameserver 172.16.1.20
说明:-h就是指定主机名。
下面我们在创建容器时就指定DNS:
[root@master chenzx]# docker run --name t1 -it --network bridge -h t1 --dns 114.114.114.114  --rm busybox:latest
WARNING: IPv4 forwarding is disabled. Networking will not work.
/ # cat /etc/resolv.conf
nameserver 114.114.114.114
下面我们在创建容器时指定域名和ip:
[root@master chenzx]# docker run --name t1 -it --network bridge -h t1 --dns 114.114.114.114  --dns-search czxin.com --add-host www.baidu,com:1.1.1.1 --rm busybox:latest
WARNING: IPv4 forwarding is disabled. Networking will not work.
/ # cat /etc/hosts
127.0.0.1	localhost
::1	localhost ip6-localhost ip6-loopback
fe00::0	ip6-localnet
ff00::0	ip6-mcastprefix
ff02::1	ip6-allnodes
ff02::2	ip6-allrouters
1.1.1.1	www.baidu,com
172.17.0.3	t1
使用-p端口把容器里面的端口和宿主机里面的端口,进行映射。
[root@master chenzx]# docker run --name myweb --rm -p 0.0.0.0:8080:80 nginx
说明:0.0.0.0代表宿主机上的所有地址,不写就默认是0.0.0.0,宿主机上的8080端口对应容器里面的80端口
[root@master chenzx]# docker port myweb
80/tcp -> 0.0.0.0:8080
[root@master chenzx]# docker kill myweb
myweb
让两个容器共享同一个网络名称空间,这叫联盟式容器。
[root@master chenzx]# docker run -name b1 -it --rm busybox
/ # ifconfig
eth0      Link encap:Ethernet  HWaddr 02:42:AC:11:00:03
          inet addr:172.17.0.3  Bcast:172.17.255.255  Mask:255.255.0.0
          UP BROADCAST RUNNING MULTICAST  MTU:1500  Metric:1
          RX packets:8 errors:0 dropped:0 overruns:0 frame:0
          TX packets:0 errors:0 dropped:0 overruns:0 carrier:0
          collisions:0 txqueuelen:0
          RX bytes:648 (648.0 B)  TX bytes:0 (0.0 B)
lo        Link encap:Local Loopback
          inet addr:127.0.0.1  Mask:255.0.0.0
          UP LOOPBACK RUNNING  MTU:65536  Metric:1
          RX packets:0 errors:0 dropped:0 overruns:0 frame:0
          TX packets:0 errors:0 dropped:0 overruns:0 carrier:0
          collisions:0 txqueuelen:1
          RX bytes:0 (0.0 B)  TX bytes:0 (0.0 B)
再开一个窗口:
[root@master chenzx]#  docker run --name b2 --network container:b1  -it --rm busybox
/ # ifconfig
eth0      Link encap:Ethernet  HWaddr 02:42:AC:11:00:03
          inet addr:172.17.0.3  Bcast:172.17.255.255  Mask:255.255.0.0
          UP BROADCAST RUNNING MULTICAST  MTU:1500  Metric:1
          RX packets:8 errors:0 dropped:0 overruns:0 frame:0
          TX packets:0 errors:0 dropped:0 overruns:0 carrier:0
          collisions:0 txqueuelen:0
          RX bytes:648 (648.0 B)  TX bytes:0 (0.0 B)
lo        Link encap:Local Loopback
          inet addr:127.0.0.1  Mask:255.0.0.0
          UP LOOPBACK RUNNING  MTU:65536  Metric:1
          RX packets:0 errors:0 dropped:0 overruns:0 frame:0
          TX packets:0 errors:0 dropped:0 overruns:0 carrier:0
          collisions:0 txqueuelen:1
          RX bytes:0 (0.0 B)  TX bytes:0 (0.0 B)


 说明:--network container:b1表示b2容器共享b1的网络名称空间。
这样,在b2中创建一个web服务,在b1中可以用 http://127.0.0.1 访问到页面。
[root@master chenzx]#  docker run --name b2 --network host  -it --rm busybox
/ # ifconfig
docker0   Link encap:Ethernet  HWaddr 02:42:43:84:8F:9A
          inet addr:172.17.0.1  Bcast:172.17.255.255  Mask:255.255.0.0
          inet6 addr: fe80::42:43ff:fe84:8f9a/64 Scope:Link
          UP BROADCAST RUNNING PROMISC MULTICAST  MTU:1500  Metric:1
          RX packets:10703077 errors:0 dropped:0 overruns:0 frame:0
          TX packets:8005286 errors:0 dropped:0 overruns:0 carrier:0
          collisions:0 txqueuelen:0
          RX bytes:2802551116 (2.6 GiB)  TX bytes:2896826107 (2.6 GiB)
ens192    Link encap:Ethernet  HWaddr 00:50:56:A2:58:7C
          inet addr:172.16.22.100  Bcast:172.16.22.255  Mask:255.255.255.0
          inet6 addr: fe80::9cf3:d9de:59f:c320/64 Scope:Link
          inet6 addr: fe80::e34:f952:2859:4c69/64 Scope:Link
          UP BROADCAST RUNNING MULTICAST  MTU:1500  Metric:1
          RX packets:4846834 errors:0 dropped:17 overruns:0 frame:0
          TX packets:1920701 errors:0 dropped:0 overruns:0 carrier:0
          collisions:0 txqueuelen:1000
          RX bytes:1970381702 (1.8 GiB)  TX bytes:199949362 (190.6 MiB)
lo        Link encap:Local Loopback
          inet addr:127.0.0.1  Mask:255.0.0.0
          inet6 addr: ::1/128 Scope:Host
          UP LOOPBACK RUNNING  MTU:65536  Metric:1
          RX packets:316 errors:0 dropped:0 overruns:0 frame:0
          TX packets:316 errors:0 dropped:0 overruns:0 carrier:0
          collisions:0 txqueuelen:1
          RX bytes:35923 (35.0 KiB)  TX bytes:35923 (35.0 KiB)
veth444969e Link encap:Ethernet  HWaddr 7E:3C:4A:6A:52:65
          inet6 addr: fe80::7c3c:4aff:fe6a:5265/64 Scope:Link
          UP BROADCAST RUNNING MULTICAST  MTU:1500  Metric:1
          RX packets:41635 errors:0 dropped:0 overruns:0 frame:0
          TX packets:34905 errors:0 dropped:0 overruns:0 carrier:0
          collisions:0 txqueuelen:0
          RX bytes:21175416 (20.1 MiB)  TX bytes:7734711 (7.3 MiB)
veth49b8902 Link encap:Ethernet  HWaddr 36:68:B9:A7:04:56
          inet6 addr: fe80::3468:b9ff:fea7:456/64 Scope:Link
          UP BROADCAST RUNNING MULTICAST  MTU:1500  Metric:1
          RX packets:5 errors:0 dropped:0 overruns:0 frame:0
          TX packets:13 errors:0 dropped:0 overruns:0 carrier:0
          collisions:0 txqueuelen:0
          RX bytes:378 (378.0 B)  TX bytes:1026 (1.0 KiB)
可见,host网络模型,容器里面的ip是宿主机的ip。这有什么用呢,这可以充分利用容器的特性,但是又想用宿主机网络的情况。
转载:http://blog.51cto.com/wsxxsl/2060761
第一步 删除原有配置
sudo service docker stopsudo ip link set dev docker0 downsudo brctl delbr docker0sudo iptables -t nat -F POSTROUTING
第二步 创建新的网桥
sudo brctl addbr docker0sudo ip addr add 172.17.0.1/16 dev docker0sudo ip link set dev docker0 up
第三步 配置Docker的文件
注意: 这里是 增加下面的配置
cat /etc/docker/daemon.json ##追加的即可{ "bip": "172.17.0.1/16"}自定义docker0桥的网络属性信息:/etc/docker/daemon.json
{
"registry-mirrors": ["http://hub-mirror.c.163.com"],
"bip": "172.17.0.1/16",
"dns": ["114.114.114.114", "8.8.8.8"]
}
说明:bip就是docker 0的ip地址,以后容器的地址都和docker 0一个网段。
第四步 重启docker
systemctl restart docker 或者 service restart docker
[root@master chenzx]# docker network create -d bridge --subnet "172.26.0.0/16" --gateway "172.26.0.1" mybr0
4e70305bb5c793e457f57486aef0ac9ac0567432a73a1b6884898fc4c9a09d06
[root@master chenzx]#
[root@master chenzx]# docker network ls
NETWORK ID          NAME                DRIVER              SCOPE
863255cf4b6e        bridge              bridge              local
ae048711b7aa        host                host                local
4e70305bb5c7        mybr0               bridge              local
77190e2a8be4        none                null                local
[root@master chenzx]# ifconfig
br-4e70305bb5c7: flags=4099<UP,BROADCAST,MULTICAST>  mtu 1500
        inet 172.26.0.1  netmask 255.255.0.0  broadcast 172.26.255.255
        ether 02:42:01:cb:21:78  txqueuelen 0  (Ethernet)
        RX packets 10703186  bytes 2802559748 (2.6 GiB)
        RX errors 0  dropped 0  overruns 0  frame 0
        TX packets 8005375  bytes 2896856389 (2.6 GiB)
        TX errors 0  dropped 0 overruns 0  carrier 0  collisions 0
docker0: flags=4419<UP,BROADCAST,RUNNING,PROMISC,MULTICAST>  mtu 1500
        inet 10.42.0.1  netmask 255.255.0.0  broadcast 10.42.255.255
        inet6 fe80::42:43ff:fe84:8f9a  prefixlen 64  scopeid 0x20<link>
        ether 02:42:43:84:8f:9a  txqueuelen 0  (Ethernet)
        RX packets 10703186  bytes 2802559748 (2.6 GiB)
        RX errors 0  dropped 0  overruns 0  frame 0
        TX packets 8005375  bytes 2896856389 (2.6 GiB)
        TX errors 0  dropped 0 overruns 0  carrier 0  collisions 0
把br-4e70305bb5c7改名为docker1
[root@master chenzx]# ifconfig br-4e70305bb5c7 down
[root@master chenzx]# ip link set dev br-4e70305bb5c7 name docker1
[root@master chenzx]# ifconfig docker1 up
[root@master chenzx]# ifconfig
docker0: flags=4419<UP,BROADCAST,RUNNING,PROMISC,MULTICAST>  mtu 1500
        inet 10.42.0.1  netmask 255.255.0.0  broadcast 10.42.255.255
        inet6 fe80::42:43ff:fe84:8f9a  prefixlen 64  scopeid 0x20<link>
        ether 02:42:43:84:8f:9a  txqueuelen 0  (Ethernet)
        RX packets 10703186  bytes 2802559748 (2.6 GiB)
        RX errors 0  dropped 0  overruns 0  frame 0
        TX packets 8005375  bytes 2896856389 (2.6 GiB)
        TX errors 0  dropped 0 overruns 0  carrier 0  collisions 0
docker1: flags=4099<UP,BROADCAST,MULTICAST>  mtu 1500
        inet 172.26.0.1  netmask 255.255.0.0  broadcast 172.26.255.255
        ether 02:42:01:cb:21:78  txqueuelen 0  (Ethernet)
        RX packets 0  bytes 0 (0.0 B)
        RX errors 0  dropped 0  overruns 0  frame 0
        TX packets 0  bytes 0 (0.0 B)
        TX errors 0  dropped 0 overruns 0  carrier 0  collisions 0
下面我们创建一个容器,加入mybr0网络
[root@master chenzx]# docker run --name afdfdfda -it --rm --net mybr0 busybox:latest
在容器ifconfig里面后,就能看的创建的容器ip和mybr0一个网段。
以上是“docker中如何实现容器虚拟化网络”这篇文章的所有内容,感谢各位的阅读!相信大家都有了一定的了解,希望分享的内容对大家有所帮助,如果还想学习更多知识,欢迎关注亿速云行业资讯频道!
免责声明:本站发布的内容(图片、视频和文字)以原创、转载和分享为主,文章观点不代表本网站立场,如果涉及侵权请联系站长邮箱:is@yisu.com进行举报,并提供相关证据,一经查实,将立刻删除涉嫌侵权内容。