您好,登录后才能下订单哦!
这篇文章主要介绍“docker怎么部署EFK日志系统”,在日常操作中,相信很多人在docker怎么部署EFK日志系统问题上存在疑惑,小编查阅了各式资料,整理出简单好用的操作方法,希望对大家解答”docker怎么部署EFK日志系统”的疑惑有所帮助!接下来,请跟着小编一起来学习吧!
一个完整的k8s集群,应该包含如下六大部分:kube-dns、ingress-controller、metrics server监控系统、dashboard、存储和EFK日志系统。
我们的日志系统要部署在k8s集群之外,这样即使整个k8s集群宕机了,我们还能从外置的日志系统查看到k8s宕机前的日志。
另外,我们生产部署的日志系统要单独放在一个存储卷上。这里我们为了方便,本次测试关闭了日志系统的存储卷功能。
1、添加incubator源(这个源是开发版的安装包,用起来可能不稳定)
访问https://hub.kubeapps.com/charts
[root@master ~]# helm repo list
NAME  URL
local http://127.0.0.1:8879/charts
stablehttps://kubernetes.oss-cn-hangzhou.aliyuncs.com/charts
[root@master efk]# helm repo add incubator https://kubernetes-charts-incubator.storage.googleapis.com
"incubator" has been added to your repositories
[root@master efk]# helm repo list
NAME     URL
local    http://127.0.0.1:8879/charts
stable   https://kubernetes.oss-cn-hangzhou.aliyuncs.com/charts
incubatorhttps://kubernetes-charts-incubator.storage.googleapis.com
2、下载elasticsearch
[root@master efk]# helm fetch incubator/elasticsearch
[root@master efk]# ls
elasticsearch-1.10.2.tgz
[root@master efk]# tar -xvf elasticsearch-1.10.2.tgz
3、关闭存储卷(生产上不要关,我们这里为了测试方便才关的)
[root@master efk]# vim elasticsearch/values.yaml
把
 persistence:
    enabled: true
改成
 persistence:
    enabled: false
有两处需要改
上面我们关闭了存储卷的功能,而改用本地目录来存储日志。
4、创建单独的名称空间
[root@master efk]# kubectl   create namespace efk
namespace/logs created
[root@master efk]# kubectl get ns
NAME               STATUS    AGE
ekf               Active    13s
5、把elasticsearch安装在efk名称空间中
[root@master efk]# helm install --name els1 --namespace=efk -f elasticsearch/values.yaml incubator/elasticsearch
NAME:   els1
LAST DEPLOYED: Thu Oct 18 01:59:15 2018
NAMESPACE: efk
STATUS: DEPLOYED
RESOURCES:
==> v1/Pod(related)
NAME                                        READY  STATUS   RESTARTS  AGE
els1-elasticsearch-client-58899f6794-gxn7x  0/1    Pending  0         0s
els1-elasticsearch-client-58899f6794-mmqq6  0/1    Pending  0         0s
els1-elasticsearch-data-0                   0/1    Pending  0         0s
els1-elasticsearch-master-0                 0/1    Pending  0         0s
==> v1/ConfigMap
NAME                DATA  AGE
els1-elasticsearch  4     1s
==> v1/Service
NAME                          TYPE       CLUSTER-IP      EXTERNAL-IP  PORT(S)   AGE
els1-elasticsearch-client     ClusterIP  10.103.147.142  <none>       9200/TCP  0s
els1-elasticsearch-discovery  ClusterIP  None            <none>       9300/TCP  0s
==> v1beta1/Deployment
NAME                       DESIRED  CURRENT  UP-TO-DATE  AVAILABLE  AGE
els1-elasticsearch-client  2        0        0           0          0s
==> v1beta1/StatefulSet
NAME                       DESIRED  CURRENT  AGE
els1-elasticsearch-data    2        1        0s
els1-elasticsearch-master  3        1        0s
NOTES:
The elasticsearch cluster has been installed.
***
Please note that this chart has been deprecated and moved to stable.
Going forward please use the stable version of this chart.
***
Elasticsearch can be accessed:
  * Within your cluster, at the following DNS name at port 9200:
    els1-elasticsearch-client.efk.svc
  * From outside the cluster, run these commands in the same shell:
    export POD_NAME=$(kubectl get pods --namespace efk -l "app=elasticsearch,component=client,release=els1" -o jsonpath="{.items[0].metadata.name}")
    echo "Visit http://127.0.0.1:9200 to use Elasticsearch"
    kubectl port-forward --namespace efk $POD_NAME 9200:9200
说明:--name els1是chart部署后的release名字,名字自己随便取就行。
上面我们是通过values.yaml文件在线安装的els。但是我们已经下载els安装包了,也可以通过下载的els包进行离线安装,如下:
[root@master efk]# ls
elasticsearch  elasticsearch-1.10.2.tgz
[root@master efk]# helm install --name els1 --namespace=efk ./elasticsearch
说明:./elasticsearch就是当前els安装包目录的名字。
安装完后,我们就能在efk名称空间中看到相应的pods资源了(我在安装elasticsearch时,当时是安装不上的,因为说是打不开elasticseartch的官网,也就是不能再这个官网下载镜像,后来我就放置了两天没管,再登录上看,发现镜像竟然自己下载好了,真是有意思)
[root@master efk]#  kubectl get pods -n efk -o wide
NAME                                         READY     STATUS    RESTARTS   AGE       IP             NODE
els1-elasticsearch-client-78b54979c5-kzj7z   1/1       Running   2          1h        10.244.2.157   node2
els1-elasticsearch-client-78b54979c5-xn2gb   1/1       Running   1          1h        10.244.2.151   node2
els1-elasticsearch-data-0                    1/1       Running   0          1h        10.244.1.165   node1
els1-elasticsearch-data-1                    1/1       Running   0          1h        10.244.2.169   node2
els1-elasticsearch-master-0                  1/1       Running   0          1h        10.244.1.163   node1
els1-elasticsearch-master-1                  1/1       Running   0          1h        10.244.2.168   node2
els1-elasticsearch-master-2                  1/1       Running   0          57m       10.244.1.170   node1
查看安装好的release:
[root@master efk]# helm list
NAME  REVISIONUPDATED                 STATUS  CHART               NAMESPACE
els1  1       Thu Oct 18 23:11:54 2018DEPLOYEDelasticsearch-1.10.2efk
查看els1的状态:
[root@k8s-master1 ~]# helm status els1
  * Within your cluster, at the following DNS name at port 9200:
    els1-elasticsearch-client.efk.svc  ##这个就是els1 service的主机名
  * From outside the cluster, run these commands in the same shell:
    export POD_NAME=$(kubectl get pods --namespace efk -l "app=elasticsearch,component=client,release=els1" -o jsonpath="{.items[0].metadata.name}")
    echo "Visit http://127.0.0.1:9200 to use Elasticsearch"
    kubectl port-forward --namespace efk $POD_NAME 9200:9200
cirror是专门为测试虚拟环境的客户端,它可以快速创建一个kvm的虚拟机,一共才几兆的大小,而且里面提供的工具还是比较完整的。
下面我们运行cirror:
[root@k8s-master1 ~]# kubectl run cirror-$RANDOM --rm -it --image=cirros -- /bin/sh
kubectl run --generator=deployment/apps.v1beta1 is DEPRECATED and will be removed in a future version. Use kubectl create instead.
If you don't see a command prompt, try pressing enter.
/ #
/ # nslookup els1-elasticsearch-client.efk.svc
Server:    10.96.0.10
Address 1: 10.96.0.10 kube-dns.kube-system.svc.cluster.local
Name:      els1-elasticsearch-client.efk.svc
Address 1: 10.103.105.170 els1-elasticsearch-client.efk.svc.cluster.local
-rm:表示退出我们就直接删除掉
-it:表示交互式登录
上面我们看到els1-elasticsearch-client.efk.svc服务名解析出来的ip地址。
下面我们再访问http:els1-elasticsearch-client.efk.svc:9200 页面:
/ # curl els1-elasticsearch-client.efk.svc:9200
curl: (6) Couldn't resolve host 'els1-elasticsearch-client.efk.svc'
/ #
/ # curl els1-elasticsearch-client.efk.svc.cluster.local:9200
{
  "name" : "els1-elasticsearch-client-b898c9d47-5gwzq",
  "cluster_name" : "elasticsearch",
  "cluster_uuid" : "RFiD2ZGWSAqM2dF6wy24Vw",
  "version" : {
    "number" : "6.4.2",
    "build_flavor" : "oss",
    "build_type" : "tar",
    "build_hash" : "04711c2",
    "build_date" : "2018-09-26T13:34:09.098244Z",
    "build_snapshot" : false,
    "lucene_version" : "7.4.0",
    "minimum_wire_compatibility_version" : "5.6.0",
    "minimum_index_compatibility_version" : "5.0.0"
  },
  "tagline" : "You Know, for Search"
}
看里面的内容:
/ # curl els1-elasticsearch-client.efk.svc.cluster.local:9200/_cat
=^.^=
/_cat/allocation
/_cat/shards
/_cat/shards/{index}
/_cat/master
/_cat/nodes
/_cat/tasks
/_cat/indices
/_cat/indices/{index}
/_cat/segments
/_cat/segments/{index}
/_cat/count
/_cat/count/{index}
/_cat/recovery
/_cat/recovery/{index}
/_cat/health
/_cat/pending_tasks
/_cat/aliases
/_cat/aliases/{alias}
/_cat/thread_pool
/_cat/thread_pool/{thread_pools}
/_cat/plugins
/_cat/fielddata
/_cat/fielddata/{fields}
/_cat/nodeattrs
/_cat/repositories
/_cat/snapshots/{repository}
/_cat/templates
看有几个节点:
/ # curl els1-elasticsearch-client.efk.svc.cluster.local:9200/_cat/nodes
10.244.2.104 23 95 0 0.00 0.02 0.05 di - els1-elasticsearch-data-0
10.244.4.83  42 99 1 0.01 0.11 0.13 mi * els1-elasticsearch-master-1
10.244.4.81  35 99 1 0.01 0.11 0.13 i  - els1-elasticsearch-client-b898c9d47-5gwzq
10.244.4.84  31 99 1 0.01 0.11 0.13 mi - els1-elasticsearch-master-2
10.244.2.105 35 95 0 0.00 0.02 0.05 i  - els1-elasticsearch-client-b898c9d47-shqd2
10.244.4.85  18 99 1 0.01 0.11 0.13 di - els1-elasticsearch-data-1
10.244.4.82  40 99 1 0.01 0.11 0.13 mi - els1-elasticsearch-master-0
6、把fluentd安装在efk空间中
[root@k8s-master1 ~]# helm fetch incubator/fluentd-elasticsearch
[root@k8s-master1 ~]# tar -xvf fluentd-elasticsearch-0.7.2.tgz
[root@k8s-master1 ~]# cd fluentd-elasticsearch
[root@k8s-master1 fluentd-elasticsearch]# vim values.yaml
1、改其中的host: 'elasticsearch-client',改成host: 'els1-elasticsearch-client.efk.svc.cluster.local'表示到哪找我们的elasticsearch服务。
2、改tolerations污点,表示让k8s master也能接受部署fluentd pod,这样才能收集主节点的日志:
把
tolerations: {}
  # - key: node-role.kubernetes.io/master
  #   operator: Exists
  #   effect: NoSchedule
改成
tolerations:
  - key: node-role.kubernetes.io/master
    operator: Exists
    effect: NoSchedule
3、改annotations,这样也就能收集监控prometheus的日志了
把
annotations: {}
  # prometheus.io/scrape: "true"
  # prometheus.io/port: "24231"
改成
annotations:
  prometheus.io/scrape: "true"
  prometheus.io/port: "24231"
同时把
service: {}
  # type: ClusterIP
  # ports:
  #   - name: "monitor-agent"
  #     port: 24231
改成
service:
  type: ClusterIP
  ports:
    - name: "monitor-agent"
    port: 24231
  这样通过service 24231找监控prometheus的fluentd
开始安装fluentd:
[root@k8s-master1 fluentd-elasticsearch]# helm install --name fluentd1 --namespace=efk -f values.yaml ./
[root@k8s-master1 fluentd-elasticsearch]# helm list
NAME    REVISIONUPDATED                 STATUS  CHART                      NAMESPACE
els1    1       Sun Nov  4 09:37:35 2018DEPLOYEDelasticsearch-1.10.2       efk
fluentd11       Tue Nov  6 09:28:42 2018DEPLOYEDfluentd-elasticsearch-0.7.2efk
[root@k8s-master1 fluentd-elasticsearch]# kubectl get pods -n efk
NAME                                        READY   STATUS             RESTARTS   AGE
els1-elasticsearch-client-b898c9d47-5gwzq   1/1     Running            0          47h
els1-elasticsearch-client-b898c9d47-shqd2   1/1     Running            0          47h
els1-elasticsearch-data-0                   1/1     Running            0          47h
els1-elasticsearch-data-1                   1/1     Running            0          45h
els1-elasticsearch-master-0                 1/1     Running            0          47h
els1-elasticsearch-master-1                 1/1     Running            0          45h
els1-elasticsearch-master-2                 1/1     Running            0          45h
fluentd1-fluentd-elasticsearch-9k456        1/1     Running           0          2m28s
fluentd1-fluentd-elasticsearch-dcnsc        1/1     Running           0          2m28s
    fluentd1-fluentd-elasticsearch-p5h88        1/1   Running           0          2m28s
fluentd1-fluentd-elasticsearch-sdvn9        1/1     Running           0          2m28s
fluentd1-fluentd-elasticsearch-ztm9s        1/1     Running           0          2m28s
7、把kibanna安装在efk空间中
注意,安装kibana的版本号一定要和elasticsearch的版本号一致,否则二者无法结合起来。
[root@k8s-master1 ~]# helm fetch stable/kibana
[root@k8s-master1 ~]# ls
 kibana-0.2.2.tgz
[root@k8s-master1 ~]# tar -xvf kibana-0.2.2.tgz
[root@k8s-master1 ~]# cd kibana
[root@t-cz-mysql1 appuser]# vim last_10_null_sql.txt
修改ELASTICSEARCH_URL为:
ELASTICSEARCH_URL:
els的域名是通过helm status els1输出结果查看到:
[root@k8s-master1 ~]# helm status els1
  * Within your cluster, at the following DNS name at port 9200:
    els1-elasticsearch-client.efk.svc

另外,把vim last_10_null_sql.txt中
service:
  type: ClusterIP
  externalPort: 443
  internalPort: 5601
改成
service:
  type: NodePort
  externalPort: 443
  internalPort: 5601
开始部署kibana:
[root@k8s-master1 kibana]# helm install --name=kib1 --namespace=efk -f values.yaml ./
==> v1/Service
NAME         TYPE      CLUSTER-IP    EXTERNAL-IP  PORT(S)        AGE
kib1-kibana  NodePort  10.108.188.4  <none>       443:31865/TCP  0s
[root@k8s-master1 kibana]# kubectl get svc -n efk
NAME                           TYPE        CLUSTER-IP       EXTERNAL-IP   PORT(S)         AGE
els1-elasticsearch-client      ClusterIP   10.103.105.170   <none>        9200/TCP        2d22h
els1-elasticsearch-discovery   ClusterIP   None             <none>        9300/TCP        2d22h
kib1-kibana                    NodePort    10.108.188.4     <none>        443:31865/TCP   4m27s
[root@k8s-master1 kibana]# kubectl get pods -n efk
NAME                                        READY   STATUS              RESTARTS   AGE
els1-elasticsearch-client-b898c9d47-5gwzq   1/1     Running             0          2d22h
els1-elasticsearch-client-b898c9d47-shqd2   1/1     Running             0          2d22h
els1-elasticsearch-data-0                   1/1     Running             0          22h
els1-elasticsearch-data-1                   1/1     Running             0          22h
els1-elasticsearch-master-0                 1/1     Running             0          2d22h
els1-elasticsearch-master-1                 1/1     Running             0          2d19h
els1-elasticsearch-master-2                 1/1     Running             0          2d19h
fluentd1-fluentd-elasticsearch-9k456        1/1     Running             0          22h
fluentd1-fluentd-elasticsearch-dcnsc        1/1     Running             0          22h
fluentd1-fluentd-elasticsearch-p5h88        1/1     Running             0          22h
fluentd1-fluentd-elasticsearch-sdvn9        1/1     Running             0          22h
fluentd1-fluentd-elasticsearch-ztm9s        1/1     Running             0          22h
kib1-kibana-68f9fbfd84-pt2dt                0/1     Running   0          9m59s #这个镜像如果下载不下来,多等几天就下载下来了
然后找个浏览器,打开宿主机ip:nodeport
https://172.16.22.201:31865
不过我这个打开的页面有错误,做如下操作即可:
[root@k8s-master1 ~]# kubectl get pods -n efk |grep ela
els1-elasticsearch-client-b898c9d47-8pntr   1/1     Running   1          43h
els1-elasticsearch-client-b898c9d47-shqd2   1/1     Running   1          5d13h
els1-elasticsearch-data-0                   1/1     Running   0          117m
els1-elasticsearch-data-1                   1/1     Running   0          109m
els1-elasticsearch-master-0                 1/1     Running   1          2d11h
els1-elasticsearch-master-1                 1/1     Running   0          14h
els1-elasticsearch-master-2                 1/1     Running   0          14h
[root@k8s-master1 ~]# kubectl exec -it els1-elasticsearch-client-b898c9d47-shqd2  -n efk -- /bin/bash
删除elasticsearch下的.kibana即可
[root@els1-elasticsearch-client-b898c9d47-shqd2 elasticsearch]#  curl -XDELETE http://els1-elasticsearch-client.efk.svc:9200/.kibana


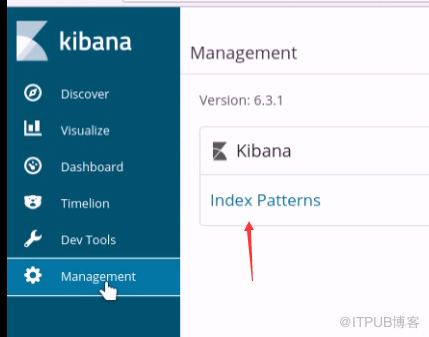
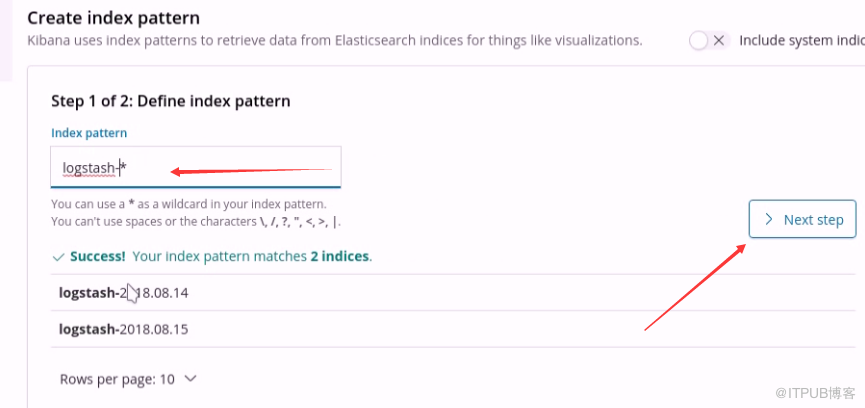
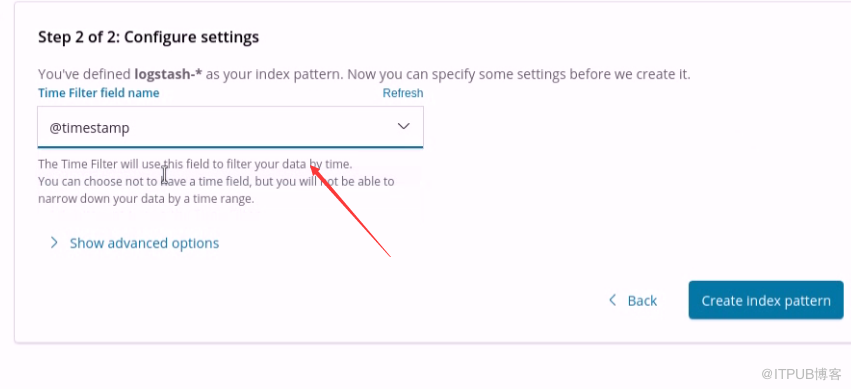
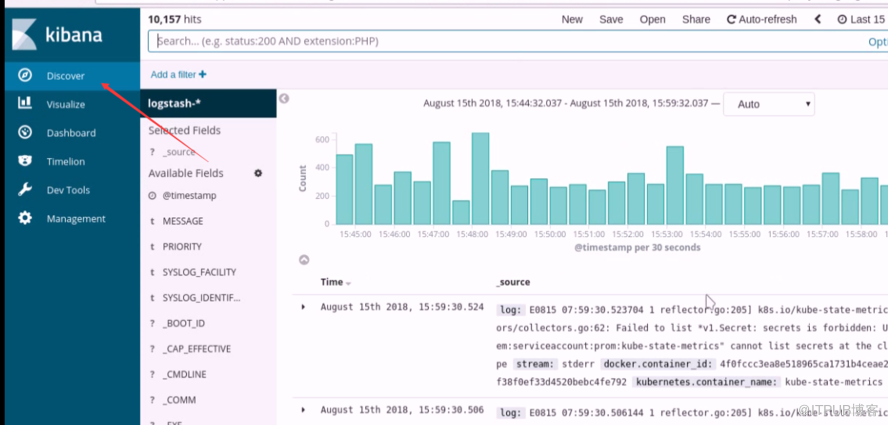
最终,看到我们做出了EFK的日志收集系统
到此,关于“docker怎么部署EFK日志系统”的学习就结束了,希望能够解决大家的疑惑。理论与实践的搭配能更好的帮助大家学习,快去试试吧!若想继续学习更多相关知识,请继续关注亿速云网站,小编会继续努力为大家带来更多实用的文章!
免责声明:本站发布的内容(图片、视频和文字)以原创、转载和分享为主,文章观点不代表本网站立场,如果涉及侵权请联系站长邮箱:is@yisu.com进行举报,并提供相关证据,一经查实,将立刻删除涉嫌侵权内容。