жӮЁеҘҪпјҢзҷ»еҪ•еҗҺжүҚиғҪдёӢи®ўеҚ•е“ҰпјҒ
еҜҶз Ғзҷ»еҪ•
зҷ»еҪ•жіЁеҶҢ
зӮ№еҮ» зҷ»еҪ•жіЁеҶҢ еҚіиЎЁзӨәеҗҢж„ҸгҖҠдәҝйҖҹдә‘з”ЁжҲ·жңҚеҠЎжқЎж¬ҫгҖӢ
CentOS 7.5
IP:192.168.1.2
grafana-5.1.4
PostgreSQL-10гҖҒpg_stat_statementsжЁЎеқ—
InfluxDB-1.5.3
Python3
#е…ій—ӯselinuxд»ҘеҸҠfirewalldгҖӮ
##иҮӘиЎҢе®үиЈ…д»ҘдёҠеә”з”ЁпјҒпјҒпјҒжң¬ж–ҮдёҚжҸҗдҫӣе®үиЈ…иҝҮзЁӢпјҒпјҒпјҒ
vi /var/lib/pgsql/10/data/postgresql.conf
shared_preload_libraries = 'pg_stat_statements'
track_io_timing = on
#зј–иҫ‘postgresql.confй…ҚзҪ®ж–Ү件пјҢж·»еҠ еҰӮдёӢдёӨиЎҢпјҲеүҚжҸҗпјҡиЈ…еҘҪpg_stat_statementsжЁЎеқ—
vi /var/lib/pgsql/10/data/pg_hba.conf
local all all peer
host all all 127.0.0.1/32 trust
host all all ::1/128 trust
#дҝ®ж”№и®ӨиҜҒжЁЎејҸпјҢйҖҡиҝҮ127.0.0.1и®ҝй—®зҡ„з”ЁжҲ·дёҚйңҖиҰҒеҜҶз Ғи®ӨиҜҒ
#дёәдәҶе®үе…ЁиҜ·иҮӘиЎҢй…ҚзҪ®пјҢpg_hba.confй…ҚзҪ®ж–Ү件иҜҰи§ЈиҜ·иҮӘиЎҢзҷҫеәҰ~~


systemctl restart postgresql-10.service
#йҮҚеҗҜж•°жҚ®еә“
mkdir /app && cd /app
git clone https://github.com/cybertec-postgresql/pgwatch3.git
#е…ӢйҡҶжәҗз Ғд»“еә“пјҢжңүдёҖдәӣдёңиҘҝйңҖиҰҒз”ЁеҲ°гҖӮ

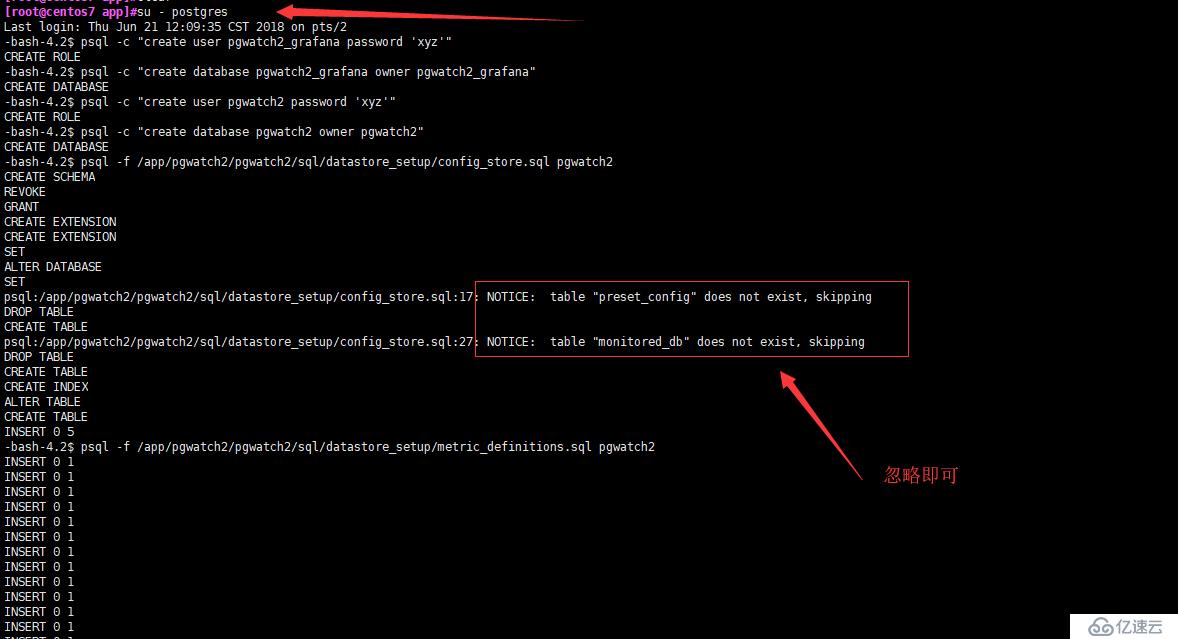
su - postgres
psql -c "create user pgwatch3_grafana password 'xyz'"
psql -c "create database pgwatch3_grafana owner pgwatch3_grafana"
psql -c "create user pgwatch3 password 'xyz'"
psql -c "create database pgwatch3 owner pgwatch3"
psql -f /app/pgwatch3/pgwatch3/sql/datastore_setup/config_store.sql pgwatch3
psql -f /app/pgwatch3/pgwatch3/sql/datastore_setup/metric_definitions.sql pgwatch3
#еҲҮжҚўиҮіpostgreз”ЁжҲ·д»Ҙдҫҝж“ҚдҪңж•°жҚ®еә“гҖӮ
#еҲӣе»әpgwatch3_grafanaгҖҒpgwatch3з”ЁжҲ·е№¶и®ҫзҪ®еҜҶз ҒгҖӮ
#еҲӣе»әpgwatch3_grafanaгҖҒpgwatch3ж•°жҚ®еә“并и®ҫзҪ®жүҖеұһдё»гҖӮ
#еҜје…Ҙpgwatch3зҡ„ж•°жҚ®гҖӮ
vi /etc/influxdb/influxdb.conf
[http]
enabled = true
bind-address = "127.0.0.1:8086"
#дҝ®ж”№й…ҚзҪ®ж–Ү件пјҢе°Ҷhttpз«Ҝзҡ„bind-addressдҝ®ж”№жҲҗ127.0.0.1
#еӣ дёәжҳҜеҒҡзӣ‘жҺ§з”Ёзҡ„пјҢжүҖд»ҘдёҚеҒҡи®ӨиҜҒпјҢдҪҶд»…е…Ғи®ёжң¬ең°ең°еқҖи®ҝй—®гҖӮ
systemctl start influxdb
#еҗҜеҠЁInfluxDB

influx
CREATE USER "pgwatch3" WITH PASSWORD 'xyz'
CREATE DATABASE pgwatch3
use pgwatch3
GRANT ALL ON pgwatch3 to "pgwatch3"
#еҲӣе»әpgwatch3з”ЁжҲ·д»ҘеҸҠеҗҢеҗҚзҡ„ж•°жҚ®еә“пјҢ并且жҺҲжқғгҖӮ

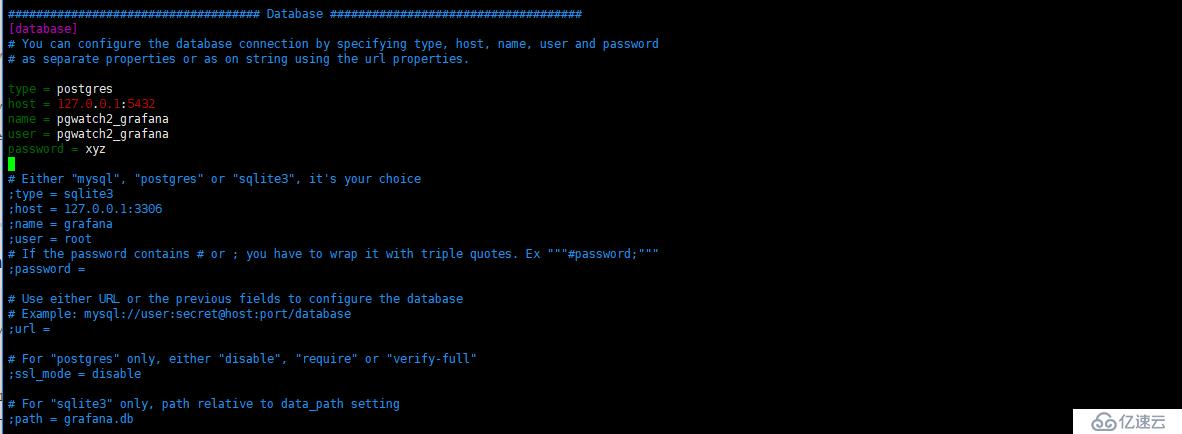
vi /etc/grafana/grafana.ini
[database]
type = postgres
host = 127.0.0.1:5432
name = pgwatch3_grafana
user = pgwatch3_grafana
password = xyz
#е°ҶGrafanaзҡ„ж•°жҚ®еӯҳе…Ҙpostgresql
http://192.168.1.2:3000
#и®ҝй—®Grafanaзҡ„webйЎөйқўиҝӣиЎҢй…ҚзҪ®
#й»ҳи®Өз”ЁжҲ·еҗҚдёҺеҜҶз Ғ:admin

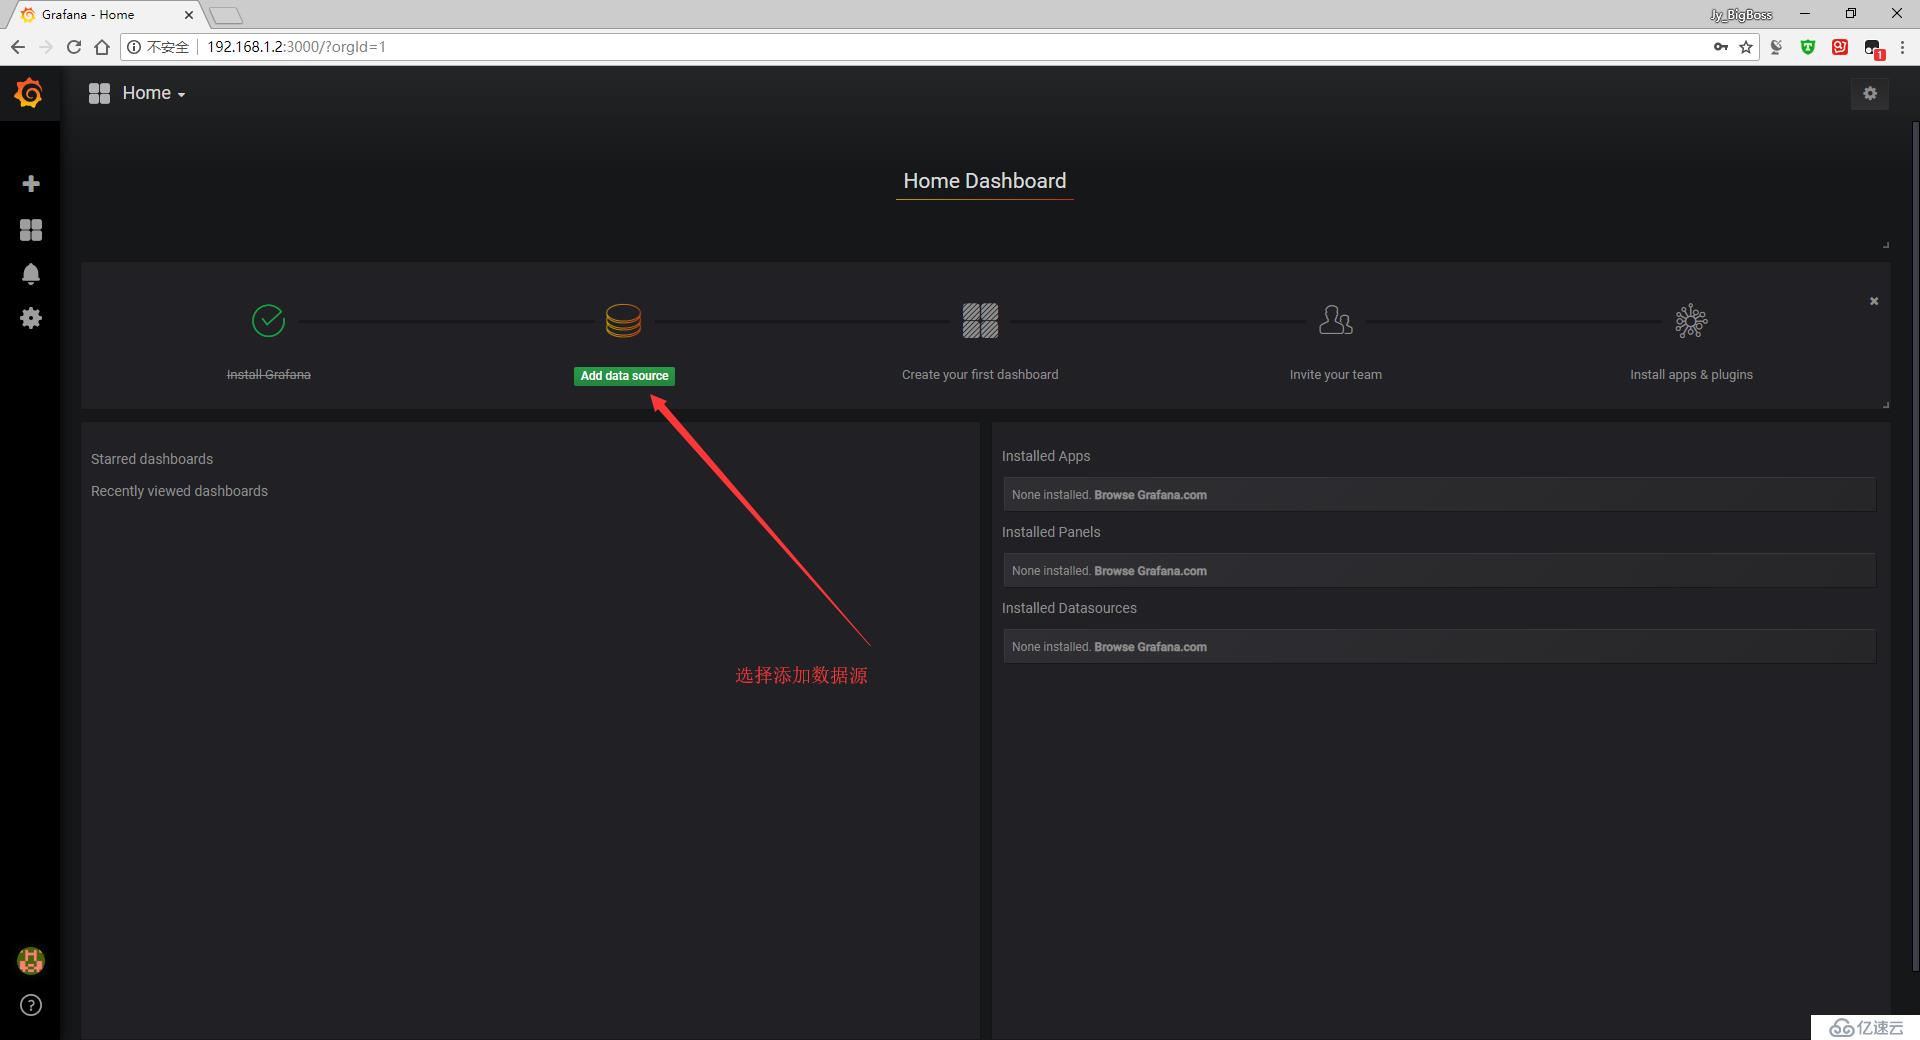
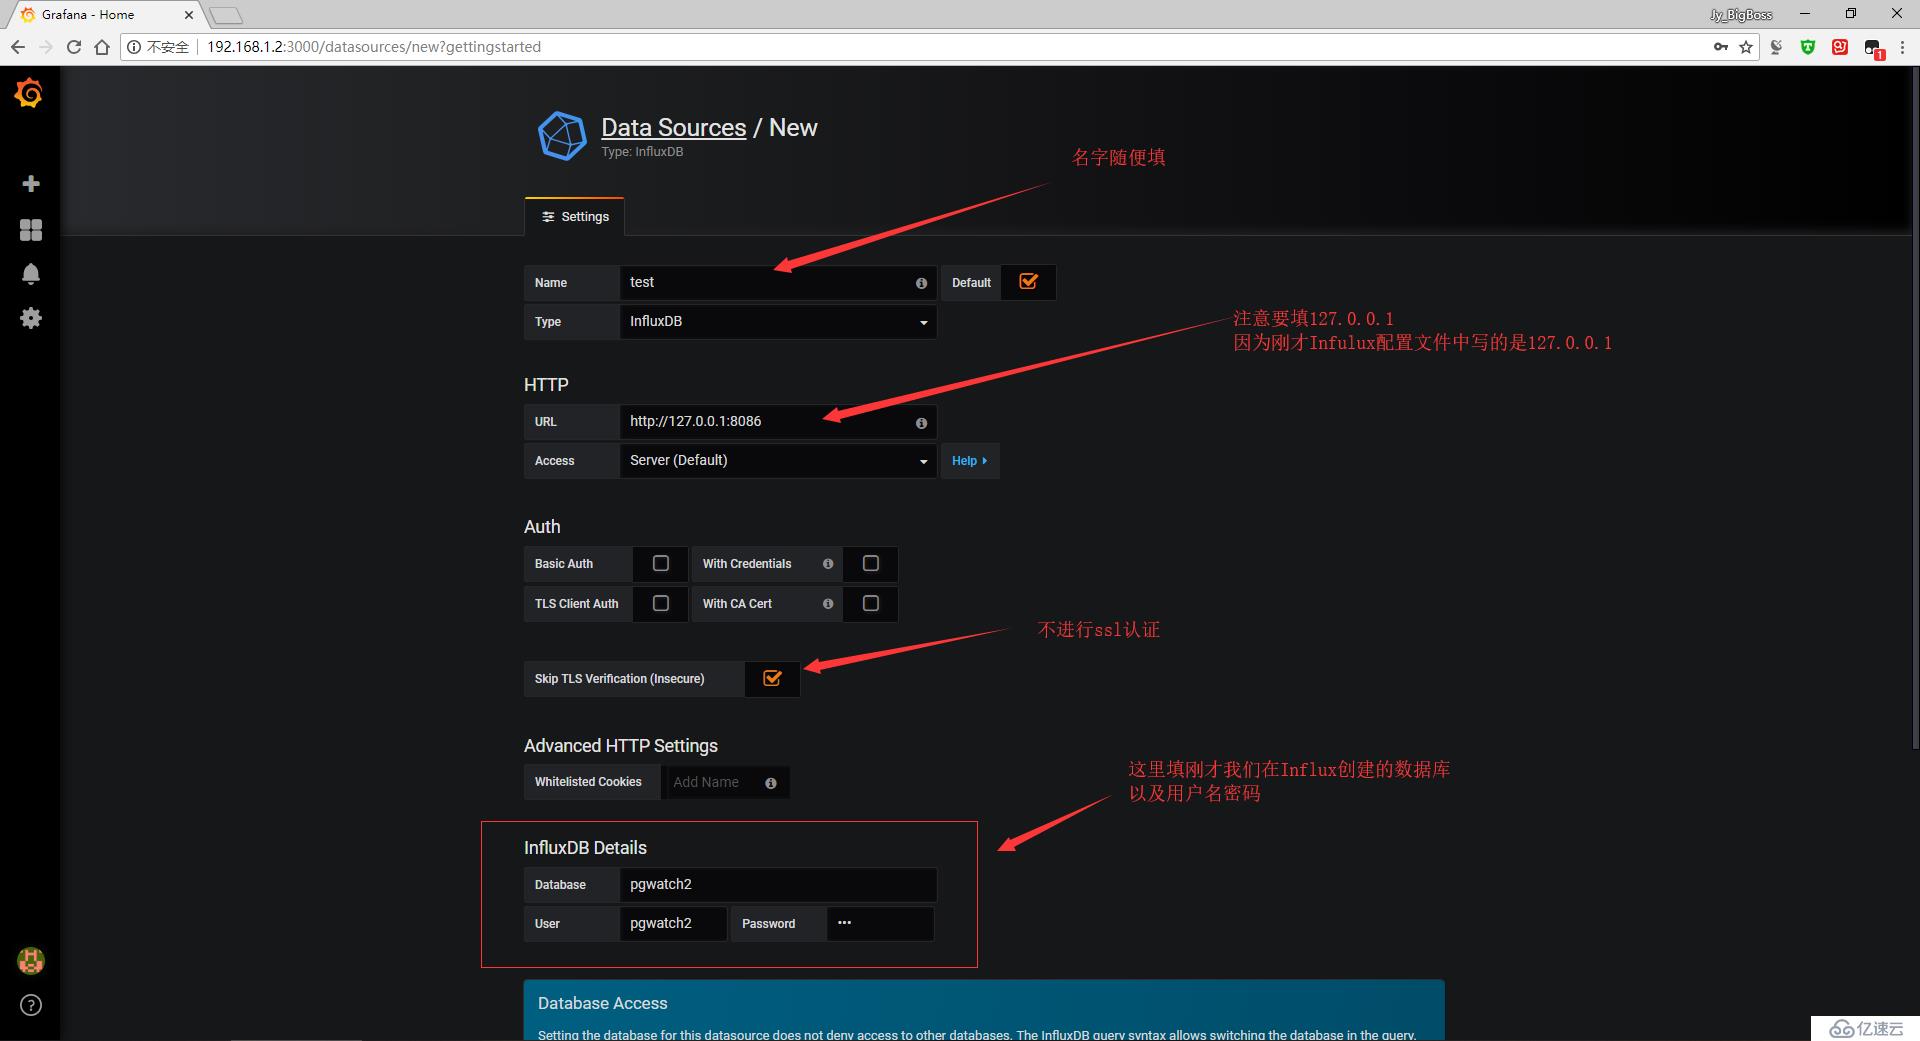
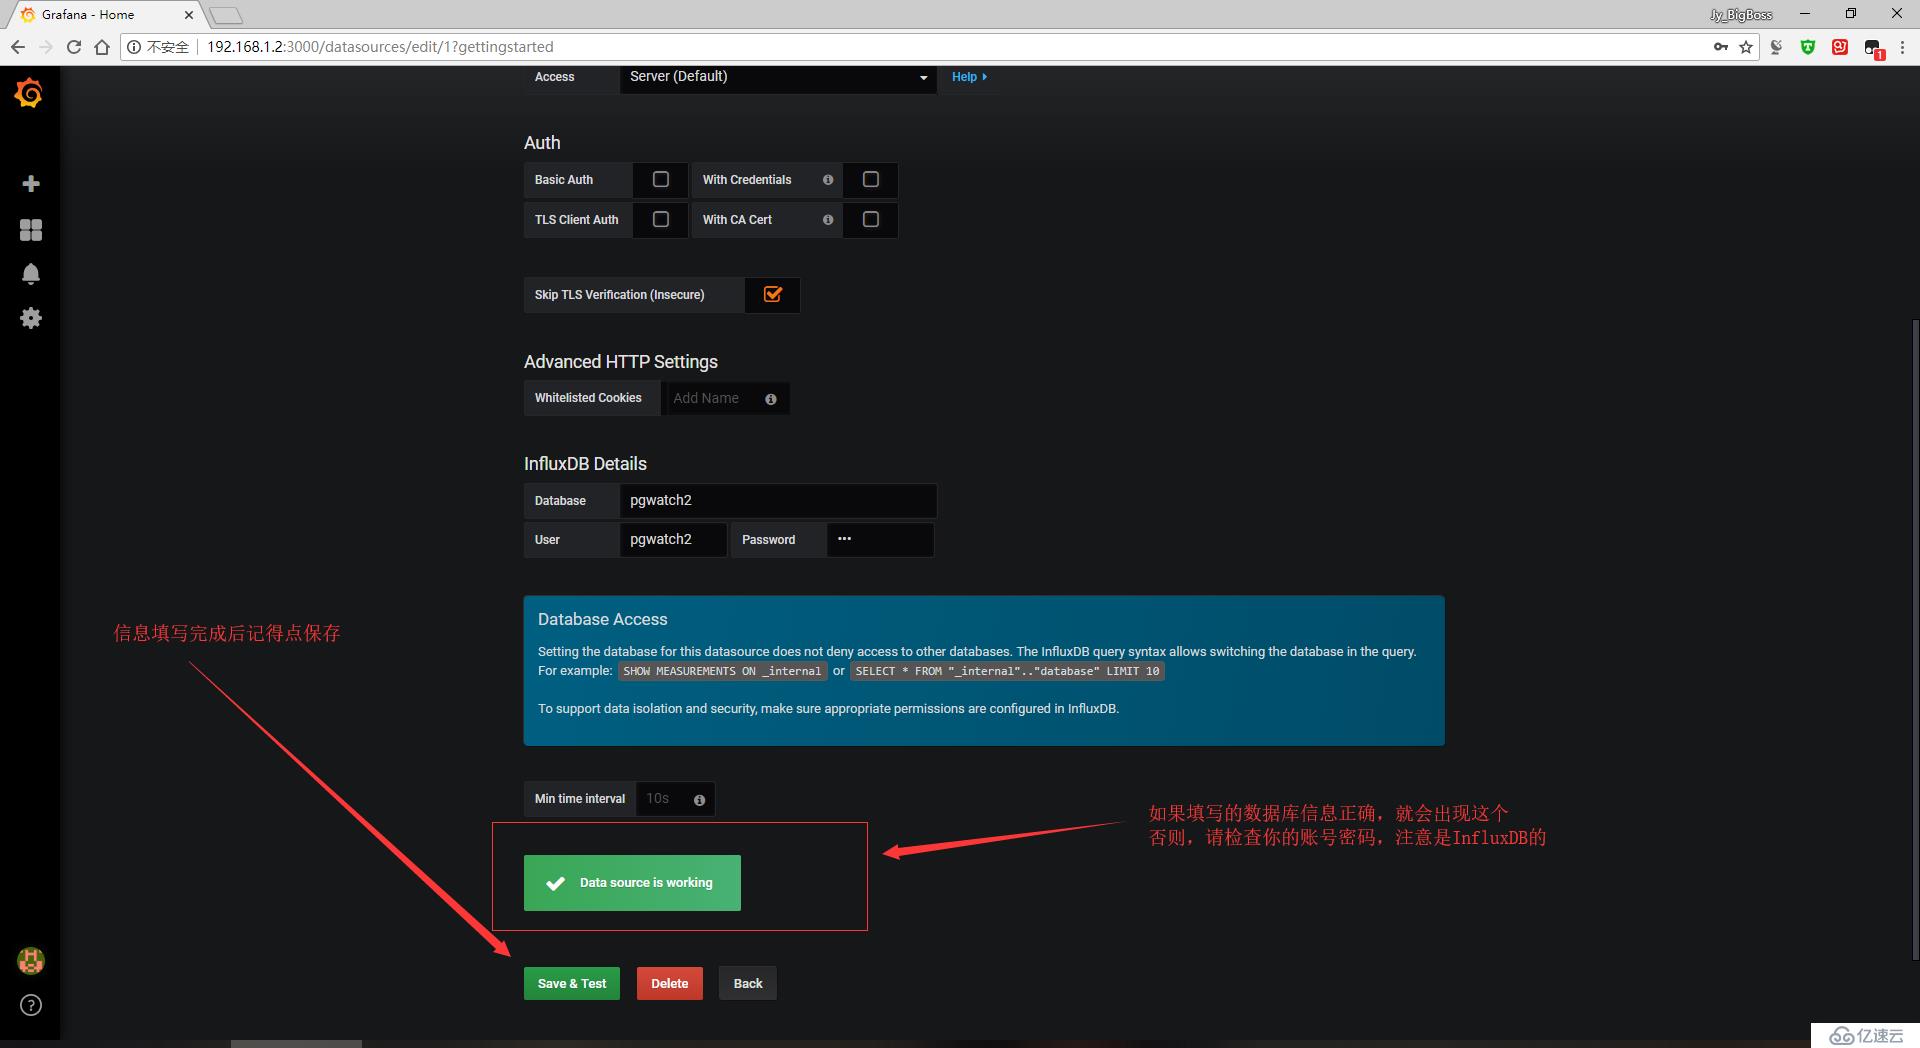
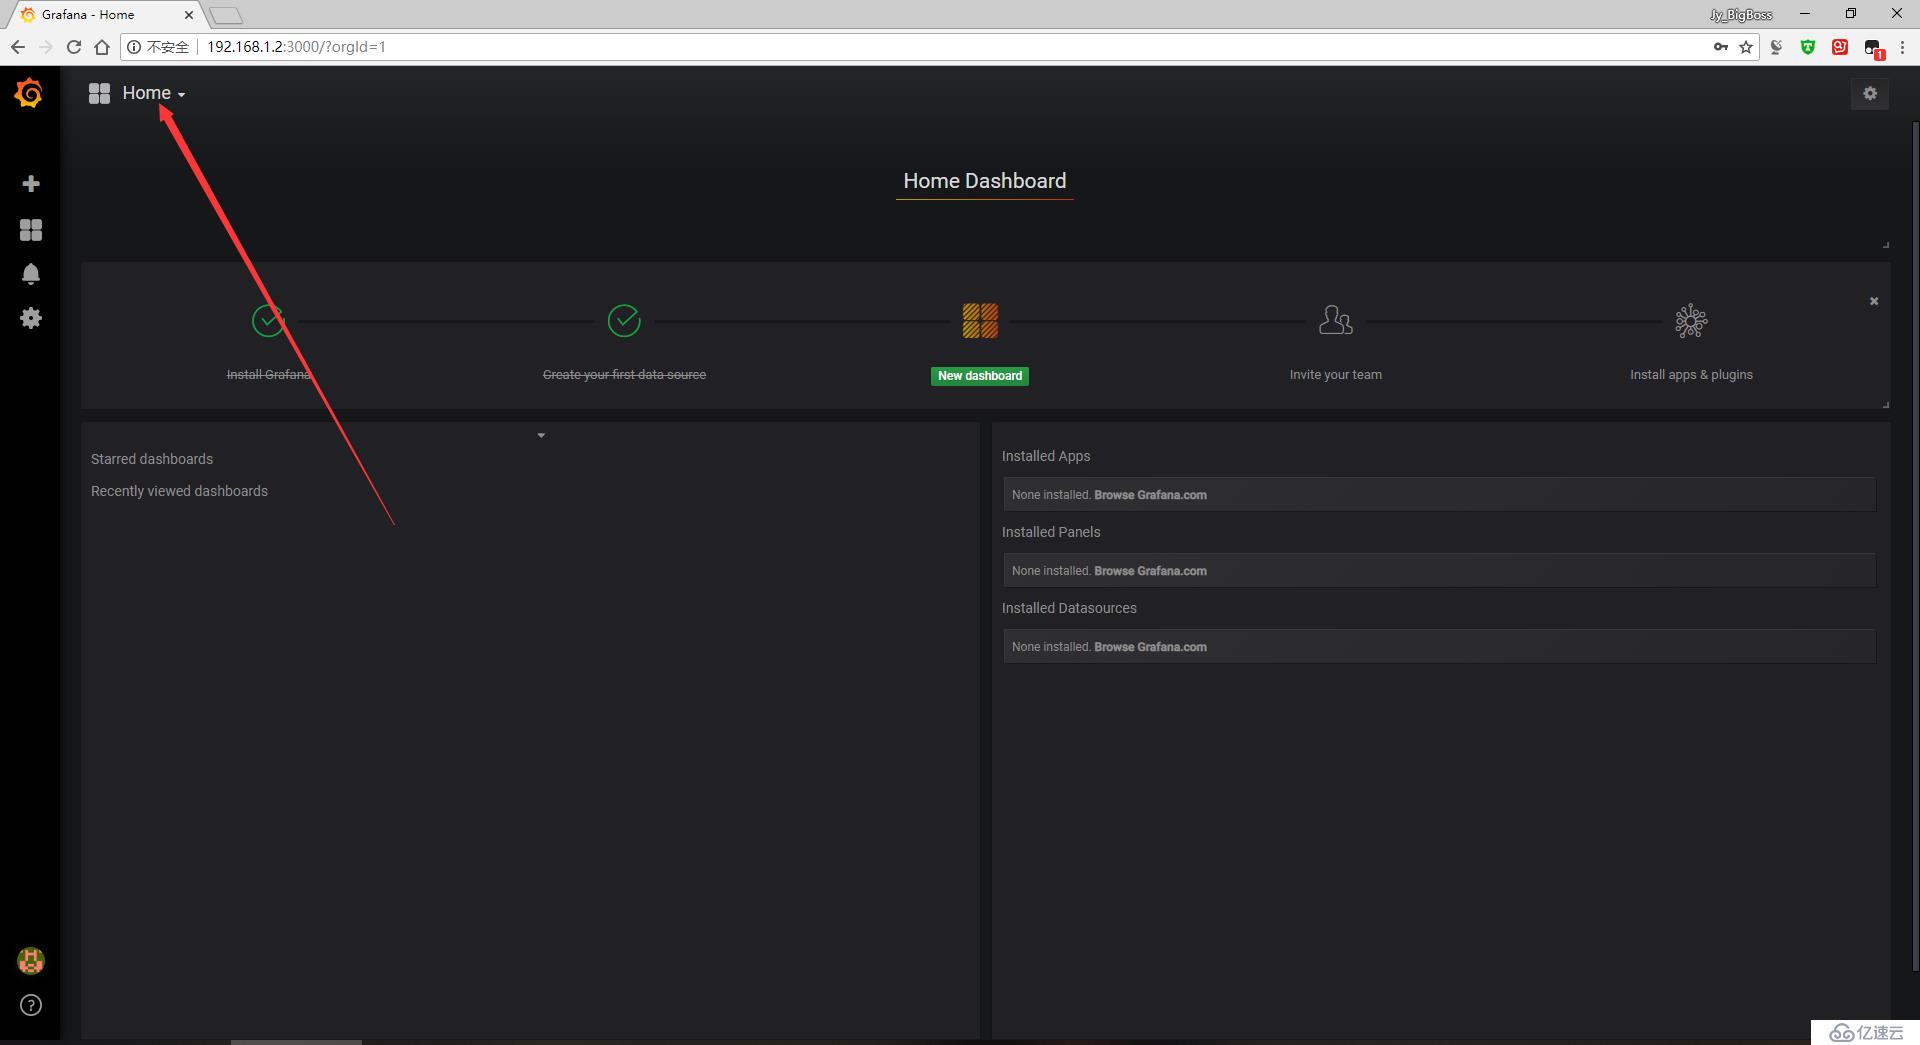
#ејҖе§Ӣй…ҚзҪ®д»ӘиЎЁзӣҳ
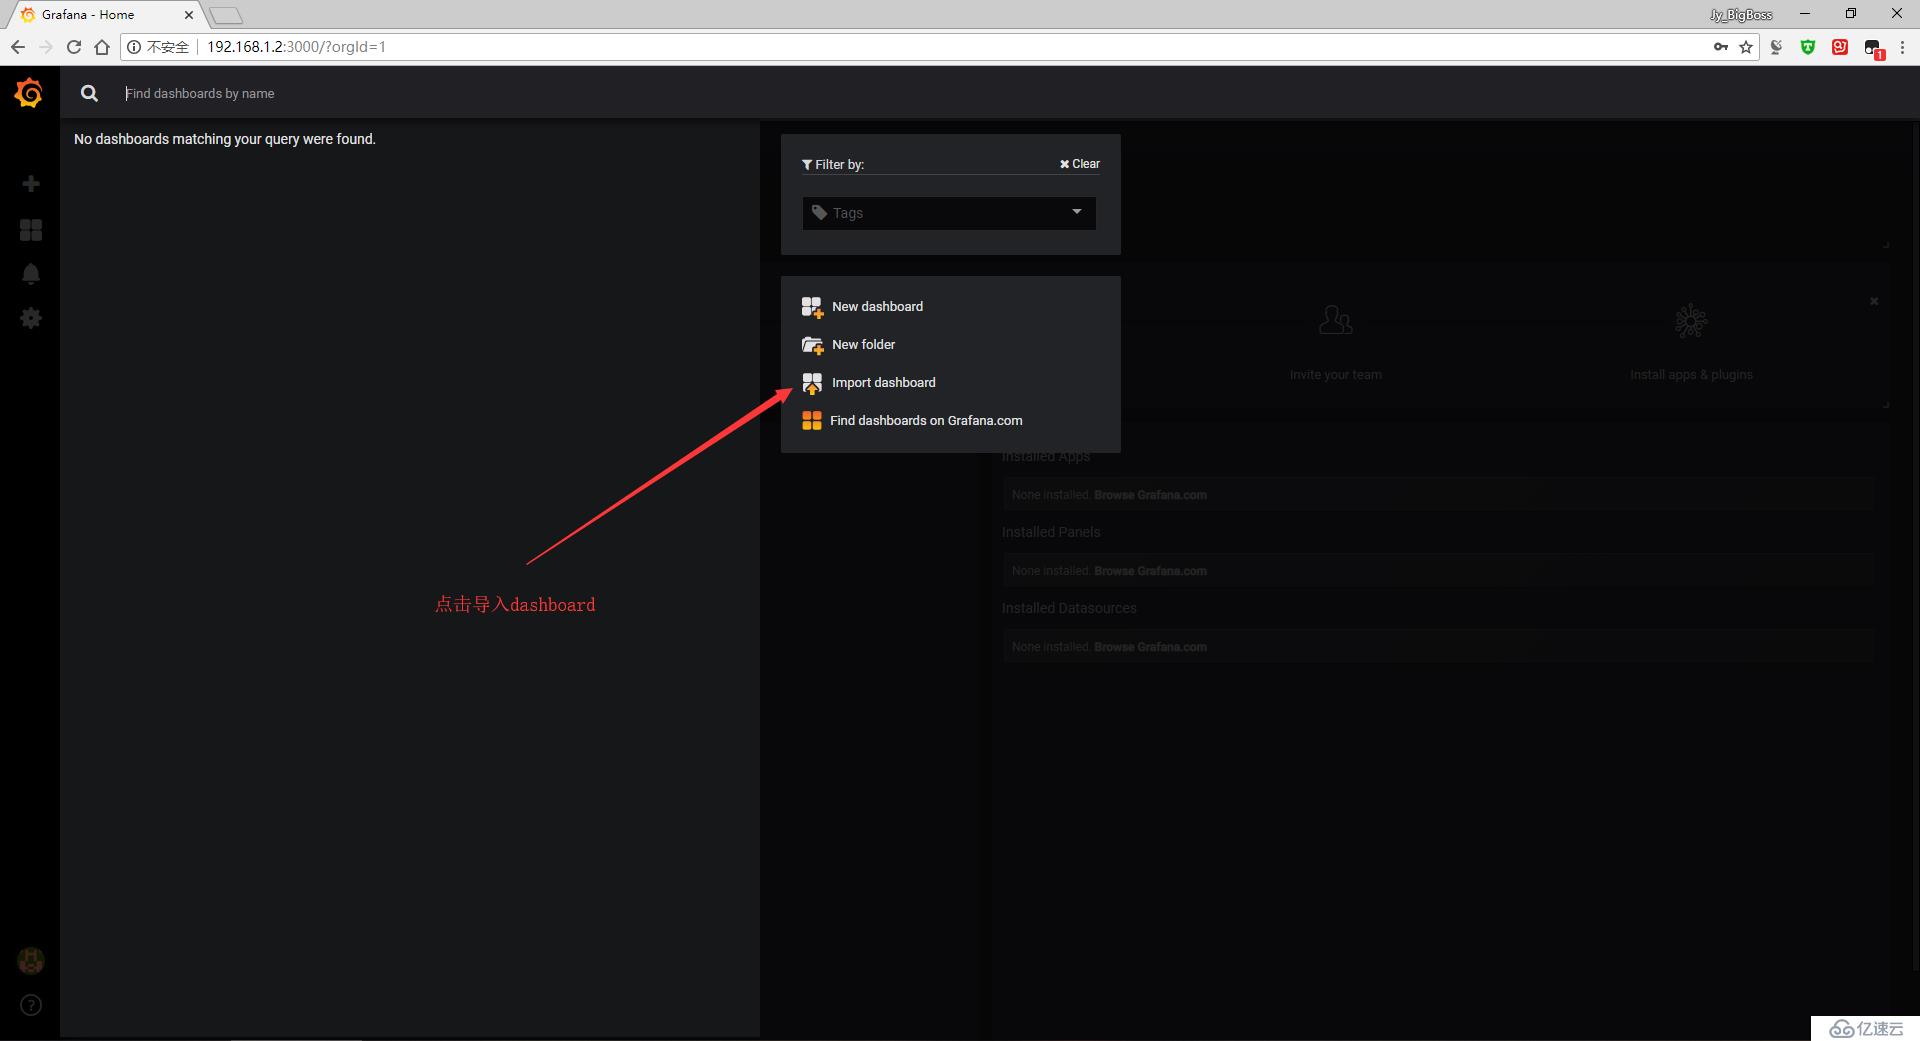
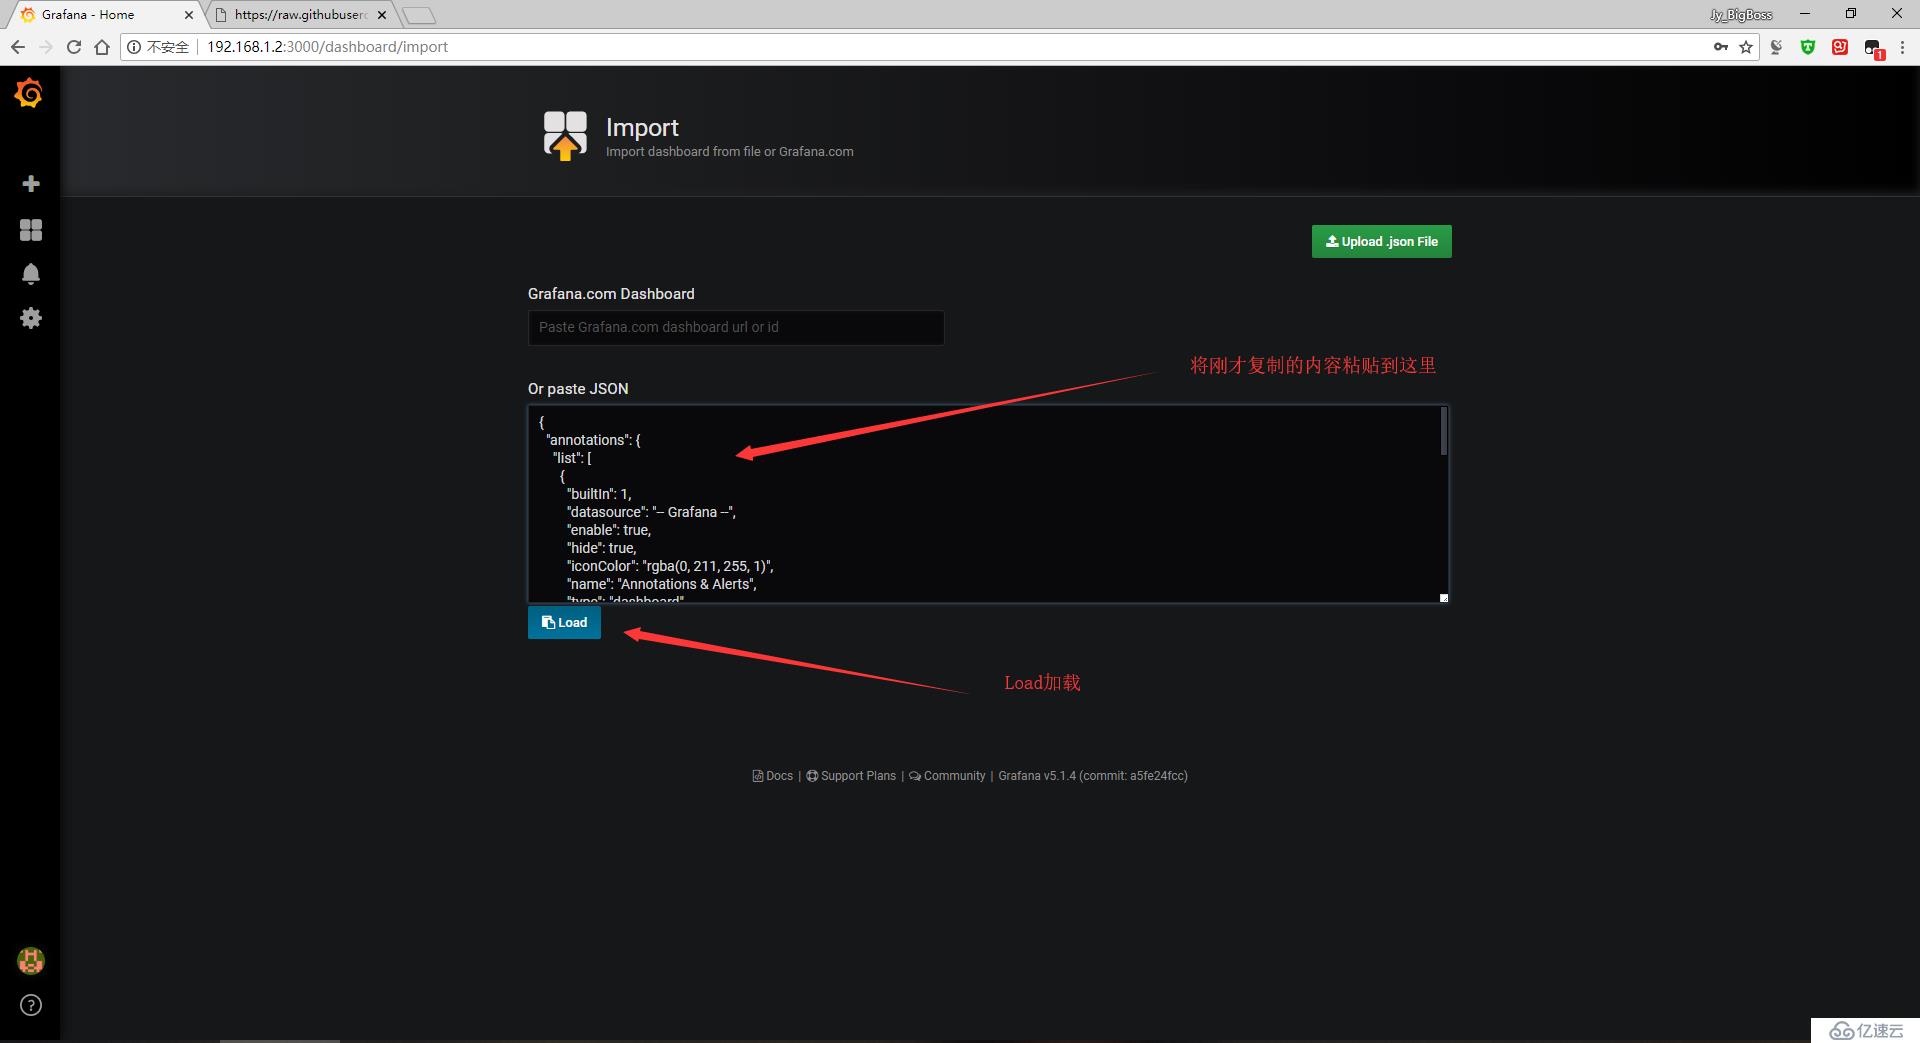
#жәҗз Ғд»“еә“дёӯпјҡpgwatch3/grafana_dashboards/v5/и·Ҝеҫ„дёӢе°ұжҳҜжүҖжңүзҡ„д»ӘиЎЁзӣҳеҶ…е®№пјҢжҜҸдёӘж–Ү件еӨ№дёәдёҖдёӘд»ӘиЎЁзӣҳ
#жҜҸдёӘж–Ү件еӨ№еҶ…йғҪеҗ«жңүdashboard.jsonж–Ү件пјҢжҠҠиҝҷдёӘж–Ү件еҜје…ҘеҚіеҸҜ
#иҝҷйҮҢдёәдәҶеұ•зӨәж•ҲжһңжҲ‘е°ұеҸӘеҜје…ҘдёҖдёӘпјҡdb-overview/dashboard.json
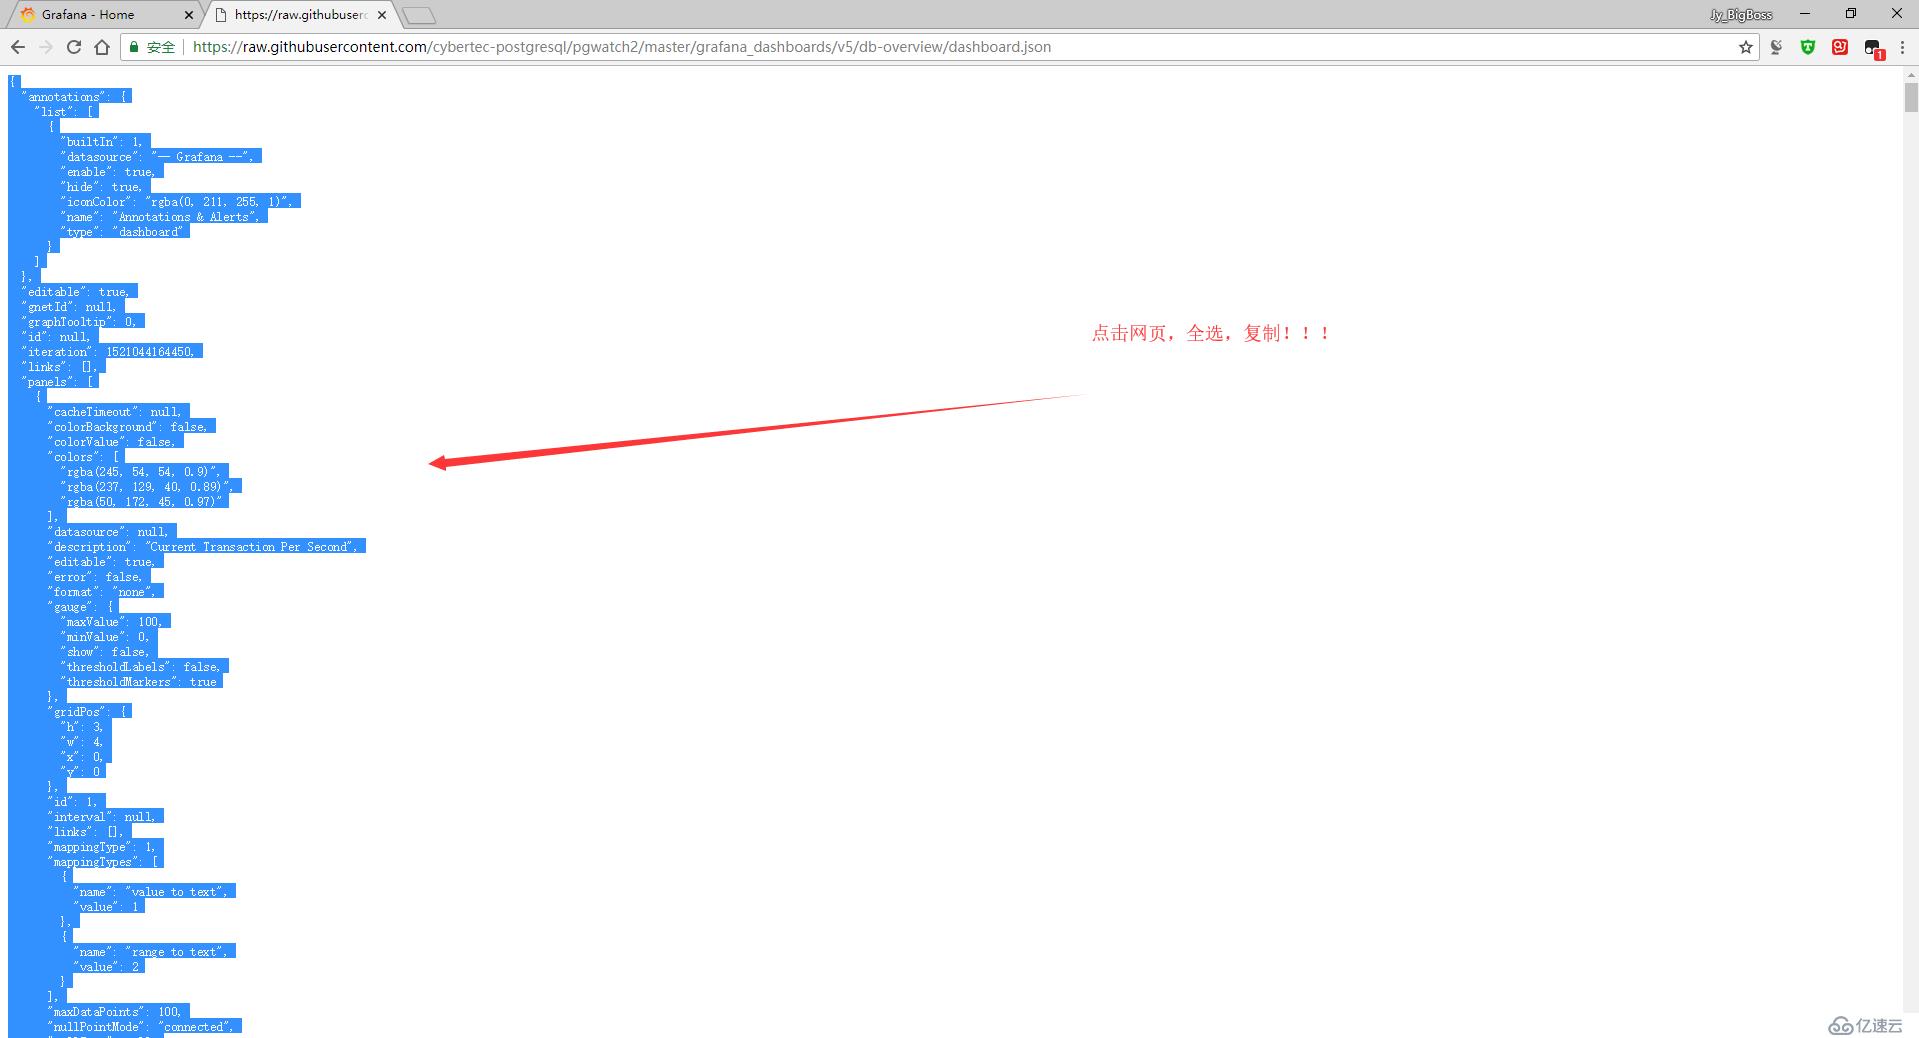
#githubзҪ‘йЎөдёҠзҡ„дјҡжҜ”иҫғеҘҪеӨҚеҲ¶пјҢеӨҚеҲ¶зҪ‘йЎөдёӯзҡ„жүҖжңүеҶ…е®№пјҡ
#https://raw.githubusercontent.com/cybertec-postgresql/pgwatch3/master/grafana_dashboards/v5/db-overview/dashboard.json
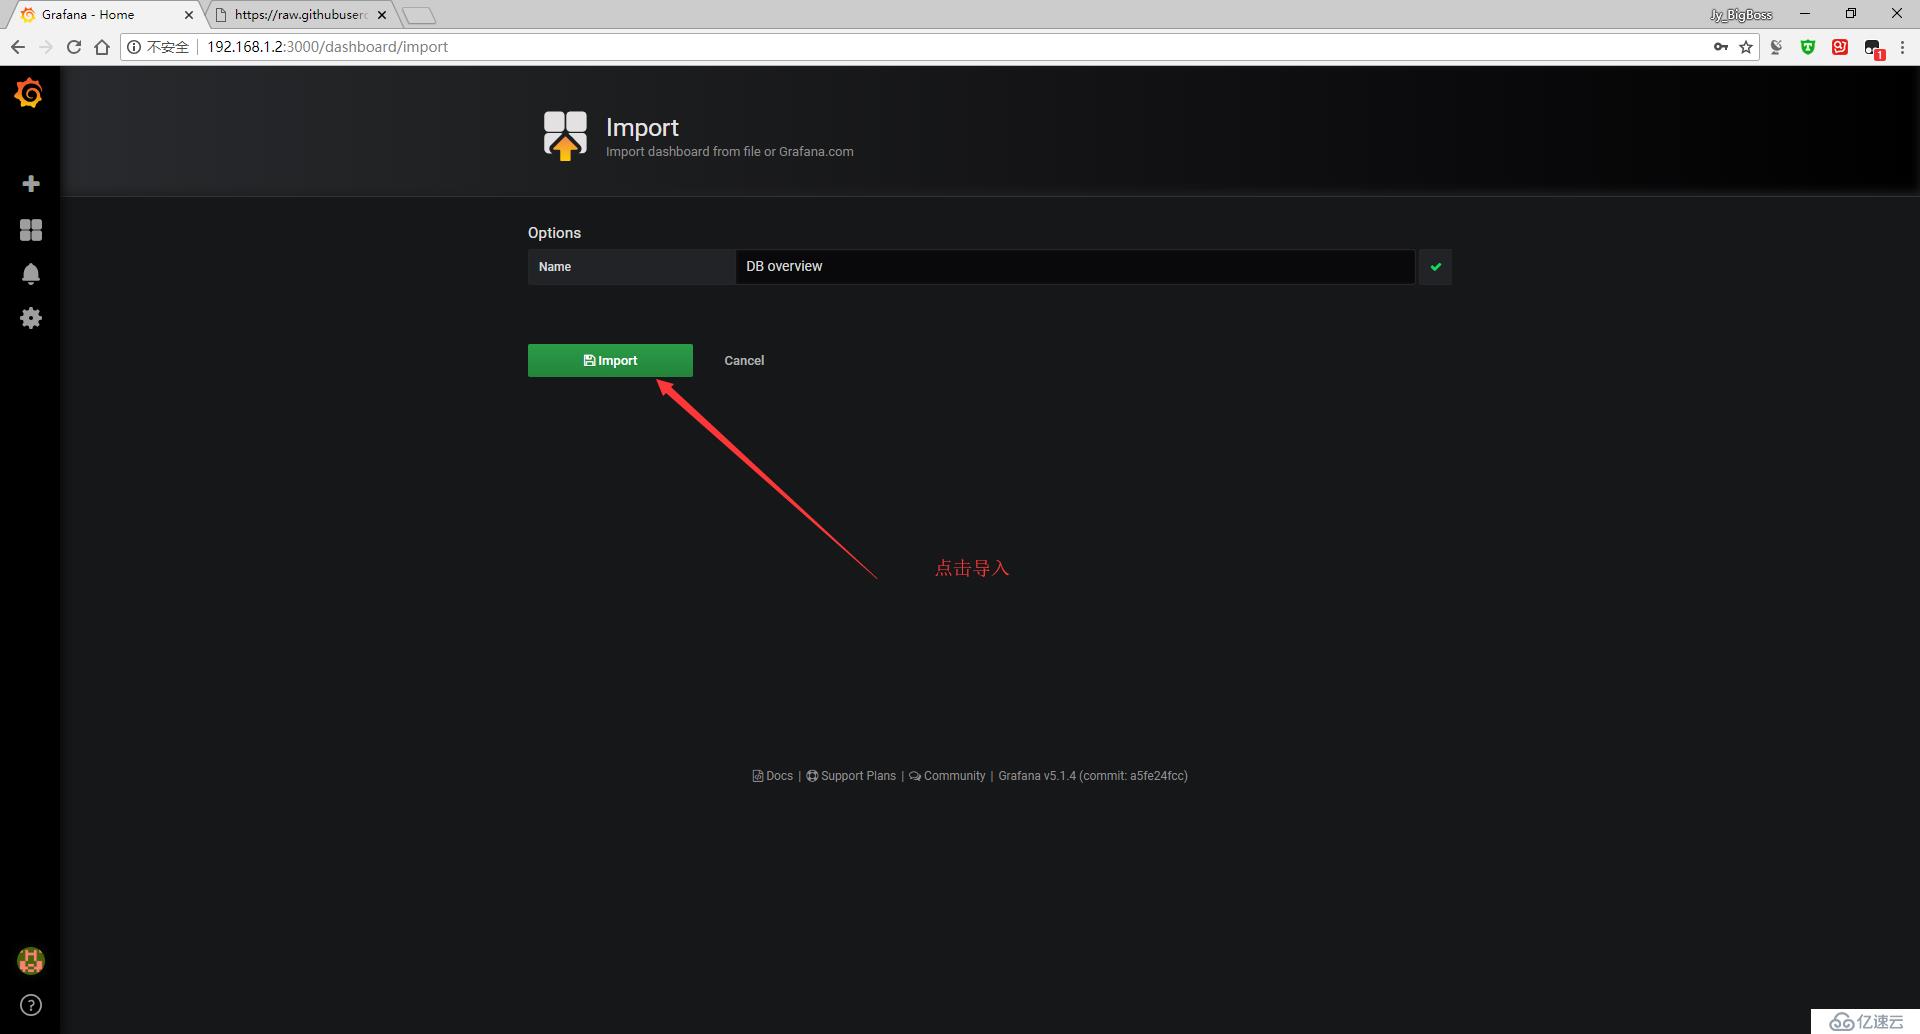
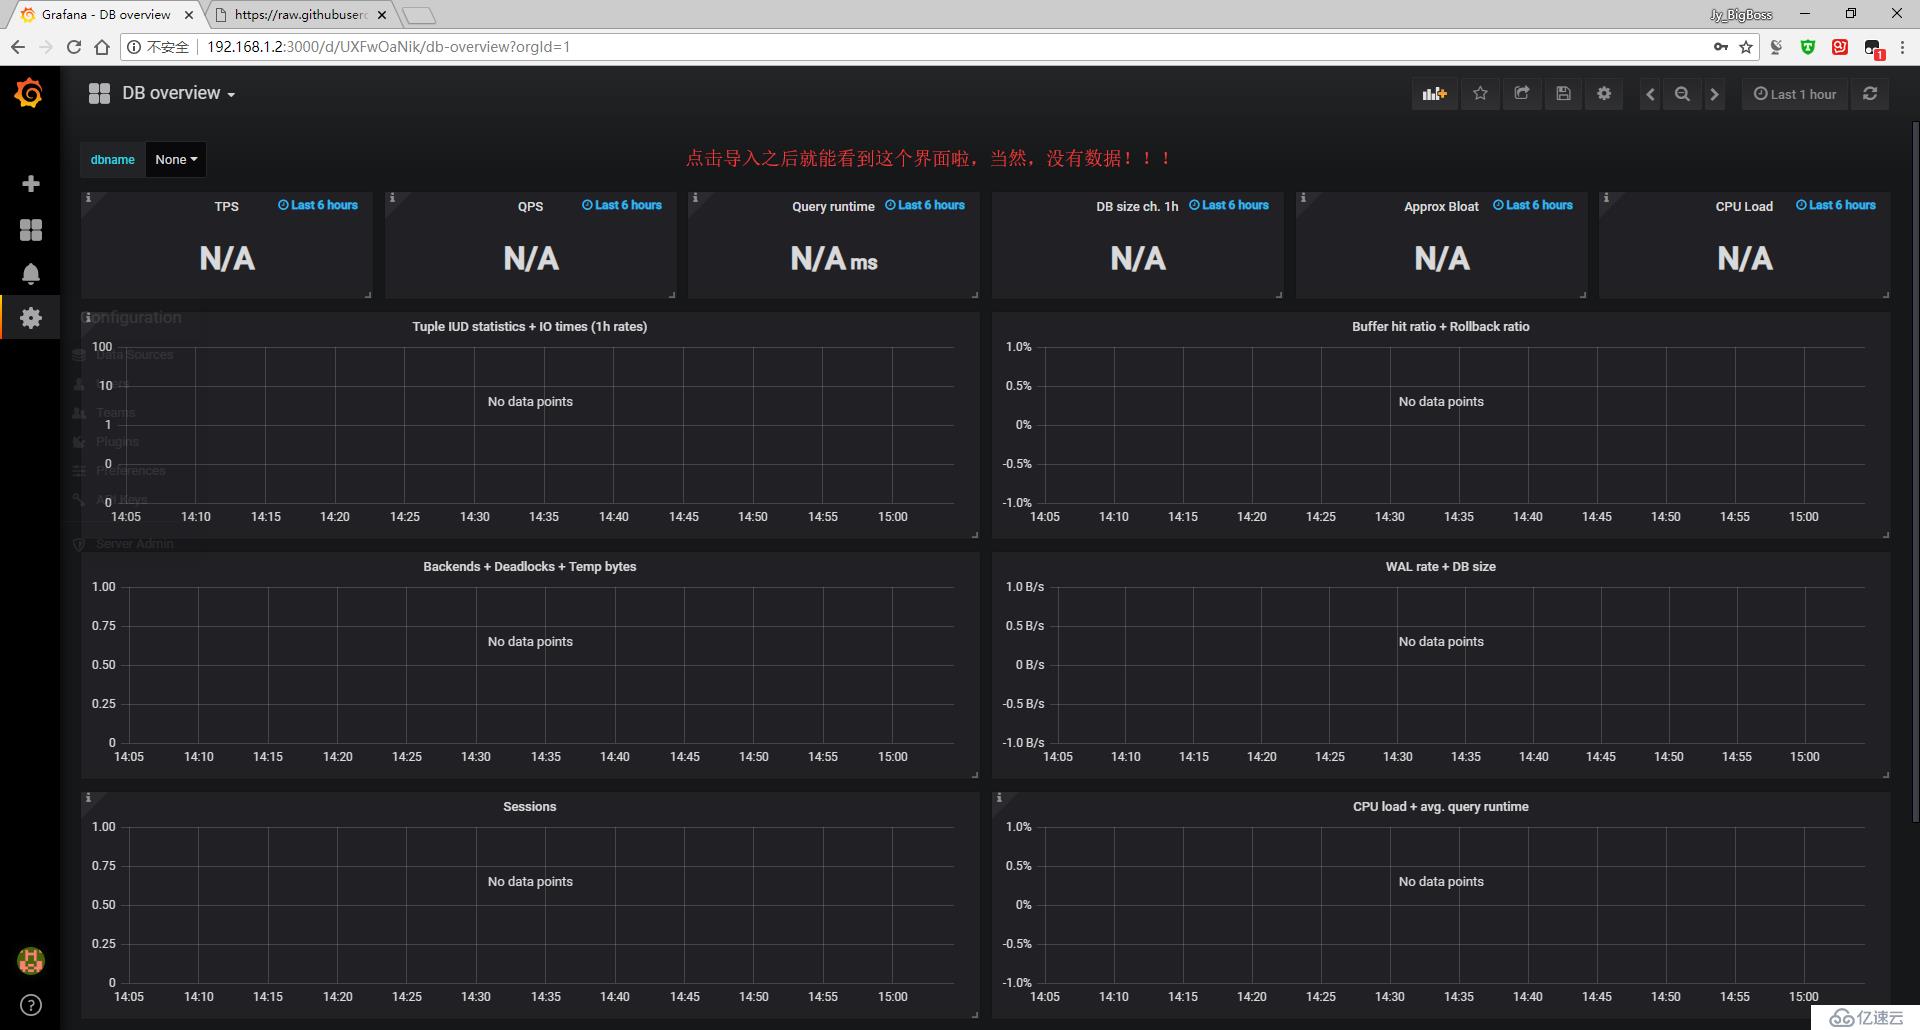
cd /app/pgwatch3/
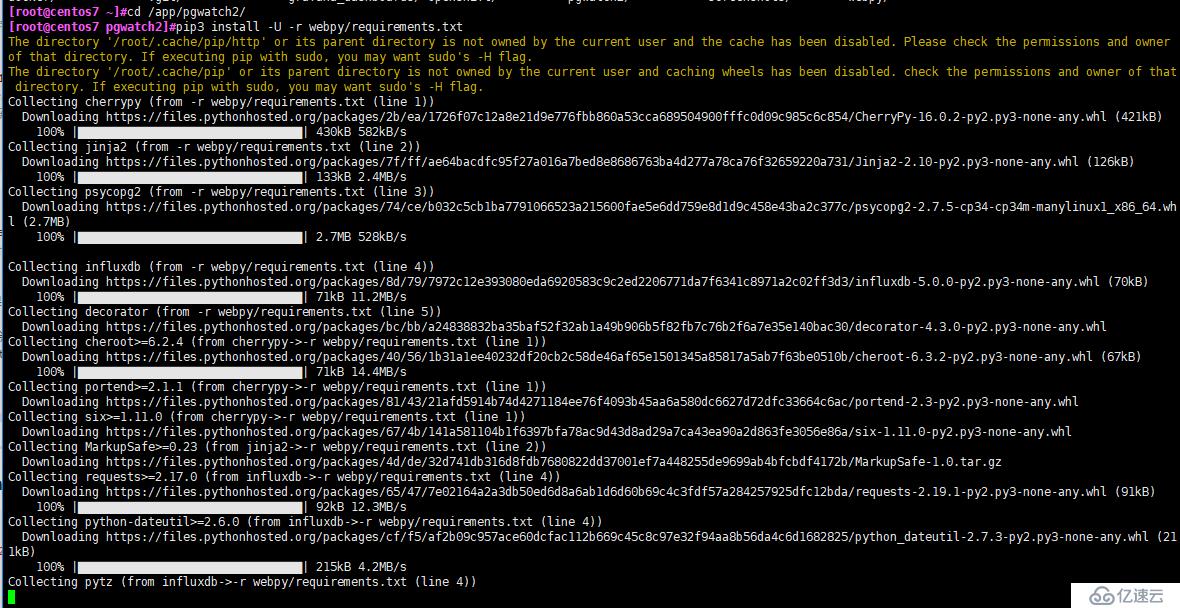
pip3 install -U -r webpy/requirements.txt
cd webpy
python3 web.py
#иҝӣе…Ҙpgwatchзӣ®еҪ•пјҢpipе®үиЈ…дёҖдәӣдҫқиө–еә“
#жү§иЎҢweb.py
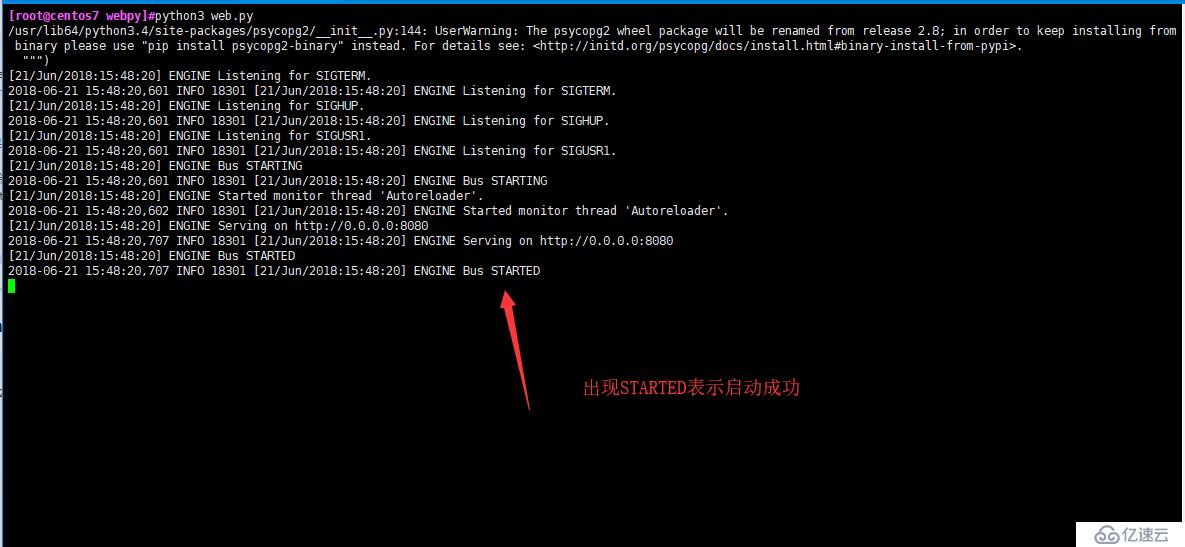
#и®ҝй—®webйЎөйқўиҝӣиЎҢдёӢдёҖжӯҘй…ҚзҪ®
#й…ҚзҪ®иў«зӣ‘жҺ§ж•°жҚ®еә“зҡ„дҝЎжҒҜпјҢжіЁж„ҸпјҢиҝҷйҮҢеЎ«зҡ„жҳҜиў«зӣ‘жҺ§ж•°жҚ®еә“зҡ„дҝЎжҒҜпјҒпјҒпјҒ
#д№ҹе°ұжҳҜдҪ иҰҒеңЁеҜ№еә”зҡ„ж•°жҚ®еә“еҲӣе»әз”ЁжҲ·е№¶дё”жҺҲжқғпјҢ然еҗҺеҗҜз”Ёpg_stat_statementsжЁЎеқ—
#жҲ‘иҝҷйҮҢд»…д»…еҸӘзӣ‘жҺ§жң¬жңәдёҠзҡ„pgwatch3ж•°жҚ®еә“гҖӮ
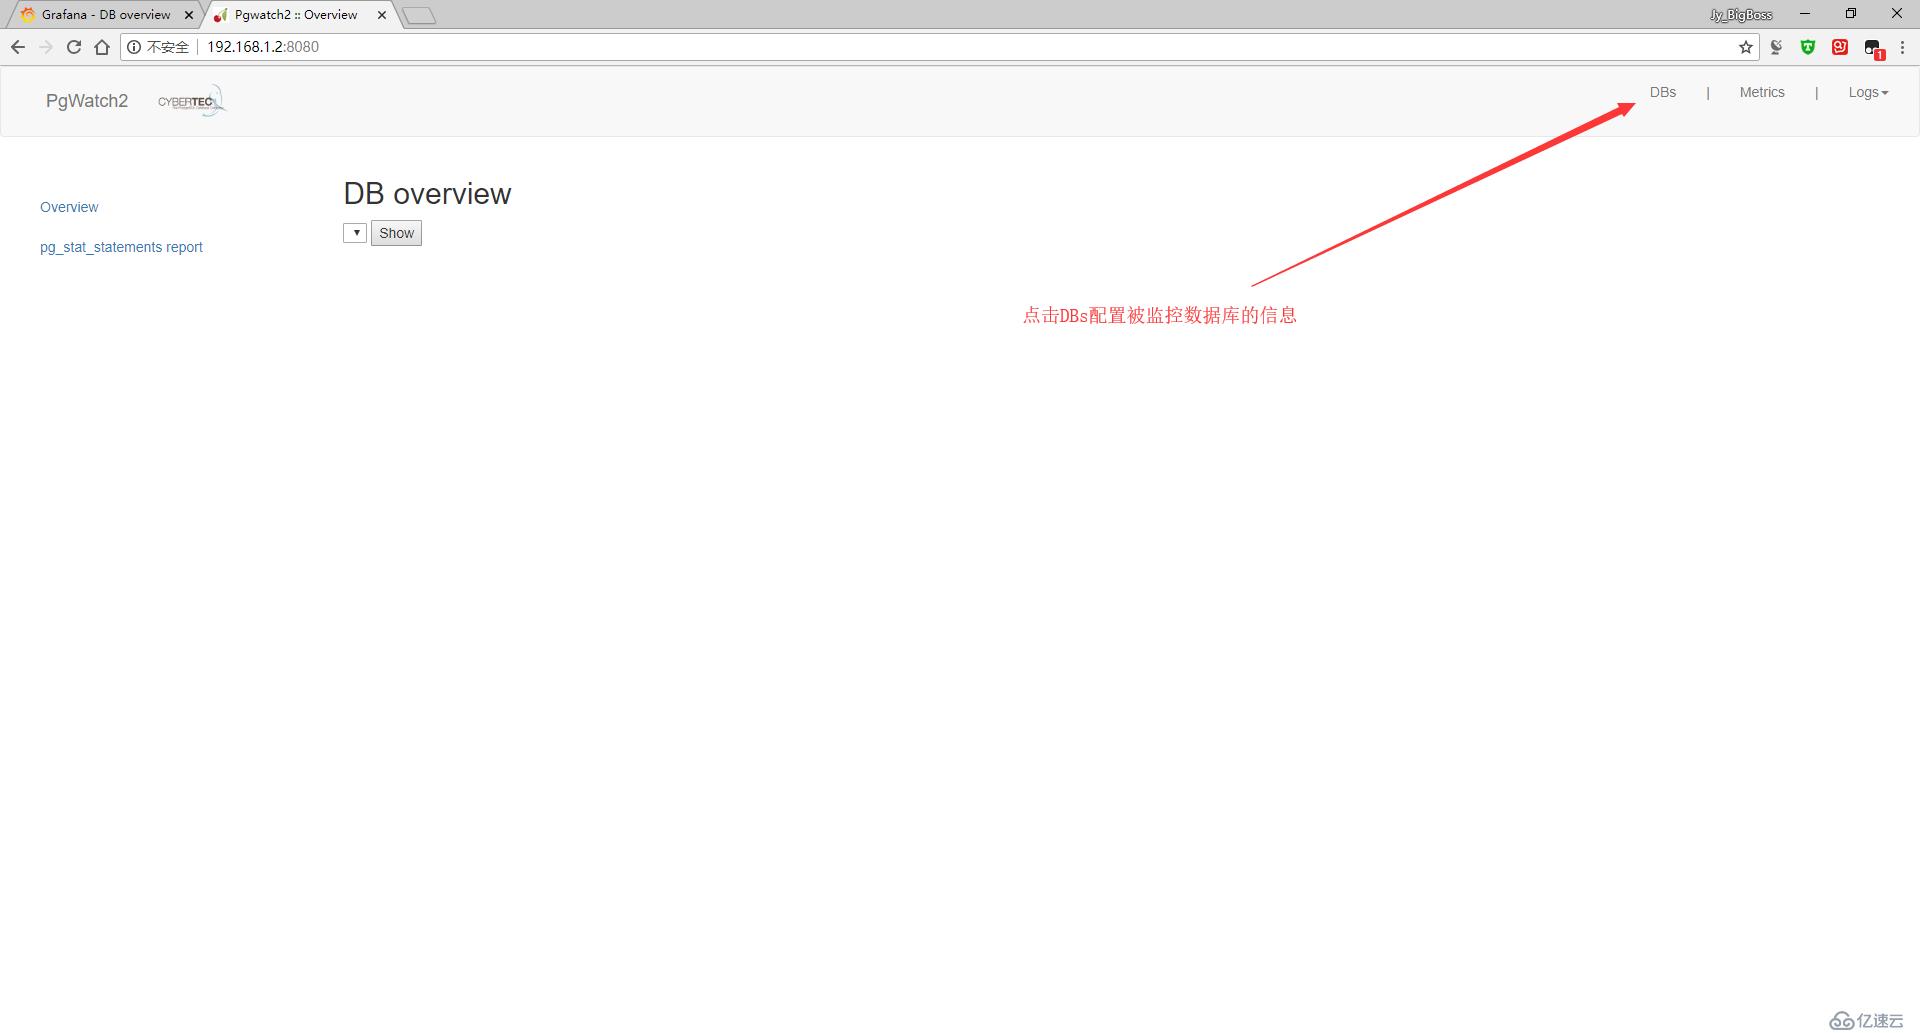
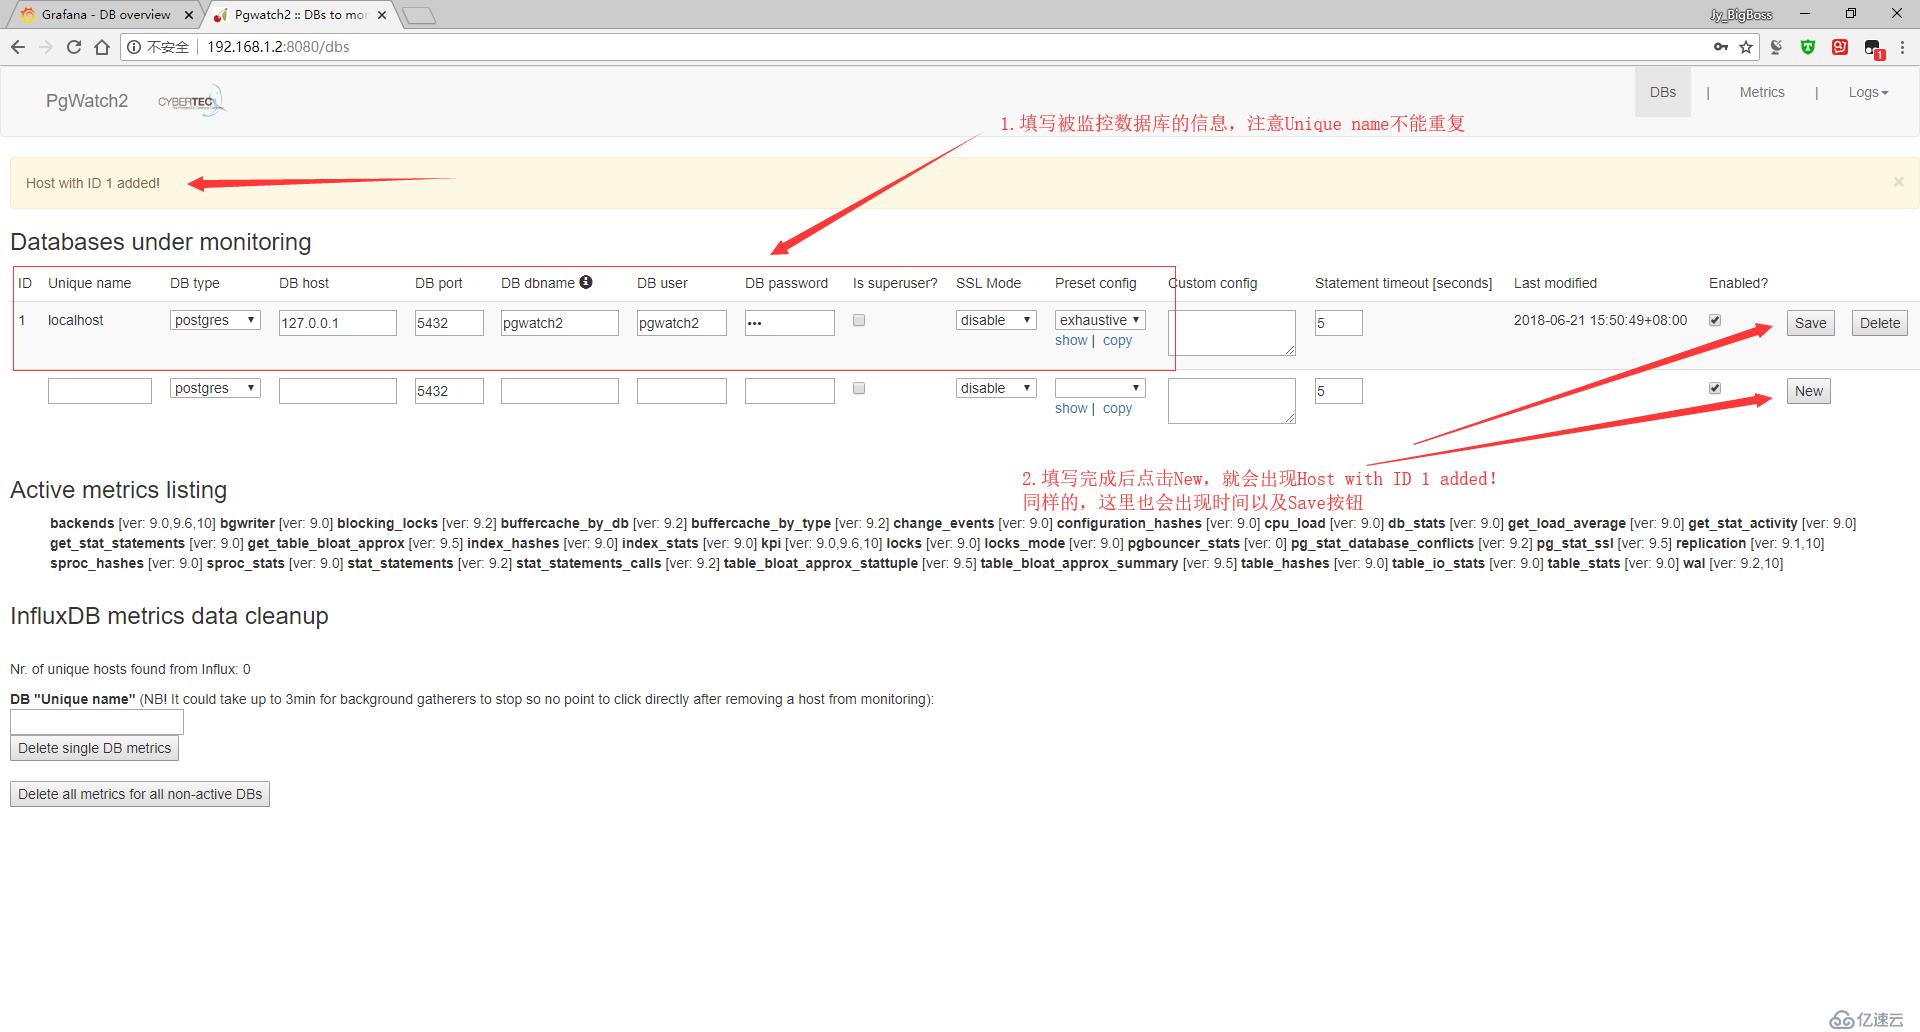
#й…ҚзҪ®иў«зӣ‘жҺ§зҡ„ж•°жҚ®еә“
#иҝҷйҮҢжҲ‘е°ұеҸӘзӣ‘жҺ§pgwatch3ж•°жҚ®еә“
su - postgres
psql -d pgwatch3 -c "CREATE EXTENSION pg_stat_statements;"
psql -d pgwatch3 -c "CREATE EXTENSION plpythonu;"
psql -f /app/pgwatch3/pgwatch3/sql/metric_fetching_helpers/stat_activity_wrapper.sql pgwatch3
psql -f /app/pgwatch3/pgwatch3/sql/metric_fetching_helpers/stat_statements_wrapper.sql pgwatch3
psql -f /app/pgwatch3/pgwatch3/sql/metric_fetching_helpers/cpu_load_plpythonu.sql pgwatch3
psql -f /app/pgwatch3/pgwatch3/sql/metric_fetching_helpers/table_bloat_approx.sql pgwatch3
#е®ҳж–№иҜҙжҳҺпјҡhttps://github.com/cybertec-postgresql/pgwatch3#steps-to-configure-your-database-for-monitoring

#зј–иҜ‘pgwatch3зЁӢеәҸ
yum install go -y
cd /app/pgwatch3/pgwatch3
./build_gatherer.sh
#е®үиЈ…goиҜӯиЁҖзҺҜеўғпјҢиҝӣе…Ҙpgwatch3зӣ®еҪ•пјҢжү§иЎҢbuild_gatherer.shејҖе§Ӣзј–иҜ‘
#иҝҷдёӘиҝҮзЁӢдјҡжҜ”иҫғж…ўпјҢеӣ дёәдјҡеҲ°githubдёҠдёӢиҪҪдёңиҘҝпјҢдёҖе®ҡиҰҒдҝқиҜҒз”өи„‘еҸҜд»ҘpingйҖҡgithub
#зј–иҜ‘е®ҢжҲҗеҗҺдјҡз”ҹжҲҗдёҖдёӘpgwatch3зҡ„еҸҜжү§иЎҢж–Ү件

./pgwatch3
#иҝҗиЎҢpgwatch3зЁӢеәҸ
#еӣ дёәеҲҡжүҚи®ҫзҪ®зҡ„жүҖжңүиҙҰжҲ·еҜҶз Ғи·ҹpgwatch3зЁӢеәҸй»ҳи®ӨеҖјжҳҜдёҖиҮҙзҡ„пјҢжүҖжңүзӣҙжҺҘиҝҗиЎҢеҚіеҸҜ
#иӢҘдёҚдёҖиҮҙпјҢиҜ·иҮӘиЎҢдҪҝз”Ё./pgwatch3 --helpжҹҘзңӢеё®еҠ©
#жү§иЎҢдёҚжҠҘй”ҷпјҢжҺҘдёӢжқҘеҺ»GrafanaзңӢж•°жҚ®е°ұиЎҢдәҶпјҒпјҒпјҒ
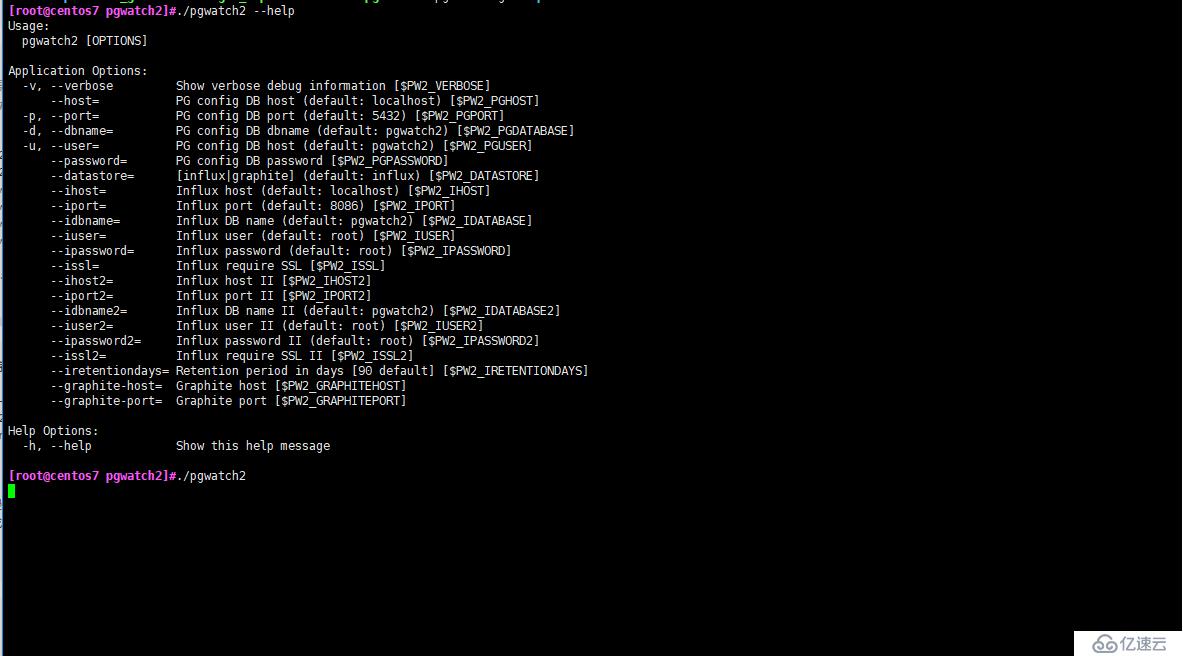
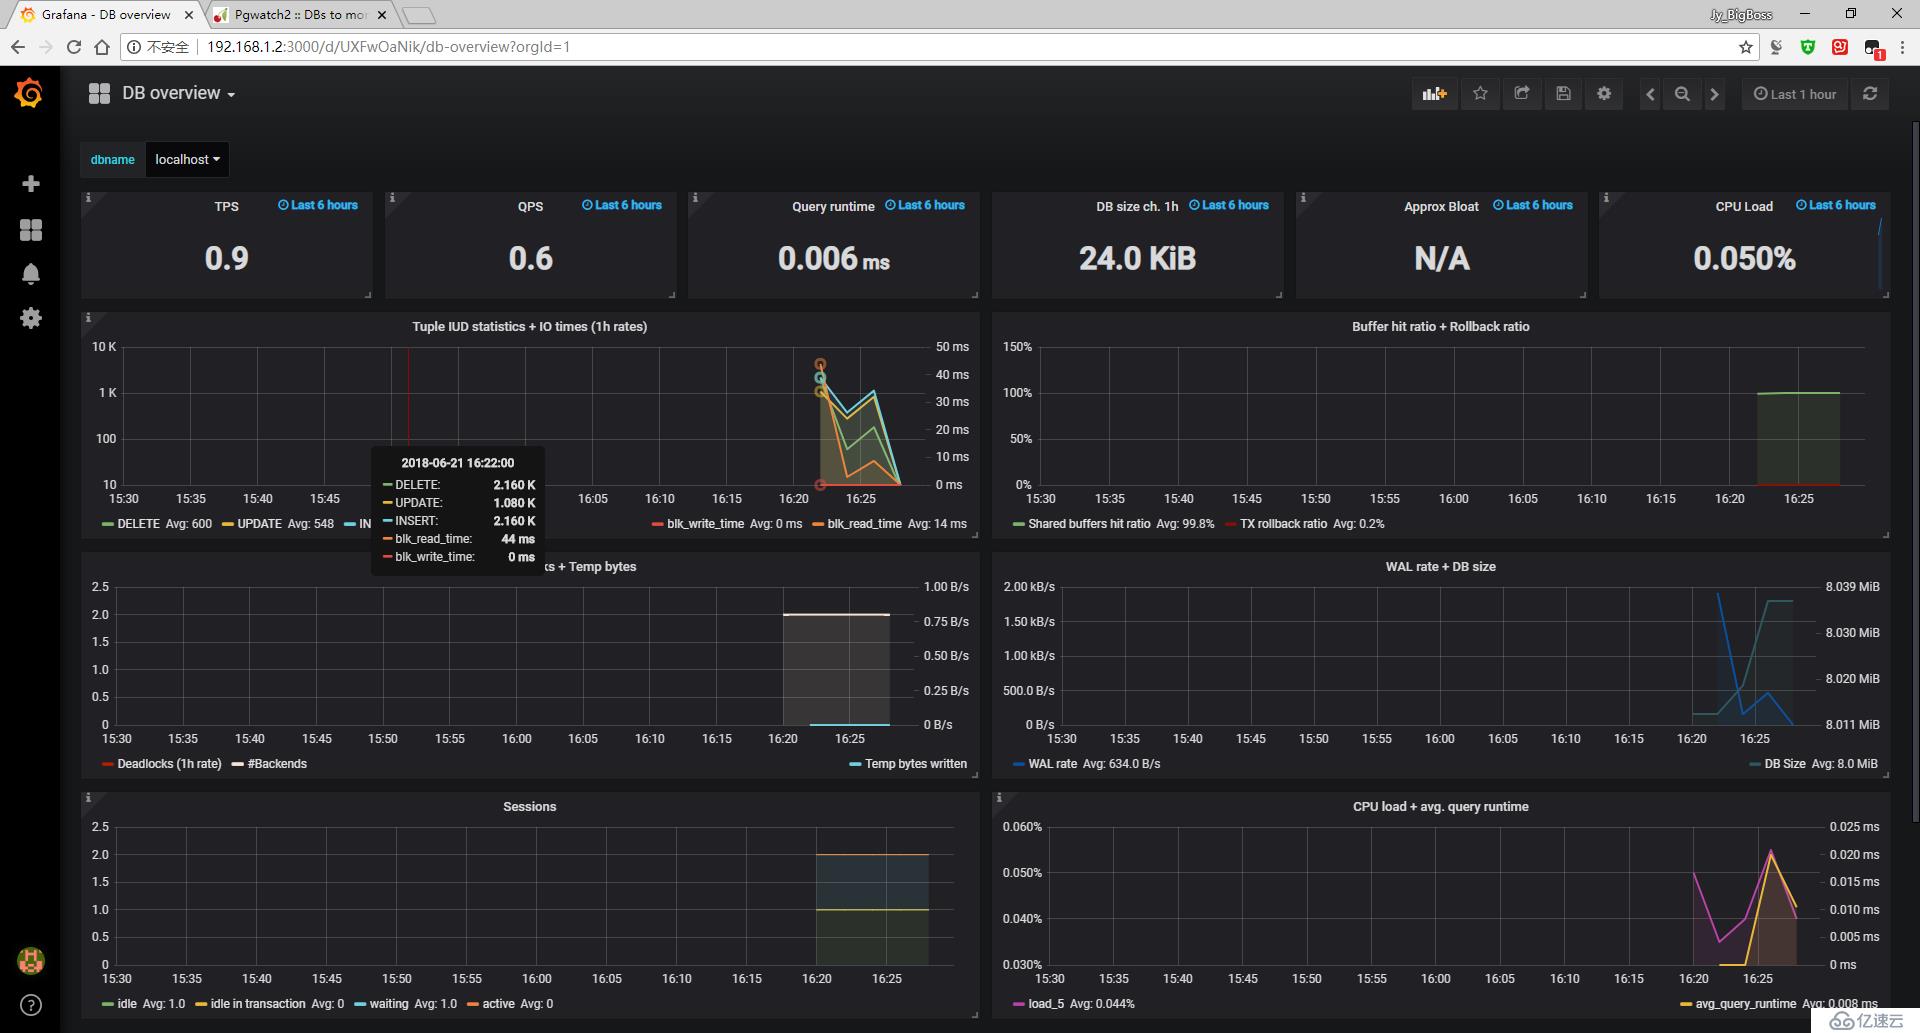
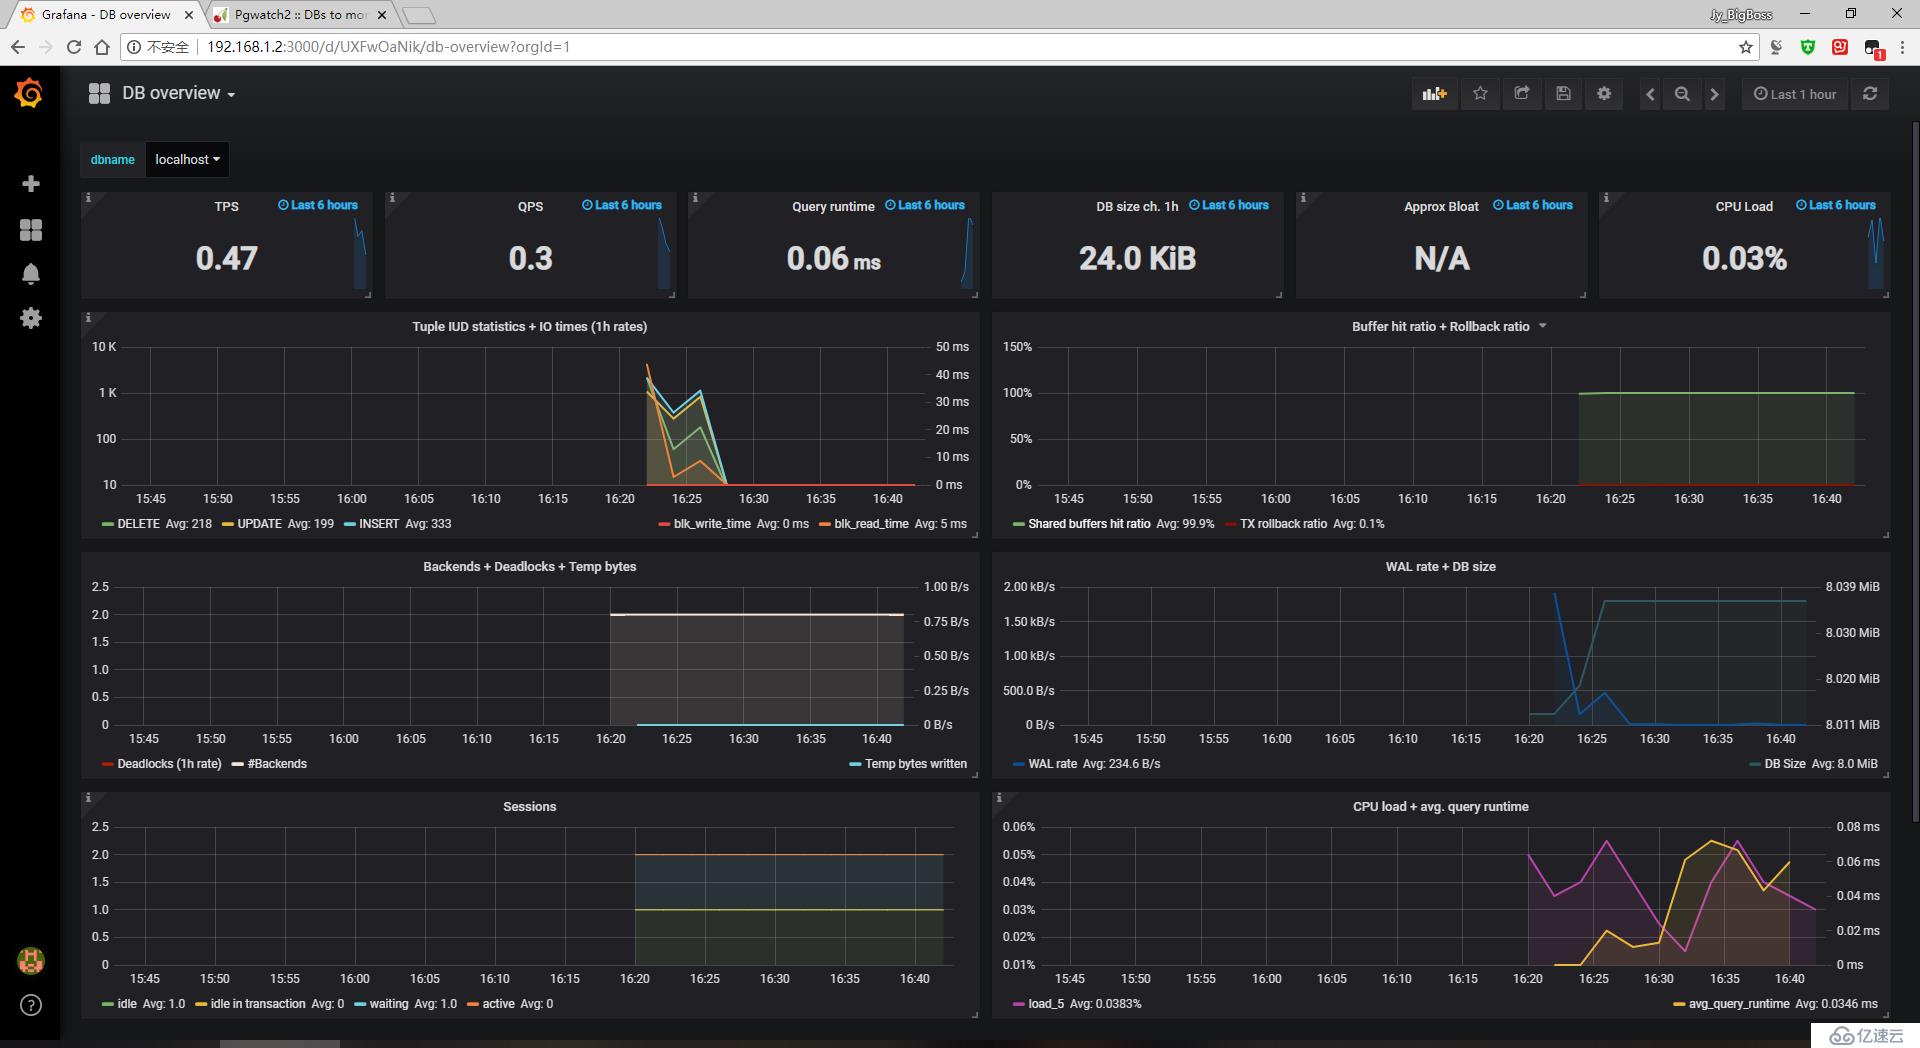
#жңҖеҗҺпјҢжҠҠpgwatch3й…ҚзҪ®жҲҗеҸҜд»Ҙз”Ёsystemctlж–№ејҸеҗҜеҠЁ
#жҠҠдёӢйқўзҡ„еҶ…е®№зІҳиҙҙеҲ°/etc/systemd/system/pgwatch3.service
#然еҗҺе°ұеҸҜд»Ҙз”Ёsystemctl start еҗҜеҠЁе•Ұ
#жіЁж„ҸпјҢйҖҡиҝҮиҝҷдёӘж–№ејҸеҗҜеҠЁпјҢжүҖжңүзҡ„иҫ“еҮәдҝЎжҒҜйғҪдјҡеңЁ/var/log/messages
[Unit]
Description=pgwatch3
After=syslog.target
After=network.target
[Service]
User=root
Restart=on-failure
PIDFile=/tmp/pgwatch3.pid
KillMode=control-group
ExecStart=/app/pgwatch3/pgwatch3/pgwatch3
ExecStop=/bin/kill -SIGTERM $MAINPID
RestartSec=10s
TimeoutSec=0
[Install]
WantedBy=multi-user.target

е…ҚиҙЈеЈ°жҳҺпјҡжң¬з«ҷеҸ‘еёғзҡ„еҶ…е®№пјҲеӣҫзүҮгҖҒи§Ҷйў‘е’Ңж–Үеӯ—пјүд»ҘеҺҹеҲӣгҖҒиҪ¬иҪҪе’ҢеҲҶдә«дёәдё»пјҢж–Үз« и§ӮзӮ№дёҚд»ЈиЎЁжң¬зҪ‘з«ҷз«ӢеңәпјҢеҰӮжһңж¶үеҸҠдҫөжқғиҜ·иҒ”зі»з«ҷй•ҝйӮ®з®ұпјҡis@yisu.comиҝӣиЎҢдёҫжҠҘпјҢ并жҸҗдҫӣзӣёе…іиҜҒжҚ®пјҢдёҖз»ҸжҹҘе®һпјҢе°Ҷз«ӢеҲ»еҲ йҷӨж¶үе«ҢдҫөжқғеҶ…е®№гҖӮ
жӮЁеҘҪпјҢзҷ»еҪ•еҗҺжүҚиғҪдёӢи®ўеҚ•е“ҰпјҒ