您好,登录后才能下订单哦!
密码登录
登录注册
点击 登录注册 即表示同意《亿速云用户服务条款》
最近有个老项目想逐步将新业务的数据放到新的数据库,以前的业务还得连接以前的数据库,于是需要整合多数据源 。
多数据源实际上是继承了AbstractRoutingDataSource类,这个类最终实现了DataSource接口,DataSource里只有一个getConnection方法,数据库每次访问的时候都要先通过这个方法获取连接,所有多数据源就是每次访问数据库之前动态的改变数据源。
在请求前改变数据源当然需要用到SpringAOP,自定义注解操作
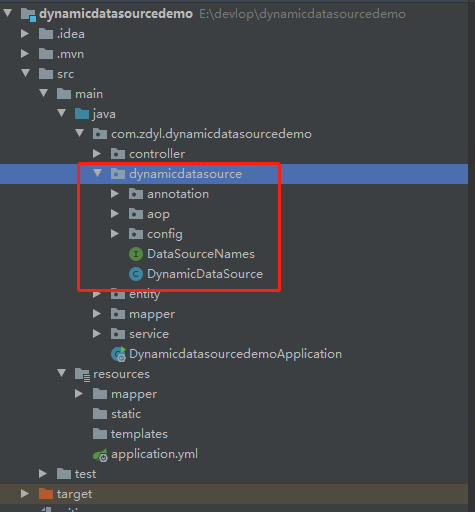
项目结构

下面上代码:
首先是依赖:
<!--数据库连接-->
    <dependency>
      <groupId>mysql</groupId>
      <artifactId>mysql-connector-java</artifactId>
      <scope>runtime</scope>
    </dependency>
    <dependency>
      <groupId>org.springframework.boot</groupId>
      <artifactId>spring-boot-starter-jdbc</artifactId>
    </dependency>
    <!--sqlserver-->
    <dependency>
      <groupId>com.microsoft.sqlserver</groupId>
      <artifactId>mssql-jdbc</artifactId>
      <scope>runtime</scope>
    </dependency>
    <!--mybatis-plus-->
    <dependency>
      <groupId>com.baomidou</groupId>
      <artifactId>mybatis-plus-boot-starter</artifactId>
      <version>3.1.2</version>
    </dependency>
    <!--数据库连接池-->
    <dependency>
      <groupId>com.alibaba</groupId>
      <artifactId>druid</artifactId>
      <version>1.1.8</version>
    </dependency>      <!--AOP-->
    <dependency>
      <groupId>org.springframework.boot</groupId>
      <artifactId>spring-boot-starter-aop</artifactId>
    </dependency>
yml配置数据源
server:
 port: 8888

spring:
 jackson:
  time-zone: GMT+8
  date-format: yyyy-MM-dd HH:mm:ss
 datasource:
  druid:
   first:
    driver-class-name: com.mysql.cj.jdbc.Driver
    type: com.alibaba.druid.pool.DruidDataSource
    jdbc-url: jdbc:mysql://rm-uf6265pj340sc9447oo.mysql.rds.54565.com:3306/dm?serverTimezone=Asia/Shanghai&useSSL=false&allowPublicKeyRetrieval=true&characterEncoding=utf-8
    username: username
    password: password
   second:
    type: com.alibaba.druid.pool.DruidDataSource
    driver-class-name: com.microsoft.sqlserver.jdbc.SQLServerDriver
    jdbc-url: jdbc:sqlserver://39.104.203.222:1433;DatabaseName=TestTLcom
    username: root
    password: 123456

mybatis-plus:
 mapper-locations: classpath*:/mapper/*Mapper.xml
 type-aliases-package: com.zdyl.dynamicdatasourcedemo.entity
 global-config:
  #主键类型 0:"数据库ID自增", 1:"用户输入ID",2:"全局唯一ID (数字类型唯一ID)", 3:"全局唯一ID UUID";
  id-type: 3
  #字段策略 0:"忽略判断",1:"非 NULL 判断"),2:"非空判断"
  field-strategy: 2
  #驼峰下划线转换
  db-column-underline: true
  #刷新mapper 调试神器
  refresh-mapper: true
  #数据库大写下划线转换
  #capital-mode: true
  #序列接口实现类配置
  #key-generator: com.baomidou.springboot.xxx
  #逻辑删除配置
  #logic-delete-value: 0
  #logic-not-delete-value: 1
  #自定义填充策略接口实现
  #meta-object-handler: com.baomidou.springboot.xxx
  #自定义SQL注入器
  #sql-injector: com.baomidou.springboot.xxx
 configuration:
  map-underscore-to-camel-case: true
  cache-enabled: false
定义数据库名称
/**
 * 数据库名称
 */
public interface DataSourceNames {

  String FIRST = "first";
  String SECOND = "second";
}
动态数据源
import org.springframework.jdbc.datasource.lookup.AbstractRoutingDataSource;

import javax.sql.DataSource;
import java.util.HashMap;
import java.util.Map;

/**
 * 动态数据源
 */
public class DynamicDataSource extends AbstractRoutingDataSource {

  private static final ThreadLocal<String> contextHolder = new ThreadLocal<>();

  public DynamicDataSource(DataSource defaultTargetDataSource, Map<String, DataSource> targetDataSources) {

    super.setDefaultTargetDataSource(defaultTargetDataSource);
    super.setTargetDataSources(new HashMap<>(targetDataSources));
    super.afterPropertiesSet();
  }

  @Override
  protected Object determineCurrentLookupKey() {
    return getDataSource();
  }

  public static String getDataSource() {
    return contextHolder.get();
  }

  public static void setDataSource(String dataSource) {
    contextHolder.set(dataSource);
  }

  public static void clearDataSource() {
    contextHolder.remove();
  }
}
配置多数据源
import com.baomidou.mybatisplus.extension.plugins.PaginationInterceptor;
import com.zdyl.dynamicdatasourcedemo.dynamicdatasource.DataSourceNames;
import com.zdyl.dynamicdatasourcedemo.dynamicdatasource.DynamicDataSource;
import org.mybatis.spring.annotation.MapperScan;
import org.springframework.boot.context.properties.ConfigurationProperties;
import org.springframework.boot.jdbc.DataSourceBuilder;
import org.springframework.context.annotation.Bean;
import org.springframework.context.annotation.Configuration;
import org.springframework.context.annotation.Primary;

import javax.sql.DataSource;
import java.util.HashMap;
import java.util.Map;

/**
 * 多数据源配置
 */
@Configuration
@MapperScan("com.zdyl.dynamicdatasourcedemo.**.mapper*")
public class MybatisPluConfig {

  /**
   * 数据源配置
   * @return
   */
  @Bean
  @ConfigurationProperties(prefix="spring.datasource.druid.first")
  public DataSource firstDataSource() {
    return DataSourceBuilder.create().build();
  }

  @Bean
  @ConfigurationProperties(prefix="spring.datasource.druid.second")
  public DataSource secondDataSource() {
    return DataSourceBuilder.create().build();
  }

  @Bean
  @Primary
  public DynamicDataSource dataSource(DataSource firstDataSource, DataSource secondDataSource){
    Map<String, DataSource> targetDataSources = new HashMap<>();
    targetDataSources.put(DataSourceNames.FIRST, firstDataSource);
    targetDataSources.put(DataSourceNames.SECOND, secondDataSource);
    return new DynamicDataSource(firstDataSource, targetDataSources);
  }

  /**
   * mybatis-plus分页插件<br>
   * 文档:http://mp.baomidou.com<br>
   */
  @Bean
  public PaginationInterceptor paginationInterceptor() {
    return new PaginationInterceptor();
  }

}
下面就是自定义注解
import java.lang.annotation.*;

/**
 * 多数据源注解
 * AOP拦截此注解更换数据源
 */

@Target(ElementType.METHOD)
@Retention(RetentionPolicy.RUNTIME)
@Documented
public @interface CurDataSource {

  String name() default "";
}
AOP
import com.zdyl.dynamicdatasourcedemo.dynamicdatasource.DataSourceNames;
import com.zdyl.dynamicdatasourcedemo.dynamicdatasource.DynamicDataSource;
import com.zdyl.dynamicdatasourcedemo.dynamicdatasource.annotation.CurDataSource;
import lombok.extern.slf4j.Slf4j;
import org.aspectj.lang.ProceedingJoinPoint;
import org.aspectj.lang.annotation.Around;
import org.aspectj.lang.annotation.Aspect;
import org.aspectj.lang.annotation.Pointcut;
import org.aspectj.lang.reflect.MethodSignature;
import org.springframework.core.Ordered;
import org.springframework.stereotype.Component;

import java.lang.reflect.Method;


/**
 * 多数据源,切面处理类
 * AOP拦截多数据源注解 @CurDataSource 注解更换数据源
 */

@Slf4j
@Aspect
@Component
public class DataSourceAspect implements Ordered {


  /**
   * 切点
   */
  @Pointcut("@annotation(com.zdyl.dynamicdatasourcedemo.dynamicdatasource.annotation.CurDataSource)")
  public void dataSourcePointCut() {

  }

  @Around("dataSourcePointCut()")
  public Object around(ProceedingJoinPoint point) throws Throwable {
    MethodSignature signature = (MethodSignature) point.getSignature();
    Method method = signature.getMethod();
    CurDataSource curDataSource = method.getAnnotation(CurDataSource.class);
    if (curDataSource == null) {
      DynamicDataSource.setDataSource(DataSourceNames.FIRST);
      log.info("set datasource is " + DataSourceNames.FIRST);
    } else {
      DynamicDataSource.setDataSource(curDataSource.name());
      log.info("set datasource is " + curDataSource.name());
    }
    try {
      return point.proceed();
    } finally {
      DynamicDataSource.clearDataSource();
      log.info("clean datasource");
    }
  }

  @Override
  public int getOrder() {
    return 1;
  }
}
最后主启动了去掉数据源自动加载
@SpringBootApplication(exclude = DataSourceAutoConfiguration.class)
最后我们来跑起来请求一下,测试一下是否正确
@RestController
public class CfgDeviceController {
  @Resource
  CfgDeviceService cfgDeviceService;
  @Resource
  CfgChargeStartInfoService cfgChargeStartInfoService;

  @CurDataSource(name = DataSourceNames.FIRST)
  @GetMapping("/test")
  public void getUser() {
    CfgDevice byId = cfgDeviceService.getById(19);
    System.out.println(byId.toString());
  }

  @CurDataSource(name = DataSourceNames.SECOND)
  @GetMapping("/test1")
  public void getUser1() {
    CfgChargeStartInfo byId = cfgChargeStartInfoService.getById(1);
    System.out.println(byId.toString());
  }
}

**如果不加注解,使用默认数据源
至此就整合完了
以上就是本文的全部内容,希望对大家的学习有所帮助,也希望大家多多支持亿速云。
免责声明:本站发布的内容(图片、视频和文字)以原创、转载和分享为主,文章观点不代表本网站立场,如果涉及侵权请联系站长邮箱:is@yisu.com进行举报,并提供相关证据,一经查实,将立刻删除涉嫌侵权内容。