您好,登录后才能下订单哦!
密码登录
登录注册
点击 登录注册 即表示同意《亿速云用户服务条款》
jQuery如何实现评论模块的方法?这个问题可能是我们日常学习或工作经常见到的。希望通过这个问题能让你收获颇深。下面是小编给大家带来的参考内容,让我们一起来看看吧!
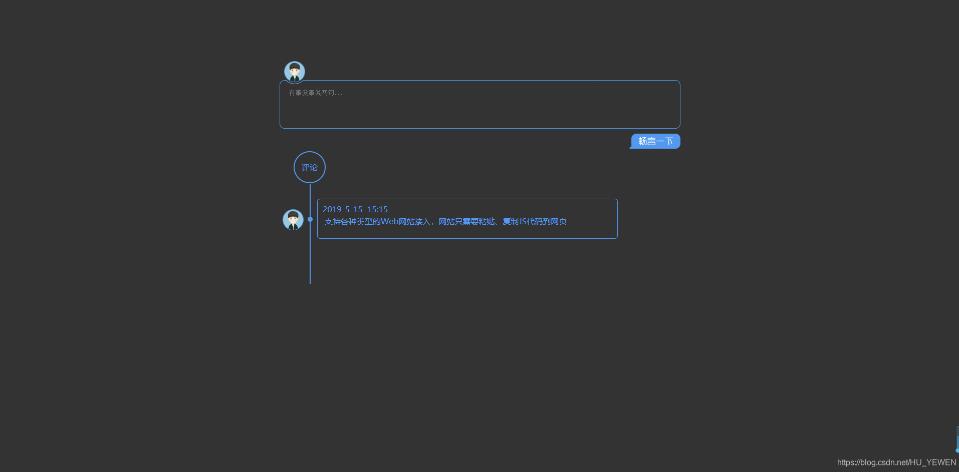
本模块可用于评论或留言,输入区模仿畅言,内容显示使用时间轴,以下是示例图。

实现代码如下:
index.html
<!DOCTYPE html>
<html lang="en">
<head>
<meta charset="UTF-8">
<meta name="viewport" content="width=device-width, initial-scale=1.0">
<meta http-equiv="X-UA-Compatible" content="ie=edge">
<title>Document</title>
<link rel="stylesheet" href="css/publish_comment.css" >
</head>
<body>
<div class="comment-box">
<div class="input-box">
<div class="input-box-head">
<img class="user-photo" src="images/photo.jpg">
</div>
<div class="input-box-main">
<div class="box-border-l"></div>
<div class="box-border-r"></div>
<div class="box-top"></div>
<div class="box-main">
<div class="input-region">
<textarea class="input-text-area" name="comment_input" placeholder="有事没事说两句..."></textarea>
</div>
</div>
<div class="pub-area">
<div class="pub-btn"></div>
</div>
</div>
</div>
<div class="show-box">
<div class="comment-title">评论</div>
<div class="time-line">
<div class="comment-content">
<div class='comment'> <img class=head-shot src='images/photo.jpg'>
<div class='c-circle'></div>
<span id='time'>2019-5-15
<span id='hour'>15:15</span>
</span>
<br>
<p style='padding:4px'>支持各种类型的Web网站接入,网站只需要粘贴、复制JS代码到网页</p>
</div>
</div>
</div>
</div>
</div>
<script src="js/jquery-3.3.1.min.js"></script>
<script>
var hei = 200;
$(function() {
var dateDom = new Date();
//获取本地时间,年月日时分
var year = dateDom.getFullYear();
var month = dateDom.getMonth() + 1;
var day = dateDom.getDate();
var hour = dateDom.getHours();
var min = dateDom.getMinutes();
$(".time-line").css("height", hei + "px");
$(".pub-btn").click(function() {
var comment_c = $(".input-text-area").val();
if (comment_c == "") {
alert("请输入内容");
return;
}
$(".comment-content").prepend("<div class='comment'>" + "<img class=head-shot src='images/photo.jpg'>" +
"<div class='c-circle'></div>" +
"<span id='time'>" + year + "-" +
month + "-" +
day + " " +
"<span id='hour'>" + hour + ":" + min + "</span>" +
"</span>" +
"<br>" +
"<p style='padding:4px'>" + comment_c + "</p>" +
"</div>");
$(".time-line").css("height", hei + "px");
hei += 115;
})
})
</script>
</body>
</html>publish_comment.css
* {
 margin: 0;
 padding: 0
}

body {
 font-size: 14px;
 font-family: "微软雅黑";
 /* background: url("../images/2.jpg") top no-repeat; */
 background: #333333;
 background-attachment: fixed;
 z-index: 0;
 background-size: 100%;
}

.comment-box {
 width: 800px;
 margin: auto;
 margin-top: 100px;
}

.input-box {
 width: 100%;
}

.input-box-head {
 position: relative;
 width: 100%;
 height: 60px;
 z-index: 10;
}

.user-photo {
 width: 40px;
 height: 40px;
 border-radius: 42px;
 border: 1px solid #4398ed;
 position: absolute;
 top: 22px;
 left: 9px;
 font-size: 14px;
 color: #4398ed;
 text-align: center;
 line-height: 42px!important;
 font-family: "Microsoft YaHei";
 cursor: pointer;
 background: 0 0;
}

.input-box-main {
 display: block;
 position: relative;
 zoom: 1;
 z-index: 2;
}

.box-border-l {
 width: 8px;
 height: 97px;
 position: absolute;
 background: url("../images/border-l.png");
 top: 0;
 left: 0;
}

.box-border-r {
 width: 8px;
 height: 97px;
 position: absolute;
 background: url("../images/border-r.png");
 top: 0;
 right: 0;
}

.box-main {
 margin: 0 8px;
 height: 96px;
 /* background: #fff; */
 border-bottom: 1px solid #4398ed;
}

.box-top {
 width: calc(100% - 16px);
 height: 8px;
 background: url(https://changyan.itc.cn/mdevp/extensions/cmt-box/065/images/border-t.png);
 overflow: hidden;
 position: absolute;
 left: 8px;
 top: 0;
}

.input-region {
 padding: 18px 10px 0;
}

.input-text-area {
 width: 100%;
 height: 70px;
 background: 0 0;
 overflow-x: hidden;
 overflow-y: auto;
 border: 0;
 font-size: 13px;
 color: #4398ed;
 resize: none;
 line-height: normal;
 text-align: left;
 box-shadow: none;
 -webkit-box-shadow: none;
 outline: none;
 border: none;
}

.pub-area {
 width: 100%;
 position: relative;
 z-index: 12;
}

.pub-btn {
 position: absolute;
 top: 10px;
 right: 0;
 width: 102px;
 height: 30px;
 overflow: hidden;
 border: 0;
 padding: 0;
 margin: 0;
 cursor: pointer;
 background-image: url("../images/post-btn.png");
 background-repeat: no-repeat;
 background-color: transparent;
}

.show-box {
 position: relative;
 top: 10px;
}

.comment-title {
 position: absolute;
 top: 35px;
 left: 28px;
 width: 60px;
 height: 60px;
 line-height: 60px;
 text-align: center;
 font-size: 16px;
 color: #4398ed;
 border: 2px solid #4398ed;
 border-radius: 50%;
}

.time-line {
 width: 60px;
 height: 0;
 position: absolute;
 top: 100px;
 left: 0;
 border-right: 2px solid #4398ed;
}

.comment-content {
 width: 380px;
 height: 80px;
 position: absolute;
 top: 0px;
 left: 60px;
}

.comment-content .comment {
 width: 600px;
 height: 80px;
 /* background: #fff; */
 border: 1px solid #4398ed;
 border-radius: 6px;
 margin-top: 30px;
 font-size: 16px;
 line-height: 20px;
 color: #4398ed;
 word-break: break-all;
 position: relative;
 left: 15px;
 padding: 10px;
 box-sizing: border-box;
}

.c-circle {
 width: 6px;
 height: 6px;
 border-radius: 50%;
 border: 2px solid #4398ed;
 background: #4398ed;
 position: absolute;
 top: 35px;
 left: -20px;
}

.head-shot {
 position: absolute;
 top: 20px;
 left: -70px;
 width: 40px;
 height: 40px;
 border: 1px solid #4398ed;
 border-radius: 50%;
}
感谢各位的阅读!看完上述内容,你们对jQuery如何实现评论模块的方法大概了解了吗?希望文章内容对大家有所帮助。如果想了解更多相关文章内容,欢迎关注亿速云行业资讯频道。
免责声明:本站发布的内容(图片、视频和文字)以原创、转载和分享为主,文章观点不代表本网站立场,如果涉及侵权请联系站长邮箱:is@yisu.com进行举报,并提供相关证据,一经查实,将立刻删除涉嫌侵权内容。