жӮЁеҘҪпјҢзҷ»еҪ•еҗҺжүҚиғҪдёӢи®ўеҚ•е“ҰпјҒ
еҜҶз Ғзҷ»еҪ•
зҷ»еҪ•жіЁеҶҢ
зӮ№еҮ» зҷ»еҪ•жіЁеҶҢ еҚіиЎЁзӨәеҗҢж„ҸгҖҠдәҝйҖҹдә‘з”ЁжҲ·жңҚеҠЎжқЎж¬ҫгҖӢ
иҝҷзҜҮж–Үз« е°ҶдёәеӨ§е®¶иҜҰз»Ҷи®Іи§Јжңүе…ідёҖж–ҮиҜ»жҮӮAndroidзҡ„иҝӣзЁӢпјҢж–Үз« еҶ…е®№иҙЁйҮҸиҫғй«ҳпјҢеӣ жӯӨе°Ҹзј–еҲҶдә«з»ҷеӨ§е®¶еҒҡдёӘеҸӮиҖғпјҢеёҢжңӣеӨ§е®¶йҳ…иҜ»е®ҢиҝҷзҜҮж–Үз« еҗҺеҜ№зӣёе…ізҹҘиҜҶжңүдёҖе®ҡзҡ„дәҶи§ЈгҖӮ
еӨҡиҝӣзЁӢ
еҰӮжһңйңҖиҰҒзҡ„ж—¶еҖҷпјҢappеҸҜд»ҘеҲӣе»әеӨҡиҝӣзЁӢгҖӮ
еңЁиҝӣзЁӢйҮҢйқў
еҗ„зұ»з»„件е…ғзҙ зҡ„жё…еҚ•ж–Ү件жқЎзӣ® гҖҒ гҖҒ е’Ң
вҖ” еқҮж”ҜжҢҒ android:process еұһжҖ§пјҢжӯӨеұһжҖ§еҸҜд»ҘжҢҮе®ҡиҜҘ组件еә”еңЁе“ӘдёӘиҝӣзЁӢиҝҗиЎҢгҖӮ
й»ҳи®ӨиҝӣзЁӢе°ұжҳҜдё»иҝӣзЁӢгҖӮе…¶д»–иҝӣзЁӢдёҖиҲ¬жқҘиҜҙйғҪжҳҜеӯҗиҝӣзЁӢгҖӮ
2дёӘactivityеңЁдёҚеҗҢзҡ„иҝӣзЁӢйҮҢйқўпјҢеҸҜд»ҘеҲ·ж–°UIеҗ—пјҹ
<activity android:name=".androidsample.ActivityProgressB"
android:process=":progressb"/>жөӢиҜ•з»“жһңпјҡActivityProgressBеҸҜд»ҘжӯЈеёёжҳҫзӨәгҖӮиҝҷдёӘе…¶е®һеҫҲеҘҪзҗҶи§ЈпјҢеҰӮжһңдҪ жү“ејҖзі»з»ҹзӣёжңәйЎөйқўпјҢйӮЈдёӘactivityиӮҜе®ҡдёҺдҪ зҡ„appдёҚеҶҚдёҖдёӘиҝӣзЁӢпјҢдҪҶжҳҜд»–еҸҜд»ҘеҫҲйЎәеҲ©зҡ„жү“ејҖпјҢжүҖд»ҘеҸҜд»Ҙж”ҜжҢҒгҖӮ
дҝқжҙ»
OOM_ADJ
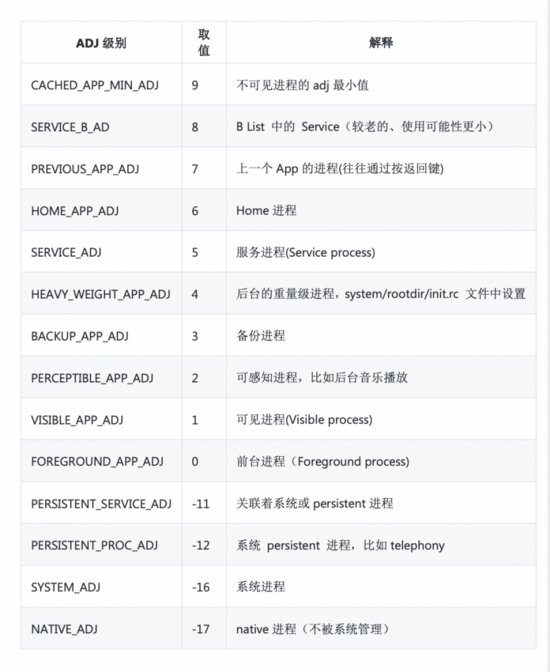
иҝҷдёӘе°ұжҳҜoom еӣһkillиҝӣзЁӢзҡ„дјҳе…Ҳзә§гҖӮ
иҝӣзЁӢkillзҡ„ж–№ејҸ
| еңәжҷҜ | жҺҘеҸЈ | иҢғеӣҙ |
|---|---|---|
| LowMemoryKiller | LowMemoryKiller | д»ҺиҝӣзЁӢзҡ„дјҳе…Ҳзә§дҫқж¬ЎkillпјҢйҮҠж”ҫеҶ…еӯҳ |
| дёүж–№killпјҲж— rootпјү | killbackgroundprogersss | kill oom_adj>4 |
| дёүж–№killпјҲжңүrootпјү | forcestop or kill | зҗҶи®әдёҠжүҖжңүпјҢдёҖиҲ¬жҳҜйқһзі»з»ҹе’ҢеҸҜи§ҒиҝӣзЁӢ |
| еҺӮе•ҶkillеҠҹиғҪ | force stop or kill | зҗҶи®әдёҠжүҖжңүпјҢеҢ…жӢ¬native |
иҝӣзЁӢдҝқжҙ»зҡ„зӣ®зҡ„пјҢе°ұжҳҜжҸҗдҫӣиҝӣзЁӢзҡ„дјҳе…Ҳзә§пјҢйҷҚдҪҺиҝӣзЁӢиў«killзҡ„жҰӮзҺҮгҖӮ
дҝқжҙ»зҡ„еҘ—и·Ҝ
ејҖеҗҜ1дёӘеғҸзҙ зҡ„activity
2020-08-14 14:29:48.630 1164-8504/system_process W/ActivityTaskManager: Background activity start [callingPackage: com.demanmath.androidms; callingUid: 10398; isCallingUidForeground: false; isCallingUidPersistentSystemProcess: false; realCallingUid: 10398; isRealCallingUidForeground: false; isRealCallingUidPersistentSystemProcess: false; originatingPendingIntent: null; isBgStartWhitelisted: false; intent: Intent { flg=0x10000000 cmp=com.demanmath.androidms/.androidsample.LiveActivity }; callerApp: ProcessRecord{a168b71 2429:com.demanmath.androidms/u0a398}]
еңЁandroid Qд»ҘеҗҺпјҢдёҚе…Ғи®ёеҗҺеҸ°иҝӣзЁӢеҗҜеҠЁеҗҺеҸ°йЎөйқўдәҶгҖӮд№ҹе°ұжҳҜжғіеҗҜеҠЁдёҖдёӘеүҚеҸ°йЎөйқў
дҪҝз”ЁеүҚеҸ°жңҚеҠЎ
package com.demanmath.androidms.androidsample
import android.annotation.TargetApi
import android.app.Notification
import android.app.NotificationChannel
import android.app.NotificationManager
import android.app.Service
import android.content.Context
import android.content.Intent
import android.os.Build
import android.os.Handler
import android.os.IBinder
import androidx.core.app.NotificationCompat
import com.demanmath.androidms.AppLog
import com.demanmath.androidms.R
/**
* @author DemanMath
* @date 2020/8/14
*
*/
class KeepLiveService:Service() {
val NOTIFICATION_ID = 0x11
val NOTIFICATION_CHANNEL_ID = "demanmathId"
val channelName = "My Background Service"
companion object {
const val NOTIFICATION_ID = 0x11
}
override fun onBind(intent: Intent?): IBinder? {
return null
}
override fun onCreate() {
super.onCreate()
if (Build.VERSION.SDK_INT < Build.VERSION_CODES.O) {
startForeground(NOTIFICATION_ID, Notification())
} else {
startMyOwnForeground()
startService(Intent(this, InnerService::class.java))
}
}
@TargetApi(value = Build.VERSION_CODES.O)
private fun startMyOwnForeground() {
AppLog.d()
val chan = NotificationChannel(
NOTIFICATION_CHANNEL_ID,
channelName,
NotificationManager.IMPORTANCE_NONE
)
chan.lockscreenVisibility = Notification.VISIBILITY_PRIVATE
val manager =
(getSystemService(Context.NOTIFICATION_SERVICE) as NotificationManager)
manager.createNotificationChannel(chan)
val notificationBuilder =
NotificationCompat.Builder(this, NOTIFICATION_CHANNEL_ID)
val notification = notificationBuilder.setOngoing(true)
.setSmallIcon(R.drawable.ic_launcher_background)
.setContentTitle("App is running in background")
.setPriority(NotificationManager.IMPORTANCE_MIN)
.setCategory(Notification.CATEGORY_SERVICE)
.build()
startForeground(NOTIFICATION_ID, notification)
}
class InnerService : Service() {
override fun onBind(intent: Intent): IBinder? {
return null
}
override fun onCreate() {
super.onCreate()
//дҪҝз”ЁchanneId & channelName
//еҸ‘йҖҒдёҺKeepLiveServiceдёӯIDзӣёеҗҢзҡ„NotificationпјҢ然еҗҺе°Ҷе…¶еҸ–ж¶Ҳ并еҸ–ж¶ҲиҮӘе·ұзҡ„еүҚеҸ°жҳҫзӨә
// val builder: Notification.Builder = Notification.Builder(this)
// builder.setSmallIcon(R.mipmap.ic_launcher)
// startForeground(NOTIFICATION_ID, builder.build())
Handler().postDelayed(Runnable {
stopForeground(true)
val manager =
getSystemService(Context.NOTIFICATION_SERVICE) as NotificationManager
manager.cancel(NOTIFICATION_ID)
stopSelf()
}, 100)
}
}
}дҪҶжҳҜandroidQејҖе§Ӣд»ҘеҗҺпјҢзҰҒжӯўеҗҺеҸ°иҝӣзЁӢејҖеҗҜеүҚеҸ°иҝӣзЁӢпјҢиҝҷдёӘд№ҹжҳҜandroidдёәдәҶзңҒз”өиҖғиҷ‘зҡ„гҖӮ
еӨҡиҝӣзЁӢзӣёдә’е”ӨйҶ’
иҝҷдёӘе°ұжҳҜжҜҸдёӘappпјҢе…¶еӨҡдёӘиҝӣзЁӢпјҢеҰӮжһңжҜ”killжҺүдәҶпјҢеҸҜд»ҘйҖҡиҝҮеҸҰдёҖдёӘе”Өиө·гҖӮд»ҺдёҠйқўзҡ„еүҚеҸ°serviceзҡ„еҠҹж•Ҳжңүдәӣзұ»дјјгҖӮ
еҗҢж ·зҡ„й—®йўҳпјҢandroid Qд»ҘеҗҺж— ж•ҲгҖӮ
JobSchedule
package com.demanmath.androidms.jobservice
import android.app.job.JobParameters
import android.app.job.JobService
import android.content.Intent
import android.os.Handler
import android.os.Message
import android.widget.Toast
import com.demanmath.androidms.AppLog
/**
* @author DemanMath
* @date 2020/8/20
*
*/
class JobDemoService:JobService() {
override fun onCreate() {
super.onCreate()
AppLog.i()
}
override fun onStartCommand(intent: Intent?, flags: Int, startId: Int): Int {
AppLog.i()
return super.onStartCommand(intent, flags, startId)
}
private var mHandler = object:Handler(){
override fun handleMessage(msg: Message) {
AppLog.i()
Toast.makeText(
applicationContext,
"JobService task running", Toast.LENGTH_SHORT
).show()
//иҜ·жіЁж„ҸпјҢжҲ‘们жүӢеҠЁи°ғз”ЁдәҶjobFinishedж–№жі•гҖӮ
//еҪ“onStartJobиҝ”еӣһtrueзҡ„ж—¶еҖҷпјҢжҲ‘们еҝ…йЎ»жүӢеҠЁи°ғз”ЁjobFinishedж–№жі•
//еҗҰеҲҷиҜҘеә”з”Ёдёӯзҡ„е…¶д»–jobе°ҶдёҚдјҡиў«жү§иЎҢ
jobFinished(msg.obj as JobParameters, false)
}
}
override fun onStartJob(params: JobParameters?): Boolean {
AppLog.i()
mHandler.sendMessage(Message.obtain(mHandler,1,params))
return true
}
override fun onStopJob(params: JobParameters?): Boolean {
AppLog.i()
mHandler.removeMessages(1)
return false
}
}package com.demanmath.androidms.jobservice
import android.app.job.JobInfo
import android.app.job.JobScheduler
import android.content.ComponentName
import android.content.Context
import com.demanmath.androidms.AppLog
/**
* @author DemanMath
* @date 2020/8/20
*
*/
class JobHelper(var context: Context) {
lateinit var jobScheduler:JobScheduler
fun startJob(){
AppLog.i()
jobScheduler = context.getSystemService(Context.JOB_SCHEDULER_SERVICE) as JobScheduler
var builder = JobInfo.Builder(1, ComponentName(context.packageName,JobDemoService::class.java.name))
// builder.setBackoffCriteria(1000L,JobInfo.BACKOFF_POLICY_LINEAR)
var boolean = jobScheduler.schedule(builder.build())
AppLog.i(boolean.toString())
}
}е…ідәҺдёҖж–ҮиҜ»жҮӮAndroidзҡ„иҝӣзЁӢе°ұеҲҶдә«еҲ°иҝҷйҮҢдәҶпјҢеёҢжңӣд»ҘдёҠеҶ…е®№еҸҜд»ҘеҜ№еӨ§е®¶жңүдёҖе®ҡзҡ„её®еҠ©пјҢеҸҜд»ҘеӯҰеҲ°жӣҙеӨҡзҹҘиҜҶгҖӮеҰӮжһңи§үеҫ—ж–Үз« дёҚй”ҷпјҢеҸҜд»ҘжҠҠе®ғеҲҶдә«еҮәеҺ»и®©жӣҙеӨҡзҡ„дәәзңӢеҲ°гҖӮ
е…ҚиҙЈеЈ°жҳҺпјҡжң¬з«ҷеҸ‘еёғзҡ„еҶ…е®№пјҲеӣҫзүҮгҖҒи§Ҷйў‘е’Ңж–Үеӯ—пјүд»ҘеҺҹеҲӣгҖҒиҪ¬иҪҪе’ҢеҲҶдә«дёәдё»пјҢж–Үз« и§ӮзӮ№дёҚд»ЈиЎЁжң¬зҪ‘з«ҷз«ӢеңәпјҢеҰӮжһңж¶үеҸҠдҫөжқғиҜ·иҒ”зі»з«ҷй•ҝйӮ®з®ұпјҡis@yisu.comиҝӣиЎҢдёҫжҠҘпјҢ并жҸҗдҫӣзӣёе…іиҜҒжҚ®пјҢдёҖз»ҸжҹҘе®һпјҢе°Ҷз«ӢеҲ»еҲ йҷӨж¶үе«ҢдҫөжқғеҶ…е®№гҖӮ
жӮЁеҘҪпјҢзҷ»еҪ•еҗҺжүҚиғҪдёӢи®ўеҚ•е“ҰпјҒ