жӮЁеҘҪпјҢзҷ»еҪ•еҗҺжүҚиғҪдёӢи®ўеҚ•е“ҰпјҒ
еҜҶз Ғзҷ»еҪ•
зҷ»еҪ•жіЁеҶҢ
зӮ№еҮ» зҷ»еҪ•жіЁеҶҢ еҚіиЎЁзӨәеҗҢж„ҸгҖҠдәҝйҖҹдә‘з”ЁжҲ·жңҚеҠЎжқЎж¬ҫгҖӢ
жң¬зҜҮж–Үз« дёәеӨ§е®¶еұ•зӨәдәҶдҪҝз”ЁpythonеҰӮдҪ•ејҖеҸ‘зҝ»иҜ‘е·Ҙе…·пјҢеҶ…е®№з®ҖжҳҺжүјиҰҒ并且容жҳ“зҗҶи§ЈпјҢз»қеҜ№иғҪдҪҝдҪ зңјеүҚдёҖдә®пјҢйҖҡиҝҮиҝҷзҜҮж–Үз« зҡ„иҜҰз»Ҷд»Ӣз»ҚеёҢжңӣдҪ иғҪжңүжүҖ收иҺ·гҖӮ
ж•Ҳжһңеұ•зӨә
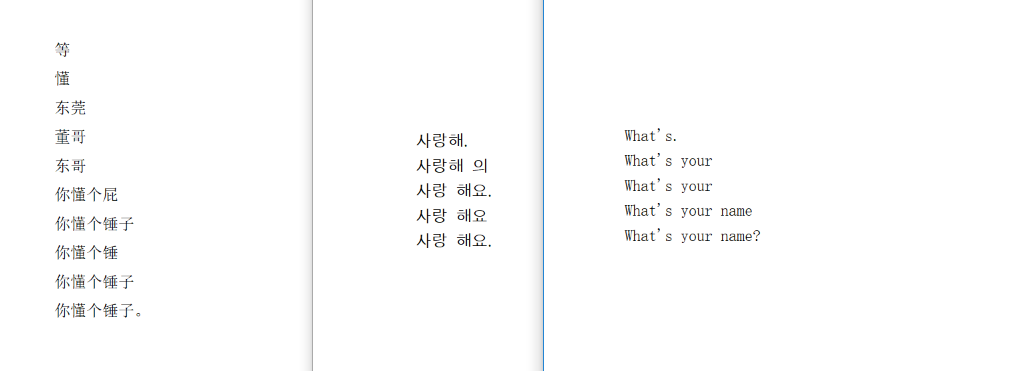
е…ҲзңӢзңӢз•Ңйқўе’Ңз»“жһңе“Ҳпјҡ
еҸҜд»ҘйҖүжӢ©еӨҡз§ҚиҜӯйҹіпјҢиҝҷйҮҢеҸӘеҶҷдәҶеӣӣз§Қеёёи§Ғзҡ„пјҡ
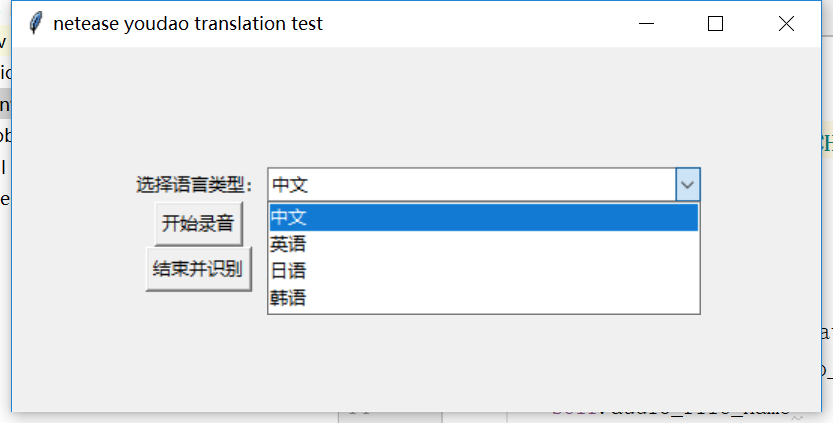
еҒ¶еҲҶеҲ«жөӢиҜ•зҡ„дёӯж–ҮгҖҒйҹ©ж–ҮгҖҒиӢұж–ҮгҖӮзңӢзқҖиҝҳдёҚй”ҷе“Ұ~
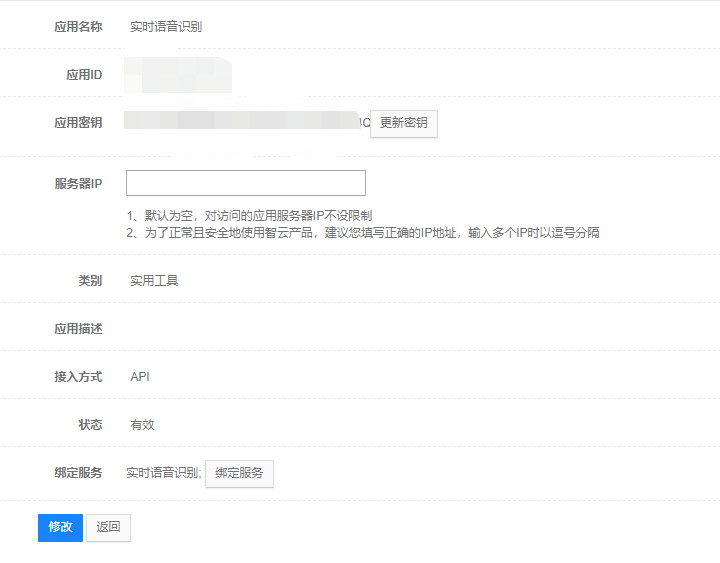
и°ғз”ЁAPIжҺҘеҸЈзҡ„еҮҶеӨҮе·ҘдҪң
йҰ–е…ҲпјҢжҳҜйңҖиҰҒеңЁжңүйҒ“жҷәдә‘зҡ„дёӘдәәйЎөйқўдёҠеҲӣе»әе®һдҫӢгҖҒеҲӣе»әеә”з”ЁгҖҒз»‘е®ҡеә”з”Ёе’Ңе®һдҫӢпјҢиҺ·еҸ–и°ғз”ЁжҺҘеҸЈз”ЁеҲ°зҡ„еә”з”Ёзҡ„idе’ҢеҜҶй’ҘгҖӮе…·дҪ“дёӘдәәжіЁеҶҢзҡ„иҝҮзЁӢе’Ңеә”з”ЁеҲӣе»әиҝҮзЁӢиҜҰи§Ғж–Үз« еҲҶдә«дёҖж¬Ўжү№йҮҸж–Ү件зҝ»иҜ‘зҡ„ејҖеҸ‘иҝҮзЁӢ
ејҖеҸ‘иҝҮзЁӢиҜҰз»Ҷд»Ӣз»Қ
дёӢйқўд»Ӣз»Қе…·дҪ“зҡ„д»Јз ҒејҖеҸ‘иҝҮзЁӢгҖӮ
йҰ–е…ҲжҳҜж №жҚ®е®һж—¶иҜӯйҹіиҜҶеҲ«ж–ҮжЎЈжқҘеҲҶжһҗжҺҘеҸЈзҡ„иҫ“е…Ҙиҫ“еҮәгҖӮжҺҘеҸЈи®ҫи®Ўзҡ„зӣ®зҡ„жҳҜеҜ№иҝһз»ӯйҹійў‘жөҒзҡ„е®һж—¶иҜҶеҲ«пјҢиҪ¬жҚўжҲҗж–Үжң¬дҝЎжҒҜ并иҝ”еҜ№еә”ж–Үеӯ—жөҒпјҢеӣ жӯӨйҖҡдҝЎйҮҮз”ЁwebsocketпјҢи°ғз”ЁиҝҮзЁӢеҲҶдёәи®ӨиҜҒгҖҒе®һж—¶йҖҡдҝЎдёӨйҳ¶ж®өгҖӮ
еңЁи®ӨиҜҒйҳ¶ж®өпјҢйңҖеҸ‘йҖҒд»ҘдёӢеҸӮж•°пјҡ
| еҸӮж•° | зұ»еһӢ | еҝ…еЎ« | иҜҙжҳҺ | зӨәдҫӢ |
|---|---|---|---|---|
| appKey | String | жҳҜ | е·Із”іиҜ·зҡ„еә”з”ЁID | ID |
| salt | String | жҳҜ | UUID | UUID |
| curtime | String | жҳҜ | ж—¶й—ҙжҲіпјҲз§’пјү | TimeStamp |
| sign | String | жҳҜ | еҠ еҜҶж•°еӯ—зӯҫеҗҚгҖӮ | sha256 |
| signType | String | жҳҜ | ж•°еӯ—зӯҫеҗҚзұ»еһӢ | v4 |
| langType | String | жҳҜ | иҜӯиЁҖйҖүжӢ©пјҢеҸӮиҖғж”ҜжҢҒиҜӯиЁҖеҲ—иЎЁ | zh-CHS |
| format | String | жҳҜ | йҹійў‘ж јејҸпјҢж”ҜжҢҒwav | wav |
| channel | String | жҳҜ | еЈ°йҒ“пјҢж”ҜжҢҒ1пјҲеҚ•еЈ°йҒ“пјү | 1 |
| version | String | жҳҜ | apiзүҲжң¬ | v1 |
| rate | String | жҳҜ | йҮҮж ·зҺҮ | 16000 |
зӯҫеҗҚ
signз”ҹжҲҗж–№жі•еҰӮдёӢпјҡ
signType=v4пјӣ
sign=sha256(еә”з”ЁID+salt+curtime+еә”з”ЁеҜҶй’Ҙ)гҖӮ
и®ӨиҜҒд№ӢеҗҺпјҢе°ұиҝӣе…ҘдәҶе®һж—¶йҖҡдҝЎйҳ¶ж®өпјҢеҸ‘йҖҒйҹійў‘жөҒпјҢиҺ·еҸ–иҜҶеҲ«з»“жһңпјҢжңҖеҗҺеҸ‘йҖҒз»“жқҹж Үеҝ—з»“жқҹйҖҡдҝЎпјҢиҝҷйҮҢйңҖиҰҒжіЁж„Ҹзҡ„жҳҜпјҢеҸ‘йҖҒзҡ„йҹійў‘жңҖеҘҪжҳҜ16bitдҪҚж·ұзҡ„еҚ•еЈ°йҒ“гҖҒ16kйҮҮж ·зҺҮзҡ„жё…жҷ°зҡ„wavйҹійў‘ж–Ү件пјҢиҝҷйҮҢжҲ‘ејҖеҸ‘ж—¶жңҖејҖе§Ӣеӣ дёәйҹійў‘еҪ•еҲ¶и®ҫеӨҮжңүй—®йўҳпјҢеҜјиҮҙйҹійў‘ж•ҲжһңжһҒе·®пјҢжҺҘеҸЈдёҖзӣҙиҝ”еӣһй”ҷиҜҜз Ғ304пјҲжүӢеҠЁжҚӮи„ёпјүгҖӮ
DemoејҖеҸ‘пјҡ
иҝҷдёӘdemoдҪҝз”Ёpython3ејҖеҸ‘пјҢеҢ…жӢ¬maindow.pyпјҢaudioandprocess.pyпјҢrecobynetease.pyдёүдёӘж–Ү件гҖӮз•ҢйқўйғЁеҲҶпјҢдҪҝз”ЁpythonиҮӘеёҰзҡ„tkinterеә“пјҢжқҘиҝӣиЎҢиҜӯиЁҖйҖүжӢ©гҖҒеҪ•йҹіејҖе§ӢгҖҒеҪ•йҹіеҒңжӯўе№¶иҜҶеҲ«зҡ„ж“ҚдҪңгҖӮaudioandprocess.pyе®һзҺ°дәҶеҪ•йҹігҖҒйҹійў‘еӨ„зҗҶзҡ„йҖ»иҫ‘пјҢжңҖеҗҺйҖҡиҝҮrecobynetease.pyдёӯзҡ„ж–№жі•жқҘи°ғз”Ёе®һж—¶иҜӯйҹіиҜҶеҲ«APIгҖӮ
1.з•ҢйқўйғЁеҲҶпјҡ
дё»иҰҒе…ғзҙ пјҡ
root=tk.Tk()
root.title("netease youdao translation test")
frm = tk.Frame(root)
frm.grid(padx='80', pady='80')
# label1=tk.Label(frm,text="йҖүжӢ©еҫ…зҝ»иҜ‘ж–Ү件пјҡ")
# label1.grid(row=0,column=0)
label=tk.Label(frm,text='йҖүжӢ©иҜӯиЁҖзұ»еһӢпјҡ')
label.grid(row=0,column=0)
combox=ttk.Combobox(frm,textvariable=tk.StringVar(),width=38)
combox["value"]=lang_type_dict
combox.current(0)
combox.bind("<<ComboboxSelected>>",get_lang_type)
combox.grid(row=0,column=1)
btn_start_rec = tk.Button(frm, text='ејҖе§ӢеҪ•йҹі', command=start_rec)
btn_start_rec.grid(row=2, column=0)
lb_Status = tk.Label(frm, text='Ready', anchor='w', fg='green')
lb_Status.grid(row=2,column=1)
btn_sure=tk.Button(frm,text="з»“жқҹ并иҜҶеҲ«",command=get_result)
btn_sure.grid(row=3,column=0)
root.mainloop()2.йҹійў‘еҪ•еҲ¶йғЁеҲҶпјҢеј•е…Ҙpyaudioеә“пјҲйңҖйҖҡиҝҮpipе®үиЈ…пјүжқҘи°ғз”Ёйҹійў‘и®ҫеӨҮпјҢеҪ•еҲ¶жҺҘеҸЈиҰҒжұӮзҡ„wavж–Ү件пјҢ并йҖҡиҝҮwaveеә“еӯҳеӮЁж–Ү件пјҡ
def __init__(self, audio_path, language_type,is_recording):
self.audio_path = audio_path,
self.audio_file_name=''
self.language_type = language_type,
self.language=language_dict[language_type]
print(language_dict[language_type])
self.is_recording=is_recording
self.audio_chunk_size=1600
self.audio_channels=1
self.audio_format=pyaudio.paInt16
self.audio_rate=16000
def record_and_save(self):
self.is_recording = True
# self.audio_file_name=self.audio_path+'/recordtmp.wav'
self.audio_file_name='/recordtmp.wav'
threading.Thread(target=self.record,args=(self.audio_file_name,)).start()
def record(self,file_name):
print(file_name)
p=pyaudio.PyAudio()
stream=p.open(
format=self.audio_format,
channels=self.audio_channels,
rate=self.audio_rate,
input=True,
frames_per_buffer=self.audio_chunk_size
)
wf = wave.open(file_name, 'wb')
wf.setnchannels(self.audio_channels)
wf.setsampwidth(p.get_sample_size(self.audio_format))
wf.setframerate(self.audio_rate)
# иҜ»еҸ–ж•°жҚ®еҶҷе…Ҙж–Ү件
while self.is_recording:
data = stream.read(self.audio_chunk_size)
wf.writeframes(data)
wf.close()
stream.stop_stream()
stream.close()
p.terminate()3.зҝ»иҜ‘жҺҘеҸЈи°ғз”ЁйғЁеҲҶпјҡ
def recognise(filepath,language_type):
  global file_path
  file_path=filepath
  nonce = str(uuid.uuid1())
  curtime = str(int(time.time()))
  signStr = app_key + nonce + curtime + app_secret
  print(signStr)
  sign = encrypt(signStr)

  uri = "wss://openapi.youdao.com/stream_asropenapi?appKey=" + app_key + "&salt=" + nonce + "&curtime=" + curtime + \
     "&sign=" + sign + "&version=v1&channel=1&format=wav&signType=v4&rate=16000&langType=" + language_type
  print(uri)
  start(uri, 1600)


def encrypt(signStr):
  hash = hashlib.sha256()
  hash.update(signStr.encode('utf-8'))
  return hash.hexdigest()


def on_message(ws, message):
  result=json.loads(message)
  try:
    resultmessage1 = result['result'][0]
    resultmessage2 = resultmessage1["st"]['sentence']
    print(resultmessage2)
  except Exception as e:
    print('')

def on_error(ws, error):
  print(error)


def on_close(ws):
  print("### closed ###")


def on_open(ws):
  count = 0
  file_object = open(file_path, 'rb')
  while True:
    chunk_data = file_object.read(1600)
    ws.send(chunk_data, websocket.ABNF.OPCODE_BINARY)
    time.sleep(0.05)
    count = count + 1
    if not chunk_data:
      break
  print(count)
  ws.send('{\"end\": \"true\"}', websocket.ABNF.OPCODE_BINARY)


def start(uri,step):

  websocket.enableTrace(True)

  ws = websocket.WebSocketApp(uri,
                on_message=on_message,
                on_error=on_error,
                on_close=on_close)

  ws.on_open = on_open
ws.run_forever()дёҠиҝ°еҶ…е®№е°ұжҳҜдҪҝз”ЁpythonеҰӮдҪ•ејҖеҸ‘зҝ»иҜ‘е·Ҙе…·пјҢдҪ 们еӯҰеҲ°зҹҘиҜҶжҲ–жҠҖиғҪдәҶеҗ—пјҹеҰӮжһңиҝҳжғіеӯҰеҲ°жӣҙеӨҡжҠҖиғҪжҲ–иҖ…дё°еҜҢиҮӘе·ұзҡ„зҹҘиҜҶеӮЁеӨҮпјҢж¬ўиҝҺе…іжіЁдәҝйҖҹдә‘иЎҢдёҡиө„и®Ҝйў‘йҒ“гҖӮ
е…ҚиҙЈеЈ°жҳҺпјҡжң¬з«ҷеҸ‘еёғзҡ„еҶ…е®№пјҲеӣҫзүҮгҖҒи§Ҷйў‘е’Ңж–Үеӯ—пјүд»ҘеҺҹеҲӣгҖҒиҪ¬иҪҪе’ҢеҲҶдә«дёәдё»пјҢж–Үз« и§ӮзӮ№дёҚд»ЈиЎЁжң¬зҪ‘з«ҷз«ӢеңәпјҢеҰӮжһңж¶үеҸҠдҫөжқғиҜ·иҒ”зі»з«ҷй•ҝйӮ®з®ұпјҡis@yisu.comиҝӣиЎҢдёҫжҠҘпјҢ并жҸҗдҫӣзӣёе…іиҜҒжҚ®пјҢдёҖз»ҸжҹҘе®һпјҢе°Ҷз«ӢеҲ»еҲ йҷӨж¶үе«ҢдҫөжқғеҶ…е®№гҖӮ
жӮЁеҘҪпјҢзҷ»еҪ•еҗҺжүҚиғҪдёӢи®ўеҚ•е“ҰпјҒ