жӮЁеҘҪпјҢзҷ»еҪ•еҗҺжүҚиғҪдёӢи®ўеҚ•е“ҰпјҒ
иҝҷзҜҮж–Үз« е°ҶдёәеӨ§е®¶иҜҰз»Ҷи®Іи§Јжңүе…ідҪҝз”Ёspring bootе®һзҺ°profilesеҠЁжҖҒеҲҮжҚўпјҢж–Үз« еҶ…е®№иҙЁйҮҸиҫғй«ҳпјҢеӣ жӯӨе°Ҹзј–еҲҶдә«з»ҷеӨ§е®¶еҒҡдёӘеҸӮиҖғпјҢеёҢжңӣеӨ§е®¶йҳ…иҜ»е®ҢиҝҷзҜҮж–Үз« еҗҺеҜ№зӣёе…ізҹҘиҜҶжңүдёҖе®ҡзҡ„дәҶи§ЈгҖӮ
е…·дҪ“еҒҡжі•пјҡ
1гҖҒйҰ–е…ҲеңЁpomдёӯж·»еҠ profiles:
<profiles>
  <profile>
   <id>dev</id>
   <activation>
     <activeByDefault>true</activeByDefault>
   </activation>
   <properties>
     <spring.profiles.active>dev</spring.profiles.active>
   </properties>
   <dependencies>
     <dependency>
      <groupId>org.springframework.boot</groupId>
      <artifactId>spring-boot-devtools</artifactId>
      <optional>true</optional>
     </dependency>
     <dependency>
      <groupId>org.springframework.boot</groupId>
      <artifactId>spring-boot-starter-undertow</artifactId>
     </dependency>
   </dependencies>
  </profile>

  <profile>
   <id>prod</id>
   <dependencies>
     <dependency>
      <groupId>org.springframework.boot</groupId>
      <artifactId>spring-boot-starter-undertow</artifactId>
     </dependency>
   </dependencies>
   <properties>
     <spring.profiles.active>prod</spring.profiles.active>
   </properties>
  </profile>
</profiles>devжҢҮејҖеҸ‘жЁЎејҸпјҢprodжҢҮз”ҹдә§жЁЎејҸпјҢеҰӮйңҖе…¶д»–жЁЎејҸпјҢеҸӘйңҖиҰҒж·»еҠ profileеҚіеҸҜ.
2гҖҒеңЁpom.xmlзҡ„buildдёӯж·»еҠ plugin:
<plugin>
  <groupId>org.apache.maven.plugins</groupId>
  <artifactId>maven-resources-plugin</artifactId>
  <version>${maven-resources-plugin.version}</version>
  <executions>
   <execution>
     <id>default-resources</id>
     <phase>validate</phase>
     <goals>
      <goal>copy-resources</goal>
     </goals>
     <configuration>
      <outputDirectory>target/classes</outputDirectory>
      <useDefaultDelimiters>false</useDefaultDelimiters>
      <delimiters>
        <delimiter>#</delimiter>
      </delimiters>
      <resources>
        <resource>
         <directory>src/main/resources/</directory>
         <filtering>true</filtering>
         <includes>
           <include>**/*.xml</include>
           <include>**/*.yml</include>
         </includes>
        </resource>
        <resource>
         <directory>src/main/resources/</directory>
         <filtering>false</filtering>
         <excludes>
           <exclude>**/*.xml</exclude>
           <exclude>**/*.yml</exclude>
         </excludes>
        </resource>
      </resources>
     </configuration>
   </execution>
  </executions>
</plugin>иҜҘй…ҚзҪ®з”ЁжқҘеңЁжү“еҢ…зҡ„ж—¶еҖҷдҝ®ж”№й…ҚзҪ®ж–Ү件гҖӮ
3гҖҒзј–еҶҷDefaultProfileUtilе·Ҙе…·зұ»жқҘж·»еҠ й»ҳи®ӨеҗҜеҠЁй…ҚзҪ®ж–Ү件:
import org.springframework.boot.SpringApplication;
import org.springframework.core.env.Environment;

import java.util.HashMap;
import java.util.Map;

/**
 * Utility class to load a Spring profile to be used as default
 * when there is no <code>spring.profiles.active</code> set in the environment or as command line argument.
 * If the value is not available in <code>application.yml</code> then <code>dev</code> profile will be used as default.
 */
public final class DefaultProfileUtil {

  private static final String SPRING_PROFILE_DEFAULT = "spring.profiles.default";

  private DefaultProfileUtil(){
  }

  /**
   * Set a default to use when no profile is configured.
   *
   * @param app the spring application
   */
  public static void addDefaultProfile(SpringApplication app) {
    Map<String, Object> defProperties = new HashMap<>();
    /*
    * The default profile to use when no other profiles are defined
    * This cannot be set in the <code>application.yml</code> file.
    * See https://github.com/spring-projects/spring-boot/issues/1219
    */
    defProperties.put(SPRING_PROFILE_DEFAULT, Constants.SPRING_PROFILE_DEVELOPMENT);
    app.setDefaultProperties(defProperties);
    System.out.println(app);
  }

  /**
   * Get the profiles that are applied else get default profiles.
   */
  public static String[] getActiveProfiles(Environment env) {
    String[] profiles = env.getActiveProfiles();
    if (profiles.length == 0) {
      return env.getDefaultProfiles();
    }
    return profiles;
  }
}
public class Constants {
public static final String SPRING_PROFILE_DEVELOPMENT = "dev";
public static final String SPRING_PROFILE_PRODUCTION = "prod";
private Constants() {
}
}4гҖҒдҝ®ж”№application.ymlй…ҚзҪ®ж–Ү件пјҢж·»еҠ (йҮҮз”Ёapplication.propertiesж–Ү件)пјҡ
spring:
  profiles:
   active: #spring.profiles.active#
mavenзҡ„жһ„е»әзҡ„ж—¶еҖҷдјҡжӣҝжҚў#spring.profiles.active#
5гҖҒдҝ®ж”№йЎ№зӣ®зҡ„еҗҜеҠЁзұ»пјҡ
@SpringBootApplication
public class Demo1Application {

  private static final Logger log = LoggerFactory.getLogger(Demo1Application.class);

  public static void main(String[] args) {
   SpringApplication app = new SpringApplication(Demo1Application.class);
   DefaultProfileUtil.addDefaultProfile(app);
   Environment env = app.run(args).getEnvironment();
   log.info("\n----------------------------------------------------------\n\t" +
         "Application '{}' is running! Access URLs:\n\t" +
         "Local: \t\thttp://localhost:{}\n\t" +
         "----------------------------------------------------------",
      env.getProperty("spring.application.name"),
      env.getProperty("server.port"));
  }
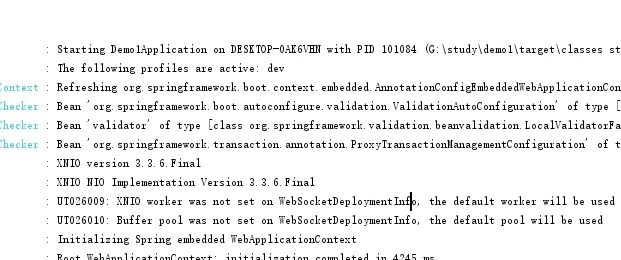
}д»ҘдёҠдҝ®ж”№е®ҢжҲҗд№ӢеҗҺпјҢеңЁеҗҜеҠЁзҡ„ж—¶еҖҷдјҡжҳҫзӨәпјҡThe following profiles are active: dev й»ҳи®ӨdevжЁЎејҸеҲҮжҚўжҲҗеҠҹгҖӮ

6гҖҒжһ„е»әйЎ№зӣ®пјҡ
йҮҮз”Ёmvn clean package -Pprodе‘Ҫд»Өжһ„е»әпјҢжңҖеҗҺзҡ„й…ҚзҪ®ж–Ү件дјҡиў«ж”№жҲҗпјҡ

е…ідәҺдҪҝз”Ёspring bootе®һзҺ°profilesеҠЁжҖҒеҲҮжҚўе°ұеҲҶдә«еҲ°иҝҷйҮҢдәҶпјҢеёҢжңӣд»ҘдёҠеҶ…е®№еҸҜд»ҘеҜ№еӨ§е®¶жңүдёҖе®ҡзҡ„её®еҠ©пјҢеҸҜд»ҘеӯҰеҲ°жӣҙеӨҡзҹҘиҜҶгҖӮеҰӮжһңи§үеҫ—ж–Үз« дёҚй”ҷпјҢеҸҜд»ҘжҠҠе®ғеҲҶдә«еҮәеҺ»и®©жӣҙеӨҡзҡ„дәәзңӢеҲ°гҖӮ
е…ҚиҙЈеЈ°жҳҺпјҡжң¬з«ҷеҸ‘еёғзҡ„еҶ…е®№пјҲеӣҫзүҮгҖҒи§Ҷйў‘е’Ңж–Үеӯ—пјүд»ҘеҺҹеҲӣгҖҒиҪ¬иҪҪе’ҢеҲҶдә«дёәдё»пјҢж–Үз« и§ӮзӮ№дёҚд»ЈиЎЁжң¬зҪ‘з«ҷз«ӢеңәпјҢеҰӮжһңж¶үеҸҠдҫөжқғиҜ·иҒ”зі»з«ҷй•ҝйӮ®з®ұпјҡis@yisu.comиҝӣиЎҢдёҫжҠҘпјҢ并жҸҗдҫӣзӣёе…іиҜҒжҚ®пјҢдёҖз»ҸжҹҘе®һпјҢе°Ҷз«ӢеҲ»еҲ йҷӨж¶үе«ҢдҫөжқғеҶ…е®№гҖӮ
жӮЁеҘҪпјҢзҷ»еҪ•еҗҺжүҚиғҪдёӢи®ўеҚ•е“ҰпјҒ