您好,登录后才能下订单哦!
这期内容当中小编将会给大家带来有关springcloud组件的使用方法,文章内容丰富且以专业的角度为大家分析和叙述,阅读完这篇文章希望大家可以有所收获。
Springcloud技术分享
Spring Cloud 是一套完整的微服务解决方案,基于 Spring Boot 框架,准确的说,它不是一个框架,而是一个大的容器,它将市面上较好的微服务框架集成进来,从而简化了开发者的代码量。
Spring Cloud 是什么?
Spring Cloud 是一系列框架的有序集合,它利用 Spring Boot 的开发便利性简化了分布式系统的开发,比如服务发现、服务网关、服务路由、链路追踪等。Spring Cloud 并不重复造轮子,而是将市面上开发得比较好的模块集成进去,进行封装,从而减少了各模块的开发成本。换句话说:Spring Cloud 提供了构建分布式系统所需的“全家桶”。
Spring Cloud 现状
目前,国内使用 Spring Cloud 技术的公司并不多见,不是因为 Spring Cloud 不好,主要原因有以下几点:
Spring Cloud 中文文档较少,出现问题网上没有太多的解决方案。
国内创业型公司技术老大大多是阿里系员工,而阿里系多采用 Dubbo 来构建微服务架构。
大型公司基本都有自己的分布式解决方案,而中小型公司的架构很多用不上微服务,所以没有采用 Spring Cloud 的必要性。
但是,微服务架构是一个趋势,而 Spring Cloud 是微服务解决方案的佼佼者,这也是作者写本系列课程的意义所在。
Spring Cloud 优缺点
其主要优点有:
集大成者,Spring Cloud 包含了微服务架构的方方面面。
约定优于配置,基于注解,没有配置文件。
轻量级组件,Spring Cloud 整合的组件大多比较轻量级,且都是各自领域的佼佼者。
开发简便,Spring Cloud 对各个组件进行了大量的封装,从而简化了开发。
开发灵活,Spring Cloud 的组件都是解耦的,开发人员可以灵活按需选择组件。
接下来,我们看下它的缺点:
项目结构复杂,每一个组件或者每一个服务都需要创建一个项目。
部署门槛高,项目部署需要配合 Docker 等容器技术进行集群部署,而要想深入了解 Docker,学习成本高。
Spring Cloud 的优势是显而易见的。因此对于想研究微服务架构的同学来说,学习 Spring Cloud 是一个不错的选择。
Spring Cloud 和 Dubbo 对比
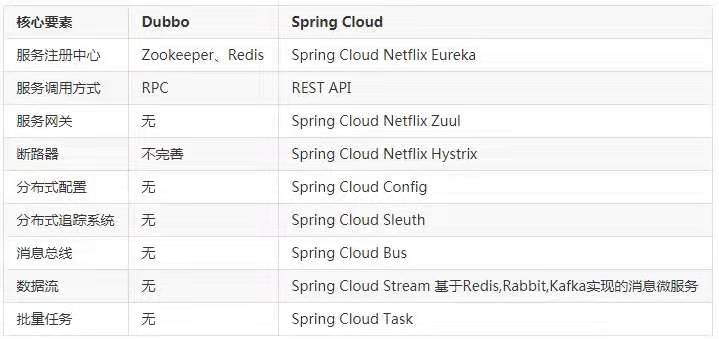
Dubbo 只是实现了服务治理,而 Spring Cloud 实现了微服务架构的方方面面,服务治理只是其中的一个方面。下面通过一张图对其进行比较:

下面我们就简单的进行springcloud的学习吧,本文章涉及springcloud的相关重要组件的使用。
1. 1. 新建maven工程
使用idea创建maven项目
1. 2. 在parent项目pom中导入以下依赖
<parent>
 <groupId>org.springframework.boot</groupId>
 <artifactId>spring-boot-starter-parent</artifactId>
 <version>2.3.4.RELEASE</version>
</parent>
<properties>
 <spring.cloud-version>Hoxton.SR8</spring.cloud-version>
</properties>
<dependencyManagement>
<dependencies>
 <dependency>
 <groupId>org.springframework.cloud</groupId>
 <artifactId>spring-cloud-dependencies</artifactId>
 <version>${spring.cloud-version}</version>
 <type>pom</type>
 <scope>import</scope>
 </dependency>
</dependencies>
</dependencyManagement>Eureka是Spring Cloud Netflix的核心组件之一,其还包括Ribbon、Hystrix、Feign这些Spring Cloud Netflix主要组件。其实除了eureka还有些比较常用的服务发现组件如Consul,Zookeeper等,目前对于springcloud支持最好的应该还是eureka。
eureka组成
Eureka Server:服务的注册中心,负责维护注册的服务列表。
Service Provider:服务提供方,作为一个Eureka Client,向Eureka Server做服务注册、续约和下线等操作,注册的主要数据包括服务名、机器ip、端口号、域名等等。
Service Consumer:服务消费方,作为一个Eureka Client,向Eureka Server获取Service Provider的注册信息,并通过远程调用与Service Provider进行通信。
2. 1. 创建子module,命名为eureka-server 2. 2. 在eureka-server中添加以下依赖
<dependency>
 <groupId>org.springframework.boot</groupId>
 <artifactId>spring-boot-starter-web</artifactId>
</dependency>
<dependency>
 <groupId>org.springframework.cloud</groupId>
 <artifactId>spring-cloud-starter-netflix-eureka-server</artifactId>
</dependency>
<dependency>
 <groupId>org.springframework.boot</groupId>
 <artifactId>spring-boot-starter-security</artifactId>
</dependency>
2. 3. 在application.yml中添加以下配置
server:
 port: 8900 #应用的端口号
eureka:
 client:
 service-url:
 defaultZone: http://user:123@localhost:8900/eureka #eureka服务的的注册地址
 fetch-registry: false #是否去注册中心拉取其他服务地址
 register-with-eureka: false #是否注册到eureka
spring:
 application:
 name: eureka-server #应用名称 还可以用eureka.instance.hostname = eureka-server
 security: #配置自定义Auth账号密码
 user:
 name: user
2. 4. 在启动类上架注解
@SpringBootApplication
@EnableEurekaServer
在启动类中加入以下方法,防止spring的Auth拦截eureka请求
@EnableWebSecurity
 static class WebSecurityConfig extends WebSecurityConfigurerAdapter {
 @Override
 protected void configure(HttpSecurity http) throws Exception {
  http.csrf().ignoringAntMatchers("/eureka/**");
  super.configure(http);
 }
 }
2. 5. 创建module名为provider-user为服务提供者 2. 5. 1. 在pom中添加以下依赖
<dependency>
 <groupId>org.springframework.boot</groupId>
 <artifactId>spring-boot-starter-web</artifactId>
</dependency>
<dependency>
 <groupId>org.springframework.cloud</groupId>
 <artifactId>spring-cloud-starter-netflix-eureka-client</artifactId>
</dependency>
2. 5. 2. application.yml配置
server:
 port: 7900 #程序启动入口
spring:
 application:
 name: provider-user #应用名称
eureka:
 client:
 service-url:
 defaultZone: http://user:123@${eureka.instance.hostname}:${server.port}/eureka/
2. 5. 3. 启动类加注解
@SpringBootApplication
@EnableEurekaClient
Controller相关代码如下:
@RestController
public class UserController {
 @GetMapping (value = "/user/{id}")
 public User getUser(@PathVariable Long id){
 User user = new User();
 user.setId(id);
 user.setDate(new Date());
 System.out.println("7900");
 return user;
 }
 @PostMapping (value = "/user")
 public User getPostUser(@RequestBody User user){
 return user;
 }
}
2. 6. 创建module名为consumer-order为服务提供者 2. 6. 1. pom依赖同服务提供者 2. 6. 2. application.yml配置
server:
 port: 8010
spring:
 application:
 name: consumer-order
eureka:
 client:
 serviceUrl:
 defaultZone: http://user:123@${eureka.instance.hostname}:${server.port}/eureka/
2. 6. 3. 启动类
@SpringBootApplication
@EnableEurekaClient
public class ConsumerApp
{
 @Bean
 public RestTemplate restTemplate(){
 return new RestTemplate();
 }
 public static void main( String[] args )
 {
 SpringApplication.run(ConsumerApp.class,args);
 }
}
2. 6. 4. Controller层代码
@RestController
public class OrderController {

 @Autowired
 private RestTemplate restTemplate;
 @GetMapping (value = "/order/{id}")
 public User getOrder(@PathVariable Long id){
 //获取数据
 User user = new User();
 user.setId(id);
 user.setDate(new Date());
 user = restTemplate.getForObject("http://provider-user:7900/user/"+id,User.class);
 return user;
 }
}
2. 7. 启动应用
分别启动Eureka-server、provider-user、consumer-order三个服务
2. 8. 访问地址
http://localhost:8900就可以看到两个服务已经注册到eureka注册中心上了
2. 9. eureka高可用配置
两个节点
#高可用配置,两个节点
spring:
 application:
 name: eureka-server-ha
 profiles:
 active: peer1

eureka:
 client:
 serviceUrl:
 defaultZone: https://peer1/eureka/,http://peer2/eureka/
---
server:
 port: 8901
spring:
 profiles: peer1
eureka:
 instance:
 hostname: peer1

---
server:
 port: 8902
spring:
 profiles: peer2
eureka:
 instance:
 hostname: peer2
三个节点
#高可用配置,三个
spring:
 application:
 name: eureka-server-ha
 profiles:
 active: peer3
eureka:
 client:
 serviceUrl:
 defaultZone: http://peer1:8901/eureka/,http://peer2:8902/eureka/,http://peer3:8903/eureka/
---
spring:
 profiles: peer1
eureka:
 instance:
 hostname: peer1
server:
 port: 8901
---
spring:
 profiles: peer2
eureka:
 instance:
 hostname: peer2
server:
 port: 8902
---
spring:
 profiles: peer3
eureka:
 instance:
 hostname: peer3
server:
 port: 8903
配合eureka使用的一个负载均衡组件,一般情况下我们都是自定义负载均衡策略使用
3. 1. 方式一(默认)
轮询规则
在启动类中restTemplate()方法加入注解@LoadBalanced
RestTemplate 是由 Spring Web 模块提供的工具类,与 SpringCloud 无关,是独立存在的,因 SpringCloud 对 RestTemplate 进行了一定的扩展,所以 RestTemplate 具备了负载均衡的功能
@Bean
@LoadBalanced
public RestTemplate restTemplate(){
 return new RestTemplate();
}
在启动类上加注解
@RibbonClient(name = "provider-user")
3. 2. 方式二(配置文件自定义)
在application.yml中加入以下配置
#使用配置文件方式实现负载均衡,优先级,配置文件>注解或java代码配置>cloud默认配置
provider-user:
 ribbon:
 NFLoadBalancerRuleClassName: com.netflix.loadbalancer.RandomRule
3. 3. 方式三(Java代码自定义)
自定义一个配置类,返回规则
@RibbonClient(name = "provider-user",configuration = RibbonConfiguration.class)
public class RibbonConfiguration {
 @Bean
 public IRule getRule(){
 return new RandomRule();
 }
}什么是feign,是声明式的webservice客户端,解决远程调用,支持JAX-RS,即RestFulWebService。Feign是一种声明式、模板化的HTTP客户端。在Spring Cloud中使用Feign, 我们可以做到使用HTTP请求远程服务时能与调用本地方法一样的编码体验,开发者完全感知不到这是远程方法,更感知不到这是个HTTP请求,这整个调用过程和Dubbo的RPC非常类似。开发起来非常的优雅。
4. 1. 引入依赖
<dependency>
 <groupId>org.springframework.cloud</groupId>
 <artifactId>spring-cloud-starter-openfeign</artifactId>
</dependency>
4. 2. 使用注解@FeignClient编写feign调用的客户端接口
@FeignClient("provider-user")
public interface UserFeignClient {
 @RequestMapping (value = "/user/{id}", method = RequestMethod.GET)
 public User getUser(@PathVariable Long id);
 @RequestMapping (value = "/user", method = RequestMethod.POST)
 public User postUser(@RequestBody User user);
}
4. 3. 在启动类加注解@EnableFeignClients
4. 4. Controller层的调用方法
@Autowired
private UserFeignClient userFeignClient;
@GetMapping (value = "/user/{id}")
public User getUser(@PathVariable Long id){
 //获取数据
 return this.userFeignClient.getUser(id);
}
@GetMapping (value = "/user")
public User postUser(User user){
 return this.userFeignClient.postUser(user);
}hystrix是Netflix的一个类库,在微服务中,具有多层服务调用,主要实现断路器模式的类库
5. 1. 引入依赖
<dependency>
 <groupId>org.springframework.cloud</groupId>
 <artifactId>spring-cloud-starter-netflix-hystrix</artifactId>
</dependency>
5. 2. 在启动类上加注解
@EnableCircuitBreaker
在Controller层类的方法上加注解,并编写退回方法,需同名
@HystrixCommand(fallbackMethod = "findByIdFallBack")
public User getOrder(@PathVariable Long id){
 //获取数据
 User user = new User();
 user.setId(id);
 user.setDate(new Date());
 user = restTemplate.getForObject("http://provider-user/user/"+id,User.class);
 System.out.println(Thread.currentThread().getId());
 return user;
}
public User findByIdFallBack(Long id){
 System.out.println(Thread.currentThread().getId());
 User user = new User();
 user.setId(1L);
 return user;
}actuator主要用于服务健康监控,springboot 1.X和2.x有所不同,本次为2.X
6. 1. 引入依赖包
<dependency>
 <groupId>org.springframework.boot</groupId>
 <artifactId>spring-boot-starter-actuator</artifactId>
</dependency>
6. 2. 配置
#健康监控配置
management:
 endpoint:
 health:
  show-details: always #是否健康监控显示细节
 endpoints:
 web:
  exposure:
  include: hystrix.stream #hystrix保护机制,不直接暴露监控状态
  base-path: / #暴露的端点链接
6. 3. 访问
1.X版本
localhost:8080/health
2.X版本
localhost:8080/actuator/health
7. 1. 配置文件
feign:
 hystrix:
 enabled: true # 总开关,可以通过java单独控制client
7. 2. 启动类注解
@EnableFeignClients
7. 3. 控制层
@RestController
public class OrderFeignController {
 @Autowired
 private UserFeignClient userFeignClient;
 @Autowired
 private UserFeignNotHystrixClient userFeignNotHystrixClient;
 @GetMapping (value = "/order/{id}")
 public User getUser(@PathVariable Long id){
  //获取数据
  return userFeignClient.getUser(id);
 }

 /**
  * 测试Feign客户端单独控制
  * @param id
  * @return
  */
 @GetMapping(value = "/user/{id}")
 public User getUserNotHystrix(@PathVariable Long id){
  //获取数据
  return userFeignNotHystrixClient.getUserNotHystrix(id);
 }
}
7. 4. 两个FeignClient
一个加了configuration一个没有,加了可以通过注解重写feignBuilder方法单独控制,默认是返回HystrixFeignBuilder
@FeignClient(name = "provider-user", fallback = HystrixClientFallback.class)
public interface UserFeignClient {
 @RequestMapping (value = "/user/{id}", method = RequestMethod.GET)
 User getUser(@PathVariable Long id);
}

@Component
public class HystrixClientFallback implements UserFeignClient{
 @Override
 public User getUser(Long id) {
  System.out.println(Thread.currentThread().getId());
  User user = new User();
  user.setId(1L);
  return user;
 }
}
@FeignClient(name = "provider-user1",configuration = ConfigurationNotHystrix.class,fallback = HystrixClientNotHystrixFallback.class)
public interface UserFeignNotHystrixClient {
@RequestMapping (value = "/user/{id}", method = RequestMethod.GET)
User getUserNotHystrix(@PathVariable Long id);
}
@Component
public class HystrixClientNotHystrixFallback implements UserFeignNotHystrixClient{
@Override
public User getUserNotHystrix(Long id) {
System.out.println(Thread.currentThread().getId());
User user = new User();
user.setId(1L);
return user;
}
}7. 5. 配置类
@Configuration
public class ConfigurationNotHystrix {

 @Bean
 @Scope("prototype")
 public Feign.Builder feignBuilder(){
  return Feign.builder();
 }
}
7. 6. 获取异常信息代码
@FeignClient(name = "hello", fallbackFactory = HystrixClientFallbackFactory.class)
protected interface HystrixClient {
 @RequestMapping(method = RequestMethod.GET, value = "/hello")
 Hello iFailSometimes();
}

@Component
static class HystrixClientFallbackFactory implements FallbackFactory<HystrixClient> {
 @Override
 public HystrixClient create(Throwable cause) {
  return new HystrixClient() {
   @Override
   public Hello iFailSometimes() {
    return new Hello("fallback; reason was: " + cause.getMessage());
   }
  };
 }
}Zuul是Spring Cloud全家桶中的微服务API网关。
所有从设备或网站来的请求都会经过Zuul到达后端的Netflix应用程序。作为一个边界性质的应用程序,Zuul提供了动态路由、监控、弹性负载和安全功能。Zuul底层利用各种filter实现如下功能:
认证和安全 识别每个需要认证的资源,拒绝不符合要求的请求。
性能监测 在服务边界追踪并统计数据,提供精确的生产视图。
动态路由 根据需要将请求动态路由到后端集群。
压力测试 逐渐增加对集群的流量以了解其性能。
负载卸载 预先为每种类型的请求分配容量,当请求超过容量时自动丢弃。
静态资源处理 直接在边界返回某些响应。
8. 1. 编写一个Zuul网关
@SpringBootApplication
@EnableZuulProxy
@EnableEurekaClient
public class GatewayZuulApp
{
 public static void main( String[] args )
 {
  SpringApplication.run(GatewayZuulApp.class,args);
 }
 @Bean
 public PreZuulFilter preZuulFilter(){
  return new PreZuulFilter();
 }
}
application.yml 配置
zuul:
 ignoredServices: '*' #剔除的链接,*代表所有
 routes:
 lyh-provider-user: /myusers/** #自定义的反向代理url
8. 2. Zuul的fallback机制
需要实现回退的接口FallbackProvider,当服务不可用时,就会走fallback,源码如下
@Component
public class ZuulFallbackProvider implements FallbackProvider {
 /**
  * fallback的路由返回服务名,“*”匹配所有
  * @return
  */
 @Override
 public String getRoute() {
  return "lyh-provider-user";
 }

 /**
  * fallbacl响应,可以用于异常信息的记录
  * @param route
  * @param cause
  * @return
  */
 @Override
 public ClientHttpResponse fallbackResponse(String route, Throwable cause) {
  if (cause instanceof HystrixTimeoutException) {
   return response(HttpStatus.GATEWAY_TIMEOUT);
  } else {
   return response(HttpStatus.INTERNAL_SERVER_ERROR);
  }
 }
 private ClientHttpResponse response(final HttpStatus status) {
  return new ClientHttpResponse() {
   @Override
   public HttpStatus getStatusCode() throws IOException {
    //当fallback时返回给调用者的状态码
    return status;
   }

   @Override
   public int getRawStatusCode() throws IOException {
    return status.value();
   }

   @Override
   public String getStatusText() throws IOException {
    //状态码的文本形式
    return status.getReasonPhrase();
   }

   @Override
   public void close() {
   }

   @Override
   public InputStream getBody() throws IOException {
    //响应体
    return new ByteArrayInputStream("fallback".getBytes());
   }

   @Override
   public HttpHeaders getHeaders() {
    //设定headers
    HttpHeaders headers = new HttpHeaders();
    headers.setContentType(MediaType.APPLICATION_JSON);
    return headers;
   }
  };
 }
}
8. 3. Zuul 的Filter
8. 3. 1. Zuul中的Filter
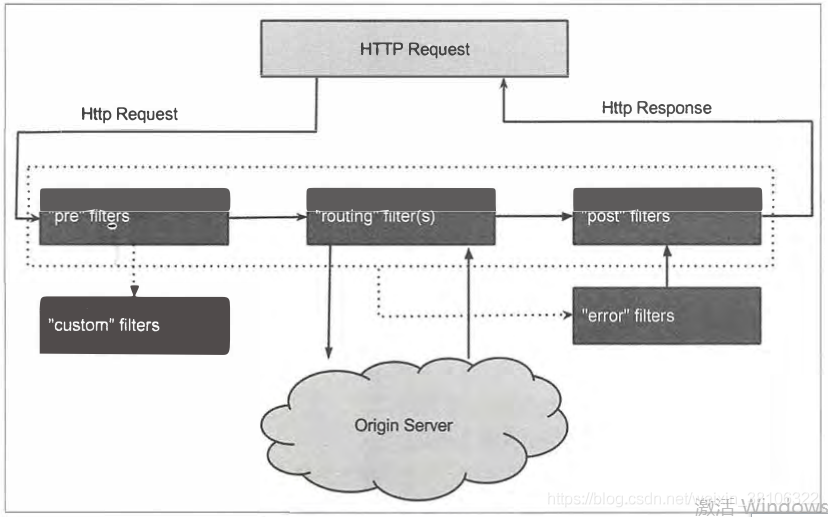
Zuul是围绕一系列Filter展开的,这些Filter在整个HTTP请求过程中执行一连串的操作。
Zuul Filter有以下几个特征:
Type:用以表示路由过程中的阶段(内置包含PRE、ROUTING、POST和ERROR)
Execution Order:表示相同Type的Filter的执行顺序
Criteria:执行条件
Action:执行体
Zuul提供了动态读取、编译和执行Filter的框架。各个Filter间没有直接联系,但是都通过RequestContext共享一些状态数据。
尽管Zuul支持任何基于JVM的语言,但是过滤器目前是用Groovy编写的。 每个过滤器的源代码被写入到Zuul服务器上的一组指定的目录中,这些目录将被定期轮询检查是否更新。Zuul会读取已更新的过滤器,动态编译到正在运行的服务器中,并后续请求中调用。
8. 3. 2. Filter Types
以下提供四种标准的Filter类型及其在请求生命周期中所处的位置:
PRE Filter:在请求路由到目标之前执行。一般用于请求认证、负载均衡和日志记录。
ROUTING Filter:处理目标请求。这里使用Apache HttpClient或Netflix Ribbon构造对目标的HTTP请求。
POST Filter:在目标请求返回后执行。一般会在此步骤添加响应头、收集统计和性能数据等。
ERROR Filter:整个流程某块出错时执行。
除了上述默认的四种Filter类型外,Zuul还允许自定义Filter类型并显示执行。例如,我们定义一个STATIC类型的Filter,它直接在Zuul中生成一个响应,而非将请求在转发到目标。
8. 3. 3. Zuul请求生命周期

一图胜千言,下面通过官方的一张图来了解Zuul请求的生命周期。
8. 3. 4. 自定义一个filter
需要继承ZuulFilter类
public class PreZuulFilter extends ZuulFilter {
 @Override
 public String filterType() {
  return "pre";
 }

 @Override
 public int filterOrder() {
  return 5;
 }

 @Override
 public boolean shouldFilter() {
  return true;
 }

 @Override
 public Object run() throws ZuulException {
  String requestURI = RequestContext.getCurrentContext().getRequest().getRequestURI();
  System.out.println(requestURI);
  return requestURI;
 }
}
将自定义的filter通过@Bean注入
@Bean
 public PreZuulFilter preZuulFilter(){
  return new PreZuulFilter();
 }
filter配置
zuul:
 PreZuulFilter: #过滤器类名
 pre: #过滤类型
  disable: false
8. 3. 5. zuul上传下载
zuul一样可以正常的上传下载,要注意的是他使用的是默认大小配置,想要上传大文件 需要在访问的地址前加/zuul/服务地址,同时需要配置超时时间
#当上传大文件是在serviceid前加zuul/ 如:zuul/servcieid/*,且需要配置ribbon的超时时间和hystrix的超时时间,防止报错后走hystrix的退回代码
hystrix.command.default.execution.isolation.thread.timeoutInMilliseconds: 60000
ribbon:
 ConnectTimeout: 3000
 ReadTimeout: 60000
9. 1. 什么是spring cloud config
在分布式系统中,spring cloud config 提供一个服务端和客户端去提供可扩展的配置服务。我们可用用配置服务中心区集中的管理所有的服务的各种环境配置文件。配置服务中心采用Git的方式存储配置文件,因此我们很容易部署修改,有助于对环境配置进行版本管理。
Spring Cloud Config就是云端存储配置信息的,它具有中心化,版本控制,支持动态更新,平台独立,语言独立等特性。其特点是:
a.提供服务端和客户端支持(spring cloud config server和spring cloud config client)
b.集中式管理分布式环境下的应用配置
c.基于Spring环境,无缝与Spring应用集成
d.可用于任何语言开发的程序
e.默认实现基于git仓库,可以进行版本管理
spring cloud config包括两部分:
Spring Boot项目不需要改动任何代码,加入一个启动配置文件指明使用ConfigServer上哪个配置文件即可
9. 2. 简单的使用
服务端配置使用
首先需要添加相关依赖
<dependency>
 <groupId>org.springframework.cloud</groupId>
 <artifactId>spring-cloud-config-server</artifactId>
</dependency>
<dependency>
 <groupId>org.springframework.cloud</groupId>
 <artifactId>spring-cloud-starter-netflix-eureka-client</artifactId>
</dependency>
启动类
@SpringBootApplication
@EnableEurekaClient
@EnableConfigServer
public class SpringCloudConfigApp
{
 public static void main( String[] args )
 {
  SpringApplication.run(SpringCloudConfigApp.class,args);
 }
}
本地方式配合Eureka配置
spring:
 application:
 name: config-server
 cloud:
 config:
  name: config-server
  server:
  native:
   search-locations: classpath:/config
  bootstrap: true
  #配置git方式
  #git:
   #uri: #配置git仓库地址
   #username: #访问git仓库的用户名
   #password: #访问git仓库的用户密码
   #search-paths: #配置仓库路径
  #label: master #git使用,默认master
 profiles:
 active: native #开启本地配置
server:
 port: 8080
eureka:
 client:
 service-url:
  defaultZone: http://user:123@localhost:8761/eureka
在resources下创建 文件夹config,在config下创建文件
lyh-provider-user-dev.yml
内容为:
profile: lyh-provider-user-dev

lyh-provider-user-pro.yml
内容为:
profile: lyh-provider-user-pro
客户端配置
添加依赖
<dependency>
 <groupId>org.springframework.boot</groupId>
 <artifactId>spring-boot-starter-web</artifactId>
</dependency>
<dependency>
 <groupId>org.springframework.cloud</groupId>
 <artifactId>spring-cloud-starter-config</artifactId>
</dependency>
<dependency>
 <groupId>org.springframework.cloud</groupId>
 <artifactId>spring-cloud-starter-netflix-eureka-client</artifactId>
</dependency>
<dependency>
 <groupId>org.springframework.cloud</groupId>
 <artifactId>spring-cloud-starter-bus-amqp</artifactId>
</dependency>
<dependency>
 <groupId>org.springframework.boot</groupId>
 <artifactId>spring-boot-starter-actuator</artifactId>
</dependency>
server:
 port: 7900 #程序启动入口
spring:
 application:
 name: lyh-provider-user #应用名称
 cloud:
 config:
  profile: dev
  discovery: #使用eureka的发现寻找config-server的服务
  enabled: true
  service-id: config-server
  name: lyh-provider-user
  #uri: http://localhost:8080 这里可以是git地址
#trace信息 配置
 bus:
  trace:
  enabled: true
#配合rabbitmq实现自动刷新参数
 rabbitmq: #配置rabbitmq实现自动刷新
  host: localhost
  port: 5672
  username: guest
  password: guest
eureka:
 client:
 service-url:
  defaultZone: http://user:123@localhost:8761/eureka
#健康监控配置
management:
 endpoint:
 health:
  show-details: always #是否健康监控显示细节
 refresh:
  enabled: true
 endpoints:
 web:
  exposure:
  include: "*" #放开所有地址,跳过安全拦截
  base-path: /
客户端测试代码,@RefreshScope注解实现参数的刷新
@RestController
@RefreshScope
public class UserController {
 @Value("${profile}")
 private String profile;
 @GetMapping (value = "/profile")
 public String getProfile(){
  return this.profile;
 }
}
访问后我们就能拿到config服务的profile配置上数据
上述就是小编为大家分享的springcloud组件的使用方法了,如果刚好有类似的疑惑,不妨参照上述分析进行理解。如果想知道更多相关知识,欢迎关注亿速云行业资讯频道。
免责声明:本站发布的内容(图片、视频和文字)以原创、转载和分享为主,文章观点不代表本网站立场,如果涉及侵权请联系站长邮箱:is@yisu.com进行举报,并提供相关证据,一经查实,将立刻删除涉嫌侵权内容。