您好,登录后才能下订单哦!
如何使用idea插件进行生成java代码?针对这个问题,这篇文章详细介绍了相对应的分析和解答,希望可以帮助更多想解决这个问题的小伙伴找到更简单易行的方法。
java代码生成
使用idea的插件codehelper.generator进行代码生成,可以根据entity,生成对应的
1、建表sql语句
2、dao.java文件
3、dao.xml文件
4、service.java文件
同时这个插件还能在new了entity之后生成所有的set方法
多次生成,不会影响自己手动添加的代码
安装
安装插件codehelper.generator

案例
@Data
@AllArgsConstructor
@NoArgsConstructor
public class UserEntity {
  @Id
  private Integer id;

  private String name;

  /**
   * 1启用,0停用
   */
  private Integer state;

  private String remark;
  @DateTimeFormat(pattern = "yyyy-MM-dd HH:mm:ss")
  @JsonFormat(pattern = "yyyy-MM-dd HH:mm:ss")
  private Date addtime;
  @DateTimeFormat(pattern = "yyyy-MM-dd HH:mm:ss")
  @JsonFormat(pattern = "yyyy-MM-dd HH:mm:ss")
  private Date stoptime;
}
生成set
UserEntity user=new UserEntity();
//new了之后在下一行:点击tool--codeHelper--GenAllSetter

生成代码
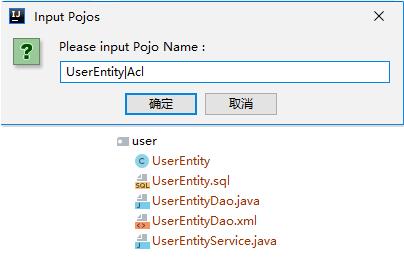
点击tool--codeHelper--tox Boxes--在弹窗中输入entity,多个使用'|'分隔,就会在当前文件夹生成代码

sql
-- auto Generated on 2020-01-14 12:49:57
-- DROP TABLE IF EXISTS `user_entity`;
CREATE TABLE user_entity(
  `id` INTEGER(20) UNSIGNED NOT NULL AUTO_INCREMENT COMMENT 'id',
  `name` VARCHAR(50) NOT NULL DEFAULT '' COMMENT 'name',
  `state` INTEGER(12) NOT NULL DEFAULT -1 COMMENT '1启用,0停用',
  `remark` VARCHAR(50) NOT NULL DEFAULT '' COMMENT 'remark',
  `addtime` DATETIME NOT NULL DEFAULT '1000-01-01 00:00:00' COMMENT 'addtime',
  `stoptime` DATETIME NOT NULL DEFAULT '1000-01-01 00:00:00' COMMENT 'stoptime',
  PRIMARY KEY (`id`)
)ENGINE=InnoDB DEFAULT CHARSET=utf8mb4 COMMENT 'user_entity';
dao
package com.demo1.invoice.entity.user;
import org.apache.ibatis.annotations.Param;
import java.util.List;
import com.demo1.invoice.entity.user.UserEntity;

public interface UserEntityDao {

  int insert(@Param("pojo") UserEntity pojo);
  int insertList(@Param("pojos") List< UserEntity> pojo);
  List<UserEntity> select(@Param("pojo") UserEntity pojo);
  int update(@Param("pojo") UserEntity pojo);
}
xml
<?xml version="1.0" encoding="UTF-8" ?>
<!DOCTYPE mapper PUBLIC "-//mybatis.org//DTD Mapper 3.0//EN" "http://mybatis.org/dtd/mybatis-3-mapper.dtd" >
<mapper namespace="com.demo1.invoice.entity.user.UserEntityDao">
<!--auto generated Code-->
<resultMap id="AllColumnMap" type="com.demo1.invoice.entity.user.UserEntity">
<result column="id" property="id"/>
<result column="name" property="name"/>
<result column="state" property="state"/>
<result column="remark" property="remark"/>
<result column="addtime" property="addtime"/>
<result column="stoptime" property="stoptime"/>
</resultMap>
<!--auto generated Code-->
<sql id="all_column">
id,
name,
state,
remark,
addtime,
stoptime
</sql>
<!--auto generated Code-->
<insert id="insert">
INSERT INTO user_entity
<trim prefix="(" suffix=")" suffixOverrides=",">
<if test="pojo.id != null"> id, </if>
<if test="pojo.name != null"> name, </if>
<if test="pojo.state != null"> state, </if>
<if test="pojo.remark != null"> remark, </if>
<if test="pojo.addtime != null"> addtime, </if>
<if test="pojo.stoptime != null"> stoptime, </if>
</trim>
VALUES
<trim prefix="(" suffix=")" suffixOverrides=",">
<if test="pojo.id != null"> #{pojo.id}, </if>
<if test="pojo.name != null"> #{pojo.name}, </if>
<if test="pojo.state != null"> #{pojo.state}, </if>
<if test="pojo.remark != null"> #{pojo.remark}, </if>
<if test="pojo.addtime != null"> #{pojo.addtime}, </if>
<if test="pojo.stoptime != null"> #{pojo.stoptime}, </if>
</trim>
</insert>
<!--auto generated Code-->
<insert id="insertList">
INSERT INTO user_entity(
<include refid="all_column"/>
)VALUES
<foreach collection="pojos" item="pojo" index="index" separator=",">
(
#{pojo.id},
#{pojo.name},
#{pojo.state},
#{pojo.remark},
#{pojo.addtime},
#{pojo.stoptime}
)
</foreach>
</insert>
<!--auto generated Code-->
<update id="update">
UPDATE user_entity
<set>
<if test="pojo.id != null"> id = #{pojo.id}, </if>
<if test="pojo.name != null"> name = #{pojo.name}, </if>
<if test="pojo.state != null"> state = #{pojo.state}, </if>
<if test="pojo.remark != null"> remark = #{pojo.remark}, </if>
<if test="pojo.addtime != null"> addtime = #{pojo.addtime}, </if>
<if test="pojo.stoptime != null"> stoptime = #{pojo.stoptime} </if>
</set>
WHERE id = #{pojo.id}
</update>
<!--auto generated Code-->
<select id="select" resultMap="AllColumnMap">
SELECT <include refid="all_column"/>
FROM user_entity
<where>
<if test="pojo.id != null"> AND id = #{pojo.id} </if>
<if test="pojo.name != null"> AND name = #{pojo.name} </if>
<if test="pojo.state != null"> AND state = #{pojo.state} </if>
<if test="pojo.remark != null"> AND remark = #{pojo.remark} </if>
<if test="pojo.addtime != null"> AND addtime = #{pojo.addtime} </if>
<if test="pojo.stoptime != null"> AND stoptime = #{pojo.stoptime} </if>
</where>
LIMIT 1000
</select>
<!--auto generated Code-->
<delete id="delete">
DELETE FROM user_entity where id = #{id}
</delete>
</mapper>service
import org.springframework.stereotype.Service;
import javax.annotation.Resource;
import java.util.List;
import com.demo1.invoice.entity.user.UserEntity;
import com.demo1.invoice.entity.user.UserEntityDao;

@Service
public class UserEntityService {

  @Resource
  private UserEntityDao userEntityDao;

  public int insert(UserEntity pojo){
    return userEntityDao.insert(pojo);
  }

  public int insertList(List< UserEntity> pojos){
    return userEntityDao.insertList(pojos);
  }

  public List<UserEntity> select(UserEntity pojo){
    return userEntityDao.select(pojo);
  }

  public int update(UserEntity pojo){
    return userEntityDao.update(pojo);
  }

}补充知识:IDEA 新建junit单元测试
1. 新建test目录
在src同级目录下新建test文件夹,右键test文件夹设置为Test Source Root

2. 创建测试类
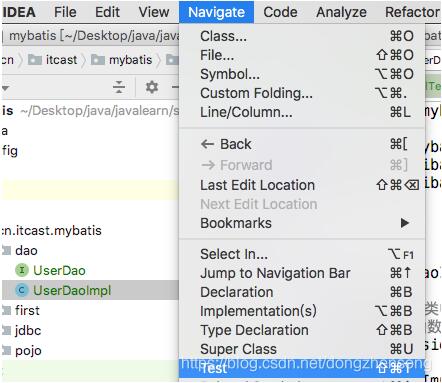
选中要创建单元测试的实现类,并将焦点放在编辑器中(鼠标在编辑器中点击一下),菜单栏选择Navigate----Test(Mac快捷键:Cmd+shift+t):

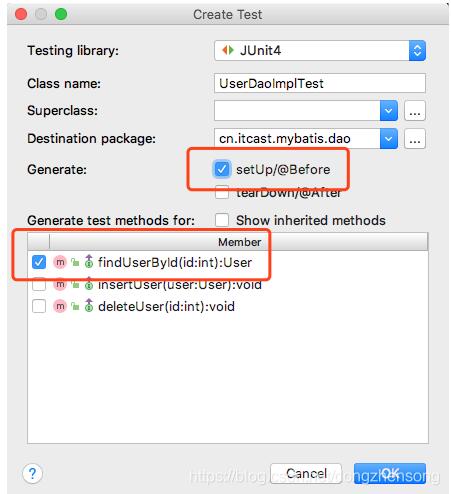
选择创建新的测试:

选中要测试的方法,以及生成@Before:

这样之后就会在test下新建一个测试类:

3. 测试函数介绍
测试类中包含两个函数:
@Before
public void setUp() throws Exception
这个是测试方法执行前执行的函数,假如在测试方法中需要使用该类中的成员变量,那么可以在该函数中定义该成员变量。
@Test
public void findUserById() throws Exception
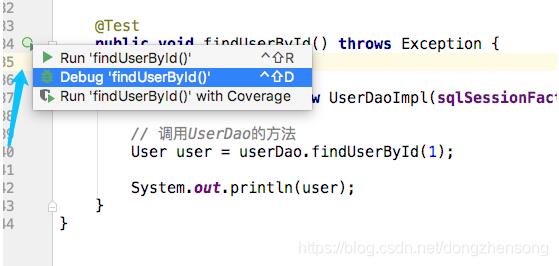
这个便是测试函数。点击编辑器左列的小工具即可发起测试。

关于如何使用idea插件进行生成java代码问题的解答就分享到这里了,希望以上内容可以对大家有一定的帮助,如果你还有很多疑惑没有解开,可以关注亿速云行业资讯频道了解更多相关知识。
免责声明:本站发布的内容(图片、视频和文字)以原创、转载和分享为主,文章观点不代表本网站立场,如果涉及侵权请联系站长邮箱:is@yisu.com进行举报,并提供相关证据,一经查实,将立刻删除涉嫌侵权内容。