您好,登录后才能下订单哦!
这篇文章运用简单易懂的例子给大家介绍使用springboot操作阿里云OSS实现文件上传,下载,删除等功能,内容非常详细,感兴趣的小伙伴们可以参考借鉴,希望对大家能有所帮助。
创建一个spring boot项目,pom文件需要引入依赖:
pom.xml
<dependencies>
 <!--
 个人版本踩坑:
 不加这个依赖的话,当在配置类中
 使用@ConfigurationProperties(prefix = "aliyun")注解时,
 我这个版本的spring boot会提示有问题
 -->
 <dependency>
 <groupId>org.springframework.boot</groupId>
 <artifactId>spring-boot-configuration-processor</artifactId>
 <optional>true</optional>
 </dependency>
 <!-- swagger2 -->
 <dependency>
 <groupId>io.springfox</groupId>
 <artifactId>springfox-swagger2</artifactId>
 <version>2.9.2</version>
 </dependency>
 <!-- swagger ui -->
 <dependency>
 <groupId>io.springfox</groupId>
 <artifactId>springfox-swagger-ui</artifactId>
 <version>2.9.2</version>
 </dependency>
 <!-- thymeleaf 可不加,个人习惯性引入 -->
 <dependency>
 <groupId>org.springframework.boot</groupId>
 <artifactId>spring-boot-starter-thymeleaf</artifactId>
 </dependency>
 <!-- web -->
 <dependency>
 <groupId>org.springframework.boot</groupId>
 <artifactId>spring-boot-starter-web</artifactId>
 </dependency>
 <!-- 热部署,看个人习惯 -->
 <dependency>
 <groupId>org.springframework.boot</groupId>
 <artifactId>spring-boot-devtools</artifactId>
 <scope>runtime</scope>
 <optional>true</optional>
 </dependency>

 <!-- 小辣椒插件,推荐使用,可以节省javaBean的setter/getter,还可以使用链式调用 -->
 <dependency>
 <groupId>org.projectlombok</groupId>
 <artifactId>lombok</artifactId>
 <optional>true</optional>
 </dependency>
 <!-- fastJson -->
 <dependency>
 <groupId>com.alibaba</groupId>
 <artifactId>fastjson</artifactId>
 <version>1.2.62</version>
 </dependency>
 <!-- aliyun-oos -->
 <dependency>
 <groupId>com.aliyun.oss</groupId>
 <artifactId>aliyun-sdk-oss</artifactId>
 <version>2.8.3</version>
 </dependency>
 <dependency>
 <groupId>joda-time</groupId>
 <artifactId>joda-time</artifactId>
 <version>2.10.1</version>
 </dependency>
 <!-- apache-common-lang3 -->
 <dependency>
 <groupId>org.apache.commons</groupId>
 <artifactId>commons-lang3</artifactId>
 <version>3.8.1</version>
 </dependency>
 <dependency>
 <groupId>org.springframework.boot</groupId>
 <artifactId>spring-boot-starter-test</artifactId>
 <scope>test</scope>
 <exclusions>
 <exclusion>
 <groupId>org.junit.vintage</groupId>
 <artifactId>junit-vintage-engine</artifactId>
 </exclusion>
 </exclusions>
 </dependency>
</dependencies>
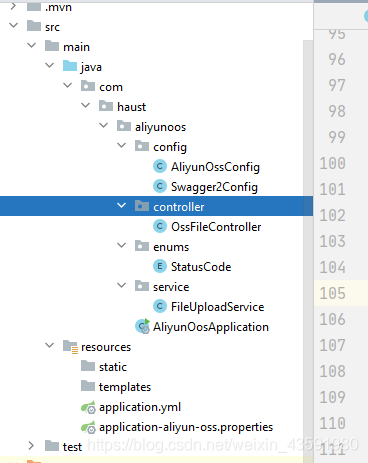
包结构很简单:

我们使用自己添加的application-aliyun-oss.properties配置文件,去配置OSS相关信息,之所以不在application.yml 中配置,看个人习惯了,因为自定义的配置属性还是提出来配比较好,没必要所有的都配到application.yml(properties)中去。
application-aliyun-oss.properties
# 文件上传大小限制
spring.servlet.multipart.max-file-size=100MB
spring.servlet.multipart.max-request-size=1000MB

# 地域节点
aliyun.endPoint=oss-cn-beijing.aliyuncs.com
# Bucket 域名
aliyun.urlPrefix=http://csp-xxxx.oss-cn-beijing.aliyuncs.com/
# accessKey Id
aliyun.accessKeyId=LTAI4XXXXXXXzqD1saGFZ
# accessKey Secret
aliyun.accessKeySecret=2WjxNXXXXXXXX4f2bREc
# 你的Bucket名称
aliyun.bucketName=csp-xxxx
# 目标文件夹
aliyun.fileHost=files
config包下的相关配置类
AliyunOssConfig.java
/**
 * @Auther: csp1999
 * @Date: 2020/10/31/13:33
 * @Description: 阿里云 OSS 基本配置
 */
// 声明配置类,放入Spring容器
@Configuration
// 指定配置文件位置
@PropertySource(value = {"classpath:application-aliyun-oss.properties"})
// 指定配置文件中自定义属性前缀
@ConfigurationProperties(prefix = "aliyun")
@Data// lombok
@Accessors(chain = true)// 开启链式调用
public class AliyunOssConfig {
 private String endPoint;// 地域节点
 private String accessKeyId;
 private String accessKeySecret;
 private String bucketName;// OSS的Bucket名称
 private String urlPrefix;// Bucket 域名
 private String fileHost;// 目标文件夹

 // 将OSS 客户端交给Spring容器托管
 @Bean
 public OSS OSSClient() {
 return new OSSClient(endPoint, accessKeyId, accessKeySecret);
 }
}
Swagger2Config.java
/**
 * @Auther: csp1999
 * @Date: 2020/10/31/16:30
 * @Description: Swagger 配置类
 */
@Configuration
@EnableSwagger2// 开启swagger2
public class Swagger2Config {

 @Bean
 public Docket webApiConfig() {

 return new Docket(DocumentationType.SWAGGER_2)
 .groupName("webApi")
 .apiInfo(webApiInfo())
 .select()
 .paths(Predicates.not(PathSelectors.regex("/error.*")))
 .build();
 }

 private ApiInfo webApiInfo() {
 return new ApiInfoBuilder()
 .title("SpringBoot整合OSS-API文档")
 .description("阿里云OSS-文件上传下载测试")
 .version("1.0")
 .contact(new Contact("CSP", "https://blog.csdn.net/weixin_43591980", ""))
 .build();
 }
}
定义一个关于执行状态结果的枚举类
/**
 * @Auther: csp1999
 * @Date: 2020/10/31/17:03
 * @Description: 状态码枚举类
 */
public enum StatusCode {
 SUCCESS("success",200),ERROR("error",500);
 private String msg;
 private Integer code;

 StatusCode(String msg,Integer code){
 this.msg = msg;
 this.code = code;
 }
 StatusCode(Integer code){
 this.code = code;
 }
 StatusCode(String msg){
 this.msg = msg;
 }
 public String getMsg() {
 return msg;
 }
 public void setMsg(String msg) {
 this.msg = msg;
 }
 public Integer getCode() {
 return code;
 }
 public void setCode(Integer code) {
 this.code = code;
 }
}
service层
在service使用ossClient操作阿里云OSS,进行上传、下载、删除、查看所有文件等操作,同时可以将图片的url进行入库操作:
FileUploadService.java
/**
 * @Auther: csp1999
 * @Date: 2020/10/31/14:30
 * @Description: 文件上传Service (为节省文章中的代码篇幅,不再做接口实现类处理)
 */
@Service("fileUploadService")
public class FileUploadService {
 // 允许上传文件(图片)的格式
 private static final String[] IMAGE_TYPE = new String[]{".bmp", ".jpg",
 ".jpeg", ".gif", ".png"};
 @Autowired
 private OSS ossClient;// 注入阿里云oss文件服务器客户端
 @Autowired
 private AliyunOssConfig aliyunOssConfig;// 注入阿里云OSS基本配置类

 /*
 * 文件上传
 * 注:阿里云OSS文件上传官方文档链接:https://help.aliyun.com/document_detail/84781.html?spm=a2c4g.11186623.6.749.11987a7dRYVSzn
 * @param: uploadFile
 * @return: string
 * @create: 2020/10/31 14:36
 * @author: csp1999
 */
 public String upload(MultipartFile uploadFile) {
 // 获取oss的Bucket名称
 String bucketName = aliyunOssConfig.getBucketName();
 // 获取oss的地域节点
 String endpoint = aliyunOssConfig.getEndPoint();
 // 获取oss的AccessKeySecret
 String accessKeySecret = aliyunOssConfig.getAccessKeySecret();
 // 获取oss的AccessKeyId
 String accessKeyId = aliyunOssConfig.getAccessKeyId();
 // 获取oss目标文件夹
 String filehost = aliyunOssConfig.getFileHost();
 // 返回图片上传后返回的url
 String returnImgeUrl = "";

 // 校验图片格式
 boolean isLegal = false;
 for (String type : IMAGE_TYPE) {
 if (StringUtils.endsWithIgnoreCase(uploadFile.getOriginalFilename(), type)) {
 isLegal = true;
 break;
 }
 }
 if (!isLegal) {// 如果图片格式不合法
 return StatusCode.ERROR.getMsg();
 }
 // 获取文件原名称
 String originalFilename = uploadFile.getOriginalFilename();
 // 获取文件类型
 String fileType = originalFilename.substring(originalFilename.lastIndexOf("."));
 // 新文件名称
 String newFileName = UUID.randomUUID().toString() + fileType;
 // 构建日期路径, 例如:OSS目标文件夹/2020/10/31/文件名
 String filePath = new SimpleDateFormat("yyyy/MM/dd").format(new Date());
 // 文件上传的路径地址
 String uploadImgeUrl = filehost + "/" + filePath + "/" + newFileName;

 // 获取文件输入流
 InputStream inputStream = null;
 try {
 inputStream = uploadFile.getInputStream();
 } catch (IOException e) {
 e.printStackTrace();
 }
 /**
 * 下面两行代码是重点坑:
 * 现在阿里云OSS 默认图片上传ContentType是image/jpeg
 * 也就是说,获取图片链接后,图片是下载链接,而并非在线浏览链接,
 * 因此,这里在上传的时候要解决ContentType的问题,将其改为image/jpg
 */
 ObjectMetadata meta = new ObjectMetadata();
 meta.setContentType("image/jpg");

 //文件上传至阿里云OSS
 ossClient.putObject(bucketName, uploadImgeUrl, inputStream, meta);
 /**
 * 注意:在实际项目中,文件上传成功后,数据库中存储文件地址
 */
 // 获取文件上传后的图片返回地址
 returnImgeUrl = "http://" + bucketName + "." + endpoint + "/" + uploadImgeUrl;

 return returnImgeUrl;
 }

 /*
 * 文件下载
 * @param: fileName
 * @param: outputStream
 * @return: void
 * @create: 2020/10/31 16:19
 * @author: csp1999
 */
 public String download(String fileName, HttpServletResponse response) throws UnsupportedEncodingException {
// // 设置响应头为下载
// response.setContentType("application/x-download");
// // 设置下载的文件名
// response.addHeader("Content-Disposition", "attachment;fileName=" + fileName);
// response.setCharacterEncoding("UTF-8");
 // 文件名以附件的形式下载
 response.setHeader("Content-Disposition", "attachment;filename=" + URLEncoder.encode(fileName, "UTF-8"));

 // 获取oss的Bucket名称
 String bucketName = aliyunOssConfig.getBucketName();
 // 获取oss目标文件夹
 String filehost = aliyunOssConfig.getFileHost();
 // 日期目录
 // 注意,这里虽然写成这种固定获取日期目录的形式,逻辑上确实存在问题,但是实际上,filePath的日期目录应该是从数据库查询的
 String filePath = new DateTime().toString("yyyy/MM/dd");

 String fileKey = filehost + "/" + filePath + "/" + fileName;
 // ossObject包含文件所在的存储空间名称、文件名称、文件元信息以及一个输入流。
 OSSObject ossObject = ossClient.getObject(bucketName, fileKey);
 try {
 // 读取文件内容。
 InputStream inputStream = ossObject.getObjectContent();
 BufferedInputStream in = new BufferedInputStream(inputStream);// 把输入流放入缓存流
 ServletOutputStream outputStream = response.getOutputStream();
 BufferedOutputStream out = new BufferedOutputStream(outputStream);// 把输出流放入缓存流
 byte[] buffer = new byte[1024];
 int len = 0;
 while ((len = in.read(buffer)) != -1) {
 out.write(buffer, 0, len);
 }
 if (out != null) {
 out.flush();
 out.close();
 }
 if (in != null) {
 in.close();
 }
 return StatusCode.SUCCESS.getMsg();
 } catch (Exception e) {
 return StatusCode.ERROR.getMsg();
 }
 }

 /*
 * 文件删除
 * @param: objectName
 * @return: java.lang.String
 * @create: 2020/10/31 16:50
 * @author: csp1999
 */
 public String delete(String fileName) {
 // 获取oss的Bucket名称
 String bucketName = aliyunOssConfig.getBucketName();
 // 获取oss的地域节点
 String endpoint = aliyunOssConfig.getEndPoint();
 // 获取oss的AccessKeySecret
 String accessKeySecret = aliyunOssConfig.getAccessKeySecret();
 // 获取oss的AccessKeyId
 String accessKeyId = aliyunOssConfig.getAccessKeyId();
 // 获取oss目标文件夹
 String filehost = aliyunOssConfig.getFileHost();
 // 日期目录
 // 注意,这里虽然写成这种固定获取日期目录的形式,逻辑上确实存在问题,但是实际上,filePath的日期目录应该是从数据库查询的
 String filePath = new DateTime().toString("yyyy/MM/dd");

 try {
 /**
 * 注意:在实际项目中,不需要删除OSS文件服务器中的文件,
 * 只需要删除数据库存储的文件路径即可!
 */
 // 建议在方法中创建OSSClient 而不是使用@Bean注入,不然容易出现Connection pool shut down
 OSSClient ossClient = new OSSClient(endpoint,
  accessKeyId, accessKeySecret);
 // 根据BucketName,filetName删除文件
 // 删除目录中的文件,如果是最后一个文件fileoath目录会被删除。
 String fileKey = filehost + "/" + filePath + "/" + fileName;
 ossClient.deleteObject(bucketName, fileKey);

 try {
 } finally {
 ossClient.shutdown();
 }
 System.out.println("文件删除!");
 return StatusCode.SUCCESS.getMsg();
 } catch (Exception e) {
 e.printStackTrace();
 return StatusCode.ERROR.getMsg();
 }
 }
}
controller层
controller提供测试接口
/**
 * @Auther: csp1999
 * @Date: 2020/10/31/16:40
 * @Description: OSS 文件上传controller
 */
@Api(description = "阿里云OSS文件上传、下载、删除API")
@RequestMapping("api/pri/file")
@RestController
public class OssFileController {
 @Autowired
 private FileUploadService fileUploadService;

 /*
 * 文件上传api
 * @param: file
 * @return: com.alibaba.fastjson.JSONObject
 * @create: 2020/10/31 17:35
 * @author: csp1999
 */
 @ApiOperation(value = "文件上传")
 @PostMapping("upload")
 public JSONObject upload(@RequestParam("file") MultipartFile file) {
 JSONObject jsonObject = new JSONObject();
 if (file != null) {
 String returnFileUrl = fileUploadService.upload(file);
 if (returnFileUrl.equals("error")) {
 jsonObject.put("error", "文件上传失败!");
 return jsonObject;
 }
 jsonObject.put("success", "文件上传成功!");
 jsonObject.put("returnFileUrl", returnFileUrl);
 return jsonObject;
 } else {
 jsonObject.put("error", "文件上传失败!");
 return jsonObject;
 }
 }

 /*
 * 文件下载api
 * @param: fileName
 * @param: response
 * @return: com.alibaba.fastjson.JSONObject
 * @create: 2020/10/31 17:35
 * @author: csp1999
 */
 @ApiOperation(value = "文件下载")
 @GetMapping(value = "download/{fileName}")
 public JSONObject download(@PathVariable("fileName") String fileName, HttpServletResponse response) throws Exception {
 JSONObject jsonObject = new JSONObject();

 String status = fileUploadService.download(fileName, response);
 if (status.equals("error")) {
 jsonObject.put("error", "文件下载失败!");
 return jsonObject;
 } else {
 jsonObject.put("success", "文件下载成功!");
 return jsonObject;
 }
 }

 /*
 * 文件删除api
 * @param: fileName
 * @return: com.alibaba.fastjson.JSONObject
 * @create: 2020/10/31 17:35
 * @author: csp1999
 */
 @ApiOperation(value = "文件删除")
 @GetMapping("/delete/{fileName}")
 public JSONObject DeleteFile(@PathVariable("fileName") String fileName) {
 JSONObject jsonObject = new JSONObject();

 String status = fileUploadService.delete(fileName);
 if (status.equals("error")) {
 jsonObject.put("error", "文件删除失败!");
 return jsonObject;
 } else {
 jsonObject.put("success", "文件删除成功!");
 return jsonObject;
 }
 }
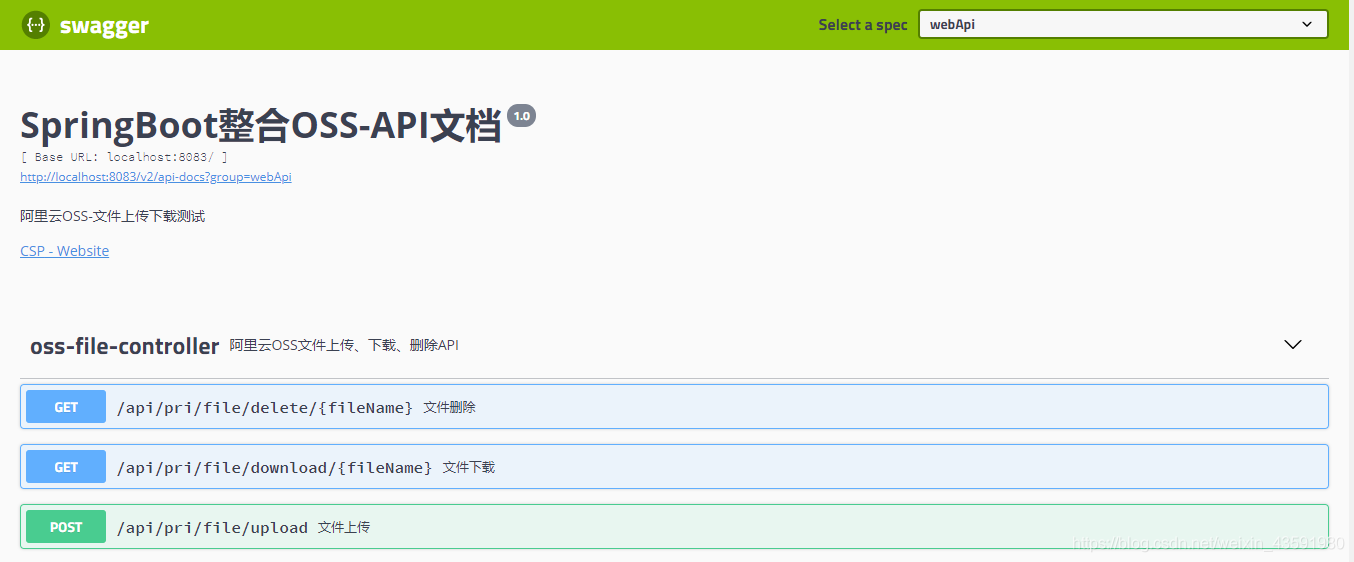
}本机访问:http://localhost:8083/swagger-ui.html

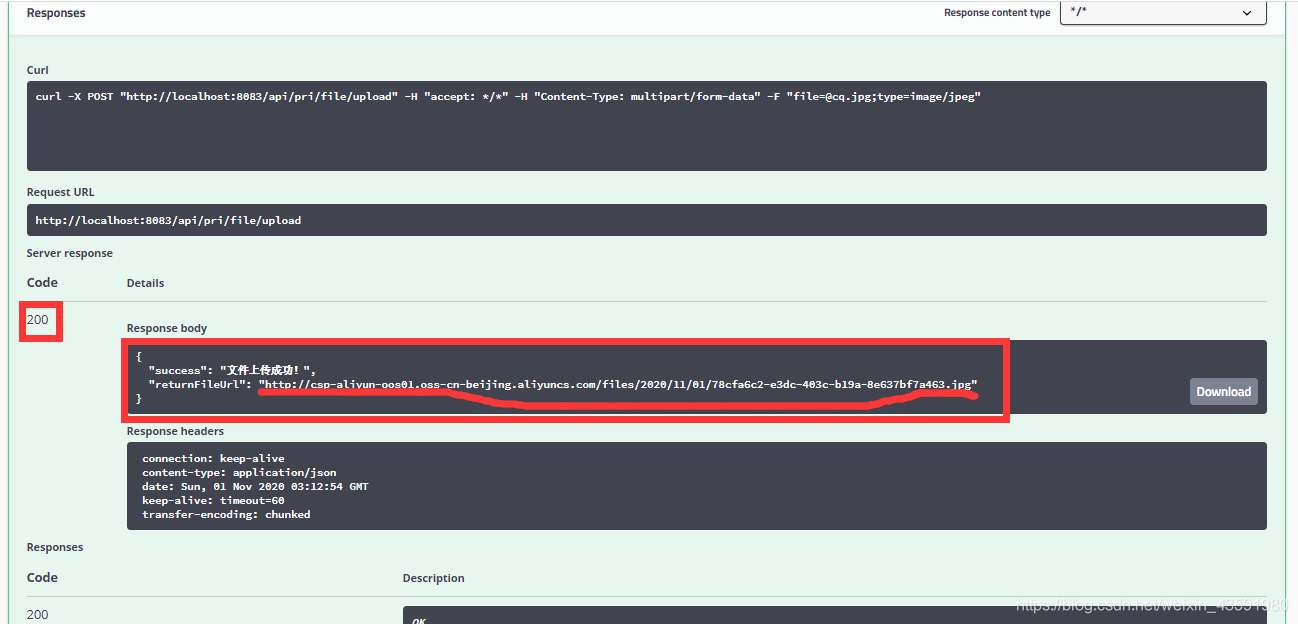
测试上传:

结果如图:

如果说明上传成功,我们来看一下这个链接能不能访问到:


关于使用springboot操作阿里云OSS实现文件上传,下载,删除等功能就分享到这里了,希望以上内容可以对大家有一定的帮助,可以学到更多知识。如果觉得文章不错,可以把它分享出去让更多的人看到。
免责声明:本站发布的内容(图片、视频和文字)以原创、转载和分享为主,文章观点不代表本网站立场,如果涉及侵权请联系站长邮箱:is@yisu.com进行举报,并提供相关证据,一经查实,将立刻删除涉嫌侵权内容。