您好,登录后才能下订单哦!
Cherrypy在Python Web项目中如何使用?相信很多没有经验的人对此束手无策,为此本文总结了问题出现的原因和解决方法,通过这篇文章希望你能解决这个问题。
1、介绍
搭建Java Web项目,需要Tomcat服务器才能进行。而搭建Python Web项目,因为cherrypy自带服务器,所以只需要下载该模块就能进行Web项目开发。
2、最基本用法
实现功能:访问html页面,点击按钮后接收后台py返回的值
html页面(test_cherry.html)
<!DOCTYPE html>
<html>

<head>
  <meta charset="utf-8">
  <title>Test Cherry</title>
  <script src="https://cdn.staticfile.org/jquery/1.10.2/jquery.min.js"></script>
</head>

<body>

  <h2>Test Cherry</h2>
  <p id="p1"></p>
  <button type="button" onclick="callHelloWorld()">hello_world</button>
  <script>


    function callHelloWorld() {
      $.get('/hello_world', function (data, status) {
        alert('data:' + data)
        alert('status:' + status)

      })
    }


  </script>
</body>

</html>
编写脚本py
# -*- encoding=utf-8 -*-

import cherrypy


class TestCherry():
  @cherrypy.expose() # 保证html能请求到该函数
  def hello_world(self):
    print('Hello')
    return 'Hello World'

  @cherrypy.expose() # 保证html能请求到该函数http://127.0.0.1:8080/index
  def index(self): # 默认页为test_cherry.html
    return open(u'test_cherry.html')


cherrypy.quickstart(TestCherry(), '/')
运行结果
[27/May/2020:09:04:42] ENGINE Listening for SIGTERM.
[27/May/2020:09:04:42] ENGINE Bus STARTING
CherryPy Checker:
The Application mounted at '' has an empty config.[27/May/2020:09:04:42] ENGINE Set handler for console events.
[27/May/2020:09:04:42] ENGINE Started monitor thread 'Autoreloader'.
[27/May/2020:09:04:42] ENGINE Serving on http://127.0.0.1:8080
[27/May/2020:09:04:42] ENGINE Bus STARTED
能看到启动的路径为127.0.0.1::8080端口号是8080
The Application mounted at '' has an empty config.表示没有自己配置,使用默认配置,如果需要可自己配置
运行py脚本后,打开浏览器输入http://127.0.0.1:8080/或者http://127.0.0.1:8080/index就可以看到test_cheery.html

点击hello_world按钮,就会访问py中的hello_world函数

解释:test_cherry.html中
function callHelloWorld() {
$.get('/hello_world', function (data, status) {
alert('data:' + data)
alert('status:' + status)
})}
1)请求/hello_world需要与py中的函数名一致
2)默认端口是8080,如果8080被占用,可以重新配置
cherrypy.quickstart(TestCherry(), '/')可以接收配置参数
若多次调试出现portend.Timeout: Port 8080 not free on 127.0.0.1.错误
是因为8080端口被占用了,如果你第一次调试时成功了,则你可以打开任务管理器把python进程停掉,8080就被释放了
3、导入webbrowser进行调试开发(可以自动打开浏览器,输入网址)
py代码
# -*- encoding=utf-8 -*-

import cherrypy
import webbrowser


class TestCherry():
  @cherrypy.expose() # 保证html能请求到该函数
  def hello_world(self):
    print('Hello')
    return 'Hello World'

  @cherrypy.expose() # 保证html能请求到该函数http://127.0.0.1:8080/index
  def index(self): # 默认页为test_cherry.html
    return open(u'test_cherry.html')

def auto_open():
  webbrowser.open('http://127.0.0.1:8080/')

cherrypy.engine.subscribe('start', auto_open) #启动前每次都调用auto_open函数
cherrypy.quickstart(TestCherry(), '/')
这样运行py就能自动打开网页了,每次改变html代码如果没达到预期效果,可以试一试清理浏览器缓存!!!
4、带参数的请求
实现传入参数并接收返回显示在html上
py中添加一个函数(get_parameters)
# -*- encoding=utf-8 -*-

import cherrypy
import webbrowser


class TestCherry():
  @cherrypy.expose() # 保证html能请求到该函数
  def hello_world(self):
    print('Hello')
    return 'Hello World'

  @cherrypy.expose() # 保证html能请求到该函数http://127.0.0.1:8080/index
  def index(self): # 默认页为test_cherry.html
    return open(u'test_cherry.html')
  @cherrypy.expose()
  def get_parameters(self, name, age, **kwargs):
    print('name:{}'.format(name))
    print('age:{}'.format(age))
    print('kwargs:{}'.format(kwargs))
    return 'Get parameters success'
def auto_open():
  webbrowser.open('http://127.0.0.1:8080/')
cherrypy.engine.subscribe('start', auto_open) # 启动前每次都调用auto_open函数
cherrypy.quickstart(TestCherry(), '/')
html中添加一个新按钮和对应按钮事件
<!DOCTYPE html>
<html>

<head>
  <meta charset="utf-8">
  <title>Test Cherry</title>
  <script src="https://cdn.staticfile.org/jquery/1.10.2/jquery.min.js"></script>
</head>

<body>

  <h2>Test Cherry</h2>
  <p id="p1"></p>
  <button type="button" onclick="callHelloWorld()">hello_world</button>
  <button type="button" id="postForParameters">get_parameters</button>
  <p id="getReturn"></p>
  <script>


    function callHelloWorld() {
      $.get('/hello_world', function (data, status) {
        alert('data:' + data)
        alert('status:' + status)

      })
    }

    $(document).ready(function () {

      $('#postForParameters').click(function () {
        alert('pst')
        $.post('/get_parameters',
          {
            name: 'TXT',
            age: 99,
            other: '123456'
          },
          function (data, status) {
            if (status === 'success') {
              $('#getReturn').text(data)
            }
          })
      })
    })
  </script>
</body>

</html>
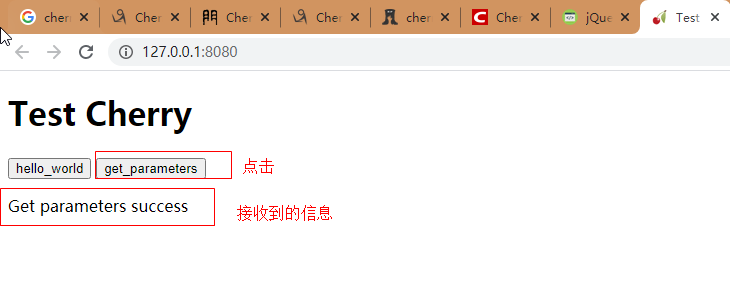
运行结果
点击get_parameters按钮后
D:\Python37_32\python.exe D:/B_CODE/Python/WebDemo/test_cherry.py
[27/May/2020:09:58:40] ENGINE Listening for SIGTERM.
[27/May/2020:09:58:40] ENGINE Bus STARTING
CherryPy Checker:
The Application mounted at '' has an empty config.[27/May/2020:09:58:40] ENGINE Set handler for console events.
[27/May/2020:09:58:40] ENGINE Started monitor thread 'Autoreloader'.
[27/May/2020:09:58:41] ENGINE Serving on http://127.0.0.1:8080
[27/May/2020:09:58:41] ENGINE Bus STARTED
127.0.0.1 - - [27/May/2020:09:58:41] "GET / HTTP/1.1" 200 1107 "" "Mozilla/5.0 (Windows NT 6.3; WOW64) AppleWebKit/537.36 (KHTML, like Gecko) Chrome/83.0.4103.61 Safari/537.36"
127.0.0.1 - - [27/May/2020:09:59:37] "GET / HTTP/1.1" 200 1136 "" "Mozilla/5.0 (Windows NT 6.3; WOW64) AppleWebKit/537.36 (KHTML, like Gecko) Chrome/83.0.4103.61 Safari/537.36"
127.0.0.1 - - [27/May/2020:09:59:37] "GET /favicon.ico HTTP/1.1" 200 1406 "http://127.0.0.1:8080/" "Mozilla/5.0 (Windows NT 6.3; WOW64) AppleWebKit/537.36 (KHTML, like Gecko) Chrome/83.0.4103.61 Safari/537.36"
127.0.0.1 - - [27/May/2020:10:02:50] "GET / HTTP/1.1" 200 1208 "" "Mozilla/5.0 (Windows NT 6.3; WOW64) AppleWebKit/537.36 (KHTML, like Gecko) Chrome/83.0.4103.61 Safari/537.36"
127.0.0.1 - - [27/May/2020:10:02:50] "GET /favicon.ico HTTP/1.1" 200 1406 "http://127.0.0.1:8080/" "Mozilla/5.0 (Windows NT 6.3; WOW64) AppleWebKit/537.36 (KHTML, like Gecko) Chrome/83.0.4103.61 Safari/537.36"
name:TXT
age:99
kwargs:{'other': '123456'}
127.0.0.1 - - [27/May/2020:10:02:54] "POST /get_parameters HTTP/1.1" 200 22 "http://127.0.0.1:8080/" "Mozilla/5.0 (Windows NT 6.3; WOW64) AppleWebKit/537.36 (KHTML, like Gecko) Chrome/83.0.4103.61 Safari/537.36"
能看出传入的参数已经打印出来了

5、config配置以及对应url(追加,所以代码不同了)
# -*- encoding=utf-8 -*-
import json
import os
import webbrowser
import cherrypy


class Service(object):
  def __init__(self, port):
    self.media_folder = os.path.abspath(os.path.join(os.getcwd(), 'media'))
    self.host = '0.0.0.0'
    self.port = int(port)
    self.index_html = 'index.html'
    pass

  @cherrypy.expose()
  def index(self):
    return open(os.path.join(self.media_folder, self.index_html), 'rb')

  def auto_open(self):
    webbrowser.open('http://127.0.0.1:{}/'.format(self.port))

  @cherrypy.expose()
  def return_info(self, sn):
    cherrypy.response.headers['Content-Type'] = 'application/json'
    cherrypy.response.headers['Access-Control-Allow-Origin'] = '*'
    my_dict = {'aaa':'123'}# 或者用list[]可保证有序
    return json.dumps(my_dict).encode('utf-8')


def main():

  service = Service(8090)
  conf = {
    'global': {
      # 主机0.0.0.0表示可以使用本机IP访问,如http://10.190.20.72:8090,可部署给别人访问
      # 否则只可以用http://127.0.0.1:8090
      'server.socket_host': service.host,
      # 端口号
      'server.socket_port': service.port,
      # 当代码变动时,是否自动重启服务,True==是,False==否
      # 设为True时,当该PY代码改变,服务会重启
      'engine.autoreload.on': False
    },
    # 根目录设置
    '/': {
      'tools.staticdir.on': True,
      'tools.staticdir.dir': service.media_folder
    },
    '/static': {
      'tools.staticdir.on': True,
      # 可以这么访问http://127.0.0.1:8090/static加上你的资源,例如
      # http://127.0.0.1:8090/static/js/jquery-1.11.3.min.js
      'tools.staticdir.dir': service.media_folder
    },

  }

  # 可以使用该种写法代替config配置
  # cherrypy.config.update(
  #     {'server.socket_port': service.port})
  # cherrypy.config.update(
  #     {'server.thread_pool': int(service.thread_pool_count)})
  # 当代码变动时,是否重启服务,True==是,False==否
  # cherrypy.config.update({'engine.autoreload.on': False})
  # 支持http://10.190.20.72:8080/形式
  # cherrypy.server.socket_host = '0.0.0.0'
  # 启动时调用函数
  cherrypy.engine.subscribe('start', service.auto_open)
  cherrypy.quickstart(service, '/', conf)


if __name__ == '__main__':
  pass
  main()
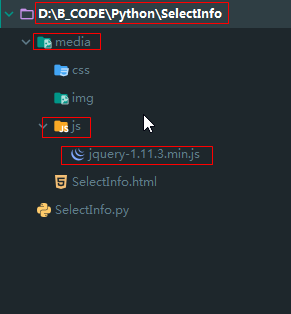
工程文件夹

看完上述内容,你们掌握Cherrypy在Python Web项目中如何使用的方法了吗?如果还想学到更多技能或想了解更多相关内容,欢迎关注亿速云行业资讯频道,感谢各位的阅读!
免责声明:本站发布的内容(图片、视频和文字)以原创、转载和分享为主,文章观点不代表本网站立场,如果涉及侵权请联系站长邮箱:is@yisu.com进行举报,并提供相关证据,一经查实,将立刻删除涉嫌侵权内容。