您好,登录后才能下订单哦!
密码登录
登录注册
点击 登录注册 即表示同意《亿速云用户服务条款》
这篇文章将为大家详细讲解有关.Net Core项目如何添加日志功能详解,小编觉得挺实用的,因此分享给大家做个参考,希望大家阅读完这篇文章后可以有所收获。
一、微软内置的日志组件
在.Net Core中使用模板新建的Web Api项目时,会自动加入日志功能。只需要在控制器中注入ILogger就可以了。命名空间为:Microsoft.Extensions.Logging。
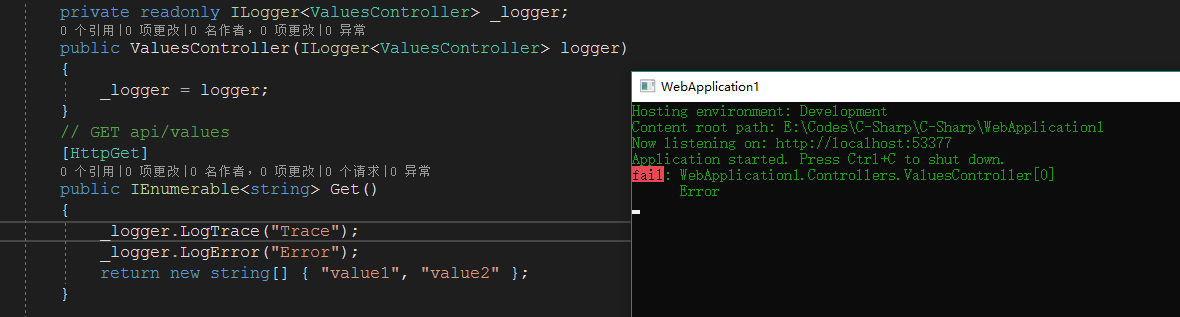
会发现只有Error被打印到了控制台,Trace没有被打印。那是因为在appsetting.json中配置了Logging>Console>Default的等级为Debug,日志的等级大于等于Debug才会输出到控制台。在这里说一下LogLevel:Trace<Debug<Information<Warning<Error<Critical<None。
当打开appsettings.development.json文件你会发现跟appsettings.json配置不同。如下:
{
 "Logging": {
 "IncludeScopes": false,
 "LogLevel": {
 "Default": "Debug",
 "System": "Information",
 "Microsoft": "Information"
 }
 }
}
例如:
"System": "Information" 表示命名空间以System开头的类中且日志等级大于等于Information才会输出到控制台。
"Default": "Debug" 表示除以System和Microsoft开头的命名空间日志等级大约等于Debug才会输出到控制台。
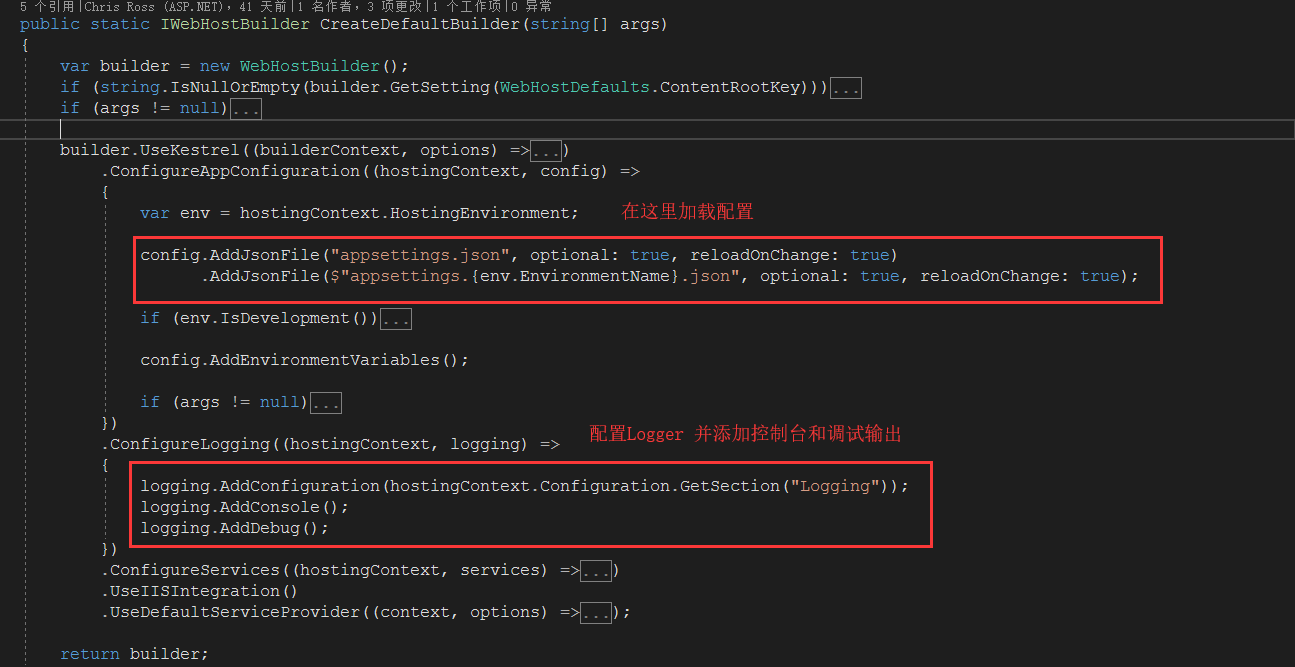
这里说明一下到底是在什么时候,读取了appsettings.json中的配置了了? 其实是在Program中 WebHost.CreateDefaultBuilder(arge) 。
打开源码发现
当然我们可以不用微软提供的默认配置
public class Program
 {
 public static void Main(string[] args)
 {
  //指定配置文件路径
  var configBuilder = new ConfigurationBuilder()
     .SetBasePath(Directory.GetCurrentDirectory())
    .AddJsonFile($"appsettings.json", true, true)
    .AddJsonFile($"appsettings.{EnvironmentName.Development}.json", true, true);

  var config = configBuilder.Build();

  var host = new WebHostBuilder()
   .UseKestrel()
   .UseStartup<Startup>()
   .UseContentRoot(Directory.GetCurrentDirectory())
   .UseUrls(config["AppSettings:Url"])//设置启动时的地址
   .Build();
  host.Run();
 }
 }
配置文件为:
{
 "AppSettings": {
 "Url": "http://0.0.0.0:6000"
 },
 "Logging": {
 "IncludeScopes": false,
 "Debug": {
 "LogLevel": {
 "Default": "Info"
 }
 },
 "Console": {
 "LogLevel": {
 "Default": "Warning"
 }
 }
 }
}
StartUp为:
public class Startup
 {
 public IConfiguration Configuration { get; private set; }
 public Startup(IHostingEnvironment env)//在构造函数中注入 IHostingEnvironment
 {
  Configuration = new ConfigurationBuilder()
    .SetBasePath(env.ContentRootPath)
    .AddJsonFile($"appsettings.json")
    .Build();
 }
 public void ConfigureServices(IServiceCollection services)
 {
  services.AddMvc();
 }

 public void Configure(IApplicationBuilder app,
  IHostingEnvironment env,
  ILoggerFactory loggerFactory)
 {
  if (env.IsDevelopment())
  {
  app.UseDeveloperExceptionPage();
  }
  //添加控制台输出
  loggerFactory.AddConsole(Configuration.GetSection("Logging"));
  loggerFactory.AddDebug();

  app.UseMvc();
 }
 }
但是微软提供的内置的日志组件没有实现将日志记录到文件、数据库上。下面介绍NLog
二、NLog
首先使用NuGet添加NLog,然后在Startup的Configure中添加以下代码
public void Configure(IApplicationBuilder app,
  IHostingEnvironment env,
  ILoggerFactory loggerFactory)
 {
  if (env.IsDevelopment())
  {
  app.UseDeveloperExceptionPage();
  }
  //添加控制台输出
  loggerFactory.AddConsole(Configuration.GetSection("Logging"));
  loggerFactory.AddDebug();

  loggerFactory.AddNLog();//添加NLog
  NLog.LogManager.LoadConfiguration($@"{env.ContentRootPath}/nlog.config");//指定NLog的配置文件

  app.UseMvc();
 }
配置NLog的配置文件
<?xml version="1.0" encoding="utf-8" ?>
<nlog xmlns="http://www.nlog-project.org/schemas/NLog.xsd"
 xmlns:xsi="http://www.w3.org/2001/XMLSchema-instance"
 autoReload="true">
 <!--internalLogLevel="Warn"
 internalLogFile="internal-nlog.txt">-->
 <targets>
 <target name="allfile" xsi:type="File" fileName="./logs/${shortdate}/all.log" layout="${longdate}|${message} ${exception}" />
 <target name="debugfile" xsi:type="File" fileName="./logs/${shortdate}/debug.log" layout="${longdate}|${message} ${exception}" />
 <target name="infofile" xsi:type="File" fileName="./logs/${shortdate}/info.log" layout="${longdate}|${message} ${exception}" />
 <target name="warnfile" xsi:type="File" fileName="./logs/${shortdate}/warn.log" layout="${longdate}|${message} ${exception}" />
 <target name="errorfile" xsi:type="File" fileName="./logs/${shortdate}/error.log" layout="${longdate}|${message} ${exception}" />
 <target name="fatalfile" xsi:type="File" fileName="./logs/${shortdate}/fatal.log" layout="${longdate}|${message} ${exception}" />
   <target name="network" xsi:type="Network" address="udp://chinacloudapp.cn:4561" layout="Development|${longdate}|${event-properties:item=EventId.Id}|${logger}|${uppercase:${level}}|${message} ${exception}" />//将日志通过网络输出
 <target name="debuge" xsi:type="Console"/>//将日志输出到控制台
 </targets>

 <rules>
 <logger name="*" minlevel="Trace" writeTo="allfile,debuge" />
 <logger name="*" level="Info" writeTo="infofile" />
 <logger name="*" level="debug" writeTo="debugfile" />
 <logger name="*" level="warn" writeTo="warnfile" />
 <logger name="*" level="error" writeTo="errorfile" />
 <logger name="*" level="fatal" writeTo="fatalfile" />

 </rules>
</nlog>xsi:type=“File”存储日志为文件格式 ,
xsi:type="Console" 表示为控制台输出。
fileName="./logs/${shortdate}/all.log" 表示存储文件路径。
layout="${longdate}|${message} ${exception}" 表示为文件内容的布局。
rules标签下面表示,对应等级的日志写到对应target中。如
<logger name="*" level="Info" writeTo="infofile" /> 表示等级为Info的日志写到target名称为infofile的文件中。
<logger name="*" minlevel="Trace" writeTo="allfile,debuge" /> 表示日志等级大于Trace的日志写到target名称为allfile和debuge(控制台输出)中。
同样在使用的时候,只需要在用到的地方注入ILogger,就可以使用了。
关于“.Net Core项目如何添加日志功能详解”这篇文章就分享到这里了,希望以上内容可以对大家有一定的帮助,使各位可以学到更多知识,如果觉得文章不错,请把它分享出去让更多的人看到。
免责声明:本站发布的内容(图片、视频和文字)以原创、转载和分享为主,文章观点不代表本网站立场,如果涉及侵权请联系站长邮箱:is@yisu.com进行举报,并提供相关证据,一经查实,将立刻删除涉嫌侵权内容。