您好,登录后才能下订单哦!
密码登录
登录注册
点击 登录注册 即表示同意《亿速云用户服务条款》
这篇文章主要介绍asp.net core下给网站做安全设置的示例分析,文中介绍的非常详细,具有一定的参考价值,感兴趣的小伙伴们一定要看完!
设置方法如下
首先,我们来看下stack overflow网站的请求头文件:
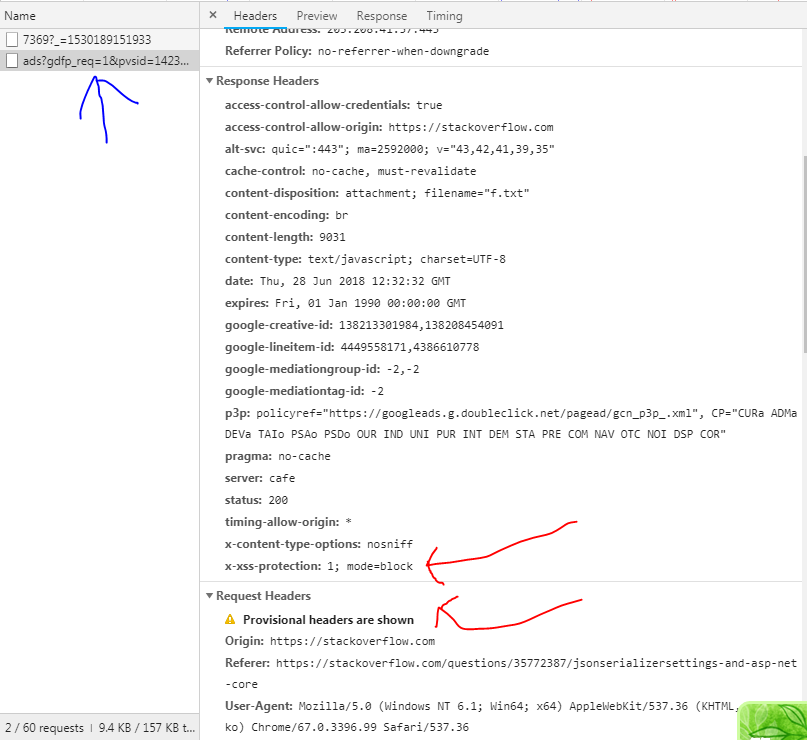
可以看到一些我们熟悉或是陌生的HTTP头部文件字段。
在这里我们在对HTTP输入流的头部文件中,做一些基本的防护。首先要明确,既然我们是对HTTP头部做处理,那么就需要在Startup.cs类的
Configuration方法中做处理,因为这里就是处理HTTP输入流的。
首先做一些基本的处理,比如中间件和基本的类:
public class SecurityHeadersPolicy
{
 public IDictionary<string, string> SetHeaders { get; }
  = new Dictionary<string, string>();

 public ISet<string> RemoveHeaders { get; }
 = new HashSet<string>();
}
这里的头部信息是我们定义好的,用来增加或是删除头部信息,然后就是我们的中间件:
public class SecurityHeadersMiddleware
{
 private readonly RequestDelegate _next;
 private readonly SecurityHeadersPolicy _policy;

 public SecurityHeadersMiddleware(RequestDelegate next, SecurityHeadersPolicy policy)
 {
 _next = next;
 _policy = policy;
 }

 public async Task Invoke(HttpContext context)
 {
 IHeaderDictionary headers = context.Response.Headers;

 foreach (var headerValuePair in _policy.SetHeaders)
 {
  headers[headerValuePair.Key] = headerValuePair.Value;
 }

 foreach (var header in _policy.RemoveHeaders)
 {
  headers.Remove(header);
 }

 await _next(context);
 }
}
基于IApplicationBuilder接口做一个中间件的扩展方法:
public static class MiddlewareExtensions
{
 public static IApplicationBuilder UseSecurityHeadersMiddleware(this IApplicationBuilder app, SecurityHeadersBuilder builder)
 {
 SecurityHeaderPolicy policy = builder.Build();
 return app.UseMiddleware<SecurityHeadersMiddleware>(policy);
 }
}
封装好相关的安全类:
public class SecurityHeadersBuilder
{
 private readonly SecurityHeadersPolicy _policy = new SecurityHeadersPolicy();

 public SecurityHeadersBuilder AddDefaultSecurePolicy()
 {
 AddFrameOptionsDeny();
 AddXssProtectionBlock();
 AddContentTypeOptionsNoSniff();
 AddStrictTransportSecurityMaxAge();
 RemoveServerHeader();

 return this;
 }

 public SecurityHeadersBuilder AddFrameOptionsDeny()
 {
 _policy.SetHeaders[FrameOptionsConstants.Header] = FrameOptionsConstants.Deny;
 return this;
 }

 public SecurityHeadersBuilder AddFrameOptionsSameOrigin()
 {
 _policy.SetHeaders[FrameOptionsConstants.Header] = FrameOptionsConstants.SameOrigin;
 return this;
 }

 public SecurityHeadersBuilder AddFrameOptionsSameOrigin(string uri)
 {
 _policy.SetHeaders[FrameOptionsConstants.Header] = string.Format(FrameOptionsConstants.AllowFromUri, uri);
 return this;
 }

 public SecurityHeadersBuilder RemoveServerHeader()
 {
 _policy.RemoveHeaders.Add(ServerConstants.Header);
 return this;
 }

 public SecurityHeadersBuilder AddCustomHeader(string header, string value)
 {
 _policy.SetHeaders[header] = value;
 return this;
 }

 public SecurityHeadersBuilder RemoveHeader(string header)
 {
 _policy.RemoveHeaders.Add(header);
 return this;
 }

 public SecurityHeadersPolicy Build()
 {
 return _policy;
 }
}
最后注入到HTTP的输入流中:
app.UseSecurityHeadersMiddleware(new SecurityHeadersBuilder()
.AddDefaultSecurePolicy()
);
然后我们浏览一下网页,就可以在HTTP的头部信息中看到:
HTTP/1.1 200 OK
Content-Type: text/html; charset=utf-8
X-Frame-Options: DENY
X-XSS-Protection: 1; mode=block
X-Content-Type-Options: nosniff
Strict-Transport-Security: max-age=31536000
X-Powered-By: ASP.NET
还有一个就是CSRF的防护,如果之前你用过ASP.NET MVC,在最基本的MVC模板中,可能你会留意到已有的cshtml页面中的form表单有这么一句:
@Html.AntiForgeryToken()
这就是微软在MVC框架中为我们提供的防护CSRF的方法。我们在表单中直接使用上面那句代码就可以了,然后在表单提交的Action方法中:
[ValidateAntiForgeryToken]
[HttpPost]
public IActionResult AntiForm(string message)
{
return Content(message);
}
使用[ValidateAntiForgeryToken]属性,来验证CSRF。
以上是“asp.net core下给网站做安全设置的示例分析”这篇文章的所有内容,感谢各位的阅读!希望分享的内容对大家有帮助,更多相关知识,欢迎关注亿速云行业资讯频道!
免责声明:本站发布的内容(图片、视频和文字)以原创、转载和分享为主,文章观点不代表本网站立场,如果涉及侵权请联系站长邮箱:is@yisu.com进行举报,并提供相关证据,一经查实,将立刻删除涉嫌侵权内容。