您好,登录后才能下订单哦!
密码登录
登录注册
点击 登录注册 即表示同意《亿速云用户服务条款》
一)Centos下安装MySQL数据库
安装MySql参考网址: https://dev.mysql.com/doc/mysql-yum-repo-quick-guide/en/
因为MySQL官网有创建yum仓库,所以直接以yum方式安装会非常便捷,具体步骤如下:
配置服务器的yum仓库:将MySQL的yum仓库添加至服务器
a. 到 http://dev.mysql.com/downloads/repo/yum/地址下载
b. 根据服务器系统及版本选择相应的RPM包
c. 通过以下示例命令安装RPM包以完成服务器yum仓库的扩展
rpm -Uvh mysql57-community-release-el6-n.noarch.rpm
2. 选择要安装的MySQL版本
如果是安装最新的版本则不需任何设置,如果是安装历史版本,则通过以下命令设置:
a. yum repolist all | grep mysql //查看所有可用版本
b. yum-config-manager --disable mysql57-community //disable掉5.7版本
c. yum-config-manager --enable mysql56-community //enable 5.6版本
3. 安装MySQL
yum install mysql-community-server //运行该命令直接安装第2步enable的版本
4. 启动MySQL服务
service mysqld start //centos 6
systemctl start mysqld.service //centos 7
service mysqld status //查看启动情况
5. 登录MySQL数据库
mysql -h localhost -u root -p //刚安装的MySQL数据库的root用户无密码,直接回车即可登录命令行模式
特别提醒:
如果是在Centos 7及以上版本中安装,则这里是不能成功登录的。
需要如下一些处理步骤:
centos 7及以上版本中安装MySQL后,root用户每次尝试登录都会生产一个随机密码存在var/log/mysqld.log文件中,因此可运行grep "password" /var/log/mysqld.log 命令获取到该随机密码:
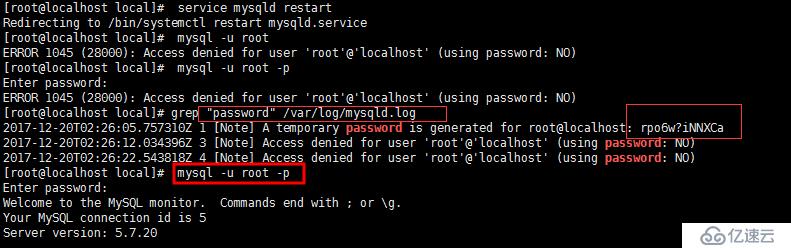
然后,再运行mysql -h localhost -u root -p命令并以随机密码登录命令模式,接下来再进行第二部分的用户及权限管理操作。
详细信息,请参考以下网址:https://blog.csdn.net/z13615480737/article/details/78906598
二)MySQL用户及权限管理
用户管理参考网址: https://www.cnblogs.com/fslnet/p/3143344.html
1. 初次使用为root用户设置密码,运行以下命令:
mysql> set password for 'root'@'localhost' =password('123456') ; //将密码设置为 123456
2. 用户管理
mysql>use mysql;
查看
mysql> select host,user,password from user ;
创建
mysql> create user zx_root IDENTIFIED by 'xxxxx'; //identified by 会将纯文本密码加密作为散列值存储
修改
mysql>rename user feng to newuser;//mysql 5之后可以使用,之前需要使用update 更新user表
删除
mysql>drop user newuser; //mysql5之前删除用户时必须先使用revoke 删除用户权限,然后删除用户,mysql5之后drop 命令可以删除用户的同时删除用户的相关权限
更改密码
mysql> set password for zx_root =password('xxxxxx');
mysql> update mysql.user set password=password('xxxx') where user='otheruser';
3. 查看用户权限
mysql> show grants for zx_root;
赋予权限
mysql> grant select/all on dmc_db.* to zx_root;
回收权限
mysql> revoke select on dmc_db.* from zx_root; //如果权限不存在会报错
上面的命令也可使用多个权限同时赋予和回收,权限之间使用逗号分隔
grant select on testdb.* to common_user@’%’;
grant insert on testdb.* to common_user@’%’;
grant update on testdb.* to common_user@’%’;
grant delete on testdb.* to common_user@’%’;
或者,用一条 MySQL 命令来替代:
grant select, insert, update, delete on testdb.* to common_user@'%';
如果想立即看到结果使用
flush privileges ;
命令更新
设置权限时必须给出以下信息
1,要授予的权限
2,被授予访问权限的数据库或表
3,用户名
grant和revoke可以在几个层次上控制访问权限
1,整个服务器,使用 grant ALL 和revoke ALL
2,整个数据库,使用on database.*
3,特点表,使用on database.table
4,特定的列
5,特定的存储过程
user表中host列的值的意义
% 匹配所有主机
localhost localhost不会被解析成IP地址,直接通过UNIXsocket连接
127.0.0.1 会通过TCP/IP协议连接,并且只能在本机访问;
::1 ::1就是兼容支持ipv6的,表示同ipv4的127.0.0.1
4.权限授予实例
grant 数据库开发人员,创建表、索引、视图、存储过程、函数。。。等权限
grant 创建、修改、删除 MySQL 数据表结构权限。
grant create on testdb.* to developer@’192.168.0.%’;
grant alter on testdb.* to developer@’192.168.0.%’;
grant drop on testdb.* to developer@’192.168.0.%’;
grant 操作 MySQL 外键权限
grant references on testdb.* to developer@’192.168.0.%’;
grant 操作 MySQL 临时表权限
grant create temporary tables on testdb.* to developer@’192.168.0.%’;
grant 操作 MySQL 索引权限
grant index on testdb.* to developer@’192.168.0.%’;
grant 操作 MySQL 视图、查看视图源代码权限
grant create view on testdb.* to developer@’192.168.0.%’;
grant show view on testdb.* to developer@’192.168.0.%’;
grant 操作 MySQL 存储过程、函数权限
grant create routine on testdb.* to developer@’192.168.0.%’; //now, can show procedure status
grant alter routine on testdb.* to developer@’192.168.0.%’; //now, you can drop a procedure
grant execute on testdb.* to developer@’192.168.0.%’;
grant 普通 DBA 管理某个 MySQL 数据库的权限
grant all privileges on testdb to dba@’localhost’;
其中,关键字 “privileges” 可以省略。
grant 高级 DBA 管理 MySQL 中所有数据库的权限
grant all on *.* to dba@’localhost’;
MySQL grant 权限,分别可以作用在多个层次上
1. grant 作用在整个 MySQL 服务器上:
grant select on *.* to dba@localhost; // dba 可以查询 MySQL 中所有数据库中的表。
grant all on *.* to dba@localhost; // dba 可以管理 MySQL 中的所有数据库
2. grant 作用在单个数据库上:
grant select on testdb.* to dba@localhost; // dba 可以查询 testdb 中的表。
3. grant 作用在单个数据表上:
grant select, insert, update, delete on testdb.orders to dba@localhost;
4. grant 作用在表中的列上:
grant select(id, se, rank) on testdb.apache_log to dba@localhost;
5. grant 作用在存储过程、函数上:
grant execute on procedure testdb.pr_add to ’dba’@’localhost’;
grant execute on function testdb.fn_add to ’dba’@’localhost’;
注意:
a. 修改完权限以后 一定要刷新服务,或者重启服务,刷新服务用:FLUSH PRIVILEGES。
b. MySQL中默认存在一个用户名为空的账户,只要在本地,可以不用输入账号密码即可登录到MySQL中。而因为这个账户的存在,导致新增的用户无法用账号密码登录,只需以root用户登陆,然后删掉即可。
    mysql -u root   # 以root账户登录MySQL
use mysql   #选择mysql库
delete from user where User='';  #删除账号为空的行
flush privileges;  #刷新权限
exit  #退出mysql
c. 运行下面命令使root用户可远程登录
mysql> grant all privileges on *.* to 'root'@'%' identified by '123456' with grant option;
权限表
| 权限 | 说明 |
| all | |
| alter | |
| alter routine | 使用alter procedure 和drop procedure |
| create | |
| create routine | 使用create procedure |
| create temporary tables | 使用create temporary table |
| create user | |
| create view | |
| delete | |
| drop | |
| execute | 使用call和存储过程 |
| file | 使用select into outfile 和load data infile |
| grant option | 可以使用grant和revoke |
| index | 可以使用create index 和drop index |
| insert | |
| lock tables | 锁表 |
| process | 使用show full processlist |
| reload | 使用flush |
| replication client | 服务器位置访问 |
| replocation slave | 由复制从属使用 |
| select | |
| show databases | |
| show view |
| shutdown | 使用mysqladmin shutdown 来关闭mysql |
| super | |
| update | |
| usage | 无访问权限 |
三)创建远程登录
1. 首先,授权特定用户具有远程登录权限,具体方法,参考上述第二部分。
2. 其次,MySQL数据库默认使用3306端口,需要对外开放3306端口,用户才能从远程端登录数据库系统。
a. centos 7以下执行以下命令对外开放3306端口:
#/sbin/iptables -I INPUT -p tcp --dport 3306 -j ACCEPT
#/etc/rc.d/init.d/iptables save
#/etc/init.d/iptables status
b. centos 7及以上执行以下命令对外开放3306端口:
#firewall-cmd --zone=public --add-port=3306/tcp --permanent
#firewall-cmd --reload
四)数据库备份及恢复
备份
备份数据库命令,两命令没有区别
mysqldump -hhostname -uusername -p databasename > backupfile.sql
或
mysqldump -hhostname -uusername -p --add-drop-table databasename > backupfile.sql
注:这2个命令dump的数据没有数据库创建语句,因此在恢复时,如果目标库不存在,需先手动创建!
2. 同时备份多个MySQL数据库
mysqldump -hhostname -uusername -p --databases databasename1 databasename2 databasenameN > backupfile.sql
3. 仅仅备份表结构
mysqldump -hhostname -uusername -p --no-data --databases database1 database2 databaseN > backupfile.sql
注:这2个命令dump的数据含数据库创建语句!
4. 只备份数据库中某些表
mysqldump -hhostname -uusername -p databasename specify_table1 specify_table2 > backupfile.sql
5. 备份所有数据库
mysqldump -hhostname -uusername -p --all-databases > backupfile.sql
6. 将数据库压缩备份
mysqldump -hhostname -uusername -p databasename | gzip > backupfile.sql.gz
恢复
1. 恢复数据库命令
mysql -hhostname -uusername -p databasename < backupfile.sql
2. 从多个数据库备份或所有数据库备份中恢复
mysql -hhostname -uusername -p --one-database databasename < backupfile.sql //恢复特定的数据库,目标库必须存在
mysql -hhostname -uusername -p < backupfile.sql //从多个备份中一次恢复全部数据库,目标库不存在可以自动创建
3. 恢复压缩的MySQL数据库
gunzip < backupfile.sql.gz | mysql -hhostname -uusername -p databasename
注:
恢复的逻辑是:
1. 在备份后新建的表将保留;
2. 删除了备份中的表,或者修改了备份中的数据都将恢复。
免责声明:本站发布的内容(图片、视频和文字)以原创、转载和分享为主,文章观点不代表本网站立场,如果涉及侵权请联系站长邮箱:is@yisu.com进行举报,并提供相关证据,一经查实,将立刻删除涉嫌侵权内容。