жӮЁеҘҪпјҢзҷ»еҪ•еҗҺжүҚиғҪдёӢи®ўеҚ•е“ҰпјҒ
д»ҠеӨ©е°ұи·ҹеӨ§е®¶иҒҠиҒҠжңүе…іжҖҺд№ҲеңЁLaravelжЎҶжһ¶дёӯдҪҝз”ЁBladeжЁЎжқҝпјҢеҸҜиғҪеҫҲеӨҡдәәйғҪдёҚеӨӘдәҶи§ЈпјҢдёәдәҶи®©еӨ§е®¶жӣҙеҠ дәҶи§ЈпјҢе°Ҹзј–з»ҷеӨ§е®¶жҖ»з»“дәҶд»ҘдёӢеҶ…е®№пјҢеёҢжңӣеӨ§е®¶ж №жҚ®иҝҷзҜҮж–Үз« еҸҜд»ҘжңүжүҖ收иҺ·гҖӮ
NO.1BladeжЁЎжқҝз®Җд»Ӣ
й—®пјҡ д»Җд№ҲжҳҜBladeжЁЎжқҝпјҹ
зӯ”пјҡ BladeжЁЎжқҝжҳҜLaravelжҸҗдҫӣдёҖдёӘж—ўз®ҖеҚ•еҸҲејәеӨ§зҡ„жЁЎжқҝеј•ж“Һпјӣ
е’Ңе…¶д»–жөҒиЎҢзҡ„PHPжЁЎжқҝеј•ж“ҺдёҚдёҖж ·пјҢ他并дёҚйҷҗеҲ¶дҪ еңЁи§ҶеӣҫйҮҢдҪҝз”ЁеҺҹз”ҹPHPд»Јз Ғпјӣ
жүҖжңүBladeи§ҶеӣҫйЎөйқўйғҪе°Ҷиў«зј–иҜ‘жҲҗеҺҹз”ҹзҡ„PHPд»Јз Ғ并缓еӯҳиө·жқҘпјҢйҷӨйқһдҪ зҡ„жЁЎжқҝж–Ү件被дҝ®ж”№пјҢеҗҰеҲҷдёҚдјҡйҮҚж–°зј–иҜ‘гҖӮ
иҖҢиҝҷдәӣйғҪж„Ҹе‘ізқҖBladeдёҚдјҡз»ҷжҲ‘们еўһеҠ д»»дҪ•иҙҹжӢ…гҖӮ
е…ҲиҜҙдёҖдёӢиҝҷйҮҢжҲ‘们дјҡз”ЁеҲ°зҡ„зҹҘиҜҶзӮ№
section
yield
extends
parent
й—®пјҡ BladeжЁЎжқҝ继жүҝдҪҝз”Ёзҡ„дјҳеҠҝеңЁе“Әпјҹдёәд»Җд№ҲиҰҒдҪҝз”Ёе®ғпјҹ
зӯ”пјҡ
BladeжЁЎжқҝ继жүҝзҡ„дјҳеҠҝеңЁдәҺпјҢдҪ еҶҷдёҖдёӘз®ЎзҗҶзі»з»ҹжҲ–иҖ…еҲ«зҡ„зі»з»ҹзҡ„ж—¶еҖҷпјҢеҰӮжһңжҹҗйғЁеҲҶж ·ејҸдёҚеҸҳпјҢдҪ еҸҜиғҪдјҡеӣ дёәиҝҷдёӘеҶҷдёҖдёӘеҸҲдёҖдёӘйЎөйқўпјҢе°ұеҫҲйә»зғҰпјҢиҖҢдё”д»Јз ҒйҮҸеӨҡпјҢеҒҡзҡ„ж—¶й—ҙд№…пјҢеҲ«дәәжҺҘжүӢд№ҹдјҡжҠ“зӢӮпјҢд»Јз Ғи§ӮиөҸжҖ§дёҚејәгҖӮдҪҶжҳҜдҪ иҰҒжҳҜз”ЁеҲ°дәҶBladeжЁЎжқҝ继жүҝпјҢдҪ е°ұеҸҜд»ҘзңҒжҺүйӮЈдәӣдёҖж ·жқҝеқ—д»Јз Ғзҡ„ж•°йҮҸпјӣ
дёәд»Җд№ҲиҰҒдҪҝз”Ёе®ғпјҹеӣ дёәж–№дҫҝз»ҙжҠӨпјҢд№ҹиҠӮзңҒд»Јз ҒйҮҸгҖӮ еӨҡиҜҙж— зӣҠпјҢжҲ‘们жӢҝеҮәдәӢе®һиҜҙиҜқгҖӮ
иҝҷйҮҢпјҢжҲ‘们е…ҲжӢҝеҮәдёҖдёӘBootstrapзҡ„ж ·ејҸпјҢд»Јз ҒеҰӮдёӢ:
<!DOCTYPE html>
<html>
<head>
<meta charset="utf-8">
<title>BootstrapдёҺLaravelзҡ„жөӢиҜ•йӣҶеҗҲ</title>
<link rel="stylesheet" href="bootstrap/css/bootstrap.min.css" rel="external nofollow" rel="external nofollow" >
<script src="bootstrap/js/jquery.min.js"></script>
<script src="bootstrap/js/bootstrap.min.js"></script>
<style>
.fakeimg {
height: 200px;
background: #aaa;
}
</style>
</head>
<body>
<div class="jumbotron text-center" >
<h2>дҪ еҘҪ!иҝҷйҮҢжҳҜйҷҲжҹҙзҡ„зі»з»ҹ</h2>
<p>иҝҷйҮҢжҳҜLaravelдёҺBootstrapзҡ„йӣҶеҗҲ</p>
</div>
<nav class="navbar navbar-inverse">
<div class="container-fluid">
<div class="navbar-header">
<button type="button" class="navbar-toggle" data-toggle="collapse" data-target="#myNavbar">
<span class="icon-bar"></span>
<span class="icon-bar"></span>
<span class="icon-bar"></span>
</button>
<a class="navbar-brand" href="#" rel="external nofollow" rel="external nofollow" rel="external nofollow" rel="external nofollow" rel="external nofollow" rel="external nofollow" rel="external nofollow" rel="external nofollow" >зҪ‘з«ҷеҗҚ</a>
</div>
<div class="collapse navbar-collapse" id="myNavbar">
<ul class="nav navbar-nav">
<li class="@yield('index')"><a href="{{url('index')}}" rel="external nofollow" rel="external nofollow" >йҰ–йЎө</a></li>
<li class="@yield('login')"><a href="{{url('student')}}" rel="external nofollow" rel="external nofollow" >дҝЎжҒҜиЎЁ</a></li>
</ul>
</div>
</div>
</nav>
<div class="container">
<div class="row">
<div class="col-sm-4">
<h3>е…ідәҺжҲ‘</h3>
<h6>жҲ‘зҡ„з…§зүҮ:</h6>
<div class="fakeimg">иҝҷиҫ№жҸ’е…ҘеӣҫеғҸ</div>
<p>е…ідәҺжҲ‘зҡ„д»Ӣз»Қ..</p>
<h4>й“ҫжҺҘ</h4>
<p>жҸҸиҝ°ж–Үжң¬гҖӮ</p>
<ul class="nav nav-pills nav-stacked">
<li class="active"><a href="#" rel="external nofollow" rel="external nofollow" rel="external nofollow" rel="external nofollow" rel="external nofollow" rel="external nofollow" rel="external nofollow" rel="external nofollow" >й“ҫжҺҘ 1</a></li>
<li><a href="#" rel="external nofollow" rel="external nofollow" rel="external nofollow" rel="external nofollow" rel="external nofollow" rel="external nofollow" rel="external nofollow" rel="external nofollow" >й“ҫжҺҘ 2</a></li>
<li><a href="#" rel="external nofollow" rel="external nofollow" rel="external nofollow" rel="external nofollow" rel="external nofollow" rel="external nofollow" rel="external nofollow" rel="external nofollow" >й“ҫжҺҘ 3</a></li>
</ul>
<hr class="hidden-sm hidden-md hidden-lg">
</div>
<div class="col-sm-8">
<h3>ж Үйўҳ</h3>
<h6>еүҜж Үйўҳ</h6>
<div class="fakeimg">еӣҫеғҸ</div>
<p>дёҖдәӣж–Үжң¬..</p>
<p>иҸңйёҹж•ҷзЁӢпјҢеӯҰзҡ„дёҚд»…жҳҜжҠҖжңҜпјҢжӣҙжҳҜжўҰжғіпјҒпјҒпјҒиҸңйёҹж•ҷзЁӢпјҢеӯҰзҡ„дёҚд»…жҳҜжҠҖжңҜпјҢжӣҙжҳҜжўҰжғіпјҒпјҒпјҒиҸңйёҹж•ҷзЁӢпјҢеӯҰзҡ„дёҚд»…жҳҜжҠҖжңҜпјҢжӣҙжҳҜжўҰжғіпјҒпјҒпјҒ</p>
<br>
<h3>ж Үйўҳ</h3>
<h6>еүҜж Үйўҳ</h6>
<div class="fakeimg">еӣҫеғҸ</div>
<p>дёҖдәӣж–Үжң¬..</p>
<p>иҸңйёҹж•ҷзЁӢпјҢеӯҰзҡ„дёҚд»…жҳҜжҠҖжңҜпјҢжӣҙжҳҜжўҰжғіпјҒпјҒпјҒиҸңйёҹж•ҷзЁӢпјҢеӯҰзҡ„дёҚд»…жҳҜжҠҖжңҜпјҢжӣҙжҳҜжўҰжғіпјҒпјҒпјҒиҸңйёҹж•ҷзЁӢпјҢеӯҰзҡ„дёҚд»…жҳҜжҠҖжңҜпјҢжӣҙжҳҜжўҰжғіпјҒпјҒпјҒ</p>
</div>
</div>
</div>
<div class="jumbotron text-center" >
<p>еә•йғЁеҶ…е®№</p>
</div>
</body>
</html>еҪ“然дәҶпјҢеҰӮжһңдҪ жғіиҰҒдҪҝз”ЁBootstrapзҡ„жЎҶжһ¶пјҢйӮЈдҪ е®һзҺ°иҰҒжҠҠBootstrapжЎҶжһ¶зҡ„ж–Ү件дёӢиҪҪеҘҪпјҢ然еҗҺеӯҳж”ҫдәҺpublicзӣ®еҪ•дёӢпјҢжүҚиғҪдҪҝз”ЁгҖӮ
然еҗҺжҲ‘们еңЁviewзӣ®еҪ•дёӢеҲӣе»әдёҖдёӘеҗҚдёәBstp.blade.phpзҡ„и§ҶеӣҫпјҢе°ҶдёҠйқўBootstrapзҡ„д»Јз ҒеӨҚеҲ¶иҝҮеҺ»гҖӮ
еҒҡеҲ°иҝҷпјҢжҲ‘们继з»ӯеңЁviewзӣ®еҪ•дёӢеҚҲеҲӣе»әдёҖдёӘзӣ®еҪ•пјҢе‘ҪеҗҚдёәBstpпјҢеңЁеҫҖйҮҢйқўеҶҷе…ҘдёҖдёӘж–Ү件пјҢе‘ҪеҗҚдёәBstp.blade.php
иҝҷдёӘж—¶еҖҷпјҢжҲ‘们е°ұиҰҒжҖқиҖғжҖҺд№ҲжүҚиғҪ继жүҝиҝҷдёӘжЁЎжқҝдәҶгҖӮиҝҷдёӘеҫҲз®ҖеҚ•пјҢеҸӘйңҖиҰҒз”ЁеҲ°дёҠйқўжҲ‘们жҸҗеҲ°зҡ„йӮЈеҮ дёӘеҚ•иҜҚзҹҘиҜҶзӮ№еҚіеҸҜгҖӮ
<!DOCTYPE html>
<html>
<head>
<meta charset="utf-8">
<title>@yield('title')</title>
<link rel="stylesheet" href="bootstrap/css/bootstrap.min.css" rel="external nofollow" rel="external nofollow" >
<script src="bootstrap/js/jquery.min.js"></script>
<script src="bootstrap/js/bootstrap.min.js"></script>
<style>
.fakeimg {
height: 200px;
background: #aaa;
}
</style>
</head>
<body>
@section('jumbotron')
<div class="jumbotron text-center" >
<h2>дҪ еҘҪ!иҝҷйҮҢжҳҜйҷҲжҹҙзҡ„зі»з»ҹ</h2>
<p>иҝҷйҮҢжҳҜLaravelдёҺBootstrapзҡ„йӣҶеҗҲ</p>
</div>
@show
@section('nav')
<nav class="navbar navbar-inverse">
<div class="container-fluid">
<div class="navbar-header">
<button type="button" class="navbar-toggle" data-toggle="collapse" data-target="#myNavbar">
<span class="icon-bar"></span>
<span class="icon-bar"></span>
<span class="icon-bar"></span>
</button>
<a class="navbar-brand" href="#" rel="external nofollow" rel="external nofollow" rel="external nofollow" rel="external nofollow" rel="external nofollow" rel="external nofollow" rel="external nofollow" rel="external nofollow" >зҪ‘з«ҷеҗҚ</a>
</div>
<div class="collapse navbar-collapse" id="myNavbar">
<ul class="nav navbar-nav">
<li class="@yield('index')"><a href="{{url('index')}}" rel="external nofollow" rel="external nofollow" >йҰ–йЎө</a></li>
<li class="@yield('login')"><a href="{{url('student')}}" rel="external nofollow" rel="external nofollow" >дҝЎжҒҜиЎЁ</a></li>
</ul>
</div>
</div>
</nav>
@show
@section('box')
<div class="container">
<div class="row">
<div class="col-sm-4">
<h3>е…ідәҺжҲ‘</h3>
<h6>жҲ‘зҡ„з…§зүҮ:</h6>
<div class="fakeimg">иҝҷиҫ№жҸ’е…ҘеӣҫеғҸ</div>
<p>е…ідәҺжҲ‘зҡ„д»Ӣз»Қ..</p>
<h4>й“ҫжҺҘ</h4>
<p>жҸҸиҝ°ж–Үжң¬гҖӮ</p>
<ul class="nav nav-pills nav-stacked">
<li class="active"><a href="#" rel="external nofollow" rel="external nofollow" rel="external nofollow" rel="external nofollow" rel="external nofollow" rel="external nofollow" rel="external nofollow" rel="external nofollow" >й“ҫжҺҘ 1</a></li>
<li><a href="#" rel="external nofollow" rel="external nofollow" rel="external nofollow" rel="external nofollow" rel="external nofollow" rel="external nofollow" rel="external nofollow" rel="external nofollow" >й“ҫжҺҘ 2</a></li>
<li><a href="#" rel="external nofollow" rel="external nofollow" rel="external nofollow" rel="external nofollow" rel="external nofollow" rel="external nofollow" rel="external nofollow" rel="external nofollow" >й“ҫжҺҘ 3</a></li>
</ul>
<hr class="hidden-sm hidden-md hidden-lg">
</div>
<div class="col-sm-8">
<h3>ж Үйўҳ</h3>
<h6>еүҜж Үйўҳ</h6>
<div class="fakeimg">еӣҫеғҸ</div>
<p>дёҖдәӣж–Үжң¬..</p>
<p>иҸңйёҹж•ҷзЁӢпјҢеӯҰзҡ„дёҚд»…жҳҜжҠҖжңҜпјҢжӣҙжҳҜжўҰжғіпјҒпјҒпјҒиҸңйёҹж•ҷзЁӢпјҢеӯҰзҡ„дёҚд»…жҳҜжҠҖжңҜпјҢжӣҙжҳҜжўҰжғіпјҒпјҒпјҒиҸңйёҹж•ҷзЁӢпјҢеӯҰзҡ„дёҚд»…жҳҜжҠҖжңҜпјҢжӣҙжҳҜжўҰжғіпјҒпјҒпјҒ</p>
<br>
<h3>ж Үйўҳ</h3>
<h6>еүҜж Үйўҳ</h6>
<div class="fakeimg">еӣҫеғҸ</div>
<p>дёҖдәӣж–Үжң¬..</p>
<p>иҸңйёҹж•ҷзЁӢпјҢеӯҰзҡ„дёҚд»…жҳҜжҠҖжңҜпјҢжӣҙжҳҜжўҰжғіпјҒпјҒпјҒиҸңйёҹж•ҷзЁӢпјҢеӯҰзҡ„дёҚд»…жҳҜжҠҖжңҜпјҢжӣҙжҳҜжўҰжғіпјҒпјҒпјҒиҸңйёҹж•ҷзЁӢпјҢеӯҰзҡ„дёҚд»…жҳҜжҠҖжңҜпјҢжӣҙжҳҜжўҰжғіпјҒпјҒпјҒ</p>
</div>
</div>
</div>
@show
@section('footer')
<div class="jumbotron text-center" >
<p>еә•йғЁеҶ…е®№</p>
</div>
@show
</body>
</html>@section(вҖҳnav')
вҖҰ
@show
@show
иҝҷйҮҢд»ЈиЎЁзҡ„жҳҜдёҖдёӘ继жүҝжҹҗдёӘд»Јз Ғеқ—зҡ„ејҖе§Ӣд»ҘеҸҠз»“жқҹпјҢsectionејҖе§ӢпјҢshowз»“жқҹпјҢnavе®ҡд№үиҝҷдёӘеҸҜд»Ҙдҝ®ж”№зҡ„д»Јз Ғеқ—еҗҚеӯ—гҖӮж–№дҫҝеӯҗжЁЎжқҝи°ғз”ЁгҖӮ
@yield(вҖҳtitle')
иҝҷйҮҢе’ҢдёҠйқўзҡ„е®ҡд№үе·®дёҚеӨҡпјҢе”ҜдёҖдёҚеҗҢзҡ„жҳҜпјҢд»–жҳҜдёҚеҸҜжү©еұ•зҡ„пјҢд№ҹе°ұжҳҜиҜҙпјҢеҺҹжқҘиҝҷдёӘdivжңүеӨҡеӨ§пјҢдҪ е°ұеҸӘиғҪеӨҡеӨ§пјҢиҖҢдёҠйқўйӮЈдёӘдёҚдёҖж ·пјҢд»–зҡ„еҶ…е®№еҸӘиҰҒи¶…иҝҮдәҶеҺҹжң¬зҡ„divпјҢйӮЈд№ҲеҺҹжң¬зҡ„divдјҡйҡҸд№ӢеўһеӨ§
гҖӮ@extends(вҖҳBstp')
иҝҷдёӘд»ЈиЎЁзқҖпјҢдҪ иҝҷдёӘеӯҗжЁЎжқҝ继жүҝдәҺи°ҒпјҢжҲ‘иҝҷйҮҢеҶҷзҡ„жҳҜиҝҷдёӘеӯҗжЁЎжқҝ继жүҝдәҺviewзӣ®еҪ•дёӢзҡ„Bstp.blade.phpгҖӮ
@parent
иҝҷдёӘд»ЈиЎЁзқҖпјҢжҠҠдҪ еҺҹжң¬зҡ„дёҖиө·з»§жүҝиҝҮжқҘпјҢиҰҶзӣ–гҖӮ
иҜҙдәҶиҝҷд№ҲеӨҡпјҢеҰӮжһңиҝҳдёҚзҗҶи§ЈпјҢйӮЈе’ұ们е°ұиЎҢеҠЁиҜҒжҳҺ
йҰ–е…ҲпјҢжҲ‘们йӘҢиҜҒ第дёҖдёӘ@extends
然еҗҺпјҢжү“ејҖжҲ‘们viewзӣ®еҪ•дёӢзҡ„Bstpзӣ®еҪ•йҮҢзҡ„Bstp.blade.phpж–Ү件пјҢ然еҗҺиҫ“е…Ҙ@extendsпјҢ并且з»ҷд»–иөӢдәҲдёҖдёӘжҺ§еҲ¶еҷЁе’Ңи·Ҝз”ұ
еӯҗжЁЎжқҝд»Јз ҒеҰӮдёӢ:
@extends('Bstp')//继жүҝиҮӘviewзӣ®еҪ•дёӢзҡ„Bstp.blade.phpжҺ§еҲ¶еҷЁд»Јз ҒеҰӮдёӢ:
namespace App\Http\Controllers;
class StudentController extends Controller
{
public function index()
{
return view('Bstp.Bstp');//иҝҷйҮҢжҢҮзҡ„жҳҜиҝ”еӣһviewзӣ®еҪ•дёӢBstpзӣ®еҪ•дёӢзҡ„Bstp
}
}и·Ҝз”ұеҰӮдёӢ:
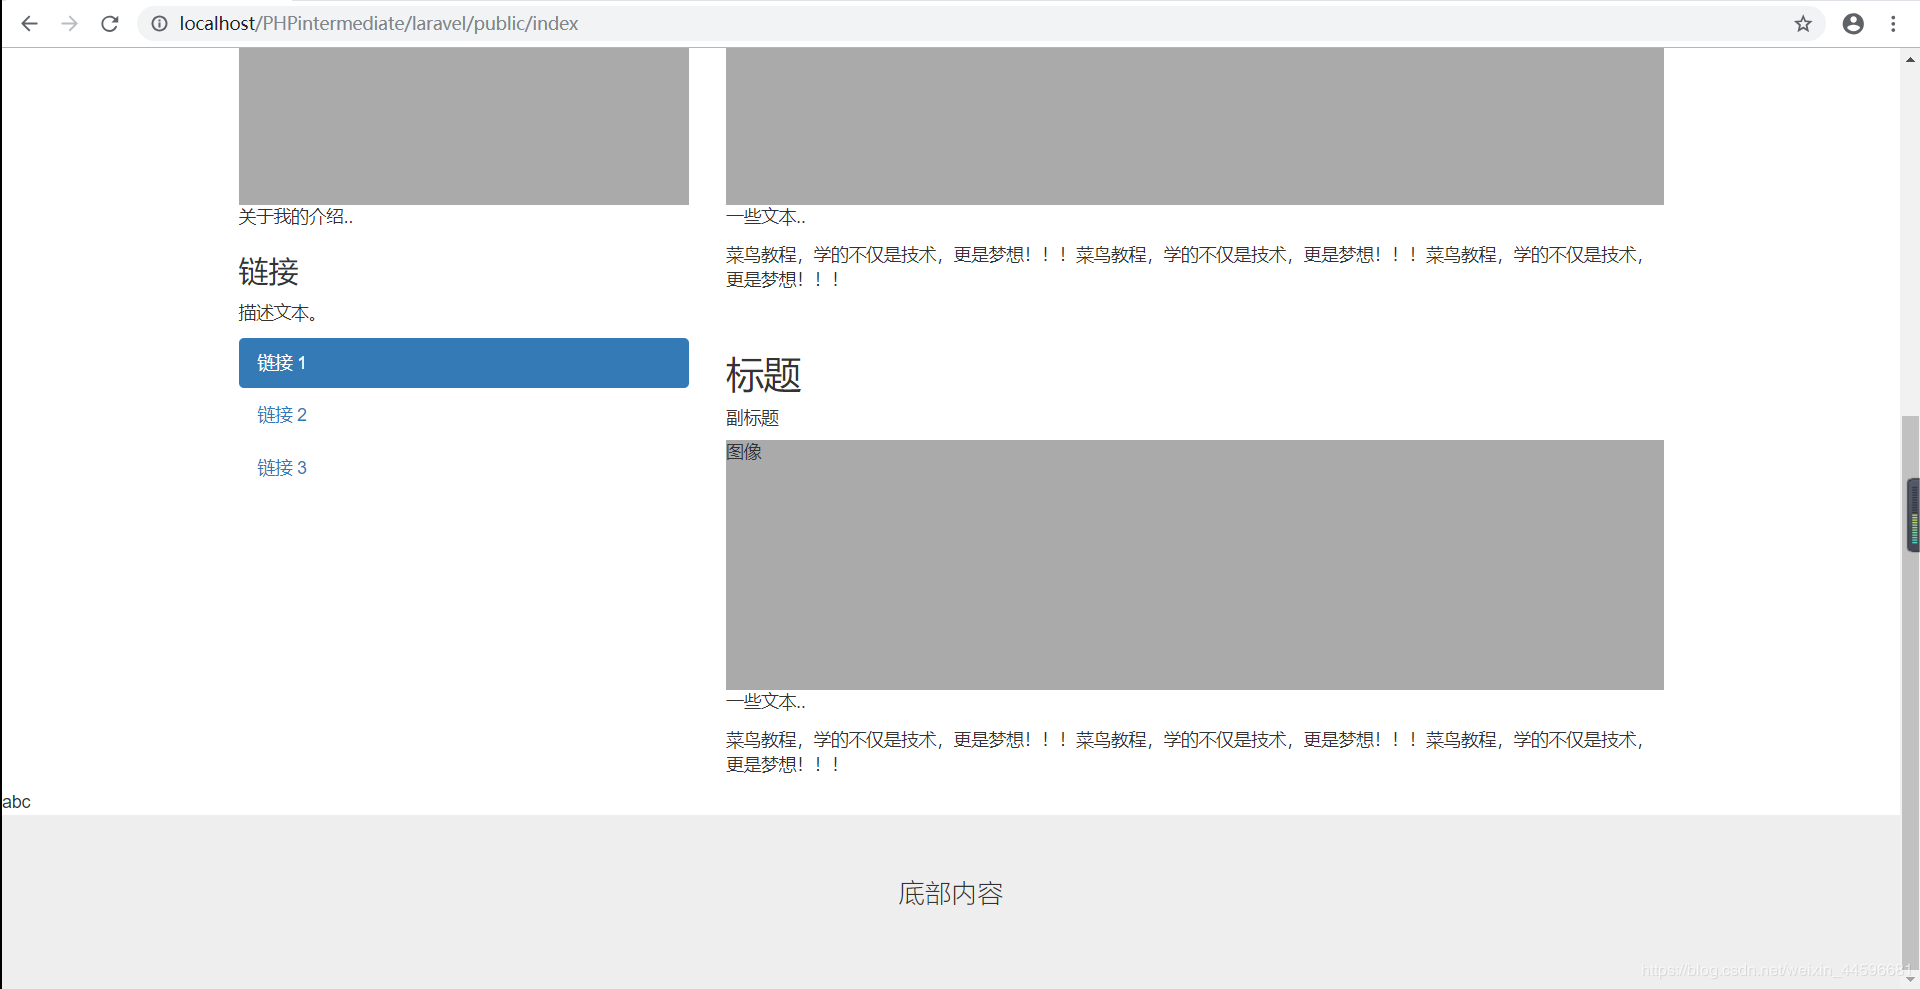
Route::get('index',['as'=>'index','uses'=>'StudentController@index']);然еҗҺжҲ‘们иҫ“е…ҘindexпјҢиҺ·еҫ—ж•ҲжһңеҰӮдёӢ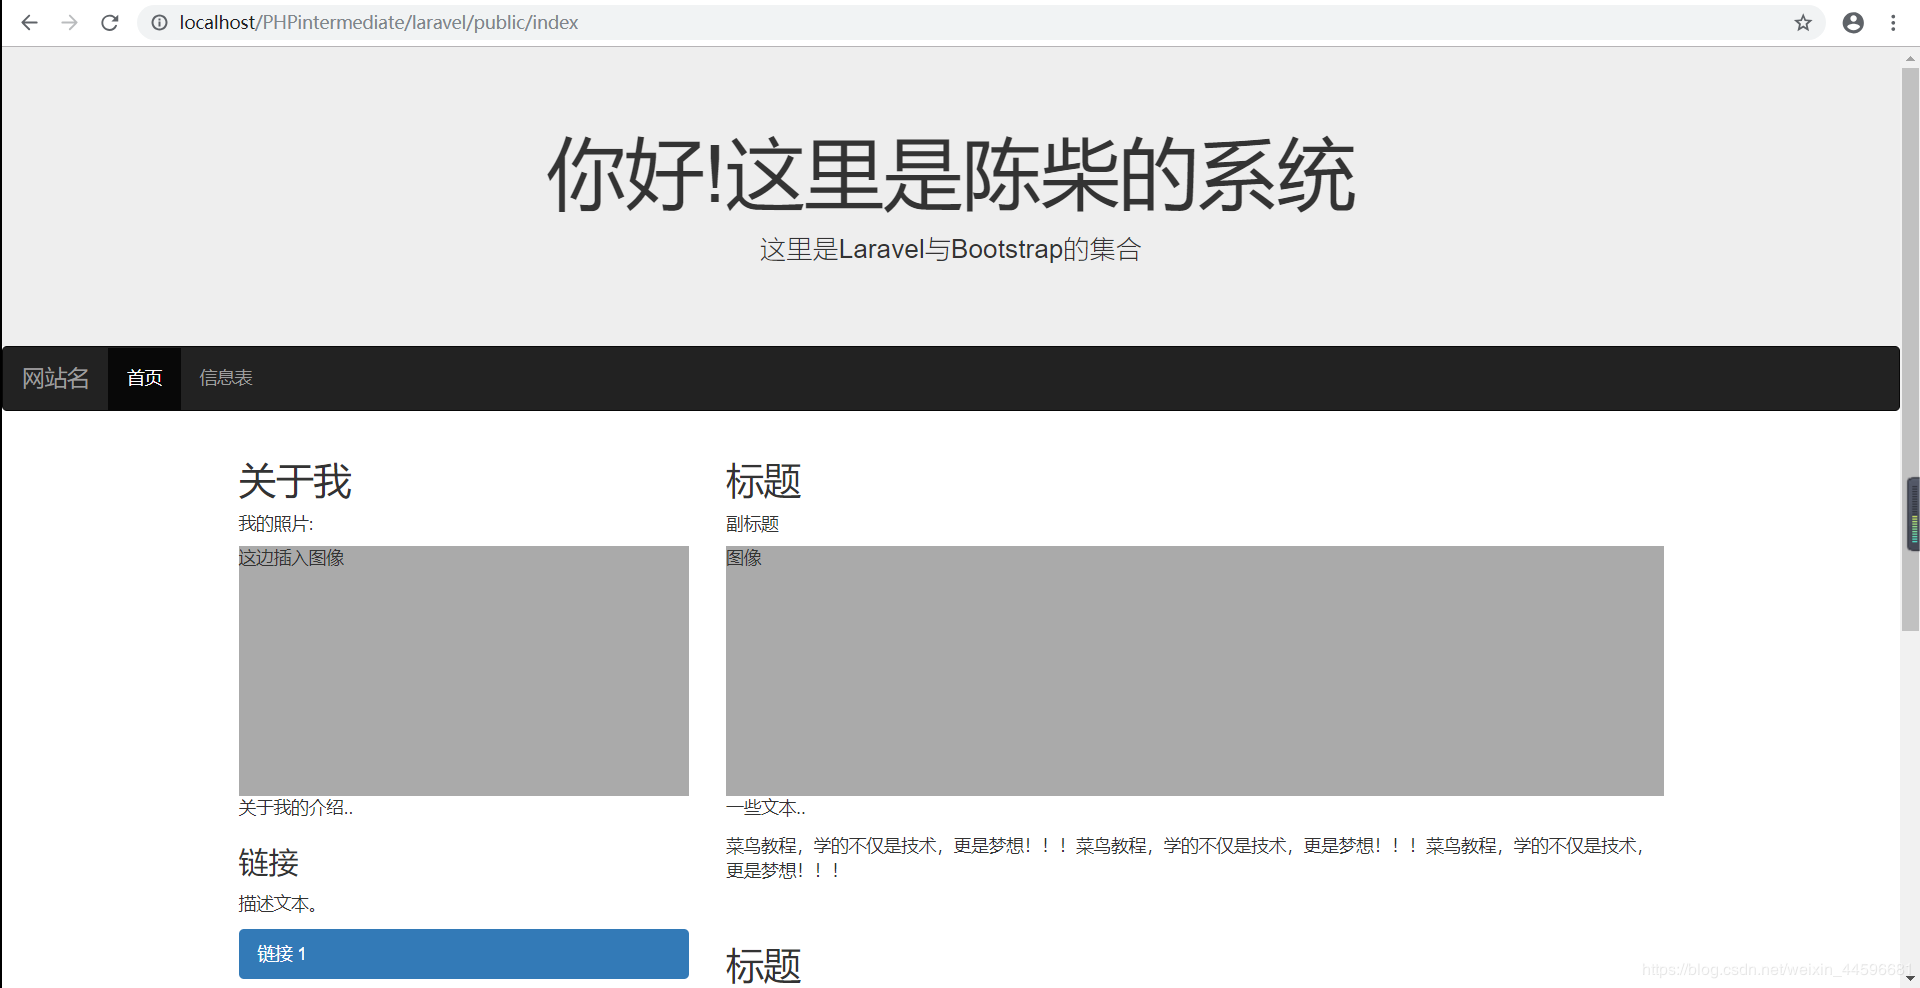
иҝҷйҮҢпјҢжҲ‘们жҳҜдёҚжҳҜе·Із»Ҹиҫ“еҮәеҮәжқҘдәҶпјҹ
(иҝҷйҮҢжңүдёӘзӮ№еҖјеҫ—жіЁж„ҸпјҢеӣ дёәжҲ‘еңЁ<title></title>йҮҢиҫ“е…ҘдәҶ@yield(вҖҳtitle'),然еҗҺеңЁпјҢBstpдёӢеҸҲз»ҷд»–иөӢдәҶдёӘеҖјпјҢеҸ«йҰ–йЎөпјҢжүҖд»Ҙж Үйўҳе°ұжҳҜйҰ–йЎө)
然еҗҺеҰӮжһңжҲ‘们жғіиҰҒжҠҠдёӯй—ҙйӮЈеқ—вҖңе…ідәҺжҲ‘вҖқпјҢвҖңж ҮйўҳвҖқпјҢвҖңй“ҫжҺҘвҖқпјҢеҺ»жҺүжҖҺд№ҲеҠһ?
еҘҪпјҢйӮЈд№ҲжҲ‘们еҸӘйңҖиҰҒпјҢеңЁBstp.blade.phpж–Ү件йҮҢ(BstpдёӢзҡ„)пјҢиҫ“е…ҘдёҖдёӘз©әзҡ„
@section('box')

@stopеҚіеҸҜпјҢж•ҲжһңеҰӮдёӢ: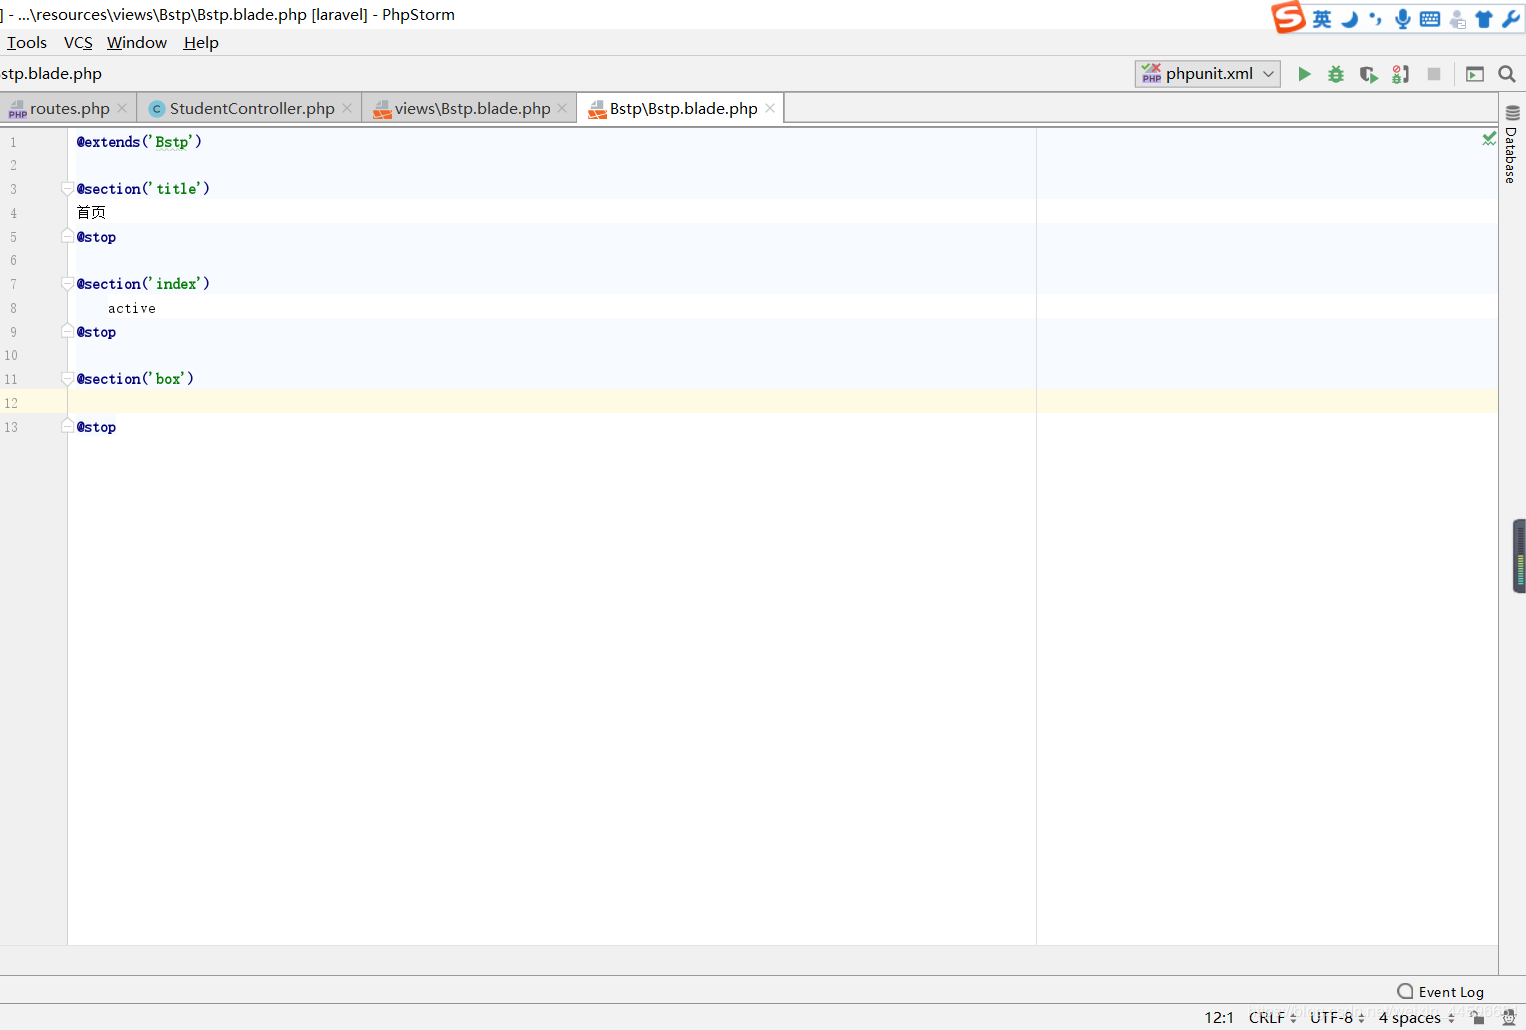
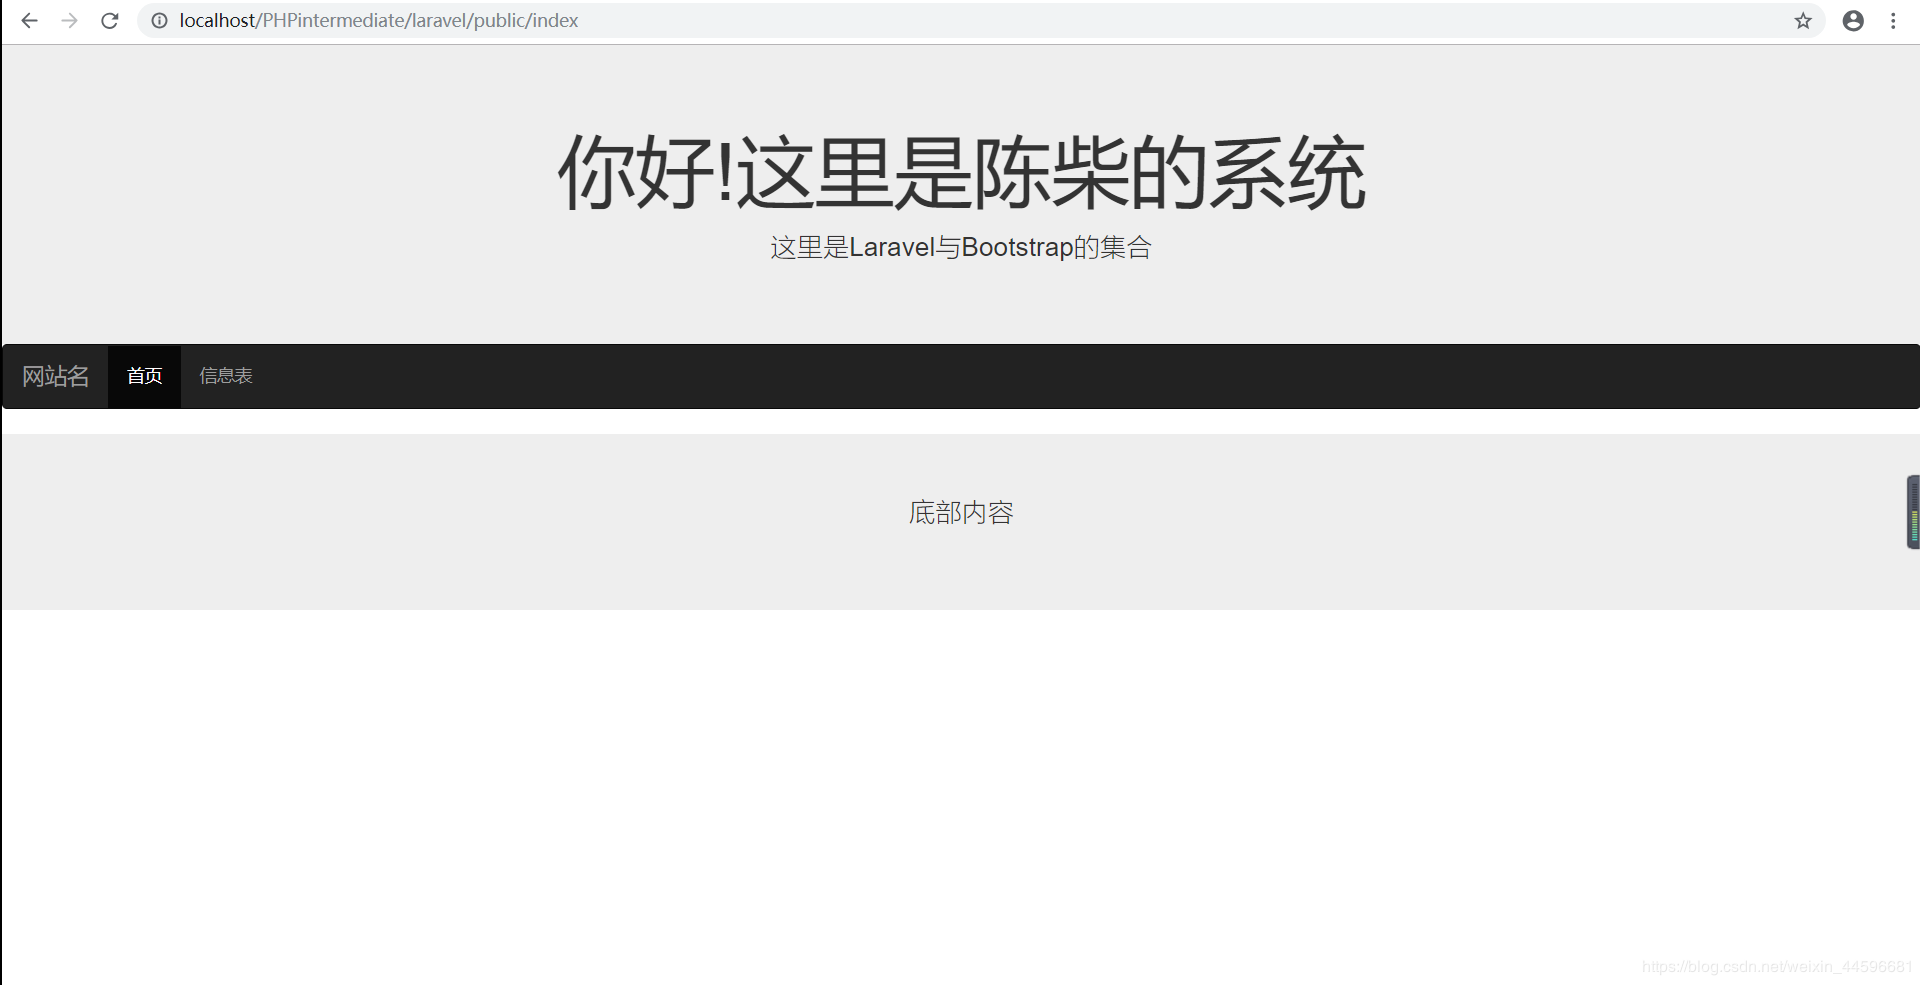
дҪ 们зңӢпјҢжҳҜдёҚжҳҜжІЎжңүдәҶ?
йӮЈд№ҲеҘҪпјҢй—®йўҳеҸҲжқҘдәҶпјҢжңүзҡ„е°ҸдјҷдјҙжғіеңЁеҺҹжқҘзҡ„еҹәзЎҖдёҠеҶҚж–°еўһдёҖзӮ№дёңиҘҝпјҢиғҪи®©иҝҷдёӘдёҚж¶ҲеӨұпјҢиҖҢдё”д№ҹиғҪжҳҫзӨәж–°еўһзҡ„дёңиҘҝпјҢиҰҒжҖҺд№ҲеҠһе‘ўпјҹ
иҝҷдёӘй—®йўҳд»…д»…еҸӘйңҖиҰҒдёҖдёӘ@parent
еҰӮдёӢ: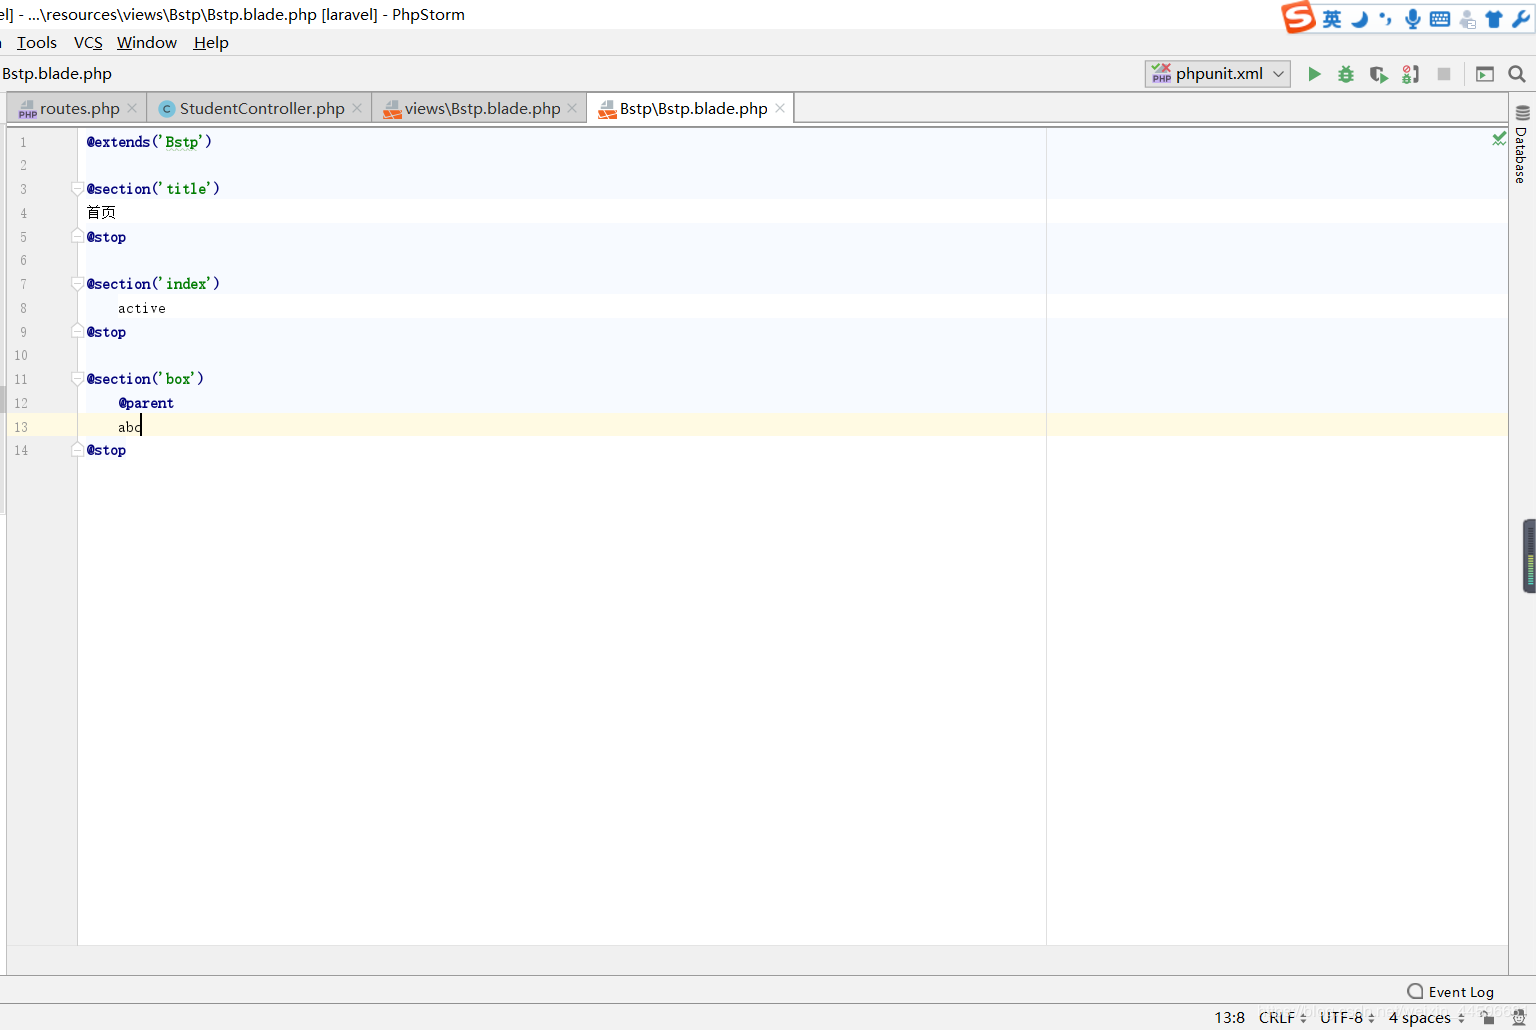
зңӢе®ҢдёҠиҝ°еҶ…е®№пјҢдҪ 们еҜ№жҖҺд№ҲеңЁLaravelжЎҶжһ¶дёӯдҪҝз”ЁBladeжЁЎжқҝжңүиҝӣдёҖжӯҘзҡ„дәҶи§Јеҗ—пјҹеҰӮжһңиҝҳжғідәҶи§ЈжӣҙеӨҡзҹҘиҜҶжҲ–иҖ…зӣёе…іеҶ…е®№пјҢиҜ·е…іжіЁдәҝйҖҹдә‘иЎҢдёҡиө„и®Ҝйў‘йҒ“пјҢж„ҹи°ўеӨ§е®¶зҡ„ж”ҜжҢҒгҖӮ
е…ҚиҙЈеЈ°жҳҺпјҡжң¬з«ҷеҸ‘еёғзҡ„еҶ…е®№пјҲеӣҫзүҮгҖҒи§Ҷйў‘е’Ңж–Үеӯ—пјүд»ҘеҺҹеҲӣгҖҒиҪ¬иҪҪе’ҢеҲҶдә«дёәдё»пјҢж–Үз« и§ӮзӮ№дёҚд»ЈиЎЁжң¬зҪ‘з«ҷз«ӢеңәпјҢеҰӮжһңж¶үеҸҠдҫөжқғиҜ·иҒ”зі»з«ҷй•ҝйӮ®з®ұпјҡis@yisu.comиҝӣиЎҢдёҫжҠҘпјҢ并жҸҗдҫӣзӣёе…іиҜҒжҚ®пјҢдёҖз»ҸжҹҘе®һпјҢе°Ҷз«ӢеҲ»еҲ йҷӨж¶үе«ҢдҫөжқғеҶ…е®№гҖӮ
жӮЁеҘҪпјҢзҷ»еҪ•еҗҺжүҚиғҪдёӢи®ўеҚ•е“ҰпјҒ