您好,登录后才能下订单哦!
密码登录
登录注册
点击 登录注册 即表示同意《亿速云用户服务条款》
[root@test ~]# cat /etc/redhat-release
CentOS Linux release 7.2.1511 (Core)
[root@test ~]# uname -r
3.10.0-327.el7.x86_64
cd /etc/yum.repos.d
#备份原镜像
mv CentOS-Base.repo CentOS-Base.repo.backup

#添加阿里云Base源
wget -O /etc/yum.repos.d/CentOS-Base.repo http://mirrors.aliyun.com/repo/Centos-7.repo

#添加阿里云epel源
wget https://mirrors.aliyun.com/repo/epel-7.repo
#清除缓存
yum clean all && yum makecache
yum install curl policycoreutils openssh-serveropenssh-clients
vi /etc/yum.repos.d/gitlab-ce.repo
[gitlab-ce]
name=Gitlab CE Repository
baseurl=https://mirrors.tuna.tsinghua.edu.cn/gitlab-ce/yum/el$releasever/
gpgcheck=0
enabled=1
yum makecache
yum install gitlab-ce
head -1 /opt/gitlab/version-manifest.txt
gitlab-ce 9.1.2
# gitlab-ctl reconfigure会把一些过去的config还原,导致修改的端口以及域名等都没有了
gitlab-ctl reconfigure

#重启gitlab-ce
gitlab-ctl restart
vi /etc/yum.repo.d/mysql.repo
[mysql56-community]
name=MySQL 5.6 Community Server
baseurl=http://repo.mysql.com/yum/mysql-5.6-community/el/7/$basearch/
enabled=1
gpgcheck=0
yum -y install mysql-server mysql-devel

#基本配置,新建密码等
mysql_secure_installation

#登录数据库
mysql -uroot -p$password

#查看用户情况
mysql> select user,host from mysql.user;
+------+-----------+
| user | host     |
+------+-----------+
| root | 127.0.0.1 |
| root | ::1      |
| root | localhost |
| root | test     |
+------+-----------+
4 rows in set (0.03 sec)

#创建一个gitlab管理用户
mysql> CREATE USER 'git'@'localhost' IDENTIFIED BY '123456';
Query OK, 0 rows affected (0.00 sec)

#创建gitlab数据库
mysql> CREATE DATABASE IF NOT EXISTS`gitlabhq_production` DEFAULT CHARACTER SET `utf8` COLLATE `utf8_general_ci`;
Query OK, 1 row affected (0.00 sec)

#授予git用户对gitlabhq_production数据库所有表的权限
mysql> GRANT SELECT, INSERT, UPDATE, DELETE,CREATE, CREATE TEMPORARY TABLES, DROP, INDEX, ALTER, LOCK TABLES, REFERENCES ON`gitlabhq_production`.* TO 'git'@'localhost';
Query OK, 0 rows affected (0.00 sec)

#使修改用户生效
mysql> flush privileges;
Query OK, 0 rows affected (0.00 sec)
mysql> \q
Bye

#测试新用户是否能连接新的数据库
sudo -u git -H mysql -u git -p -Dgitlabhq_production
Enter password:
Reading table information for completion of tableand column names
You can turn off this feature to get a quickerstartup with -A

Welcome to the MySQL monitor.  Commands end with ; or \g.
Your MySQL connection id is 32
Server version: 5.6.36 MySQL Community Server (GPL)

Copyright (c) 2000, 2017, Oracle and/or itsaffiliates. All rights reserved.

Oracle is a registered trademark of OracleCorporation and/or its
affiliates. Other names may be trademarks of theirrespective
owners.

Type 'help;' or '\h' for help. Type '\c' to clearthe current input statement.

mysql>
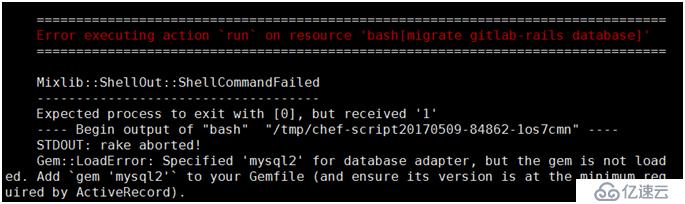
postgresql['enable'] = false
gitlab_rails['db_adapter'] = 'mysql2'
gitlab_rails['db_encoding'] = 'utf8'
gitlab_rails['db_host'] = '127.0.0.1'
gitlab_rails['db_port'] = '3306'
gitlab_rails['db_username'] = 'git'
gitlab_rails['db_password'] = '123456'
按官方文档重新配置gitlab
gitlab-ctl reconfigure
迁移数据库时出现以下错误
#查看gem源
/opt/gitlab/embedded/bin/gem source
*** CURRENT SOURCES ***

https://rubygems.org/

#更换开源中国的gem源,否则使用时会出现错误
/opt/gitlab/embedded/bin/gem sources --addhttps://gems.ruby-china.org/ --remove https://rubygems.org/

#查看更好后的gem源
/opt/gitlab/embedded/bin/gem sources
*** CURRENT SOURCES ***

https://gems.ruby-china.org/

#更改配置Gemfile文件的gem源
vi /opt/gitlab/embedded/service/gitlab-rails/ Gemfile
source 'https://gems.ruby-china.org'
#此命令会尝试更新系统中已存在的gem包
/opt/gitlab/embedded/bin/bundle install
#执行该命令需要切换到Gemfile上一级目录才可以运行
cd /opt/gitlab/embedded/service/gitlab-rails/
/opt/gitlab/embedded/bin/bundle install
vi/opt/gitlab/embedded/service/gitlab-rails/.bundle/config

gitlab-rake gitlab:check

#安装mysql2 0.3.20版本
/opt/gitlab/embedded/bin/gem install mysql2 -v'0.3.20'
出错
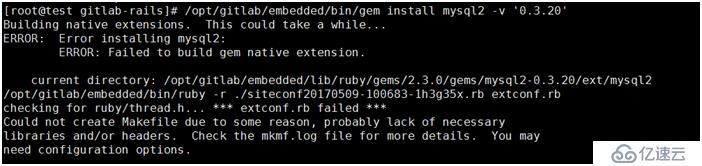
查看文件后发现没有安装gcc软件,导致不能编译文件。
故需要yum安装gcc
yum install gcc –y

/opt/gitlab/embedded/bin/gem install mysql2 -v'0.3.20'
Building native extensions.  This could take a while...
Successfully installed mysql2-0.3.20
Parsing documentation for mysql2-0.3.20
Installing ri documentation for mysql2-0.3.20
Done installing documentation for mysql2 after 1seconds
1 gem installed
#重新配置
gitlab-ctl reconfigure
#检查
gitlab-rake gitlab:check
[root@test chen]# touch README.md
[root@test chen]# git add README.md
[root@test chen]# git commit -m "addREADME"
[master(根提交) bed61ad] addREADME
 1 filechanged, 0 insertions(+), 0 deletions(-)
 create mode100644 README.md
[root@test chen]# git push -u origin master
Counting objects: 3, done.
Writing objects: 100% (3/3), 216 bytes | 0 bytes/s,done.
Total 3 (delta 0), reused 0 (delta 0)
To git@10.0.0.10:root/chen.git
 * [newbranch]      master -> master
分支 master 设置为跟踪来自 origin 的远程分支 master。

成功
参考文档:
https://docs.gitlab.com/ce/install/database_mysql.html
https://docs.gitlab.com/omnibus/settings/database.html#seed-the-database-fresh-installs-only
http://shaonian.blog.51cto.com/2975261/1894664
免责声明:本站发布的内容(图片、视频和文字)以原创、转载和分享为主,文章观点不代表本网站立场,如果涉及侵权请联系站长邮箱:is@yisu.com进行举报,并提供相关证据,一经查实,将立刻删除涉嫌侵权内容。