您好,登录后才能下订单哦!
密码登录
登录注册
点击 登录注册 即表示同意《亿速云用户服务条款》
今天小编给大家分享一下Centos中双网卡绑定及相关问题怎么解决的相关知识点,内容详细,逻辑清晰,相信大部分人都还太了解这方面的知识,所以分享这篇文章给大家参考一下,希望大家阅读完这篇文章后有所收获,下面我们一起来了解一下吧。
说明下,以下环境是在虚拟机中实现的:
系统: centos7.2 x64 最小化安装。

为了方便演示,这里共有三张网卡:
eno16777736 : 桥接网卡:10.0.0.11/24
剩下的两张网卡准备做绑定:
eno33554984
eno50332208
[root@bogon ~]# nmcli con sh
name    uuid         type   device
wired connection 2 bf0cf9b6-c7fb-4c0a-ada4-abfb650dd5f0 802-3-ethernet --
wired connection 1 5b4e0b3e-c469-404c-8839-76d18442fc20 802-3-ethernet --
eno16777736   100e462e-c0d0-4271-9b5a-1c8e47ff0d03 802-3-ethernet eno16777736
[root@bogon ~]# nmcli con del 5b4e0b3e-c469-404c-8839-76d18442fc20 bf0cf9b6-c7fb-4c0a-ada4-abfb650dd5f0
connection 'wired connection 1' (5b4e0b3e-c469-404c-8839-76d18442fc20) successfully deleted.
connection 'wired connection 2' (bf0cf9b6-c7fb-4c0a-ada4-abfb650dd5f0) successfully deleted.

[root@bogon ~]# nmcli con add type team ifname team0 con-name team0 config '{"runner":{"name":"roundrobin"}}'
connection 'team0' (913f05c2-15d8-49a9-a35f-8bc5ee843c0c) successfully added.
[root@bogon ~]# nmcli con add type team-slave ifname eno50332208 con-name team0-port2 master team0
connection 'team0-port2' (1583854c-1f85-4c76-8cc7-c643071d4b82) successfully added.
[root@bogon ~]# nmcli con mod team0 ipv4.address "192.168.121.100/24"
[root@bogon ~]# nmcli con mod team0 ipv4.method manual

[root@bogon ~]# nmcli con sh
name   uuid         type   device
eno16777736 100e462e-c0d0-4271-9b5a-1c8e47ff0d03 802-3-ethernet eno16777736
team0-port2 1583854c-1f85-4c76-8cc7-c643071d4b82 802-3-ethernet --
team0-port1 bfd408b4-76d9-4f5c-ad5b-4d92430eb6ba 802-3-ethernet --
team0  913f05c2-15d8-49a9-a35f-8bc5ee843c0c team   --
到这里都没毛病。
[root@bogon ~]# nmcli con up team0
error: connection activation failed: networkmanager plugin for 'team' unavailable
什么鬼?networkmanager "team"插件不可用。于是开始排查。
是否存在team模块
[root@bogon ~]# lsmod | egrep *team*
木有。那直接restart network好了。
[root@bogon ~]# systemctl restart network
job for network.service failed because the control process exited with error code. see "systemctl status network.service" and "journalctl -xe" for details.

[root@bogon ~]# systemctl status network
...
mar 25 04:47:56 bogon network[2742]: bringing up interface team0: error: connection activation failed: networkmanager plugin for 'team' unavailable
mar 25 04:47:56 bogon network[2742]: [failed]
...
一样的报错,难道什么包没有安装到?
[root@bogon ~]# yum list all | grep networkmanager*
networkmanager.x86_64     1:1.0.6-27.el7     @anaconda
networkmanager-libnm.x86_64    1:1.0.6-27.el7     @anaconda
networkmanager-tui.x86_64    1:1.0.6-27.el7     @anaconda
networkmanager-wifi.x86_64    1:1.0.6-27.el7     @anaconda
networkmanager-adsl.x86_64    1:1.0.6-27.el7     yum
networkmanager-bluetooth.x86_64   1:1.0.6-27.el7     yum
networkmanager-glib.x86_64    1:1.0.6-27.el7     yum
networkmanager-libreswan.x86_64   1.0.6-3.el7     yum
networkmanager-libreswan-gnome.x86_64 1.0.6-3.el7     yum
networkmanager-team.x86_64    1:1.0.6-27.el7     yum
networkmanager-wwan.x86_64    1:1.0.6-27.el7     yum
哎哟,还真有个networkmanager-team没有安装叻。
[root@bogon ~]# yum install networkmanager-team -y
然后再次尝试:
[root@bogon ~]# nmcli con sh
name   uuid         type   device
eno16777736 100e462e-c0d0-4271-9b5a-1c8e47ff0d03 802-3-ethernet eno16777736
team0-port2 1583854c-1f85-4c76-8cc7-c643071d4b82 802-3-ethernet --
team0-port1 bfd408b4-76d9-4f5c-ad5b-4d92430eb6ba 802-3-ethernet --
team0  913f05c2-15d8-49a9-a35f-8bc5ee843c0c team   --

[root@bogon ~]# nmcli con up team0
error: connection activation failed: networkmanager plugin for 'team' unavailable
尼玛,还是同样的错,这就尴尬了。那就重启下networkmanager 在看看。
[root@bogon ~]# systemctl restart networkmanager

[root@bogon ~]# nmcli con sh
name   uuid         type   device
team0-port2 1583854c-1f85-4c76-8cc7-c643071d4b82 802-3-ethernet eno50332208
eno16777736 100e462e-c0d0-4271-9b5a-1c8e47ff0d03 802-3-ethernet eno16777736
team0-port1 bfd408b4-76d9-4f5c-ad5b-4d92430eb6ba 802-3-ethernet eno33554984
team0  913f05c2-15d8-49a9-a35f-8bc5ee843c0c team   team0
好了? what the fuck!赶紧查看是不是roundrobin模式
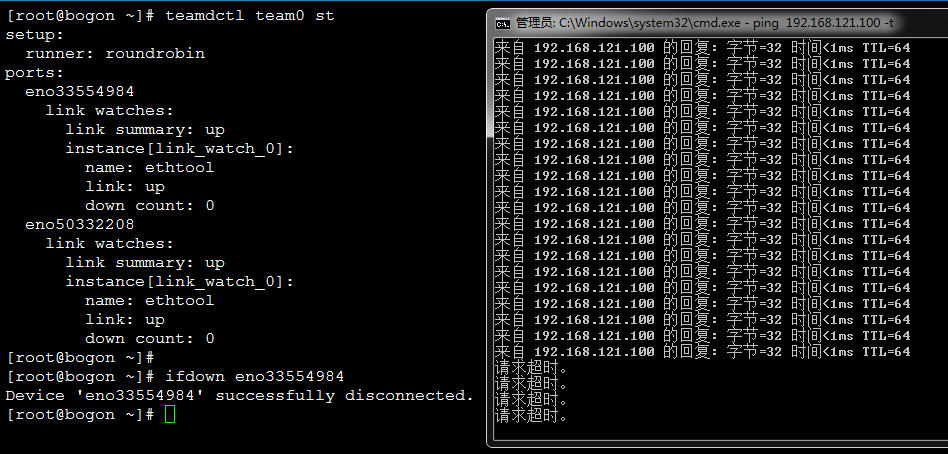
[root@bogon ~]# teamdctl team0 st
setup:
 runner: roundrobin
ports:
 eno33554984
 link watches:
  link summary: up
  instance[link_watch_0]:
  name: ethtool
  link: up
  down count: 0
 eno50332208
 link watches:
  link summary: up
  instance[link_watch_0]:
  name: ethtool
  link: up
  down count: 0
[root@bogon ~]# teamnl team0 ports
 4: eno50332208: up 1000mbit fd
 3: eno33554984: up 1000mbit fd
一切ok,老铁,扎心了。
接下来测试下roundrobin
这里说明下:roundrobin这种bind模式:
先来讲下网卡bind的原理:
通过将两张或者多张网卡通过软件虚拟出来一张逻辑网卡来传输数据,这里bind的模式有很多种。比如我们上面的这种,就是其中的链路聚合模式。当使用该模式的时候,两张物理网卡和逻辑网卡的mac地址都被设置为一致,大家都知道,我们做链路聚合就是为了让多张物理网卡聚合在一块扩展数据带宽的方式,既然我们在逻辑上是一张网卡,那mac地址也就必须一致对吧。不然我们接到交换机或者路由器上,逻辑网卡一会是物理网卡1的mac地址,一会又是物理网卡2的地址,交换机一会找的到人,一会又找不到人。那数据还怎么传输。
在链路聚合中,因为是两张物理网卡捆绑的模式,如果其中一张网卡down掉了,整个链路也就瘫了。
如下:
以上就是“Centos中双网卡绑定及相关问题怎么解决”这篇文章的所有内容,感谢各位的阅读!相信大家阅读完这篇文章都有很大的收获,小编每天都会为大家更新不同的知识,如果还想学习更多的知识,请关注亿速云行业资讯频道。
免责声明:本站发布的内容(图片、视频和文字)以原创、转载和分享为主,文章观点不代表本网站立场,如果涉及侵权请联系站长邮箱:is@yisu.com进行举报,并提供相关证据,一经查实,将立刻删除涉嫌侵权内容。