您好,登录后才能下订单哦!
密码登录
登录注册
点击 登录注册 即表示同意《亿速云用户服务条款》
【N版】openstack——基础环境准备
版本名称 | 版本日期 | 包含组件代码名称 |
Austin | 2010-10-21 | Nova,Swift |
Bexar | 2011-02-03 | Nova,Swift,Glance |
Cactus | 2011-04-15 | Nova,Swift,Glance |
Diablo | 2011-09-22 | Nova,Swift,Glance |
Essex | 2012-04-05 | Nova,Swift,Glance,Horizon,Keystone |
Folsom | 2012-09-27 | Nova,Swift,Glance,Horizon,Keystone,Quantum,Cinder |
Grizzly | 2013-04-04 | Nova,Swift,Glance,Horizon,Keystone,Quantum,Cinder |
Havana | 2013-10-17 | Nova,Swift,Glance,Horizon,Keystone,Quantum,Cinder,Heat, Ceilometer |
Icehouse | 2014-04-17 | Nova,Swift,Glance,Horizon,Keystone,Quantum,Cinder,Heat, Ceilometer,Trove |
Juno | 2014-10-16 | Nova,Swift,Glance,Horizon,Keystone,Quantum,Cinder, Heat,Ceilometer,Trove,Sahara |
Kilo | 2015-04-30 | Nova,Swift,Glance,Horizon,Keystone,Quantum,Cinder,Heat, Ceilometer,Trove,Sahara,Ironic |
Liberty | 2015-10-16 | Nova,Swift,Glance,Horizon,Keystone,Quantum,Cinder,Heat, Ceilometer,Trove,Sahara,Ironic,Zaqar, Manila, Designate, Barbican |
Mitaka | 2016-04-08 | Nova,Swift,Glance,Horizon,Keystone,Quantum,Cinder,Heat, Ceilometer,Trove,Sahara,Ironic,Zaqar, Manila, Designate, Barbican |
Newton | 2016-10-06 | Nova,Swift,Glance,Horizon,Keystone,Quantum,Cinder,Heat, Ceilometer,Trove,Sahara,Ironic,Zaqar, Manila, Designate, Barbican |
linux-node1:
[root@linux-node1~]# cat /etc/redhat-release
CentOS Linux release7.2.1511 (Core)
[root@linux-node1~]# uname -r
3.10.0-327.36.3.el7.x86_64
[root@linux-node1~]# hostname
linux-node1.example.com
[root@linux-node1~]# ifconfig eth0 |awk -F '[ :]+' 'NR ==2 {print $3}'
192.168.56.11
linux-node2:
[root@linux-node2~]# cat /etc/redhat-release
CentOS Linux release7.2.1511 (Core)
[root@linux-node2~]# uname -r
3.10.0-327.36.3.el7.x86_64
[root@linux-node2~]# hostname
linux-node2.example.com
[root@linux-node2~]# ifconfig eth0 |awk -F '[ :]+' 'NR ==2 {print $3}'
192.168.56.12
[root@linux-node1~]# yum install centos-release-openstack-newton –y
<- openstack N版 仓库 ->
[root@linux-node1~]# yum install python-openstackclient –y <- openstack客户端 ->
[root@linux-node1~]# yum install openstack-selinux –y
<- 如果没有关闭selinux安装这个包会自动设置selinux支持openstack ->
[root@linux-node1 ~]# yum install mariadbmariadb-server python2-PyMySQL –y
<- 安装数据库->
[root@linux-node1 ~]# vim/etc/my.cnf.d/openstack.cnf <- 编辑数据库配置文件->
[mysqld]
bind-address = 192.168.56.11 <- 监听地址 ->
default-storage-engine = innodb <- 默认引擎 ->
innodb_file_per_table
max_connections = 4096 <- 最大连接数->
collation-server = utf8_general_ci <- 核对字符集 ->
character-set-server = utf8 <- 字符集 ->
[root@linux-node1 ~]# yum installrabbitmq-server <- 安装rabbitMQ消息队列->
[root@linux-node1 ~]# yum install memcached python-memcached <- 安装缓存 ->
[root@linux-node1 ~]# yum installopenstack-keystone httpd mod_wsgi –y
<- 安装keystone及wsgi模块 ,openstack的认证服务->
[root@linux-node1 ~]# yum installopenstack-glance –y
<- 安装glance,openstack的镜像服务 ->
[root@linux-node1 ~]# yum install –y \ <- 安装nova,openstack的计算服务->
openstack-nova-api \ <- nova的api接口 ->
openstack-nova-conductor \ <- 计算节点访问数据库的中间件 ->
openstack-nova-console \ <- 控制台授权认证 ->
openstack-nova-novncproxy \ <- VNC代理 ->
openstack-nova-scheduler <- 云主机调度 ->
[root@linux-node1 ~]# yum install -y \ <- 安装neutron,openstack的网络服务 ->
openstack-neutron \
openstack-neutron-ml2 \
openstack-neutron-linuxbridge \
ebtables
[root@linux-node2 ~]# yum installopenstack-nova-compute –y <- 计算节点nova->
[root@linux-node2 ~]# yum installopenstack-neutron-linuxbridge ebtables ipset –y <-计算节点neutron ->
[root@linux-node1 ~]# ntpdatetime1.aliyun.com <- 两台机器均要做时间同步 ->
19 Dec 13:15:45 ntpdate[16110]: step timeserver 115.28.122.198 offset -28798.618654 sec
[root@linux-node1 ~]# cat/etc/my.cnf.d/openstack.cnf <- 准备环境时配置的 ->
[mysqld]
bind-address = 192.168.56.11
default-storage-engine = innodb
innodb_file_per_table
max_connections = 4096
collation-server = utf8_general_ci
character-set-server = utf8
[root@linux-node1 ~]# systemctl enablemariadb.service <- 允许数据库启动 ->
[root@linux-node1 ~]# systemctl startmariadb.service <- 启动数据库 ->
[root@linux-node1 ~]#mysql_secure_installation <- 设置密码并配置 ->
NOTE: RUNNING ALL PARTS OF THIS SCRIPT IS RECOMMENDEDFOR ALL MariaDB
SERVERS IN PRODUCTION USE! PLEASEREAD EACH STEP CAREFULLY!
In order to log into MariaDB to secure it,we'll need the current
password for the root user. If you've just installed MariaDB, and
you haven't set the root password yet, thepassword will be blank,
so you should just press enter here.
Enter current password for root (enter fornone):
OK, successfully used password, moving on...
Setting the root password ensures thatnobody can log into the MariaDB
root user without the proper authorisation.
Set root password? [Y/n] y
New password:
Re-enter new password:
Password updated successfully!
Reloading privilege tables..
...Success!
By default, a MariaDB installation has ananonymous user, allowing anyone
to log into MariaDB without having to have auser account created for
them. This is intended only for testing, and to make the installation
go a bit smoother. You should remove them before moving into a
production environment.
Remove anonymous users? [Y/n] y
...Success!
Normally, root should only be allowed toconnect from 'localhost'. This
ensures that someone cannot guess at theroot password from the network.
Disallow root login remotely? [Y/n] y
...Success!
By default, MariaDB comes with a databasenamed 'test' that anyone can
access. This is also intended only for testing, and should be removed
before moving into a production environment.
Remove test database and access to it? [Y/n]y
-Dropping test database...
...Success!
-Removing privileges on test database...
...Success!
Reloading the privilege tables will ensurethat all changes made so far
will take effect immediately.
Reload privilege tables now? [Y/n] y
...Success!
Cleaning up...
All done! If you've completed all of the above steps, your MariaDB
installation should now be secure.
Thanks for using MariaDB!
[root@linux-node1 ~]# systemctl enablerabbitmq-server.service
[root@linux-node1 ~]# systemctl startrabbitmq-server.service <- 启动 ->
[root@linux-node1 ~]# rabbitmqctl add_useropenstack openstack <- 添加用户 ->
Creating user "openstack" ...
[root@linux-node1 ~]# rabbitmqctlset_permissions openstack ".*" ".*" ".*"
Setting permissions for user"openstack" in vhost "/" ... <- 设置权限->
[root@linux-node1 ~]# rabbitmq-pluginsenable rabbitmq_management <- 重启 ->
The following plugins have been enabled:
mochiweb
webmachine
rabbitmq_web_dispatch
amqp_client
rabbitmq_management_agent
rabbitmq_management
Applying plugin configuration torabbit@linux-node1... started 6 plugins.
页面访问:192.168.56.11:15672打开rabbitmq页面
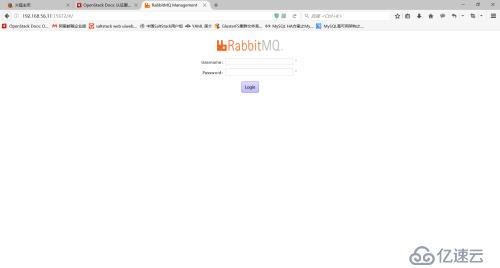
用户名:guest
密码:guest
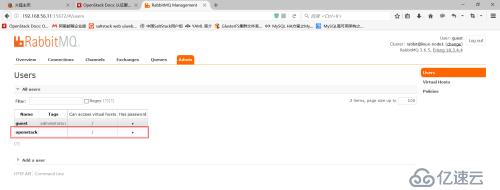
openstack为上文创建的用户
免责声明:本站发布的内容(图片、视频和文字)以原创、转载和分享为主,文章观点不代表本网站立场,如果涉及侵权请联系站长邮箱:is@yisu.com进行举报,并提供相关证据,一经查实,将立刻删除涉嫌侵权内容。