您好,登录后才能下订单哦!
这篇文章给大家介绍怎么在VS2019与VScode中对python接口进行调用,内容非常详细,感兴趣的小伙伴们可以参考借鉴,希望对大家能有所帮助。
看到这个标题有些人说了,为什么好好的C++你非要调用python?人家明明是两种语言呀!
但是在实际应用中,有时候会用到C/C++调用python来更简单地去完成一些功能,不然人家python为什么有一个文件夹叫include,里边全是.h文件呢?
首先是在VScode中为C++调用python接口配置环境,这里假设你已经配置好了c++编程环境!
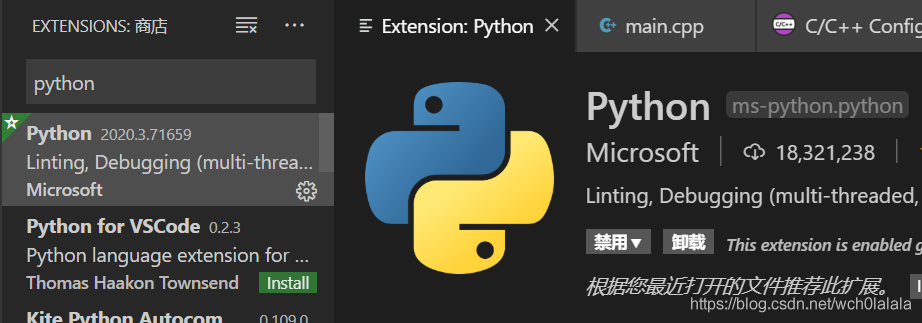
用快捷键Ctrl+Shift+X打开Extensions 商店,输入python,install:

用快捷键Ctrl+Shift+P打开命令面板,打开C/C++:编辑配置(UI):

然后编辑c_cpp_properties.json文件,在文件中的includePath项添加自己的python include路径:“D:\\Python\\Python37\\include”,注意格式。
{
 "configurations": [
  {
   "name": "Win32",
   "includePath": [
    "${workspaceFolder}/**",
    "D:\\Python\\Python37\\include"
   ],
   "defines": [
    "_DEBUG",
    "UNICODE",
    "_UNICODE"
   ],
   "compilerPath": "D:\\MinGW\\bin\\gcc.exe",
   "cStandard": "c11",
   "cppStandard": "c++17",
   "intelliSenseMode": "clang-x64"
  }
 ],
 "version": 4
}测试一下:编辑hello.py:
def printHello():
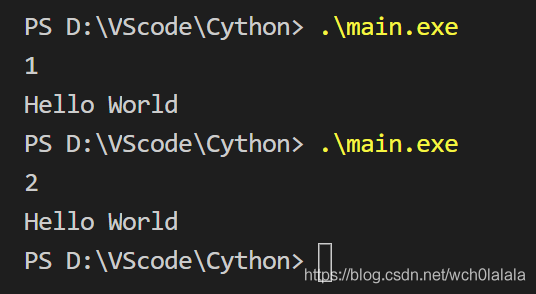
print("Hello World")c++调用python有两种方式,我在代码中都进行了测试,编辑main.cpp:
#include "D:\Python\Python37\include\Python.h"
//#include <Python.h>
#include <iostream>
using namespace std;
void cython1()
{
 Py_Initialize();       //初始化python解释器,告诉编译器要用的python编译器
 PyRun_SimpleString("import hello");  //调用python文件
 PyRun_SimpleString("hello.printHello()"); //调用上述文件中的函数
 Py_Finalize();       //结束python解释器,释放资源
}

void cython2()
{
 Py_Initialize();
 PyObject *pModule = NULL;
 PyObject *pFunc = NULL;
 pModule = PyImport_ImportModule("hello");    //这里是要调用的文件名
 pFunc = PyObject_GetAttrString(pModule, "printHello"); //这里是要调用的函数名
 PyEval_CallObject(pFunc, NULL);      //调用函数
 Py_Finalize();
}

int main()
{
 int select;
 cin >> select;
 select == 1 ? cython1():cython2();
 return 0;
}1、为什么我包含了Python.h,c++代码中调用也没有报错,但是运行时会出现如下错误?(暂未从根本上解决问题,仿照后面linux上的头文件调用方法也是无效,稍后解决会更新)
main.cpp:2:10: fatal error: Python.h: No such file or directory
 #include "Python.h"
   ^~~~~~~~~~
compilation terminated.
说明没有include成功啊,这里我猜测是由于版本问题导致的,暂未得到解决,但是有一种方式是绝对可以使用的,并且已经在代码中体现了,那就是…直接inlcude绝对路径!
#include "D:\Python\Python37\include\Python.h"
可能心细的朋友已经发现了,你只是包含了头文件,链接库还没有链接啊!但是我当时的心情不允许我这么细心啊,咳咳
这里打个广告!强烈建议各位C/C++ develpoers,去仔细读一下程序员的自我修养这本书,真的受益匪浅。
2、由于没有链接静态库而报错(同上,暂时只有傻瓜式解决办法,使用makefile解决此问题请看我之后的博客:在makefile中链接静态库)
C:\Users\11955\AppData\Local\Temp\ccLmGIL8.o:main.cpp:(.text+0xb): undefined reference to `__imp_Py_Initialize'
C:\Users\11955\AppData\Local\Temp\ccLmGIL8.o:main.cpp:(.text+0x20): undefined reference to `__imp_PyRun_SimpleStringFlags'
C:\Users\11955\AppData\Local\Temp\ccLmGIL8.o:main.cpp:(.text+0x35): undefined reference to `__imp_PyRun_SimpleStringFlags'
C:\Users\11955\AppData\Local\Temp\ccLmGIL8.o:main.cpp:(.text+0x3e): undefined reference to `__imp_Py_Finalize'
C:\Users\11955\AppData\Local\Temp\ccLmGIL8.o:main.cpp:(.text+0x56): undefined reference to `__imp_Py_Initialize'
C:\Users\11955\AppData\Local\Temp\ccLmGIL8.o:main.cpp:(.text+0x76): undefined reference to `__imp_PyImport_ImportModule'
C:\Users\11955\AppData\Local\Temp\ccLmGIL8.o:main.cpp:(.text+0x91): undefined reference to `__imp_PyObject_GetAttrString'
C:\Users\11955\AppData\Local\Temp\ccLmGIL8.o:main.cpp:(.text+0xb0): undefined reference to `__imp_PyEval_CallObjectWithKeywords'
C:\Users\11955\AppData\Local\Temp\ccLmGIL8.o:main.cpp:(.text+0xb9): undefined reference to `__imp_Py_Finalize'
解决办法:链接静态库,我把D:\Python\Python37\libs这个文件夹复制到了工作空间的文件夹下,为了方便链接直链接该文件夹下所有文件。
 g++ -o main .\main.cpp -L .\libs\*
 .\main.exe

首先明确,如果你安装的python是64位的,建议把VS 该项目下的解决方案平台改为x64,并且环境是在特定的解决方案配置下(Debug/Release)进行的,所以不要配置在Debug,却在Release调用Python.h,这样肯定会报错:无法打开Python.h。
右键project打开属性,在配置属性 - C/C++ - 常规 - 附加包含目录下添加:
D:\Python\Python37\include
在配置属性 - VC++目录 - 库目录下添加:
D:\Python\Python37\libs
C++代码和python代码同上,到此我们还没有在VS项目中添加python代码,只需要将hello.py复制到main.cpp所在目录即可。
1、如果遇到Link110:无法打开python36_d.lib(或者python**_d.lib),在你的python/libs目录下会发现没有这个静态库文件,这时候最简单的做法就是拷贝复制一份python36.lib,并重命名为python36_d.lib。
2、如果出现的错误:
Traceback (most recent call last):
File "<string>", line 1, in <module>
NameError: name 'hello' is not defined
这是由于没有找到hello.py文件,解决方案:在初始化python解释器以后添加以下两行代码,用于指定模块的路径:
PyRun_SimpleString("import sys");
PyRun_SimpleString("sys.path.append('./')");
3、如果还有错误,请参考C++调用python。
//#include "D:\Python\Python37\include\Python.h"
//当然,绝对路径永远不会失效!^o^
#include <Python.h>
#include <iostream>
using namespace std;
void cython1()
{
 Py_Initialize();       //初始化python解释器,告诉编译器要用的python编译器
 PyRun_SimpleString("import sys");
 PyRun_SimpleString("sys.path.append('./')");
 PyRun_SimpleString("import hello");  //调用python文件
 PyRun_SimpleString("hello.printHello()"); //调用上述文件中的函数
 Py_Finalize();       //结束python解释器,释放资源
}

void cython2()
{
 Py_Initialize();
 PyObject* pModule = NULL;
 PyObject* pFunc = NULL;
 PyRun_SimpleString("import sys");
 PyRun_SimpleString("sys.path.append('./')");
 pModule = PyImport_ImportModule("hello");    //这里是要调用的文件名
 pFunc = PyObject_GetAttrString(pModule, "printHello"); //这里是要调用的函数名
 PyEval_CallObject(pFunc, NULL);      //调用函数
 Py_Finalize();
}

int main()
{
 int select;
 cin >> select;
 select == 1 ? cython1() : cython2();
 return 0;
}其实这一部分有点多余,因为我在VScode下编程也采用gcc/g++编译器,linux与之相同,所以遇到的问题也是一致的,都是没有办法直接#include<Python.h>。以Ubuntu 18.04.4 LTS为例:
前提是你已经安装了g++,如果使用g++ -v查看版本无果,采用以下命令安装套件:
sudo apt-get install build-essential
首先查看自己的python版本以及位置,位置用于代码编写调用头文件,版本用于编译g++命令的指示链接库。由于ubuntu18.04自带python3,所以命令中都采用了python3而不是python:
python3 -V
>Python 3.6.9

which python3
>/usr/bin/python3
找到版本以及位置,在C++代码中采用绝对路径的方法调用Python.h:
#include "/usr/include/python3.6/Python.h"
//或者
#include <python3.6/Python.h>
同时也要在初始化python解释器以后添加以下两行代码,用于指定模块的路径:
Py_Initialize();
PyRun_SimpleString("import sys"); // add 1
PyRun_SimpleString("sys.path.append('./')"); //add 2同样在编译时需要指定静态链接库,不然的话就用makefile吧~
注意python的版本:
g++ -o main main.cpp -lpython3.6m
./main
注意,也可以采用编译时包含头文件的方式,这样就不用在代码中调用头文件了,不推荐(这样的命令我要它有何用):
g++ -o main main.cpp -lpython3.6m -I /usr/include/python3.6
./main
关于怎么在VS2019与VScode中对python接口进行调用就分享到这里了,希望以上内容可以对大家有一定的帮助,可以学到更多知识。如果觉得文章不错,可以把它分享出去让更多的人看到。
免责声明:本站发布的内容(图片、视频和文字)以原创、转载和分享为主,文章观点不代表本网站立场,如果涉及侵权请联系站长邮箱:is@yisu.com进行举报,并提供相关证据,一经查实,将立刻删除涉嫌侵权内容。