жӮЁеҘҪпјҢзҷ»еҪ•еҗҺжүҚиғҪдёӢи®ўеҚ•е“ҰпјҒ
иҝҷзҜҮж–Үз« з»ҷеӨ§е®¶д»Ӣз»Қswagger-ui 2.10.5 жҖҺд№ҲжӯЈзЎ®зҡ„еңЁspringbootдёӯдҪҝз”ЁпјҢеҶ…е®№йқһеёёиҜҰз»ҶпјҢж„ҹе…ҙи¶Јзҡ„е°Ҹдјҷдјҙ们еҸҜд»ҘеҸӮиҖғеҖҹйүҙпјҢеёҢжңӣеҜ№еӨ§е®¶иғҪжңүжүҖеё®еҠ©гҖӮ
еёёи§Ғй—®йўҳ
1.йңҖиҰҒдј е…ҘеҗҺеҸ°зҡ„дёәstringзұ»еһӢ дҪҶжҳҜдҪҝз”Ёswagger-ui жҺҘеҸЈиҝӣиЎҢжөӢиҜ•зҡ„ж—¶еҖҷпјҢиҫ“е…Ҙзҡ„дёәж•°еӯ—зұ»еһӢпјҢе»әи®®еҜ№pom.xmlж–Ү件иҝӣиЎҢи°ғж•ҙ
 <dependency>
			<groupId>io.springfox</groupId>
			<artifactId>springfox-swagger2</artifactId>
			<version>${swagger.version}</version>
		</dependency>
		<dependency>
			<groupId>io.springfox</groupId>
			<artifactId>springfox-swagger-ui</artifactId>
			<version>${swagger.version}</version>
			<exclusions>
				<exclusion>
					<groupId>io.swagger</groupId>
					<artifactId>swagger-annotations</artifactId>
				</exclusion>
				<exclusion>
					<groupId>io.swagger</groupId>
					<artifactId>swagger-models</artifactId>
				</exclusion>
			</exclusions>
		</dependency>
		<dependency>
			<groupId>io.swagger</groupId>
			<artifactId>swagger-annotations</artifactId>
			<version>1.5.21</version>
		</dependency>
		<dependency>
			<groupId>io.swagger</groupId>
			<artifactId>swagger-models</artifactId>
			<version>1.5.21</version>
</dependency>е°ҶеҺҹжқҘй»ҳи®Өзҡ„ 1.5.20 зүҲжң¬еү”йҷӨпјҢжӯӨж—¶зҡ„ swagger.version й»ҳи®Өдёә 2.10.5пјҢй»ҳи®Өеј•е…Ҙзҡ„дёә1.5.20пјҢеҸҜд»Ҙеү”йҷӨеҶҚеј•е…Ҙж–°зҡ„1.5.21.
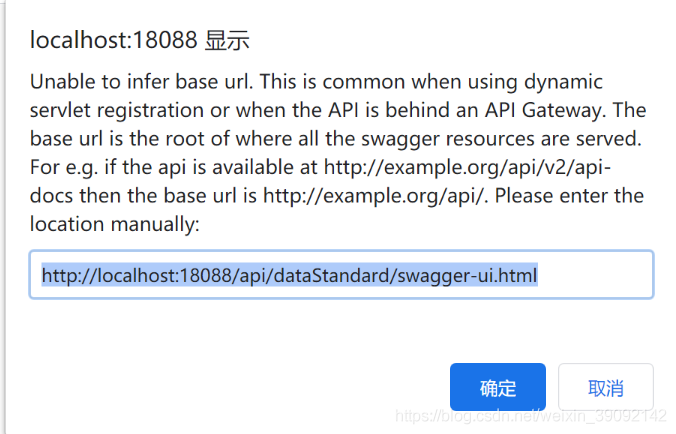
2.еҮәзҺ°еҰӮдёӢзҡ„еӣҫзүҮзҡ„й—®йўҳ
Unable to infer base url. This is common when using dynamic servlet registration or when the API is behind an API
Gateway. The base url is the root of where all the swagger resources are served. For e.g. if the api is available at
http://example.org/api/v2/api-docs then the base url is http://example.org/api/. Please enter the location manually:
еӣҫзүҮе…ҘдёӢеӣҫжүҖзӨәпјҡ

Unable to infer base url. This is common when using dynamic servlet registration or when the API is behind an API
Gateway. The base url is the root of where all the swagger resources are served. For e.g. if the api is available at
http://example.org/api/v2/api-docs then the base url is http://example.org/api/. Please enter the location manually:
жӯӨж—¶жҹҘзңӢ pom.xml зҡ„ж–Ү件жҳҜеҗҰж»Ўи¶іиҰҒжұӮпјҢ иҝҷйҮҢзҡ„ /api/dataStandard и·Ҝеҫ„дёәеҗҺеҸ° yml жҲ–иҖ… properties ж–Ү件дёӯзҡ„и·Ҝеҫ„пјҢдҫӢеҰӮпјҡ
server:
 port: 18088
 servlet:
  context-path: /api/dataStandard
еӣ swagger-ui JavaдҪҝз”Ёзҡ„жҳҜ 2.10.5 зүҲжң¬пјҢжӯӨзүҲжң¬дёҺ 3.0 е’Ң еҺҹжңү2.9 зүҲжң¬еҸҠд»ҘдёӢзҡ„зүҲжң¬дёҚеҗҢпјҢеҰӮжһңдҪ йҖүжӢ©дҪҝз”Ё webflux иҝӣиЎҢејҖеҸ‘жӯӨж—¶зҡ„pom.xml ж–Ү件еә”иҜҘеј•е…ҘеҰӮдёӢй…ҚзҪ®пјҡ
<dependency>
			<groupId>io.springfox</groupId>
			<artifactId>springfox-spring-webflux</artifactId>
			<version>2.10.5</version>
		</dependency>
еҗҢж—¶еҸҜд»ҘеңЁ SwaggerConfig.java ж–Ү件еҠ дёҠ @EnableSwagger2WebFlux жӯӨй…ҚзҪ®пјҢдёҚ然дҪҝз”ЁеҺҹжңүзҡ„ @EnableSwagger2 жҲ–иҖ…дҪҝз”ЁжҲҗ @EnableSwagger2WebMvc дјҡеҮәзҺ°еӣҫзүҮеҮәзҺ°зҡ„й”ҷиҜҜгҖӮ
еҰӮжһңдҪ дҪҝз”Ёзҡ„жҳҜ springboot-web иҝӣиЎҢејҖеҸ‘пјҢжӯӨж—¶еә”иҜҘеј•е…Ҙ pom.xml еҰӮдёӢй…ҚзҪ®пјҡ
<dependency>
			<groupId>io.springfox</groupId>
			<artifactId>springfox-spring-webmvc</artifactId>
			<version>2.10.5</version>
		</dependency>
еҗҢж—¶еҸҜд»ҘеңЁ SwaggerConfig.java ж–Ү件еҠ дёҠ @EnableSwagger2WebMvc жӯӨй…ҚзҪ®пјҢдёҚ然дҪҝз”ЁеҺҹжңүзҡ„ @EnableSwagger2 жҲ–иҖ…дҪҝз”ЁжҲҗ @EnableSwagger2WebFlux дјҡеҮәзҺ°еӣҫзүҮеҮәзҺ°зҡ„й”ҷиҜҜгҖӮ
е…·дҪ“ SwaggerConfig.java еҰӮйўҳдёӢжүҖзӨәпјҡ
import org.springframework.beans.factory.annotation.Value;
import org.springframework.context.annotation.Bean;
import org.springframework.context.annotation.Configuration;
import springfox.documentation.builders.ApiInfoBuilder;
import springfox.documentation.builders.PathSelectors;
import springfox.documentation.builders.RequestHandlerSelectors;
import springfox.documentation.service.ApiInfo;
import springfox.documentation.spi.DocumentationType;
import springfox.documentation.spring.web.plugins.Docket;
import springfox.documentation.swagger2.annotations.EnableSwagger2WebMvc;
/**
* @author hzp
* @date 2020.11.05
*/
@EnableSwagger2WebMvc
@Configuration
public class SwaggerConfig {
@Value("${swagger.enabled}")
private Boolean enabled;
@Bean
@SuppressWarnings("all")
public Docket createRestApi() {
return new Docket(DocumentationType.SWAGGER_2)
.enable(enabled)
.apiInfo(apiInfo())
.pathMapping("/")
.select()
.apis(RequestHandlerSelectors.basePackage("com.hzp.app.web"))
.paths(PathSelectors.any())
.build();
}
private ApiInfo apiInfo() {
return new ApiInfoBuilder()
.title("sso-server жҺҘеҸЈж–ҮжЎЈ")
.description("еҗҺеҸ°зҷ»еҪ•")
.version("1.0")
.build();
}
}${swagger.enabled} еҸ–ymlдёӯи®ҫзҪ®зҡ„жҳҜеҗҰеҗҜз”Ё swagger-ui еҠҹиғҪпјҢеҰӮдёӢxmlпјҡ
#жҳҜеҗҰејҖеҗҜ swagger-ui swagger: enabled: true
е…ідәҺswagger-ui 2.10.5 жҖҺд№ҲжӯЈзЎ®зҡ„еңЁspringbootдёӯдҪҝз”Ёе°ұеҲҶдә«еҲ°иҝҷйҮҢдәҶпјҢеёҢжңӣд»ҘдёҠеҶ…е®№еҸҜд»ҘеҜ№еӨ§е®¶жңүдёҖе®ҡзҡ„её®еҠ©пјҢеҸҜд»ҘеӯҰеҲ°жӣҙеӨҡзҹҘиҜҶгҖӮеҰӮжһңи§үеҫ—ж–Үз« дёҚй”ҷпјҢеҸҜд»ҘжҠҠе®ғеҲҶдә«еҮәеҺ»и®©жӣҙеӨҡзҡ„дәәзңӢеҲ°гҖӮ
е…ҚиҙЈеЈ°жҳҺпјҡжң¬з«ҷеҸ‘еёғзҡ„еҶ…е®№пјҲеӣҫзүҮгҖҒи§Ҷйў‘е’Ңж–Үеӯ—пјүд»ҘеҺҹеҲӣгҖҒиҪ¬иҪҪе’ҢеҲҶдә«дёәдё»пјҢж–Үз« и§ӮзӮ№дёҚд»ЈиЎЁжң¬зҪ‘з«ҷз«ӢеңәпјҢеҰӮжһңж¶үеҸҠдҫөжқғиҜ·иҒ”зі»з«ҷй•ҝйӮ®з®ұпјҡis@yisu.comиҝӣиЎҢдёҫжҠҘпјҢ并жҸҗдҫӣзӣёе…іиҜҒжҚ®пјҢдёҖз»ҸжҹҘе®һпјҢе°Ҷз«ӢеҲ»еҲ йҷӨж¶үе«ҢдҫөжқғеҶ…е®№гҖӮ
жӮЁеҘҪпјҢзҷ»еҪ•еҗҺжүҚиғҪдёӢи®ўеҚ•е“ҰпјҒ