жӮЁеҘҪпјҢзҷ»еҪ•еҗҺжүҚиғҪдёӢи®ўеҚ•е“ҰпјҒ
иҝҷзҜҮж–Үз« з»ҷеӨ§е®¶д»Ӣз»ҚеҲ©з”ЁspringbootжҖҺд№Ҳе®һзҺ°дёҖдёӘд»ЈзҗҶеҲҶеҸ‘жңҚеҠЎеҠҹиғҪпјҢеҶ…е®№йқһеёёиҜҰз»ҶпјҢж„ҹе…ҙи¶Јзҡ„е°Ҹдјҷдјҙ们еҸҜд»ҘеҸӮиҖғеҖҹйүҙпјҢеёҢжңӣеҜ№еӨ§е®¶иғҪжңүжүҖеё®еҠ©гҖӮ
жҠҖжңҜпјҡиҜҙйҒ“еҸҚеҗ‘д»ЈзҗҶпјҢеҸҜиғҪйҰ–е…ҲжғіеҲ°зҡ„е°ұжҳҜnginxгҖӮдёҚиҝҮеңЁжҲ‘们зҡ„йңҖжұӮдёӯпјҢеҜ№дәҺиҪ¬еҸ‘иҝҮзЁӢжңүжӣҙеӨҡйңҖжұӮпјҡ
йңҖиҰҒж“ҚдҪңsessionпјҢж №жҚ®sessionзҡ„еҸ–еҖјеҶіе®ҡиҪ¬еҸ‘иЎҢдёә
йңҖиҰҒдҝ®ж”№HttpжҠҘж–ҮпјҢеўһеҠ HeaderжҲ–жҳҜQueryString
第дёҖзӮ№еҶіе®ҡдәҶжҲ‘们зҡ„е®һзҺ°еҝ…е®ҡжҳҜеҹәдәҺServletзҡ„гҖӮspringbootжҸҗдҫӣзҡ„ProxyServletе°ұеҸҜд»Ҙж»Ўи¶іжҲ‘们зҡ„иҰҒжұӮпјҢProxyServletзӣҙжҺҘ继жүҝиҮӘHttpServletпјҢйҮҮз”ЁејӮжӯҘзҡ„ж–№ејҸи°ғз”ЁеҶ…йғЁжңҚеҠЎеҷЁпјҢеӣ жӯӨж•ҲзҺҮдёҠдёҚдјҡжңүд»Җд№Ҳй—®йўҳпјҢ并且еҗ„з§ҚеҸҜйҮҚиҪҪзҡ„еҮҪж•°д№ҹжҸҗдҫӣдәҶжҜ”иҫғејәеӨ§зҡ„е®ҡеҲ¶жңәеҲ¶гҖӮ
еј•е…Ҙдҫқиө–
<dependency>
  <groupId>org.mitre.dsmiley.httpproxy</groupId>
  <artifactId>smiley-http-proxy-servlet</artifactId>
  <version>1.11</version>
</dependency>
жһ„е»әдёҖдёӘй…ҚзҪ®зұ»
@Configuration
public class ProxyServletConfiguration {
private final static String REPORT_URL = "/newReport_proxy/*";
@Bean
public ServletRegistrationBean proxyServletRegistration() {
List<String> list = new ArrayList<>();
list.add(REPORT_URL); //еҰӮжһңйңҖиҰҒеҢ№й…ҚеӨҡдёӘurlеҲҷе®ҡд№үеҘҪж”ҫеҲ°listдёӯеҚіеҸҜ
ServletRegistrationBean registrationBean = new ServletRegistrationBean();
registrationBean.setServlet(new ThreeProxyServlet());
registrationBean.setUrlMappings(list);
//и®ҫзҪ®й»ҳи®ӨзҪ‘еқҖд»ҘеҸҠеҸӮж•°
Map<String, String> params = ImmutableMap.of("targetUri", "null", "log", "true");
registrationBean.setInitParameters(params);
return registrationBean;
}
}зј–еҶҷд»ЈзҗҶйҖ»иҫ‘
public class ThreeProxyServlet extends ProxyServlet {
private static final long serialVersionUID = -9125871545605920837L;
private final Logger logger = LoggerFactory.getLogger(ThreeProxyServlet.class);
public String proxyHttpAddr;
public String proxyName;
private ResourceBundle bundle =null;
@Override
public void init() throws ServletException {
bundle = ResourceBundle.getBundle("prop");
super.init();
}
@Override
protected void service(HttpServletRequest servletRequest, HttpServletResponse servletResponse) throws ServletException, IOException {
// еҲқе§ӢеҲҮжҚўи·Ҝеҫ„
String requestURI = servletRequest.getRequestURI();
proxyName = requestURI.split("/")[2];
//ж №жҚ®nameеҢ№й…ҚеҹҹеҗҚеҲ°propertiesж–Ү件дёӯиҺ·еҸ–
proxyHttpAddr = bundle.getString(proxyName);
String url = proxyHttpAddr;
if (servletRequest.getAttribute(ATTR_TARGET_URI) == null) {
servletRequest.setAttribute(ATTR_TARGET_URI, url);
}
if (servletRequest.getAttribute(ATTR_TARGET_HOST) == null) {
URL trueUrl = new URL(url);
servletRequest.setAttribute(ATTR_TARGET_HOST, new HttpHost(trueUrl.getHost(), trueUrl.getPort(), trueUrl.getProtocol()));
}
String method = servletRequest.getMethod();
// жӣҝжҚўеӨҡдҪҷи·Ҝеҫ„
String proxyRequestUri = this.rewriteUrlFromRequest(servletRequest);
Object proxyRequest;
if (servletRequest.getHeader("Content-Length") == null && servletRequest.getHeader("Transfer-Encoding") == null) {
proxyRequest = new BasicHttpRequest(method, proxyRequestUri);
} else {
proxyRequest = this.newProxyRequestWithEntity(method, proxyRequestUri, servletRequest);
}
this.copyRequestHeaders(servletRequest, (HttpRequest)proxyRequest);
setXForwardedForHeader(servletRequest, (HttpRequest)proxyRequest);
HttpResponse proxyResponse = null;
try {
proxyResponse = this.doExecute(servletRequest, servletResponse, (HttpRequest)proxyRequest);
int statusCode = proxyResponse.getStatusLine().getStatusCode();
servletResponse.setStatus(statusCode, proxyResponse.getStatusLine().getReasonPhrase());
this.copyResponseHeaders(proxyResponse, servletRequest, servletResponse);
if (statusCode == 304) {
servletResponse.setIntHeader("Content-Length", 0);
} else {
this.copyResponseEntity(proxyResponse, servletResponse, (HttpRequest)proxyRequest, servletRequest);
}
} catch (Exception var11) {
this.handleRequestException((HttpRequest)proxyRequest, var11);
} finally {
if (proxyResponse != null) {
EntityUtils.consumeQuietly(proxyResponse.getEntity());
}
}
}
@Override
protected HttpResponse doExecute(HttpServletRequest servletRequest, HttpServletResponse servletResponse, HttpRequest proxyRequest) throws IOException {
HttpResponse response = null;
// жӢҰжҲӘж ЎйӘҢ еҸҜиҮӘе®ҡд№үtokenиҝҮж»Ө
//String token = servletRequest.getHeader("ex_proxy_token");
// д»ЈзҗҶжңҚеҠЎйүҙжқғйҖ»иҫ‘
this.getAuthString(proxyName,servletRequest,proxyRequest);
//жү§иЎҢд»ЈзҗҶиҪ¬еҸ‘
try {
response = super.doExecute(servletRequest, servletResponse, proxyRequest);
} catch (IOException e) {
e.printStackTrace();
}
return response;
}
}дёҠиҫ№зҡ„й…ҚзҪ®з®ҖеҚ•д»Ӣз»ҚдёҖдёӢпјҢеҜ№дәҺ/newReport_proxy/* иҝҷж ·зҡ„еҶҷжі•пјҢж„ҸжҖқе°ұжҳҜеҪ“дҪ зҡ„иҜ·жұӮи·Ҝеҫ„д»ҘnewReport_proxy ејҖеӨҙпјҢжҜ”еҰӮhttp://localhost:8080/newReport_proxy/test/get1 иҝҷж ·зҡ„и·Ҝеҫ„пјҢе®ғиҜ·жұӮзҡ„зңҹе®һи·Ҝеҫ„жҳҜhttps://www.baidu.com/test/get1 гҖӮдё»иҰҒе°ұжҳҜе°ҶnewReport_proxy жӣҝжҚўжҲҗеҜ№еә”зҡ„иў«д»ЈзҗҶи·Ҝеҫ„иҖҢе·ІпјҢ* зҡ„ж„ҸжҖқе°ұжҳҜе®һйҷ…иҜ·жұӮд»ЈзҗҶйЎ№зӣ®дёӯжҺҘеҸЈзҡ„и·Ҝеҫ„пјҢиҝҷз§Қй…ҚзҪ®еҜ№get гҖҒpost иҜ·жұӮйғҪжңүж•ҲгҖӮ
жҢүеҰӮдёҠй…ҚзҪ®пјҢеңЁжү§иЎҢд»ЈзҗҶиҪ¬еҸ‘зҡ„ж—¶еҖҷйңҖиҰҒеҜ№иҪ¬еҸ‘зҡ„д»ЈзҗҶжңҚеҠЎеҷЁзҡ„жҺҘеҸЈиҝӣиЎҢйүҙжқғпјҢе…·дҪ“йүҙжқғж–№жЎҲи°ғз”Ёе°ұжҳҜ "this.getAuthString(proxyName,servletRequest,proxyRequest);вҖқиҝҷж®өд»Јз ҒгҖӮд»ЈзҗҶжңҚеҠЎзҡ„йүҙжқғйҖ»иҫ‘ж №жҚ®е…ҘеҸӮ+tokenеҖјд№ӢеҗҺжҢүз®—жі•и®Ўз®—дёҖдёӘеҖјпјҢд№ӢеҗҺиҝӣиЎҢж”ҫеҲ°headerдёӯдј йҖ’гҖӮйӮЈд№Ҳиҝҷе°ұйҒҮеҲ°дәҶдёҖдёӘй—®йўҳпјҢе°ұжҳҜеҪ“еүҚз«ҜйҮҮз”ЁrequestBodyзҡ„ж–№ејҸиҝӣиЎҢи°ғз”ЁиҜ·жұӮж—¶жңҚеҠЎ1иҝӣиЎҢд»ЈзҗҶиҪ¬еҸ‘зҡ„ж—¶еҖҷдјҡеҮәзҺ°й”ҷиҜҜпјҡ

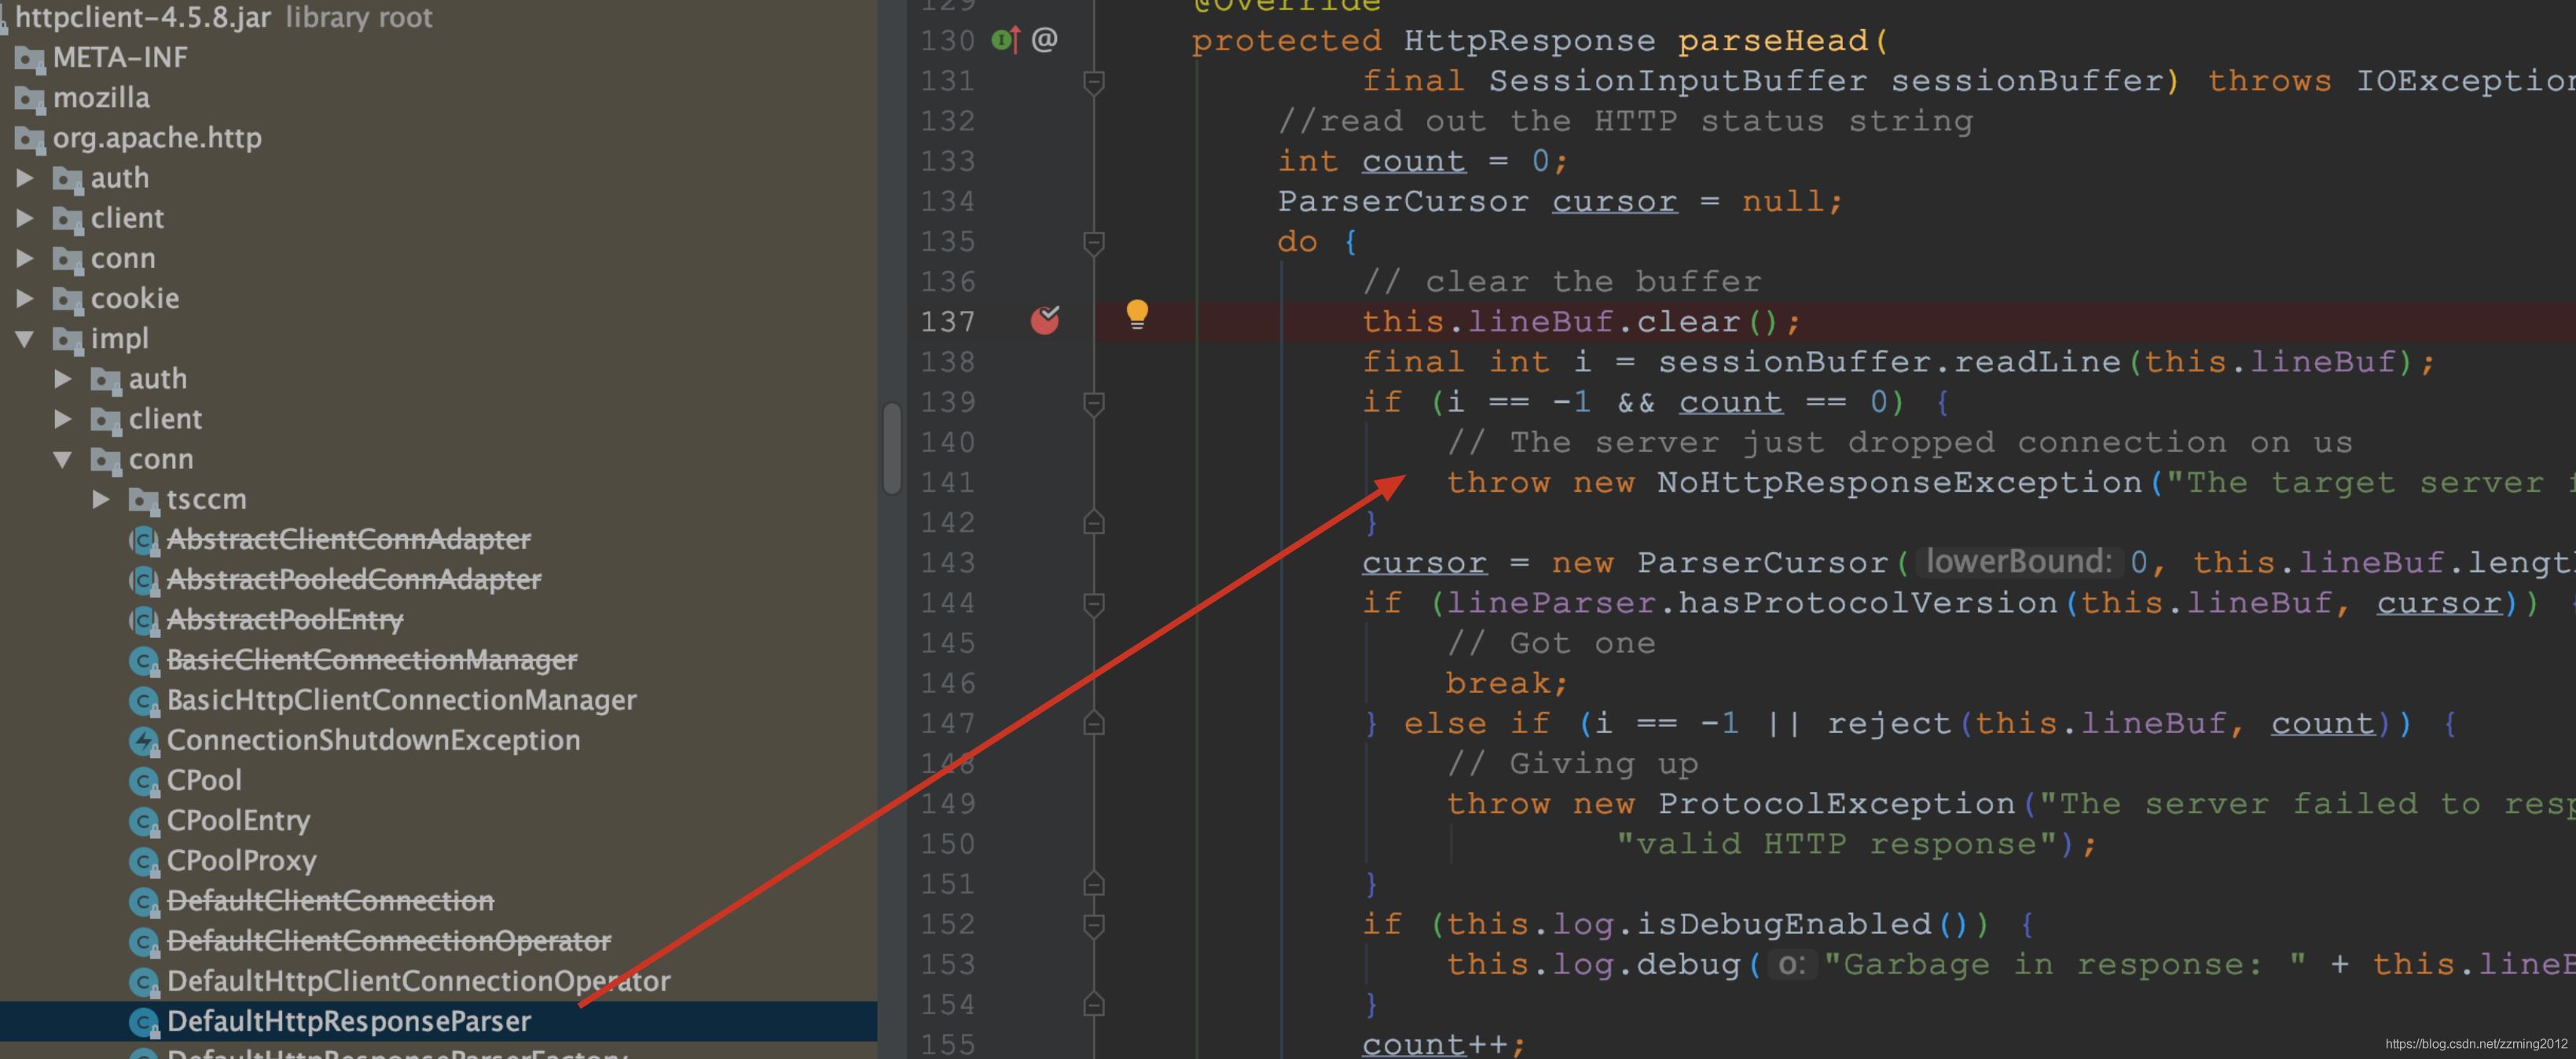
дёҖзӣҙеҚЎеңЁжү§иЎҢ doExecute()ж–№жі•гҖӮдёҖйЎҝж“ҚдҪңdebugеҗҺе®ҡдҪҚеҲ°дёҖдёӘзӮ№пјҢд№ҹе°ұжҳҜжңҖеҗҺиҝӣиЎҢи§ҰеҸ‘иҝӣиЎҢжү§иЎҢд»ЈзҗҶжңҚеҠЎи°ғз”Ёзҡ„зӮ№пјҡ

еңЁдёҠеӣҫдҪҚзҪ®жҠӣдәҶејӮеёёпјҢдёҠеӣҫдёӯiзҡ„еҖјдёә-1пјҢиҜҙжҳҺиҝҷдёӘsessionBufferдёӯжІЎжңүж•°жҚ®дәҶпјҢиҜ»еҸ–дёҚеҲ°дәҶжүҖд»Ҙиҝ”еӣһдәҶ-1гҖӮйӮЈд№ҲиҝҷдёӘsessionBufferжҳҜдёӘд»Җд№ҲдёңиҘҝе‘ўпјҹиҝҷдёӘдёңиҘҝзҝ»иҜ‘иҝҮжқҘжҢҮзҡ„жҳҜдјҡиҜқиҫ“е…Ҙзј“еҶІеҢәпјҢдјҡйҳ»еЎһиҝһжҺҘгҖӮ дёҺInputStreamзұ»зӣёдјјпјҢд№ҹжҸҗдҫӣиҜ»еҸ–ж–Үжң¬иЎҢзҡ„ж–№жі•гҖӮд№ҹе°ұжҳҜйҖҡиҝҮиҝҷдёӘзұ»е°ҶеҜ№еә”иҜ·жұӮзҡ„ж•°жҚ®жөҒеҸ‘йҖҒз»ҷзӣ®ж ҮжңҚеҠЎгҖӮиҝҷдёӘдҪҚзҪ®еҮәй”ҷиҜҙжҳҺиҝҷдёӘиҰҒеҸ‘йҖҒзҡ„ж•°жҚ®жөҒжІЎжңүдәҶпјҢйӮЈд№ҲеңЁд»Җд№Ҳж—¶еҖҷе°ҶиҜ·жұӮзҡ„ж•°жҚ®жөҒдҝЎжҒҜз»ҷеј„жІЎдәҶе‘ўпјҹйӮЈе°ұжҳҜжҲ‘们еҠ зӮ№йүҙжқғйҖ»иҫ‘пјҢйүҙжқғйҖ»иҫ‘йңҖиҰҒиҺ·еҸ–requestBodyдёӯзҡ„еҸӮж•°пјҢеҺ»иҜҘеҸӮж•°жҳҜд»ҺrequestеҜ№иұЎдёӯйҖҡиҝҮжөҒиҜ»еҸ–зҡ„гҖӮиҝҷдёӘй—®йўҳжҲ‘们д№ҹи§ҒиҝҮйҖҡеёёжғ…еҶөдёӢпјҢHttpServletRequst дёӯзҡ„ body еҶ…е®№еҸӘдјҡиҜ»еҸ–дёҖж¬Ў,дҪҶжҳҜеҸҜиғҪжҹҗдәӣжғ…еўғдёӢеҸҜиғҪдјҡиҜ»еҸ–еӨҡж¬Ў,з”ұдәҺ body еҶ…е®№жҳҜд»ҘжөҒзҡ„еҪўејҸеӯҳеңЁ,жүҖд»Ҙ第дёҖж¬ЎиҜ»еҸ–е®ҢжҲҗеҗҺ,第дәҢж¬Ўе°ұж— жі•иҜ»еҸ–дәҶ,дёҖдёӘе…ёеһӢзҡ„еңәжҷҜе°ұжҳҜ Filter еңЁж ЎйӘҢе®ҢжҲҗ body зҡ„еҶ…е®№еҗҺ,дёҡеҠЎж–№жі•е°ұж— жі•з»§з»ӯиҜ»еҸ–жөҒдәҶпјҢеҜјиҮҙи§ЈжһҗжҠҘй”ҷгҖӮ
жҖқи·Ҝпјҡз”ЁиЈ…йҘ°еҷЁжқҘдҝ®йҘ°дёҖдёӢ request,дҪҝе…¶еҸҜд»ҘеҢ…иЈ…иҜ»еҸ–зҡ„еҶ…е®№,дҫӣеӨҡж¬ЎиҜ»еҸ–гҖӮе…¶е®һspring bootжҸҗдҫӣдәҶдёҖдёӘз®ҖеҚ•зҡ„е°ҒиЈ…еҷЁContentCachingRequestWrapperпјҢд»Һжәҗз ҒдёҠзңӢиҝҷдёӘе°ҒиЈ…еҷЁе№¶дёҚе®һз”ЁпјҢжІЎжңүе°ҒиЈ…httpзҡ„еә•еұӮжөҒServletInputStreamдҝЎжҒҜпјҢжүҖд»ҘеңЁиҝҷдёӘеңәжҷҜдёӢиҝҳжҳҜдёҚиғҪйҮҚеӨҚиҺ·еҸ–еҜ№еә”зҡ„жөҒдҝЎжҒҜгҖӮ
еҸӮз…§ContentCachingRequestWrapperзұ»е®һзҺ°дёҖдёӘstreamзј“еӯҳ
public class CacheStreamHttpRequest extends HttpServletRequestWrapper {
 private static final Logger LOGGER = LoggerFactory.getLogger(CacheStreamHttpRequest.class);
 private final ByteArrayOutputStream cachedContent;
 private Map<String, String[]> cachedForm;

 @Nullable
 private ServletInputStream inputStream;

 public CacheStreamHttpRequest(HttpServletRequest request) {
  super(request);
  this.cachedContent = new ByteArrayOutputStream();
  this.cachedForm = new HashMap<>();
  cacheData();
 }

 @Override
 public ServletInputStream getInputStream() throws IOException {
  this.inputStream = new RepeatReadInputStream(cachedContent.toByteArray());
  return this.inputStream;
 }

 @Override
 public String getCharacterEncoding() {
  String enc = super.getCharacterEncoding();
  return (enc != null ? enc : WebUtils.DEFAULT_CHARACTER_ENCODING);
 }

 @Override
 public BufferedReader getReader() throws IOException {
   return new BufferedReader(new InputStreamReader(getInputStream(), getCharacterEncoding()));
 }

 @Override
 public String getParameter(String name) {
  String value = null;
  if (isFormPost()) {
   String[] values = cachedForm.get(name);
   if (null != values && values.length > 0) {
    value = values[0];
   }
  }

  if (StringUtils.isEmpty(value)) {
   value = super.getParameter(name);
  }

  return value;
 }

 @Override
 public Map<String, String[]> getParameterMap() {
  if (isFormPost() && !CollectionUtils.sizeIsEmpty(cachedForm)) {
   return cachedForm;
  }

  return super.getParameterMap();
 }

 @Override
 public Enumeration<String> getParameterNames() {
  if (isFormPost() && !CollectionUtils.sizeIsEmpty(cachedForm)) {
   return Collections.enumeration(cachedForm.keySet());
  }

  return super.getParameterNames();
 }

 @Override
 public String[] getParameterValues(String name) {
  if (isFormPost() && !CollectionUtils.sizeIsEmpty(cachedForm)) {
   return cachedForm.get(name);
  }

  return super.getParameterValues(name);
 }

 private void cacheData() {
  try {
   if (isFormPost()) {
    this.cachedForm = super.getParameterMap();
   } else {
    ServletInputStream inputStream = super.getInputStream();
    IOUtils.copy(inputStream, this.cachedContent);
   }
  } catch (IOException e) {
   LOGGER.warn("[RepeatReadHttpRequest:cacheData], error: {}", e.getMessage());
  }

 }

 private boolean isFormPost() {
  String contentType = getContentType();
  return (contentType != null &&
    (contentType.contains(MediaType.APPLICATION_FORM_URLENCODED_VALUE) ||
      contentType.contains(MediaType.MULTIPART_FORM_DATA_VALUE)) &&
    HttpMethod.POST.matches(getMethod()));
 }

 private static class RepeatReadInputStream extends ServletInputStream {
  private final ByteArrayInputStream inputStream;

  public RepeatReadInputStream(byte[] bytes) {
   this.inputStream = new ByteArrayInputStream(bytes);
  }

  @Override
  public int read() throws IOException {
   return this.inputStream.read();
  }

  @Override
  public int readLine(byte[] b, int off, int len) throws IOException {
   return this.inputStream.read(b, off, len);
  }

  @Override
  public boolean isFinished() {
   return this.inputStream.available() == 0;
  }

  @Override
  public boolean isReady() {
   return true;
  }

  @Override
  public void setReadListener(ReadListener listener) {

  }
 }
}еҰӮдёҠзұ»ж ёеҝғйҖ»иҫ‘жҳҜйҖҡиҝҮcacheData() ж–№жі•иҝӣиЎҢе°Ҷ requestеҜ№иұЎзј“еӯҳпјҢеӯҳеӮЁеҲ°ByteArrayOutputStreamзұ»дёӯпјҢеҪ“еңЁи°ғз”ЁrequestеҜ№иұЎиҺ·еҸ–getInputStream()ж–№жі•ж—¶д»ҺByteArrayOutputStreamзұ»дёӯеҶҷеӣһInputStreamж ёеҝғд»Јз Ғпјҡ
 @Override
 public ServletInputStream getInputStream() throws IOException {
  this.inputStream = new RepeatReadInputStream(cachedContent.toByteArray());
  return this.inputStream;
}дҪҝз”ЁиҝҷдёӘе°ҒиЈ…еҗҺзҡ„requestж—¶йңҖиҰҒй…ҚеҗҲFilterеҜ№еҺҹжңүзҡ„requestиҝӣиЎҢжӣҝжҚўпјҢжіЁеҶҢFilter并еңЁи°ғз”Ёй“ҫдёӯе°ҶеҺҹжңүзҡ„requestжҚўжҲҗиҜҘе°ҒиЈ…зұ»гҖӮд»Јз Ғпјҡ
//chain.doFilter(request, response); //жҚўжҺүеҺҹжқҘзҡ„requestеҜ№иұЎ з”Ёnew RepeatReadHttpRequest((HttpServletRequest) request) еӣ дёәеҗҺиҖ…жөҒдёӯз”ұзј“еӯҳжӢҰжҲӘеҷЁhttprequestжӣҝжҚў еҸҜйҮҚеӨҚиҺ·еҸ–inputstream chain.doFilter(new RepeatReadHttpRequest((HttpServletRequest) request), response);
е…ідәҺеҲ©з”ЁspringbootжҖҺд№Ҳе®һзҺ°дёҖдёӘд»ЈзҗҶеҲҶеҸ‘жңҚеҠЎеҠҹиғҪе°ұеҲҶдә«еҲ°иҝҷйҮҢдәҶпјҢеёҢжңӣд»ҘдёҠеҶ…е®№еҸҜд»ҘеҜ№еӨ§е®¶жңүдёҖе®ҡзҡ„её®еҠ©пјҢеҸҜд»ҘеӯҰеҲ°жӣҙеӨҡзҹҘиҜҶгҖӮеҰӮжһңи§үеҫ—ж–Үз« дёҚй”ҷпјҢеҸҜд»ҘжҠҠе®ғеҲҶдә«еҮәеҺ»и®©жӣҙеӨҡзҡ„дәәзңӢеҲ°гҖӮ
е…ҚиҙЈеЈ°жҳҺпјҡжң¬з«ҷеҸ‘еёғзҡ„еҶ…е®№пјҲеӣҫзүҮгҖҒи§Ҷйў‘е’Ңж–Үеӯ—пјүд»ҘеҺҹеҲӣгҖҒиҪ¬иҪҪе’ҢеҲҶдә«дёәдё»пјҢж–Үз« и§ӮзӮ№дёҚд»ЈиЎЁжң¬зҪ‘з«ҷз«ӢеңәпјҢеҰӮжһңж¶үеҸҠдҫөжқғиҜ·иҒ”зі»з«ҷй•ҝйӮ®з®ұпјҡis@yisu.comиҝӣиЎҢдёҫжҠҘпјҢ并жҸҗдҫӣзӣёе…іиҜҒжҚ®пјҢдёҖз»ҸжҹҘе®һпјҢе°Ҷз«ӢеҲ»еҲ йҷӨж¶үе«ҢдҫөжқғеҶ…е®№гҖӮ
жӮЁеҘҪпјҢзҷ»еҪ•еҗҺжүҚиғҪдёӢи®ўеҚ•е“ҰпјҒ