您好,登录后才能下订单哦!
这篇文章将为大家详细讲解有关怎么在maven中使用profile构建不同的环境,文章内容质量较高,因此小编分享给大家做个参考,希望大家阅读完这篇文章后对相关知识有一定的了解。
Profile在哪定义
一般来讲,有三种地方可以定义,不同的地方,作用范围不同,可配置项也不同;
针对于特定项目的profile配置,我们可以定义在该项目的pom.xml中。
针对于特定用户的profile配置,我们可以在用户的settings.xml文件中定义profile。该文件在用户目录下的“.m2”目录下。
全局的profile配置。全局的profile是定义在Maven安装目录下的“conf/settings.xml”文件中的。
ps:前方将使用Eclipse来演示,主要以pom配置为主,重点涉及到了profile、filter、resource标签,工程源代码在文章最末尾。
过多的理论就不再说了,还是配合着实例代码来看更容易理解一些。另外,构建不同的环境配置主要有两种效果(或者叫实现方式):
- 第一种,根据不同的环境生成不同的配置文件(profile+resources);
- 第二种,根据不同的环境生成不同的配置内容,并替换原配置文件中的内容(profile+resources+filters);
什么意思?可能比较抽象,别捉急,我们一个一个演示。哦对了,先放一张项目结构图尝尝鲜(为了结构更清晰,我把单元测试的包删了):
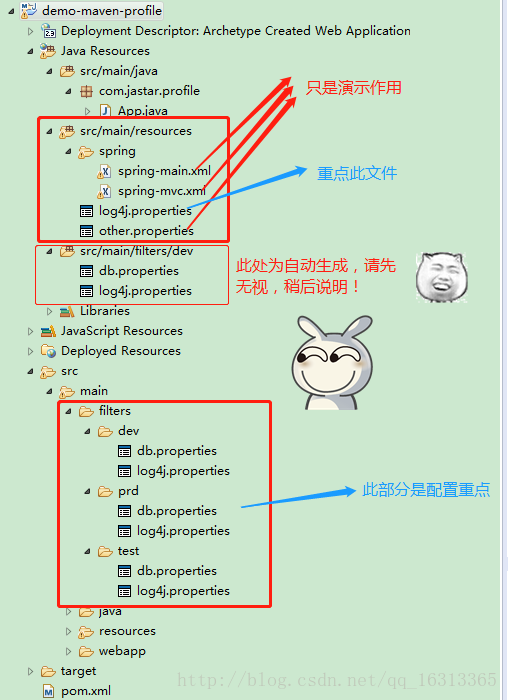
本实例达到的效果是:根据不同的环境,动态打包生成不同环境下的 db.properties 文件。
(1)在pom.xml中的project节点下配置profile
 <profiles>
  <!-- 开发 -->
  <profile>
   <!-- profile的id -->
   <id>dev</id>
   <properties>
    <!-- 此处的jastar.env可以自定义,其他地方可以使用${jastar.env}来引用此属性 -->
    <jastar.env>dev</jastar.env>
   </properties>
   <activation>
    <!-- 默认激活此配置 -->
    <activeByDefault>true</activeByDefault>
   </activation>
  </profile>
  <!-- 测试 -->
  <profile>
   <id>test</id>
   <properties>
    <jastar.env>test</jastar.env>
   </properties>
  </profile>
  <!-- 生产 -->
  <profile>
   <id>prd</id>
   <properties>
    <jastar.env>prd</jastar.env>
   </properties>
  </profile>
 </profiles>
建立三种环境的资源文件夹,如下:
src/main/filters/dev
src/main/filters/test
src/main/filters/prd
并添加各自的db.properties文件:
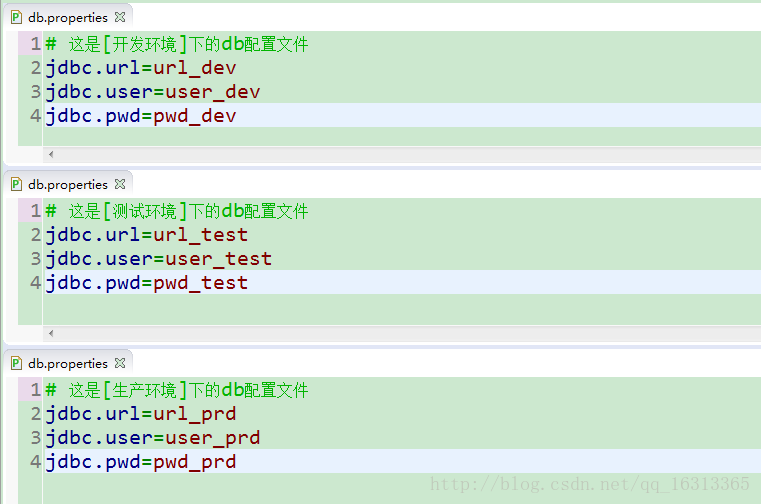
注意:maven标准目录中,提供了一个filters目录用于存放资源过滤文件。推荐在filters目录下创建,而不是resources目录,因为resources目录中的文件默认情况下是不会被过滤的,还需在resources节点下额外的配置一些东西;这样的话结构也较清晰,resource目录存放公共资源文件,filters目录存放不同环境差异化资源文件。
(3)配置maven-resources-plugin插件
在构建WAR包的时候会经过资源文件处理阶段,maven-resources-plugin 则用来处理资源文件。在pom.xml中的build节点下配置如下:
<plugins>
 <!-- 编译插件,此处用来设置jdk的版本,否则默认的版本很低 -->
 <plugin>
  <artifactId>maven-compiler-plugin</artifactId>
  <configuration>
   <source>1.7</source>
   <target>1.7</target>
   <encoding>UTF-8</encoding>
  </configuration>
 </plugin>
 <!-- 资源文件处理插件,必须配置 -->
 <plugin>
  <groupId>org.apache.maven.plugins</groupId>
  <artifactId>maven-resources-plugin</artifactId>
  <configuration>
   <encoding>UTF-8</encoding>
  </configuration>
 </plugin>
</plugins>
(4)配置resources节点
在pom.xml中的build节点下配置如下:
<!-- 最后生成的资源文件 -->
<resources>
 <!-- 所有公共资源文件 -->
 <resource>
  <directory>src/main/resources</directory>
 </resource>
 <!-- 不同环境的资源文件 -->
 <resource>
  <directory>src/main/filters/${jastar.env}</directory>
 </resource>
</resources>(5)打包测试
至此,配置已经完成了,细心的童鞋会发现,我们maven update 项目之后,资源目录会出现以下现象:
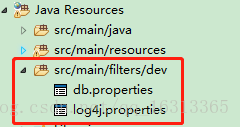
没错,这说明我们的配置生效了,因为默认的profile是dev,所以Eclipse会智能的把该目录显示在这里。
好,接下来打包测试一下是否达到了我们的预期效果。右键项目Run AS,如下:

填写maven命令后run:

运行完成刷新项目可以看到,target目录下生成了“demo-maven-profile.war”文件,打开文件可以看到生成的属性文件如下:
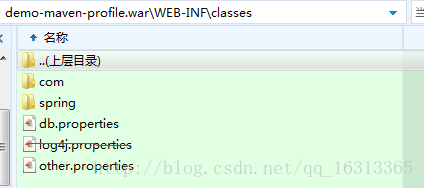
查看db.properties文件内容,perfect~当然,你们也可以试试指定其他profile,在此不再演示。

本实例达到的效果是:根据不同的环境,将
src/main/resources/log4j.properties中的部分内容替换为src/main/filters/dev、test、prd/log4j.properties中的内容。
(1)依然是先配置profile,上面已经配置过了,同上。
(2)新建src/main/resources/log4j.properties文件如下:

(3)新建src/main/filters/dev、test、prd/log4j.properties文件如下:
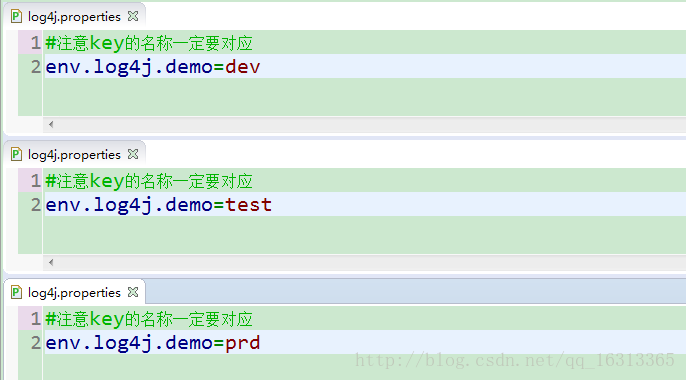
(4)重点来了,在pom.xml的build节点下配置filters节点和resources节点,如下(注意注释部分):
<!-- 此处定义变量配置文件地址 -->
<filters>
 <!-- 注意如果配置了多个filter,并且他们包含有相同的key,则以后面的value为最终值 -->
 <filter>src/main/filters/${jastar.env}/log4j.properties</filter>
</filters>
<resources>
 <resource>
  <directory>src/main/resources</directory>
  <!-- 这句配置是关键,表示该资源文件夹下要进行过滤操作 -->
  <filtering>true</filtering>
 </resource>
 <resource>
  <directory>src/main/filters/${jastar.env}</directory>
 </resource>
</resources>(5)打包测试
配置完成,接下来同样以上面的方式打包,这里我的profile填写test,运行完成,打开war包,查看log4j.properties文件如下,可以看到log4j的部分内容被替换了,实验成功!

1. 使用 activeByDefault 设置激活
在以上的实例中,我们使用了以下方式设置了默认激活:
<activation>
 <activeByDefault>true</activeByDefault>
</activation>
2. 在 settings.xml 中使用 activeProfiles 指定激活
profile配置如下:
<profiles>
 <profile>
  <id>profile1</id>
  <properties>
   <hello>lilei</hello>
  </properties>
 </profile>

 <profile>
  <id>profile2</id>
  <properties>
   <hello>hanmeimei</hello>
  </properties>
 </profile>
</profiles>
激活如下(支持多个):
<activeProfiles>
 <activeProfile>profile1</activeProfile>
</activeProfiles>
3. 在maven命令中使用参数显示激活
Eclipse窗口式运行帮我们隐藏了很多东西,其实原始的 maven 命令应该是这样写的:
mvn clean package –Pprofile1
当然,也可以取消激活:
mvn clean package –P!profile1
还有激活多个:
mvn clean package -Pprofile1,profile2,!profile3
4. 根据环境来激活
profile一个非常重要的特性就是它可以根据不同的环境来激活,比如根据jdk的版本:
<!-- 如果jdk的版本为1.8则激活该profile -->
<profiles>
 <profile>
  <id>profile1</id>
  <activation>
   <jdk>1.8</jdk>
  </activation>
 </profile>
</profiles>
根据操作系统:
<profiles>
 <profile>
  <id>profile1</id>
  <activation>
   <os>
    <!-- 不必指定所有信息 -->
    <name>linux</name>
    <family>unix</family>
    <arch>amd64</arch>
    <version>3.19.0-30-generic</version>
   </os>
  </activation>
 </profile>
</profiles>
根据环境变量:
<profiles>
 <profile>
  <id>profile1</id>
  <activation>
   <property>
    <name>debug</name>
    <value>true</value>
   </property>
  </activation>
 </profile>
</profiles>
根据文件是否存在来激活:
<profiles>
 <profile>
  <id>profile1</id>
  <activation>
   <file>
    <missing>/path/to/missing/file</missing>
    <exists>/path/to/exists/file</exists>
   </file>
  </activation>
 </profile>
</profiles>
不同类型的激活方式可以组合使用,但是只有但两个条件都匹配时才能激活。
Filter 是 maven 的 resource插件提供的功能,作用是用环境变量、pom文件里定义的属性和指定配置文件里的属性替换属性(*.properties)文件里的占位符(${jdbc.url})。
在src/main/resources目录有个配置文件jdbc.properties,内容如下:
jdbc.url=${pom.jdbc.url}
jdbc.username=${pom.jdbc.username}
jdbc.passworkd=${pom.jdbc.password}
配置 resource 插件,启用filtering功能并添加属性到pom:
<project>
 ...
 <!-- 用pom里定义的属性做替换 -->
 <properties>
  <pom.jdbc.url>jdbc:mysql://127.0.0.1:3306/dev</pom.jdbc.url>
  <pom.jdbc.username>root</pom.jdbc.username>
  <pom.jdbc.password>123456</pom.jdbc.password>
 </properties>
 <build>
  ...
  <!-- 可以把属性写到文件里,用属性文件里定义的属性做替换 -->
  <filters>
   <filter>src/main/filters.properties</filter>
  </filters>
  <resources>
   <resource>
    <directory>src/main/resources</directory>
    <filtering>true</filtering>
   </resource>
  </resources>
  ...
 </build>
 ...
</project>
编译包后 target 目录下的 jdbc.properties :
jdbc.url=jdbc:mysql://127.0.0.1:3306/dev
jdbc.username=root
jdbc.passworkd=123456
关于怎么在maven中使用profile构建不同的环境就分享到这里了,希望以上内容可以对大家有一定的帮助,可以学到更多知识。如果觉得文章不错,可以把它分享出去让更多的人看到。
免责声明:本站发布的内容(图片、视频和文字)以原创、转载和分享为主,文章观点不代表本网站立场,如果涉及侵权请联系站长邮箱:is@yisu.com进行举报,并提供相关证据,一经查实,将立刻删除涉嫌侵权内容。