您好,登录后才能下订单哦!
密码登录
登录注册
点击 登录注册 即表示同意《亿速云用户服务条款》
小编给大家分享一下C#实现上传照片到物理路径的示例,相信大部分人都还不怎么了解,因此分享这篇文章给大家参考一下,希望大家阅读完这篇文章后大有收获,下面让我们一起去了解一下吧!
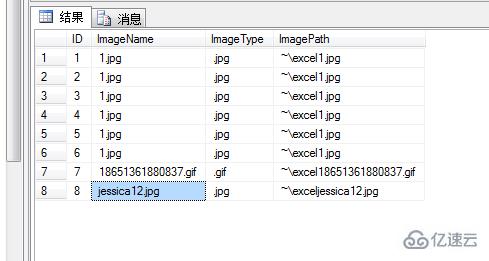
C#实现上传照片到物理路径,并且将地址保存到数据库的小例子
效果:


思路:
首先,获取图片物理地址,然后进行判断将图片保存到文件夹下,再将图片的信息保存到数据库。
数据库:
create table image1
(
ID int identity(1,1) primary key,
ImageName varchar(100) ,
ImageType varchar(20),
ImagePath varchar(200)
)
代码:
<body>
    <form id="form1" runat="server">
    <p>
        <table>
            <tr>
                <td colspan="2" style="height: 21px">

                </td>
            </tr>
            <tr>
                <td style="width: 400px">
                    <asp:FileUpload ID="FileUpload1" runat="server" />
                     <asp:Label ID="label1" runat="server" ForeColor="Red"></asp:Label>
                </td>
                <td style="width: 80px">
                    <asp:Button ID="UploadButton" runat="server" Text="上传图片" OnClick="UploadButton_Click" />
                </td>
            </tr>
            <tr>
                <td colspan="2" align="center">
                    <br />
                    <br />
                    <asp:Image ID="Image1" runat="server" Height="118px" Width="131px" />
                </td>
            </tr>
        </table>
    </p>
    </form>
</body>
using System;
using System.Collections.Generic;
using System.Linq;
using System.Web;
using System.Web.UI;
using System.Web.UI.WebControls;
using System.IO;
using System.Configuration;
using System.Data;
using System.Data.SqlClient;

namespace InExcelOutExcel
{
    public partial class UpWord : System.Web.UI.Page
    {
        protected void Page_Load(object sender, EventArgs e)
        {

        }
        string SQLString = ConfigurationManager.ConnectionStrings["ConnectionStr"].ToString();
        protected void UploadButton_Click(object sender, EventArgs e)
        {
            try
            {
                using (SqlConnection sqlcon = new SqlConnection(SQLString))
                {
                    string FullName = FileUpload1.PostedFile.FileName;//获取图片物理地址
                    FileInfo fi = new FileInfo(FullName);
                    string name = fi.Name;//获取图片名称
                    string type = fi.Extension;//获取图片类型
                    if (type == ".jpg" || type == ".gif" || type == ".bmp" || type == ".png")
                    {
                        string SavePath = Server.MapPath("~\\excel");//图片保存到文件夹下
                        this.FileUpload1.PostedFile.SaveAs(SavePath + "\\" + name);//保存路径
                        this.Image1.Visible = true;
                        this.Image1.ImageUrl = "~\\excel" + "\\" + name;//界面显示图片
                        string sql = "insert into image1(ImageName,ImageType,ImagePath) values('" + name + "','" + type + "','~\\excel" + name + "')";
                        SqlCommand cmd = new SqlCommand(sql, sqlcon);
                        sqlcon.Open();
                        cmd.ExecuteNonQuery();
                        this.label1.Text = "上传成功";
                    }
                    else
                    {
                        this.label1.Text = "请选择正确的格式图片";
                    }
                }
            }
            catch (Exception ex)
            {
                Response.Write(ex.Message);
            }
        }
    }
}
以上是“C#实现上传照片到物理路径的示例”这篇文章的所有内容,感谢各位的阅读!相信大家都有了一定的了解,希望分享的内容对大家有所帮助,如果还想学习更多知识,欢迎关注亿速云行业资讯频道!
免责声明:本站发布的内容(图片、视频和文字)以原创、转载和分享为主,文章观点不代表本网站立场,如果涉及侵权请联系站长邮箱:is@yisu.com进行举报,并提供相关证据,一经查实,将立刻删除涉嫌侵权内容。