您好,登录后才能下订单哦!
密码登录
登录注册
点击 登录注册 即表示同意《亿速云用户服务条款》
------------- LNMP + Discuz -------------
系统环境: RHEL6 x32 selinux and iptables disabled
主机角色: 172.25.46.1 nginx+mysql+php+Discuz
Mysql安装
软件包依赖性:
yum install -y gcc gcc-c++make ncurses-devel bison openssl-devel zlib-devel cmake
解压:
tar zxf mysql-5.5.12.tar.gz
cd mysql-5.5.12
编译:
cmake-DCMAKE_INSTALL_PREFIX=/usr/local/lnmp/mysql\ #安装目录
-DMYSQL_DATADIR=/usr/local/lnmp/mysql/data\ #数据库存放目录
-DMYSQL_UNIX_ADDR=/usr/local/lnmp/mysql/data/mysql.sock\ #Unix socket文件路径
-DWITH_MYISAM_STORAGE_ENGINE=1\ #安装Myisam存储引擎
-DWITH_INNOBASE_STORAGE_ENGINE=1\ #安装Innodb存储引擎
-DDEFAULT_CHARSET=utf8\ #使用Utf8字符
-DDEFAULT_COLLATION=utf8_general_ci\ #校验字符
-DEXTRA_CHARSETS=all #安装所有扩展字符集
安装:
make && makeinstall
注意:这一步若有报错,清除旧的对象文件和缓存信息,重新编译(先make clean,再rm -f CmakeCache.txt,之后再开始编译)
进入到/root/,添加环境变量:
vi .bash_profile
PATH=$PATH:$HOME/bin:/usr/local/lnmp/mysql/bin
使更改生效:
source .bash_profile
查看刚刚添加的环境变量:
which mysql
/usr/local/lnmp/mysql/bin/mysql
创建mysql用户:
groupadd -g 27 mysql
useradd -u 27 -g 27 -s/sbin/nologin -d /usr/local/lnmp/mysql/ -M mysql
初始化数据库:
cd /usr/local/lnmp/mysql/
scripts/mysql_install_db--user=mysql --basedir=/usr/local/lnmp/mysql
--datadir=/usr/local/lnmp/mysql/data
显示2个ok表示安装成功
更改权限:
chown root . -R
chgrp mysql . -R
chown mysql data/ -R
复制配置文件及启动脚本到指定位置:
cpsupport-files/my-medium.cnf /etc/my.cnf
cpsupport-files/mysql.server /etc/init.d/mysqld
启动mysql服务:
/etc/init.d/mysqld start
安装mysql:
mysql_secure_installation
Enter current password for root (enter for none):
Change the root password? [Y/n] n #若当前root有数据库的密码则输入,没有按回车
... skipping.
Remove anonymous users? [Y/n] y #移除匿名用户
... Success!
Disallow root login remotely? [Y/n] y #不允许root远程登录
... Success!
Remove test database and access to it? [Y/n] y #移除test数据库
Reload privilege tables now? [Y/n] y #重新加载数据库权限
... Success!
登录mysql验证:
mysql
Welcome to the MySQL monitor. Commands end with ; or \g.
..........
mysql> show databases;
+--------------------+
| Database |
+--------------------+
| information_schema |
| mysql |
| performance_schema |
| test |
+--------------------+
5 rows in set (0.04 sec)
Nginx安装
安装开发包:
yum install -y pcre-devel openssl-devel
解压源码包并编辑文件隐藏nginx版本:
tar zxvf nginx-1.8.0.tar.gz
cd nginx-1.8.0
vim auto/cc/gcc
#CFLAGS=”$CFLAGS -g” #注释掉这行,去掉debug模式编译,编译以后程序只有几百k
vim src/core/nginx.h
#define NGINX_VERSION "1.8.0”
#defineNGINX_VER "nginx" #修改此行,去掉后面的“NGINX_VERSION”,为了安全,这样编译后外界无法获取nginx的版本号
编译并安装:
./configure --prefix=/usr/local/lnmp/nginx --with-http_ssl_module --with-http_stub_status_module
make && makeinstall
链接方便调用和修改:
cd/usr/local/lnmp/nginx/sbin
ln -s/usr/local/lnmp/nginx/sbin/nginx /usr/local/sbin
检测语法,开启nginx服务,加载配置文件:
nginx -t
nginx
nginx -s reload
查看80端口是否打开并检测(此时要确保httpd服务是关闭的):
netstat -antlp
tcp 0 0 0.0.0.0:80 0.0.0.0:* LISTEN 7060/nginx
curl -I localhost
HTTP/1.1 200 OK
Server: nginx/1.8.0
Date: Wed, 13 Jan 2016 08:42:21 GMT
Content-Type: text/html
Content-Length: 612
Last-Modified: Wed, 13 Jan 2016 08:31:20 GMT
Connection: keep-alive
ETag: "56960b58-264"
Accept-Ranges: bytes
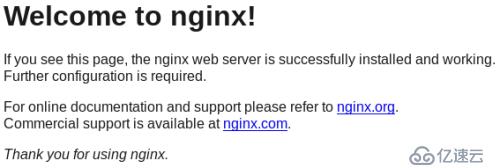
此时可以使用浏览器访问,我在实验中访问的是:172.25.46.1,显示页面如下:
更改用户及进程数:
cd /usr/local/lnmp/nginx/conf/
vi nginx.conf
#user nginx; #更改用户为nginx
worker_processes 2; #进程数改为2
重载文件并查看端口:
nginx -s reload
netstat -antlp
tcp 0 0 0.0.0.0:80 0.0.0.0:* LISTEN 7060/nginx
开启了2个进程:
ps -ax
7104 ? S 0:00 nginx: worker process
7105 ? S 0:00 nginx: worker process
生成key:
cd /etc/pki/tls/certs/
make nginx.pem
Country Name (2 letter code) [XX]:CN #国家,大写
State or Province Name (full name) []:Shanxi #省
Locality Name (eg, city) [Default City]:xi'an #市
Organization Name (eg, company) [Default CompanyLtd]:westos #组织名
Organizational Unit Name (eg, section) []:Linux #组织单元
Common Name (eg, your name or your server's hostname)[]:server1.example.com #主机名
Email Address []:742019722@qq.com #邮箱
将key加入配置文件:
mv nginx.pem/usr/local/lnmp/nginx/conf/
cd/usr/local/lnmp/nginx/conf/
vim nginx.conf
http{
.......
# HTTPS server
#
server {
listen 443 ssl;
server_name localhost;
ssl_certificate nginx.pem; #更改此处
ssl_certificate_key nginx.pem; #更改此处
ssl_session_cache shared:SSL:1m;
ssl_session_timeout 5m;
ssl_ciphers HIGH:!aNULL:!MD5;
ssl_prefer_server_ciphers on;
location/ {
root html;
index index.html index.htm;
}
}
}
重载文件查看端口:
nginx -s reload
netstat -antlp
tcp 0 0 0.0.0.0:443 0.0.0.0:* LISTEN 7060/nginx
此时可使用浏览器访问,实验中我访问的是:https://172.25.46.1,显示页面如下
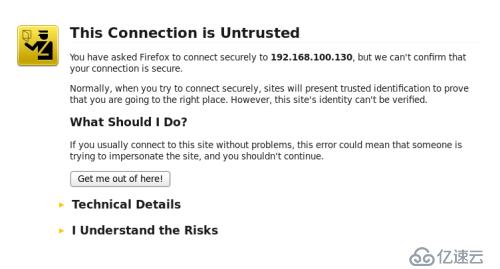
选择I Understand the Risks,进入如下页面:

Php安装
安装软件包依赖:
yum install -y pcre-devel openssl-devel libxml2-devel curl-devel libjpeg-turbo-devel.x86_64 libpng-devel gpm.h mcrypt.hnet-snmp-devel freetype-devel gmp-devel-* libjpeg-*
解压源码包并编译安装:
tar jxf php-5.4.36.tar.bz2
cd php-5.4.36
./configure --prefix=/usr/local/lnmp/php--with-config-file-path=/usr/local/lnmp/php/etc--with-mysql=/usr/local/lnmp/mysql/--with-mysqli=/usr/local/lnmp/mysql/bin/mysql_config --with-openssl --with-snmp --with-gd--with-zlib --with-curl --with-libxml-dir --with-png-dir --with-jpeg-dir --with-freetype-dir --without-pear--with-gettext --with-gmp --enable-inline-optimization --enable-soap--enable-ftp --enable-sockets --enable-mbstring --enable-fpm -- --with-fpm-user=nginx--with-fpm-group=nginx --with-mhash
make && make install
复制配置文件及启动脚本到指定位置:
cpphp.ini-production /usr/local/lnmp/php/etc/php.ini
cd sapi/fpm
cp init.d.php-fpm /etc/init.d/fpm
chmod +x /etc/init.d/fpm
编辑php-fpm.conf文件打开php运行pid
cd /usr/local/lnmp/php/etc/
cp php-fpm.conf.default php-fpm.conf
vim php-fpm.conf
...........
[global]
; Pid file
; Note: the default prefix is/usr/local/lnmp/php/var
; Default Value: none
pid = run/php-fpm.pid #打开php运行pid
..........
更改时区为亚洲上海:
vim php.ini
..........
[Date]
; Defines the default timezone used by thedate functions
; http://php.net/date.timezone
;date.timezone=Asia/Shanghai
此时开启php服务时可能会有报错:
/etc/init.d/fpm start
Starting php-fpm [14-Jan-2016 15:52:53]ERROR: [pool www] cannot get uid for user 'nginx'
[14-Jan-2016 15:52:53] ERROR: FPMinitialization failed
删除id为48的用户和组(因为apache默认id也为48,这样会有冲突),新建nginx用户:
groupadd -g 48 nginx
useradd -u 48-g 48 -s /sbin/nologin -d /usr/local/lnmp/nginx/ -M nginx
id nginx
uid=48(nginx) gid=48(nginx) groups=48(nginx)
再次开启php服务便可以成功:
/etc/init.d/fpm start
Starting php-fpm done
/etc/init.d/fpmreload
Reload service php-fpm done
编写php测试页:
cd /usr/local/lnmp/nginx/html
vim index.php
<?php
phpinfo()
?>
检测语法并重载:
nginx -t
nginx -s reload
添加cgi支持php:
vim /usr/local/lnmp/nginx/conf/nginx.conf #行号大致如下,不一定与你的完全一样
48 location / {
49 root html;
50 index index.php index.htmlindex.htm; #添加index.php为首页
51 }
..........
70 location ~ \.php$ {
71 root html;
72 fastcgi_pass 127.0.0.1:9000;
73 fastcgi_index index.php;
74 #fastcgi_param SCRIPT_FILENAME /scripts$fastcgi_script_name; #注释此行
75 include fastcgi.conf; #更改文件后缀为.conf
76 }
检测语法查看端口:
nginx -t
nginx -s reload
netstat -antlp
tcp 0 0 0.0.0.0:443 0.0.0.0:* LISTEN 1354/nginx
tcp 0 0 0.0.0.0:80 0.0.0.0:* LISTEN 1354/nginx
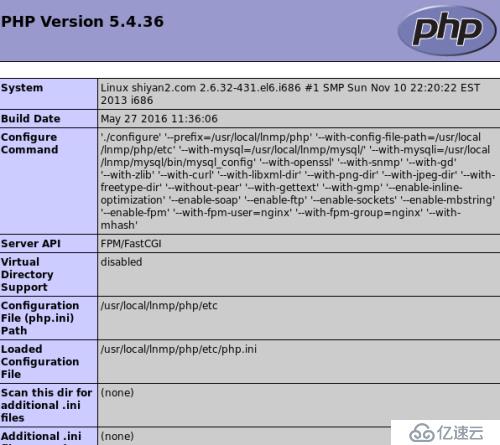
此时可使用浏览器访问,我在实验中访问的是:172.25.46.1,页面显示如下:
基于lnmp的Discuz论坛
将压缩包解压至nginx的发布目录下:
yum install -y unzip
unzip Discuz_X2.5_SC_UTF8.zip -d /usr/local/lnmp/nginx/html/
重命名upload目录为bbs,便于访问:
mv /usr/local/lnmp/nginx/html/upload /usr/local/lnmp/nginx/html/bbs
此时可使用浏览器访问,实验中我访问的是:172.25.46.1/bbs,显示页面如下:
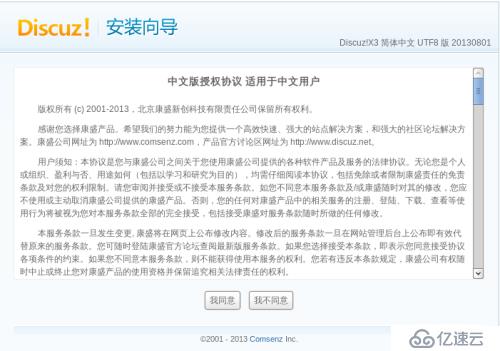
选择我同意进入下一步,设置运行环境:
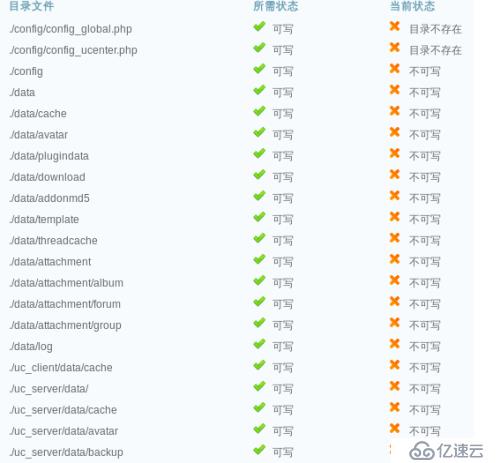
看到目录文件的当前状态显示为不可写,需更改目录及文件权限:
cd /usr/local/lnmp/nginx/html/bbs
chmod 777 config/ -R
chmod 777 data/ -R
chmod 777 data/ uc_server/ -R
chmod 777 data/ uc_client/ -R
此时更新一次显示为可写,可进入下一步,创建数据库:
在填写信息之前要设置root用户密码及创建数据库discuz
mysql_secure_installation
Enter current password for root (enter fornone): #回车,因为刚开始我没有设置root密码
OK, successfully used password, movingon...
Set root password? [Y/n] y
New password: #输入密码
Re-enter new password: #确认密码
Password updated successfully!
Remove anonymous users? [Y/n] y
...Success!
Disallow root login remotely? [Y/n] y
...Success!
Remove test database and access to it?[Y/n] y
-Dropping test database...
Reload privilege tables now? [Y/n] y
...Success!
mysql –p+密码
mysql> create database discuz;
Query OK, 1 row affected (0.00 sec)
mysql> show databases;
+--------------------+
| Database |
+--------------------+
| information_schema |
| discuz |
| mysql |
| performance_schema |
| test |
+--------------------+
5 rows in set (0.00 sec)
设置好以上信息之后可进行创建数据库,页面如下:

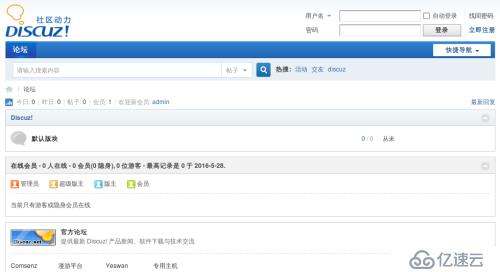
填写完信息后进入下一步,显示论坛界面如下:
至此完成了基于lnmp的Discuz论坛的搭建!

免责声明:本站发布的内容(图片、视频和文字)以原创、转载和分享为主,文章观点不代表本网站立场,如果涉及侵权请联系站长邮箱:is@yisu.com进行举报,并提供相关证据,一经查实,将立刻删除涉嫌侵权内容。