您好,登录后才能下订单哦!
密码登录
登录注册
点击 登录注册 即表示同意《亿速云用户服务条款》
LAMP的搭建:
使用两台虚拟机,一台虚拟机安装httpd及php,把php作为模块编译进httpd中,另一台安装mysql,让php能调用mysql来读取数据。
虚拟机1:172.18.250.76 Centos6.7 安装httpd、php
虚拟机2:172.18.250.10 Centos6.7 安装mysql
利用httpd创建两基于域名的虚拟主机,分别运行wordpress博客和phpmyadmin数据库。
一:yum安装httpd
[root@localhost ~]# yum -y install httpd
1、编辑配置文件,注释DocumentRoot
[root@localhost ~]# vim /etc/httpd/conf/httpd.conf
#DocumentRoot "/var/www/html"
2、创建虚拟主机文件,编辑文件
[root@localhost php]# vim /etc/httpd/conf.d/vhost.conf
NameVirtualHost 172.18.250.76:80

<VirtualHost 172.18.250.76:80>
   ServerName www.a.com
   DocumentRoot "/www/blog"
   <Directory " ">
   Options None
   Allowoverride None
   Order allow,deny
   allow from all
   </Directory>
</virtualHost>

<VirtualHost 172.18.250.76:80>
   ServerName www.b.net
   DocumentRoot "/www/php"
   <Directory " ">
   Options None
   Allowoverride None
   Order allow,deny
   allow from all
   </Directory>
</virtualHost>
3、启动httpd服务,查看监听端口
[root@localhost php]# netstat -ntlp
Active Internet connections (only servers)
Proto Recv-Q Send-Q Local Address       Foreign Address     State     PID/Program name
tcp       0     0    :::80                   :::*           LISTEN      2201/httpd
4、创建虚拟主机路径,并验证能否正常访问
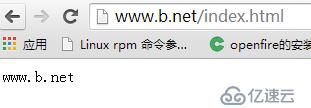
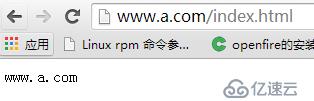
[root@localhost conf.d]# mkdir -p /www/blog
[root@localhost conf.d]# mkdir -p /www/php
[root@localhost conf.d]# cd /www/php
[root@localhost php]# echo "
[root@localhost conf.d]# cd /www/blog
[root@localhost blog]# echo "www.a.com">index.html
重启httpd服务,验证:
二、yum安装php
[root@localhost php]# yum -y install php
[root@localhost php]# httpd -M    //查看httpd所加载的模块
 php5_module (shared)             //php已经编辑进httpd
验证php能否正常加载:
[root@localhost php.d]# vim /www/blog/index.php
 <?php
    phpinfo();
 ?>

三、安装mysql
[root@lsj ~]# yum -y install mysql-server
[root@lsj ~]# service mysqld start
授权一个远程账号,让PHP能访问mysql
mysql> grant all on *.* to admin@'172.18.250.76' identified by "admin";
安装mysql驱动,支持php远程
[root@localhost modules]# yum -y install php-mysql
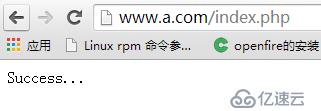
[root@localhost modules]# vim /www/blog/index.php
<?php
$conn = mysql_connect ('172.18.250.10','admin','admin');
if ($conn)
echo "success";
else
echo "false"
?> 
四、安装wordpress和phpmyadmin软件
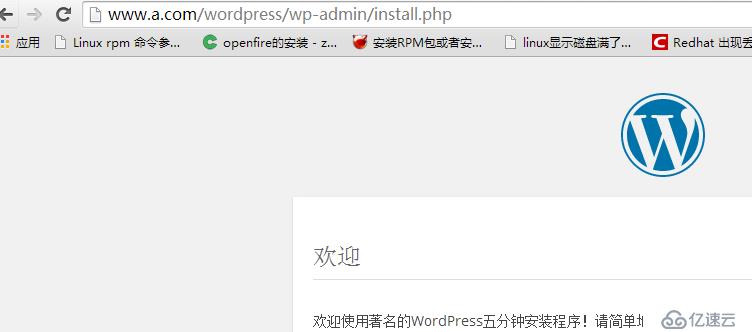
[root@localhost wordpress]# unzip wordpress-4.3.1-zh_CN.zip
[root@localhost blog]# cd wordpress
[root@localhost wordpress]# cp wp-config-sample.php wp-config.php
[root@localhost wordpress]# vim wp-config.php
/** WordPress数据库的名称 */
define('DB_NAME', 'mytest');

/** MySQL数据库用户名 */
define('DB_USER', 'admin');

/** MySQL数据库密码 */
define('DB_PASSWORD', 'admin');

/** MySQL主机 */
define('DB_HOST', '172.18.250.10');
验证能都正常登陆:
登陆博客: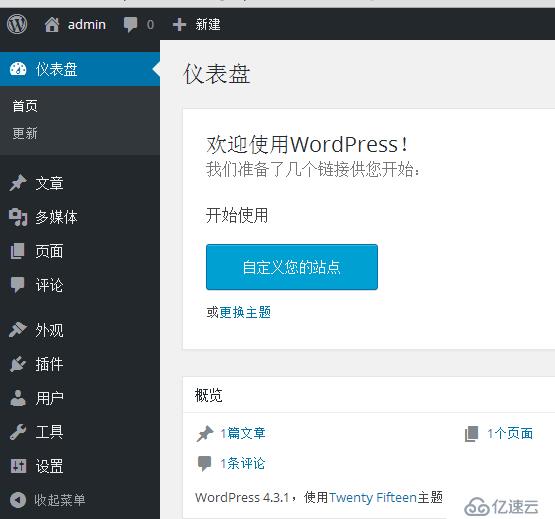
[root@localhost blog]# cd /www/php/
[root@localhost php]# unzip phpMyAdmin-4.4.14.1-all-languages.zip
[root@localhost php]# ln -s phpMyAdmin-4.4.14.1-all-languages pma
生成一段随机数,用作登陆phpmyadmin
[root@localhost pma]# cp config.sample.inc.php config.inc.php
[root@localhost pma]# openssl rand -base64 30
d8yhR7wOU5+HzeZjGEusyAmNiQv/+rTzWQuoDiCR
[root@localhost pma]# vim config.inc.php
$cfg['blowfish_secret'] = 'd8yhR7wOU5+HzeZjGEusyAmNiQv/+rTzWQuoDiCR';
$cfg['Servers'][$i]['host'] = '172.18.250.10';
验证网页是否能打开: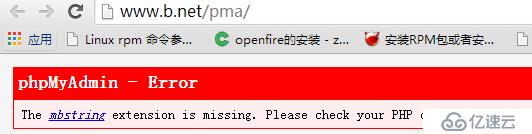
安装个php-mbstring,支持中文字符集
[root@localhost pma]# rpm -ivh php-mbstring-5.3.3-40.el6_6.x86_64.rpm
刷新页面: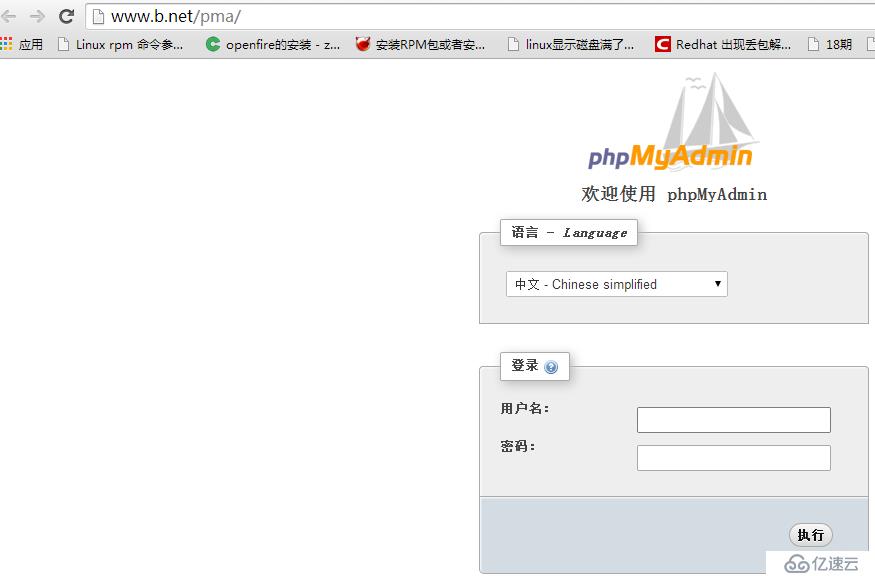
输入刚才授权的账号密码:

。。。。。。
解决思路:
1、升级mysql版本。
2、降级phpmyadmin版本。
降低版本的方法:
[root@localhost pma]# cd libraries/
[root@localhost libraries]# vim common.inc.php
if (PMA_MYSQL_INT_VERSION < 50500) {
 改成
if (PMA_MYSQL_INT_VERSION < 50100 {
再次刷新,输入账号密码:
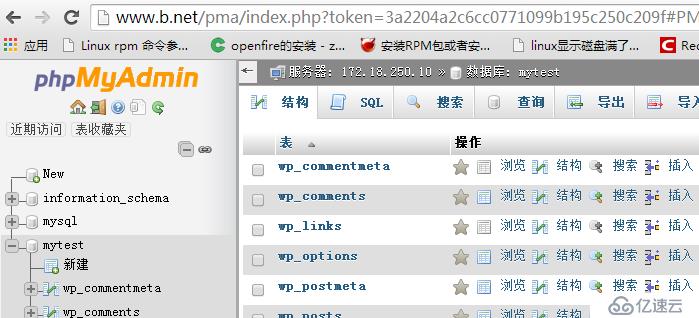
OK,数据库登录成功。
五、安装Xcache对php进行加速
[root@localhost libraries]# yum -y install php-xcache
1、先测试没开启加速前的请求速度:
[root@localhost setup]# ab -n100 -c10 http://172.18.250.76/wordpress/index.php
Benchmarking 172.18.250.76 (be patient).....done
Server Software:        Apache/2.2.15
Server Hostname:        172.18.250.76
Server Port:            80
Document Path:          /wordpress/index.php
Document Length:        0 bytes
Concurrency Level:      10
Time taken for tests:   4.792 seconds
Complete requests:      100
Failed requests:        0
Write errors:           0
Non-2xx responses:      100
Total transferred:      36800 bytes
HTML transferred:       0 bytes
Requests per second:    20.87 [#/sec] (mean)
Time per request:       479.161 [ms] (mean)
Time per request:       47.916 [ms] (mean, across all concurrent requests)
Transfer rate:          7.50 [Kbytes/sec] received

Connection Times (ms)
              min  mean[+/-sd] median   max
Connect:        0    1   3.8      0      20
Processing:   143  459 331.6    352    1783
Waiting:      143  458 331.6    343    1783
Total:        143  460 331.4    360    1783

Percentage of the requests served within a certain time (ms)
  50%    360
  66%    405
  75%    512
  80%    581
  90%    895
  95%   1375
  98%   1720
  99%   1783
 100%   1783 (longest request)
2、重启httpd服务,开启Xcache,在测试下
[root@localhost setup]# ab -n100 -c10
 Benchmarking 172.18.250.76 (be patient).....done
Server Software:        Apache/2.2.15
Server Hostname:        172.18.250.76
Server Port:            80
Document Path:          /wordpress/index.php
Document Length:        0 bytes
Concurrency Level:      10
Time taken for tests:   1.659 seconds
Complete requests:      100
Failed requests:        0
Write errors:           0
Non-2xx responses:      100
Total transferred:      36800 bytes
HTML transferred:       0 bytes
Requests per second:    60.27 [#/sec] (mean)   //三倍加速请求
Time per request:       165.908 [ms] (mean)
Time per request:       16.591 [ms] (mean, across all concurrent requests)
Transfer rate:          21.66 [Kbytes/sec] received

Connection Times (ms)
              min  mean[+/-sd] median   max
Connect:        0    1   2.6      0      10
Processing:    41  158  27.5    158     235
Waiting:       40  158  27.6    158     235
Total:         41  159  28.7    158     245

Percentage of the requests served within a certain time (ms)
  50%    158
  66%    166
  75%    168
  80%    171
  90%    192
  95%    213
  98%    240
  99%    245
 100%    245 (longest request)
六:对访问phpmyadmin网页时进行SSL加密认证
签证及CA认证是怎么进行可以参考我的博文:Linux中加密解密技术及CA认证
1、先下载mod_ssl模块,因为httpd2.2没包含这个模块
[root@localhost ssl]# yum -y install mod_ssl
2、编辑/etc/httpd/conf.d/ssl.conf文件
[root@localhost ssl]# vim /etc/httpd/conf.d/ssl.conf
DocumentRoot "/www/php"      //取消注释,修改虚拟主机的url
ServerName      //虚拟主机名
SSLEngine on                 //确保为on
SSLCertificateFile /etc/httpd/ssl/httpd.crt       //存放签署的证书
SSLCertificateFile /etc/httpd/ssl/httpd.key       //存放私钥的位置
3、重启httpd服务器,查看443端口是否启用
[root@localhost ssl]# netstat -ntlp
tcp    0   0 :::443          :::*                        LISTEN      6080/httpd
4、验证页面是否能访问
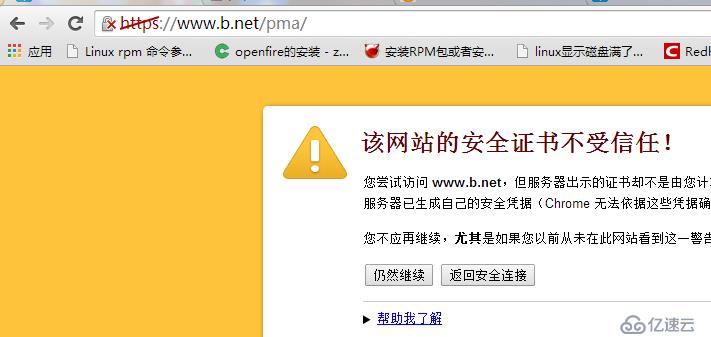
5、从虚拟机把CA证书下载到windows主机上
[root@www CA]# sz cacert.pem
6、把证书导入到浏览器当中
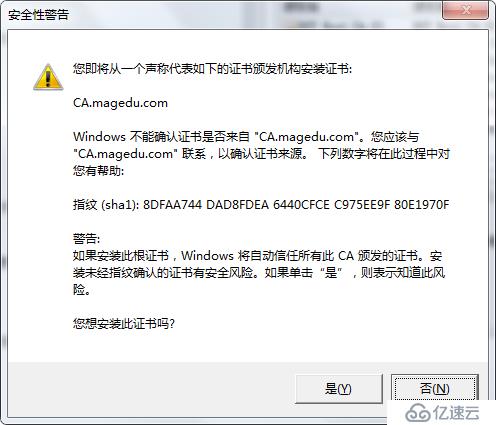
7、重新打开浏览器,输入虚拟主机名: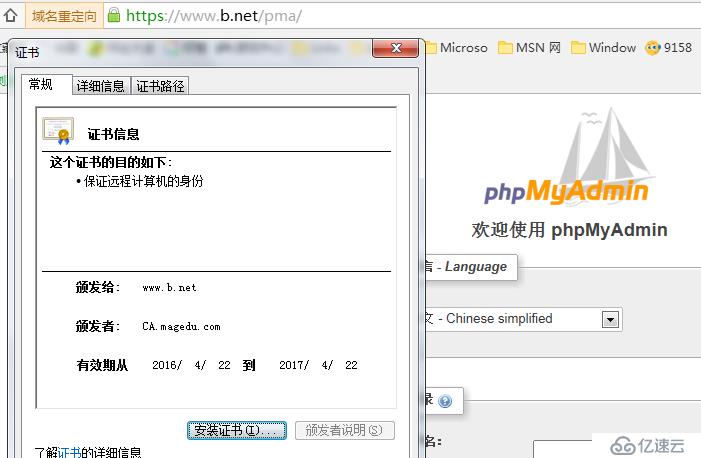
免责声明:本站发布的内容(图片、视频和文字)以原创、转载和分享为主,文章观点不代表本网站立场,如果涉及侵权请联系站长邮箱:is@yisu.com进行举报,并提供相关证据,一经查实,将立刻删除涉嫌侵权内容。