жӮЁеҘҪпјҢзҷ»еҪ•еҗҺжүҚиғҪдёӢи®ўеҚ•е“ҰпјҒ
иҝҷзҜҮж–Үз« з»ҷеӨ§е®¶еҲҶдә«зҡ„жҳҜжңүе…іhtmlеҰӮдҪ•е®һзҺ°е‘ҠиӯҰжҢүй’®зҡ„еҶ…е®№гҖӮе°Ҹзј–и§үеҫ—жҢәе®һз”Ёзҡ„пјҢеӣ жӯӨеҲҶдә«з»ҷеӨ§е®¶еҒҡдёӘеҸӮиҖғпјҢдёҖиө·и·ҹйҡҸе°Ҹзј–иҝҮжқҘзңӢзңӢеҗ§гҖӮ
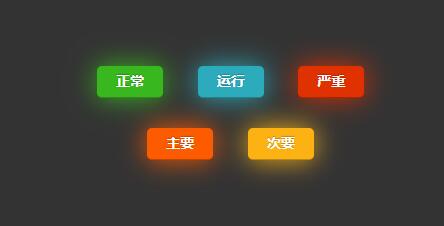
ж•ҲжһңеҰӮдёӢпјҡ

д»Јз ҒеҰӮдёӢ(зӮ№еҮ»еҸҜеұ•ејҖжҹҘзңӢжәҗз Ғ)пјҡ
<!DOCTYPE html>
<html xmlns="http://www.w3.org/1999/xhtml">
<head>
<meta http-equiv="Content-Type" content="text/html; charset=utf-8" />
<title>е‘ҠиӯҰжҢүй’®</title>
<style type="text/css">
/* Place all stylesheet code here */
body { background: #333; text-shadow: 0 1px 1px rgba(0,0,0,.5); }
@-webkit-keyframes bigAssButtonPulse {
from { background-color: #1e6a0f; -webkit-box-shadow: 0 0 25px #333; }
50% { background-color: #39ba1f; -webkit-box-shadow: 0 0 75px #39ba1f; }
to { background-color: #1e6a0f; -webkit-box-shadow: 0 0 25px #333; }
}
@-webkit-keyframes greenPulse {
from { background-color: #1e6a0f; -webkit-box-shadow: 0 0 9px #333; }
50% { background-color: #39ba1f; -webkit-box-shadow: 0 0 27px #39ba1f; }
to { background-color: #1e6a0f; -webkit-box-shadow: 0 0 9px #333; }
}
@-webkit-keyframes bluePulse {
from { background-color: #036075; -webkit-box-shadow: 0 0 9px #333; }
50% { background-color: #2daebf; -webkit-box-shadow: 0 0 27px #2daebf; }
to { background-color: #036075; -webkit-box-shadow: 0 0 9px #333; }
}
@-webkit-keyframes redPulse {
from { background-color: #8c2305; -webkit-box-shadow: 0 0 9px #333; }
50% { background-color: #e33100; -webkit-box-shadow: 0 0 27px #e33100; }
to { background-color: #8c2305; -webkit-box-shadow: 0 0 9px #333; }
}
@-webkit-keyframes magentaPulse {
from { background-color: #470123; -webkit-box-shadow: 0 0 9px #333; }
50% { background-color: #a9014b; -webkit-box-shadow: 0 0 27px #a9014b; }
to { background-color: #470123; -webkit-box-shadow: 0 0 9px #333; }
}
@-webkit-keyframes orangePulse {
from { background-color: #b84c04; -webkit-box-shadow: 0 0 9px #333; }
50% { background-color: #ff5c00; -webkit-box-shadow: 0 0 27px #ff5c00; }
to { background-color: #b84c04; -webkit-box-shadow: 0 0 9px #333; }
}
@-webkit-keyframes orangellowPulse {
from { background-color: #bd5000; -webkit-box-shadow: 0 0 9px #333; }
50% { background-color: #ffb515; -webkit-box-shadow: 0 0 27px #ffb515; }
to { background-color: #bd5000; -webkit-box-shadow: 0 0 9px #333; }
}
a.button {
-webkit-animation-duration: 2s;
-webkit-animation-iteration-count: infinite;
}
.green.button { -webkit-animation-name: greenPulse;animation-name: greenPulse; -webkit-animation-duration: 2s;animation-duration: 2s; }
.blue.button { -webkit-animation-name: bluePulse; -webkit-animation-duration: 2s; }
.red.button { -webkit-animation-name: redPulse; -webkit-animation-duration: 2s; }
.magenta.button { -webkit-animation-name: magentaPulse; -webkit-animation-duration: 2s; }
.orange.button { -webkit-animation-name: orangePulse; -webkit-animation-duration: 2s; }
.orangellow.button { -webkit-animation-name: orangellowPulse; -webkit-animation-duration: 2s; }
.wall-of-buttons { width: 100%; height: 500px; text-align: center; }
.wall-of-buttons a.button { display: inline-block; margin: 0 30px 30px 0; }
/* playground.css */
.button { background: #222 url(overlay-button.png) repeat-x 0 0; display: inline-block; padding: 5px 15px 6px; color: #fff !important; font-size: 13px; font-weight: bold; line-height: 1; text-decoration: none; -moz-border-radius: 5px; -webkit-border-radius: 5px; -moz-box-shadow: 0 1px 3px rgba(0,0,0,0.25); -webkit-box-shadow: 0 1px 3px rgba(0,0,0,0.25); text-shadow: 0 -1px 1px rgba(0,0,0,0.25); border-bottom: 1px solid rgba(0,0,0,0.25); position: relative; cursor: pointer; overflow: visible; width: auto; }
button::-moz-focus-inner { border: 0; padding: 0; }
.button:hover { background-color: #111; color: #fff; }
.button:active { -webkit-transform: translateY(1px); -moz-transform: translateY(1px); }
/* Small Buttons */
.small.button { font-size: 11px; }
/* Large Buttons */
.large.button { font-size: 14px; padding: 8px 19px 9px; }
/* Colors for our beloved buttons */
.green.button { background-color: #91bd09; }
.green.button:hover { background-color: #749a02; }
.blue.button { background-color: #2daebf; }
.blue.button:hover { background-color: #007d9a; }
.red.button { background-color: #e33100; }
.red.button:hover { background-color: #872300; }
.magenta.button{ background-color: #a9014b; }
.magenta.button:hover { background-color: #630030; }
.orange.button {background-color: #ff5c00;}
.orange.button:hover { background-color: #d45500; }
.orangellow.button { background-color: #ffb515; }
.orangellow.button:hover { background-color: #fc9200; }
.white.button { background-color: #fff; border: 1px solid #ccc; color: #666 !important; font-weight: normal; text-shadow: 0 1px 1px rgba(255,255,255,1); }
.white.button:hover { background-color: #eee; }
</style>
</head>
<body id="radioactiveButtonsPage" class="chrome windows">
<div class="wall-of-buttons">
<p> </p>
<p> </p>
<p> </p>
<p> </p>
<p> </p>
<p> </p>
<p><a class="large green button">жӯЈеёё</a>
<a class="large blue button">иҝҗиЎҢ</a>
<a class="large red button">дёҘйҮҚ</a>
<br />
<a class="large orange button">дё»иҰҒ</a>
<a class="large orangellow button">ж¬ЎиҰҒ</a>
<br />
</p>
</div>
</body>
</html>ж„ҹи°ўеҗ„дҪҚзҡ„йҳ…иҜ»пјҒе…ідәҺвҖңhtmlеҰӮдҪ•е®һзҺ°е‘ҠиӯҰжҢүй’®вҖқиҝҷзҜҮж–Үз« е°ұеҲҶдә«еҲ°иҝҷйҮҢдәҶпјҢеёҢжңӣд»ҘдёҠеҶ…е®№еҸҜд»ҘеҜ№еӨ§е®¶жңүдёҖе®ҡзҡ„её®еҠ©пјҢи®©еӨ§е®¶еҸҜд»ҘеӯҰеҲ°жӣҙеӨҡзҹҘиҜҶпјҢеҰӮжһңи§үеҫ—ж–Үз« дёҚй”ҷпјҢеҸҜд»ҘжҠҠе®ғеҲҶдә«еҮәеҺ»и®©жӣҙеӨҡзҡ„дәәзңӢеҲ°еҗ§пјҒ
е…ҚиҙЈеЈ°жҳҺпјҡжң¬з«ҷеҸ‘еёғзҡ„еҶ…е®№пјҲеӣҫзүҮгҖҒи§Ҷйў‘е’Ңж–Үеӯ—пјүд»ҘеҺҹеҲӣгҖҒиҪ¬иҪҪе’ҢеҲҶдә«дёәдё»пјҢж–Үз« и§ӮзӮ№дёҚд»ЈиЎЁжң¬зҪ‘з«ҷз«ӢеңәпјҢеҰӮжһңж¶үеҸҠдҫөжқғиҜ·иҒ”зі»з«ҷй•ҝйӮ®з®ұпјҡis@yisu.comиҝӣиЎҢдёҫжҠҘпјҢ并жҸҗдҫӣзӣёе…іиҜҒжҚ®пјҢдёҖз»ҸжҹҘе®һпјҢе°Ҷз«ӢеҲ»еҲ йҷӨж¶үе«ҢдҫөжқғеҶ…е®№гҖӮ
жӮЁеҘҪпјҢзҷ»еҪ•еҗҺжүҚиғҪдёӢи®ўеҚ•е“ҰпјҒ