您好,登录后才能下订单哦!
这篇文章主要介绍了怎么理解SpringBoot生成License的相关知识,内容详细易懂,操作简单快捷,具有一定借鉴价值,相信大家阅读完这篇怎么理解SpringBoot生成License文章都会有所收获,下面我们一起来看看吧。
License指的是版权许可证,当我们开发完系统后,如果不想让用户一直白嫖使用,比如说按时间续费,License的作用就有了。
我们可以给系统指定License的有效期,控制系统的可用时间。
那么对于SpringBoot项目,如何增加License呢?接下来王子给大家带来一套解决方案。(当然实现方式不止一种)
工具已经封装好,小伙伴们可以直接下载使用:https://gitee.com/lm970585581/spring-boot2-license
下载后打开cloud-license-serve项目直接启动即可。
然后调用项目的获取信息接口:http://localhost:9081/license/getServerInfos?osName=windows
会得到类似如下结果,分别代表ip地址、mac地址、cpu序号、主板序号。
{
    "ipAddress": [
        "192.168.80.1",
        "192.168.220.1"
    ],
    "macAddress": [
        "01-51-56-C0-00-01",
        "00-52-56-C0-00-08",
        "BC-54-2D-DF-69-FC"
    ],
    "cpuSerial": "BFECFBFF000806EC",
    "mainBoardSerial": "L1HF16301D5"
}
使用JDK自带的 keytool 工具生成公私钥证书库:
假如我们设置公钥库密码为:public_password1234,私钥库密码为:private_password1234,则生成命令如下:
#生成命令
keytool -genkeypair -keysize 1024 -validity 3650 -alias "privateKey" -keystore "privateKeys.keystore" -storepass "public_password1234" -keypass "private_password1234" -dname "CN=localhost, OU=localhost, O=localhost, L=SH, ST=SH, C=CN"

#导出命令
keytool -exportcert -alias "privateKey" -keystore "privateKeys.keystore" -storepass "public_password1234" -file "certfile.cer"

#导入命令
keytool -import -alias "publicCert" -file "certfile.cer" -keystore "publicCerts.keystore" -storepass "public_password1234"
上述命令执行完成之后,会在当前路径下生成三个文件,分别是:privateKeys.keystore、publicCerts.keystore、certfile.cer。其中文件certfile.cer不再需要可以删除,文件privateKeys.keystore用于当前的ServerDemo 项目给客户生成license文件,而文件publicCerts.keystore则随应用代码部署到客户服务器,用户解密license文件并校验其许可信息。
最后我们再生成license,调用接口地址为:http://localhost:9081/license/generateLicense
调用的参数是一个json参数,格式如下:
{
    "subject": "license_demo",
    "privateAlias": "privateKey",
    "keyPass": "private_password1234",
    "storePass": "public_password1234",
    "licensePath": "C:/Users/zifangsky/Desktop/license_demo/license.lic",
    "privateKeysStorePath": "C:/Users/zifangsky/Desktop/license_demo/privateKeys.keystore",
    "issuedTime": "2018-07-10 00:00:01",
    "expiryTime": "2019-12-31 23:59:59",
    "consumerType": "User",
    "consumerAmount": 1,
    "description": "这是证书描述信息",
    "licenseCheckModel": {
        "ipAddress": ["192.168.245.1", "10.0.5.22"],
        "macAddress": ["00-50-56-C0-00-01", "50-7B-9D-F9-18-41"],
        "cpuSerial": "BFEBFBFF000406E3",
        "mainBoardSerial": "L1HF65E00X9"
    }
}
如果请求成功,那么最后会在 licensePath 参数设置的路径生成一个license.lic 的文件,这个文件就是给客户部署代码的服务器许可文件。
如果小伙伴们按照上文的步骤一步一步的跟着实现,我们已经获得了license.lic,接下来就是把license使用到我们自己的项目中了。
cloud-license-client就是引入项目的一个例子,打开可以直接使用。
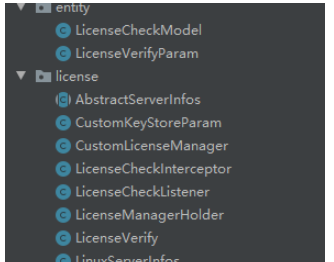
引入自己的项目只需将以下文件导入

并配置好拦截器LicenseCheckInterceptor就可以使用了。配置方法在InterceptorConfig类中,可以参考。
这里需要注意的是使用license需要两个文件:license.lic,publicCerts.keystore
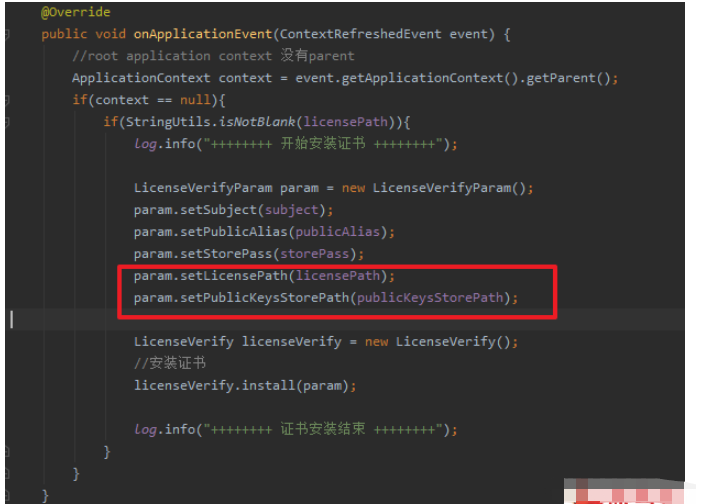
演示项目配置的路径是绝对路径,一般我们会配置相对路径,把两个文件放到项目下,配置位置在LicenseCheckListener类中
修改如下部分改为相对路径读取就可以了

这里就不演示如何修改了,因为修改起来很容易。
还需要注意一点:
对于LicenseCheckModel,LicenseCreatorParam两个类,引入到自己的客户端后一定要保证包名与生成license时的包名一致,不然会导致序列化失败的问题。
关于“怎么理解SpringBoot生成License”这篇文章的内容就介绍到这里,感谢各位的阅读!相信大家对“怎么理解SpringBoot生成License”知识都有一定的了解,大家如果还想学习更多知识,欢迎关注亿速云行业资讯频道。
免责声明:本站发布的内容(图片、视频和文字)以原创、转载和分享为主,文章观点不代表本网站立场,如果涉及侵权请联系站长邮箱:is@yisu.com进行举报,并提供相关证据,一经查实,将立刻删除涉嫌侵权内容。