您好,登录后才能下订单哦!
密码登录
登录注册
点击 登录注册 即表示同意《亿速云用户服务条款》
这篇文章将为大家详细讲解有关AmazeUI在模态框中嵌入表单如何形成模态输入框,小编觉得挺实用的,因此分享给大家做个参考,希望大家阅读完这篇文章后可以有所收获。
效果图
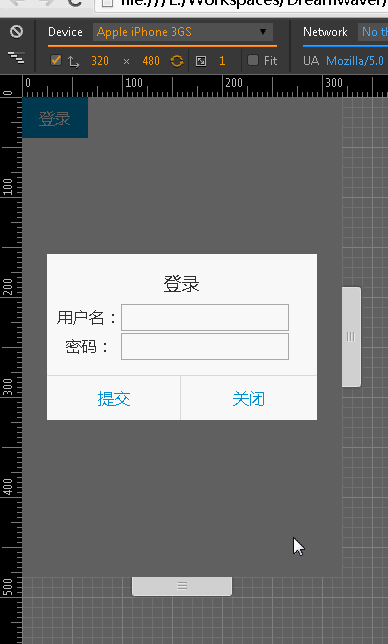
首先同样是HTML布局:
<!--使用HTML5开发-->
<!doctype html>
<html class="no-js">
<html>
    <head>
        <meta http-equiv="Content-Type" content="text/html; charset=utf-8">
        <meta http-equiv="X-UA-Compatible" content="IE=edge">
        <!--自动适应移动屏幕-->
        <meta name="viewport" content="width=device-width, initial-scale=1, maximum-scale=1, user-scalable=no">
        <!--优先使用webkit内核渲染-->
        <meta name="renderer" content="webkit">
        <!--不要被百度转码-->
        <meta http-equiv="Cache-Control" content="no-siteapp"/>
        <!--以下才是引入amazeui资源-->
        <link rel="stylesheet" href="assets/css/amazeui.min.css">
        <link rel="stylesheet" href="assets/css/app.css">
        <!--引入js的时候要注意,必须先引入jQuery,再引入amazeui,因为这个框架是基于jQuery开发的-->
        <script src="assets/js/jquery.min.js"></script>
        <script src="assets/js/amazeui.min.js"></script>
        <title>Modal</title>
    </head>
    <body>
        <button class="am-btn am-btn-primary" onClick="openModal()">登录</button>
        <!--模态框-->
        <div class="am-modal am-modal-alert" tabindex="-1" id="login">
            <div class="am-modal-dialog">
            	<div class="am-modal-hd">登录</div>
                <div class="am-modal-bd">
                <!--模态框内容-->
                    <table>
                        <tr>
                            <td>用户名:</td>
                            <td><input type="text" id="username"/></td>
                        </tr>
                        <tr>
                            <td>密码:</td>
                            <td><input type="password" id="password"/></td>
                        </tr>
                    </table>
                </div>
                <div class="am-modal-footer">
                	<!--关键是在这里为两个按钮加上data-am-modal-confirm与data-am-modal-cancel属性-->
                    <span class="am-modal-btn" data-am-modal-confirm>提交</span>
                    <span class="am-modal-btn" data-am-modal-cancel>关闭</span>
                </div>
            </div>
        </div>

    </body>
</html>
之后,这段HTML脚本要跟下面的JavaScript联系起来。
比如一按“登录”按钮,则显示这个模态输入框,JavaScript脚本则如下实现:
<script>
function openModal(){
	$('#login').modal({
		onConfirm: function() {
			var username=document.getElementById("username").value;
			var password=document.getElementById("password").value;
			alert("用户点击了提交,输入了用户名:"+username+",密码:"+password+",接下去一般是ajax提交表单");
		},
		onCancel: function() {
			alert("用户点击了关闭按钮");
		}
	});
}
</script>
关于“AmazeUI在模态框中嵌入表单如何形成模态输入框”这篇文章就分享到这里了,希望以上内容可以对大家有一定的帮助,使各位可以学到更多知识,如果觉得文章不错,请把它分享出去让更多的人看到。
免责声明:本站发布的内容(图片、视频和文字)以原创、转载和分享为主,文章观点不代表本网站立场,如果涉及侵权请联系站长邮箱:is@yisu.com进行举报,并提供相关证据,一经查实,将立刻删除涉嫌侵权内容。