您好,登录后才能下订单哦!
密码登录
登录注册
点击 登录注册 即表示同意《亿速云用户服务条款》
小编给大家分享一下springmvc报错404怎么办,相信大部分人都还不怎么了解,因此分享这篇文章给大家参考一下,希望大家阅读完这篇文章后大有收获,下面让我们一起去了解一下吧!
编程环境:win10x64+eclipse+Tomcat8.5
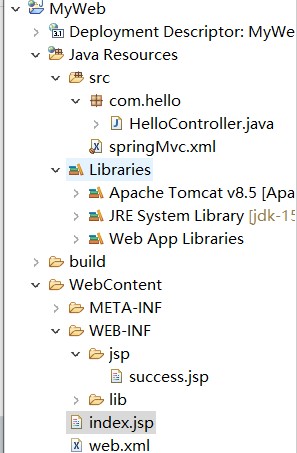
文件结构:

主要代码:
web.xml
<?xml version="1.0" encoding="UTF-8"?>
<web-app xmlns:xsi="http://www.w3.org/2001/XMLSchema-instance" xmlns="http://xmlns.jcp.org/xml/ns/javaee" xsi:schemaLocation="http://xmlns.jcp.org/xml/ns/javaee http://xmlns.jcp.org/xml/ns/javaee/web-app_3_1.xsd" id="WebApp_ID" version="3.1">
<display-name>MyWeb</display-name>
<welcome-file-list>
<welcome-file>index.html</welcome-file>
<welcome-file>index.htm</welcome-file>
<welcome-file>index.jsp</welcome-file>
<welcome-file>default.html</welcome-file>
<welcome-file>default.htm</welcome-file>
<welcome-file>default.jsp</welcome-file>
</welcome-file-list>

<!-- 加载spring配置文件 -->
<context-param>
<param-name>contextConfigLocation</param-name>
<param-value>classpath:springMvc.xml</param-value>
</context-param>
<!-- spring监听 -->
<listener>
<listener-class>org.springframework.web.context.ContextLoaderListener</listener-class>
</listener>
<!-- 配置springMvc -->
<servlet>
<servlet-name>springMvc</servlet-name>
<servlet-class>org.springframework.web.servlet.DispatcherServlet</servlet-class>

<init-param>
<param-name>contextConfigLocation</param-name>
<param-value>classpath:springMvc.xml</param-value>
</init-param>

<load-on-startup>1</load-on-startup>
<async-supported>true</async-supported>
</servlet>

<servlet-mapping>
<servlet-name>springMvc</servlet-name>
<url-pattern>/</url-pattern>
</servlet-mapping>

</web-app>
HelloController.java
package com.hello;

import org.springframework.stereotype.Controller;
import org.springframework.web.bind.annotation.RequestMapping;

@Controller
public class HelloController {

@RequestMapping("/success")
public String helloWorld() {
System.out.println("拦截");
return "success";
}
}
springMvc.xml
<?xml version="1.0" encoding="UTF-8"?>

<beans xmlns="http://www.springframework.org/schema/beans"
xmlns:xsi="http://www.w3.org/2001/XMLSchema-instance"
xmlns:context="http://www.springframework.org/schema/context"
xmlns:mvc="http://www.springframework.org/schema/mvc"
xsi:schemaLocation="http://www.springframework.org/schema/beans
http://www.springframework.org/schema/beans/spring-beans.xsd
http://www.springframework.org/schema/context http://www.springframework.org/schema/context/spring-context.xsd
http://www.springframework.org/schema/mvc http://www.springframework.org/schema/mvc/spring-mvc.xsd ">

<mvc:annotation-driven />

<context:component-scan base-package="com.hello"/>

<!-- 处理静态资源 -->
<mvc:default-servlet-handler/>

<!-- 配置视图解析器 -->
<bean
class="org.springframework.web.servlet.view.InternalResourceViewResolver">
<property name="prefix" value="/WEB-INF/jsp/"/>
<property name="suffix" value=".jsp"/>
</bean>
</beans>
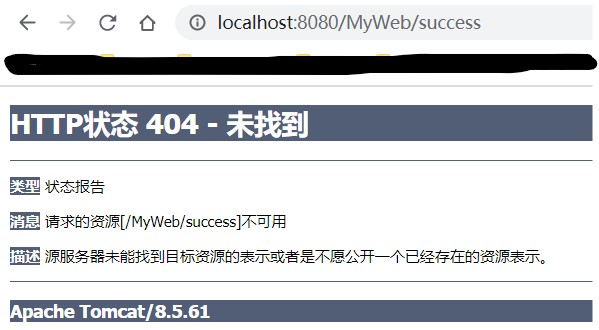
调试图:


以上是“springmvc报错404怎么办”这篇文章的所有内容,感谢各位的阅读!相信大家都有了一定的了解,希望分享的内容对大家有所帮助,如果还想学习更多知识,欢迎关注亿速云行业资讯频道!
免责声明:本站发布的内容(图片、视频和文字)以原创、转载和分享为主,文章观点不代表本网站立场,如果涉及侵权请联系站长邮箱:is@yisu.com进行举报,并提供相关证据,一经查实,将立刻删除涉嫌侵权内容。