您好,登录后才能下订单哦!
密码登录
登录注册
点击 登录注册 即表示同意《亿速云用户服务条款》
这篇文章给大家分享的是有关怎么在IOS中使用Cordova插件的内容。小编觉得挺实用的,因此分享给大家做个参考,一起跟随小编过来看看吧。
插件功能:打开IOS相机
plugman create --name [插件名称] --plugin_id [插件ID] --plugin_version [插件版本号]
plugman create --name CameraDemo --plugin_id cordova-plugin-camerademo --plugin_version 1.0.0
plugman platform add --platform_name ios
以下两种都可以生成package.json
1:使用命令 “npm init” 创建package.json文件
2:plugman createpackagejson [插件路径]
原应用使用的ionic UI框架,没有package.json无法安装插件
最终插件目录结构
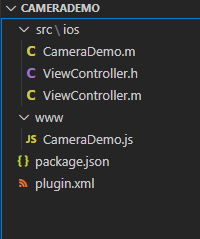
除了ViewController.h和ViewController.m文件,其余的文件通过上述步骤都会自动生成
创建文件ViewController.h和ViewController.m
ViewController.h
#import <UIKit/UIKit.h>

@interface ViewController : UIViewController{
}
@property (nonatomic,strong) UIImagePickerController *imagePicker;
- (void)getDeviceInfo;  //获取ios设备信息
- (void)OpenCamera;		//打开ios相机
@end
ViewController.m
#import "ViewController.h"

@interface ViewController ()
@end

@implementation ViewController
- (id) init{
    NSLog(@"=======================相机初始化");
    self = [super init];
    self.imagePicker = [[UIImagePickerController alloc] init];
    return self;
}

- (void)viewDidLoad {
    [super viewDidLoad];
    // Do any additional setup after loading the view.

    UIButton *button =[[UIButton alloc]init];
    [button setTitle:@"我是按钮" forState:(UIControlStateNormal)];
    [button setTitleColor:[UIColor redColor] forState:(UIControlStateNormal)];
    [button setTitleColor:[UIColor blueColor] forState:(UIControlStateHighlighted)];
    [button setBackgroundColor:[UIColor yellowColor]];
    [button setFrame:CGRectMake(10, 50, 100, 30)];
    //事件
    //[button addTarget:self action:@selector(click) forControlEvents:(UIControlEventTouchUpInside)];
    [self.view addSubview:button];

    UIButton *deviceBtn =[[UIButton alloc]init];
    [deviceBtn setTitle:@"查看设备信息" forState:(UIControlStateNormal)];
    [deviceBtn setTitleColor:[UIColor redColor] forState:(UIControlStateNormal)];
    [deviceBtn setTitleColor:[UIColor blueColor] forState:(UIControlStateHighlighted)];
    [deviceBtn setBackgroundColor:[UIColor yellowColor]];
    [deviceBtn setFrame:CGRectMake(120, 50, 200, 30)];
    [deviceBtn addTarget:self action:@selector(getDeviceInfo) forControlEvents:(UIControlEventTouchUpInside)];
    [self.view addSubview:deviceBtn];

    UIButton *openCameraBtn =[[UIButton alloc]init];
    [openCameraBtn setTitle:@"打开相机" forState:(UIControlStateNormal)];
    [openCameraBtn setTitleColor:[UIColor redColor] forState:(UIControlStateNormal)];
    [openCameraBtn setTitleColor:[UIColor blueColor] forState:(UIControlStateHighlighted)];
    [openCameraBtn setBackgroundColor:[UIColor yellowColor]];
    [openCameraBtn setFrame:CGRectMake(330, 50, 200, 30)];
    [openCameraBtn addTarget:self action:@selector(openCamera) forControlEvents:(UIControlEventTouchUpInside)];
    [self.view addSubview:openCameraBtn];


}

- (void)getDeviceInfo{
    NSLog(@"获取设备信息。。。。");
    NSString *name = [[UIDevice currentDevice] name];
    NSString *systemName = [[UIDevice currentDevice] systemName];
    NSString *systemVersion = [[UIDevice currentDevice] systemVersion];
    NSString *model = [[UIDevice currentDevice] model];
    NSString *localizeModel = [[UIDevice currentDevice] localizedModel];

    UILabel *nameL = [[UILabel alloc] init];
    UILabel *systemNameL = [[UILabel alloc] init];
    UILabel *systemVersionL = [[UILabel alloc] init];
    UILabel *modelL = [[UILabel alloc] init];
    UILabel *localizeModelL = [[UILabel alloc] init];

    [nameL setText:name];
    [systemNameL setText:systemName];
    [systemVersionL setText:systemVersion];
    [modelL setText:model];
    [localizeModelL setText:localizeModel];

    [nameL setTextColor:[UIColor blueColor]];
    [systemNameL setTextColor:[UIColor blueColor]];
    [systemVersionL setTextColor:[UIColor blueColor]];
    [modelL setTextColor:[UIColor blueColor]];
    [localizeModelL setTextColor:[UIColor blueColor]];

    CGFloat x = 10;
    CGFloat y = 80;
    CGFloat width = 200;
    CGFloat height=20;

    nameL.frame = CGRectMake(x, y+20, width, height);
    systemNameL.frame = CGRectMake(x, y+40, width, height);
    systemVersionL.frame = CGRectMake(x, y+60, width, height);
    modelL.frame = CGRectMake(x, y+80, width, height);
    localizeModelL.frame = CGRectMake(x, y+100, width, height);

    [self.view addSubview:nameL];
    [self.view addSubview:systemNameL];
    [self.view addSubview:systemVersionL];
    [self.view addSubview:modelL];
    [self.view addSubview:localizeModelL];
}

- (void)openCamera{
    //NSLog(@"打开摄像头。。。。");
    //UIImagePickerController *imagePicker = [[UIImagePickerController alloc] init];
    self.imagePicker.editing = YES;
    self.imagePicker.delegate = self;
    self.imagePicker.allowsEditing = YES;

    if([UIImagePickerController isSourceTypeAvailable:UIImagePickerControllerSourceTypeCamera]){
        NSLog(@"选择相机。。。");
        self.imagePicker.sourceType = UIImagePickerControllerSourceTypeCamera;
    }

    [self presentViewController:self.imagePicker animated:YES completion:nil];
}
@end
这两个文件其实是我已经在ios原生项目下编译运行过的文件,然后被CameraDemo.m调用。(其实有点类似于库的作用)
直白一点就是。有一个库(ViewController.h和ViewController.m),提供了一个类ViewController,这个类提供了两个方法
(void)getDeviceInfo; //获取ios设备信息
(void)OpenCamera; //打开ios相机
然后CameraDemo.m去实例化了这个类
CameraDemo.m
/********* CameraDemo.m Cordova Plugin Implementation *******/

#import <Cordova/CDV.h>
#import "ViewController.h"

//这里必须继承CDVPlugin 类,表示CameraDemo是Cordova插件类
@interface CameraDemo : CDVPlugin {
  // Member variables go here.
}
@property (nonatomic,strong) ViewController *view;  //声明一个ViewController
- (void)coolMethod:(CDVInvokedUrlCommand*)command;  //创建插件自带的方法,可以删除
- (void)openCamera:(CDVInvokedUrlCommand*)command;
@end

@implementation CameraDemo

- (void)pluginInitialize{
    NSLog(@"===========================初始化CameraDemo");
    [super pluginInitialize];
    // 实例化ViewController
    self.view = [[ViewController alloc] init];
}

//创建插件自带的方法,可以删除
- (void)coolMethod:(CDVInvokedUrlCommand*)command
{
    CDVPluginResult* pluginResult = nil;
    NSString* echo = [command.arguments objectAtIndex:0];

    if (echo != nil && [echo length] > 0) {
        pluginResult = [CDVPluginResult resultWithStatus:CDVCommandStatus_OK messageAsString:echo];
    } else {
        pluginResult = [CDVPluginResult resultWithStatus:CDVCommandStatus_ERROR];
    }

    [self.commandDelegate sendPluginResult:pluginResult callbackId:command.callbackId];
}

- (void)openCamera:(CDVInvokedUrlCommand*)command
{
	// 将ViewController的实例viewController  显示出来
    [self.viewController presentViewController:self.view animated:YES completion:nil];
    //ViewController *view = [[ViewController alloc] init];
    //[view openCamera];
    //CDVPluginResult* pluginResult = [CDVPluginResult resultWithStatus:CDVCommandStatus_ERROR];;
    //[self.commandDelegate sendPluginResult:pluginResult callbackId:command.callbackId];
}
@end
CameraDemo.js
var exec = require('cordova/exec');

exports.coolMethod = function (arg0, success, error) {
    exec(success, error, 'CameraDemo', 'coolMethod', [arg0]);
};

exports.openCamera = function (arg0, success, error) {
    exec(success, error, 'CameraDemo', 'openCamera', [arg0]);
};
plugin.xml (这个文件非常非常的重要,js可以调用oc全靠它,多查查资料)
<?xml version='1.0' encoding='utf-8'?>
<plugin id="cordova-plugin-camerademo" version="1.0.0"
    xmlns="http://apache.org/cordova/ns/plugins/1.0"
    xmlns:android="http://schemas.android.com/apk/res/android">
    <name>CameraDemo</name>
    <js-module name="CameraDemo" src="www/CameraDemo.js">
        <clobbers target="cordova.plugins.CameraDemo" />
    </js-module>

    <platform name="ios">
        <config-file parent="/*" target="config.xml">
            <feature name="CameraDemo">
                <param name="ios-package" value="CameraDemo" onload="true"/>
            </feature>
        </config-file>
        <source-file src="src/ios/CameraDemo.m" />
        <header-file src="src/ios/ViewController.h" />
        <source-file src="src/ios/ViewController.m" />
    </platform>
</plugin>
package.json (一般不需要修改)
{
  "name": "cordova-plugin-camerademo",
  "version": "1.0.0",
  "description": "",
  "cordova": {
    "id": "cordova-plugin-camerademo",
    "platforms": [
      "ios"
    ]
  },
  "keywords": [
    "ecosystem:cordova",
    "cordova-ios"
  ],
  "author": "",
  "license": "ISC"
}
CameraDemo.js 通过 plugin.xml 配置去调用了原生的ocject-c方法
重要,如果调用和插件中的plugin.xml配置有关,所以plugin.xml非常重要
// 在项目的 ts文件中调用
declare let cordova:any
cordova.plugins.CameraDemo.openCamera();
感谢各位的阅读!关于“怎么在IOS中使用Cordova插件”这篇文章就分享到这里了,希望以上内容可以对大家有一定的帮助,让大家可以学到更多知识,如果觉得文章不错,可以把它分享出去让更多的人看到吧!
免责声明:本站发布的内容(图片、视频和文字)以原创、转载和分享为主,文章观点不代表本网站立场,如果涉及侵权请联系站长邮箱:is@yisu.com进行举报,并提供相关证据,一经查实,将立刻删除涉嫌侵权内容。