您好,登录后才能下订单哦!
密码登录
登录注册
点击 登录注册 即表示同意《亿速云用户服务条款》
本篇内容介绍了“Springboot 项目集成 Nacos 实现服务注册发现与配置管理方法”的有关知识,在实际案例的操作过程中,不少人都会遇到这样的困境,接下来就让小编带领大家学习一下如何处理这些情况吧!希望大家仔细阅读,能够学有所成!
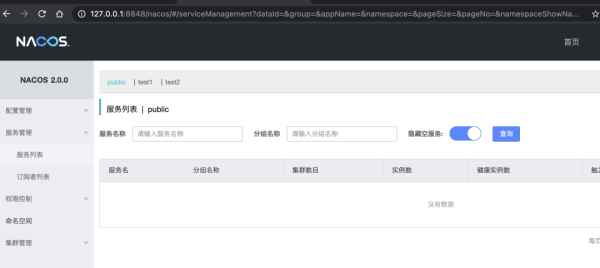
启动完本地搭建的 Nacos 服务后,我们可以看到,目前的服务管理下面的服务列表里面在三个命名空间下都没有服务,这是正常的,因为目前我们还没有服务接入Nacos。
Nacos 服务启动成功后,我们再创建两个 SpringBoot 项目,一个用于接入 Nacos 服务注册与发现和配置中心作为服务提供者 Producer,另一个只接入 Nacos的服务注册与发现,调用 Producer 获取配置中心的参数,我们叫做Consumer。
1.我们首先创建一个 SpringBoot 的项目,bootstrap.properties 文件内容如下:
spring.application.name=producer #######################配置中心配置################################# # 指定的命名空间,只会在对应的命名空间下查找对应的配置文件 spring.cloud.nacos.config.namespace=caeser-adsys-naming spring.cloud.nacos.config.file-extension=properties # 配置的分组名称 spring.cloud.nacos.config.group=TEST1 # 配置文件,数组形式,可以多个,依次递增 spring.cloud.nacos.config.ext-config[0].data-id=com.example.properties spring.cloud.nacos.config.ext-config[0].group=TEST1 # 配置中心的地址 spring.cloud.nacos.config.server-addr=127.0.0.1:8848 #启用自动刷新对应的配置文件 spring.cloud.nacos.config.ext-config[0].refresh=true ######################服务注册发现配置################################## # 服务集群名称 spring.cloud.nacos.discovery.cluster-name=TEST1_GROUP # 服务注册中心的地址 spring.cloud.nacos.discovery.server-addr=127.0.0.1:8848 # 服务的命名空间 spring.cloud.nacos.discovery.namespace=caeser-adsys-naming
2.application.properties 的文件内容如下,主要就是一个端口,其他配置根据情况自行添加或删除就好:
# 服务启动的端口 server.port=8080 spring.main.allow-bean-definition-overriding=true # tomcat 配置 server.tomcat.max-threads=500 spring.mvc.servlet.load-on-startup=1 spring.servlet.multipart.max-file-size=40MB spring.servlet.multipart.max-request-size=100MB # 日志配置 logging.level.root=info logging.level.com.alibaba=error logging.pattern.console=%clr{[%level]}{green} [%d{yyyy-MM-dd HH:mm:ss}] %clr{[${PID:-}]}{faint} %clr{[%thread]}{magenta} %clr{[%-40.40logger{80}:%line]}{cyan} %msg%n3.在启动类上面增加如下注解
package com.ziyou.nacos.demo.producer; import org.springframework.boot.SpringApplication; import org.springframework.boot.autoconfigure.SpringBootApplication; import org.springframework.cache.annotation.EnableCaching; import org.springframework.cloud.client.discovery.EnableDiscoveryClient; @SpringBootApplication(scanBasePackages = "com.ziyou.nacos") @EnableDiscoveryClient @EnableCaching public class ProducerApplication { public static void main(String[] args) { SpringApplication.run(ProducerApplication.class, args); } }4.pom.xml 文件内容如下:
<?xml version="1.0" encoding="UTF-8"?> <project xmlns="http://maven.apache.org/POM/4.0.0" xmlns:xsi="http://www.w3.org/2001/XMLSchema-instance" xsi:schemaLocation="http://maven.apache.org/POM/4.0.0 http://maven.apache.org/xsd/maven-4.0.0.xsd"> <modelVersion>4.0.0</modelVersion> <parent> <groupId>org.example</groupId> <artifactId>nacos-demo</artifactId> <version>1.0-SNAPSHOT</version> </parent> <artifactId>producer</artifactId> <version>1.0-SNAPSHOT</version> <name>producer Maven Webapp</name> <!-- FIXME change it to the project's website --> <url>http://www.example.com</url> <properties> <project.build.sourceEncoding>UTF-8</project.build.sourceEncoding> <maven.compiler.source>1.7</maven.compiler.source> <maven.compiler.target>1.7</maven.compiler.target> <spring.maven.plugin.version>2.2.2.RELEASE</spring.maven.plugin.version> </properties> <dependencies> <!-- Spring Boot --> <dependency> <groupId>org.springframework.boot</groupId> <artifactId>spring-boot-starter</artifactId> <exclusions> <exclusion> <groupId>org.springframework.boot</groupId> <artifactId>spring-boot-starter-logging</artifactId> </exclusion> </exclusions> </dependency> <dependency> <groupId>org.springframework.boot</groupId> <artifactId>spring-boot-starter-log4j2</artifactId> </dependency> <dependency> <groupId>org.springframework.boot</groupId> <artifactId>spring-boot-starter-web</artifactId> </dependency> <!-- nacos 配置中心 --> <dependency> <groupId>com.alibaba.cloud</groupId> <artifactId>spring-cloud-starter-alibaba-nacos-config</artifactId> </dependency> <!-- nacos 注册发现 --> <dependency> <groupId>com.alibaba.cloud</groupId> <artifactId>spring-cloud-starter-alibaba-nacos-discovery</artifactId> </dependency> </dependencies> <build> <!--指定下面的目录为资源文件--> <resources> <!--设置自动替换--> <resource> <directory>src/main/resources</directory> <filtering>true</filtering> <includes> <include>**/**</include> </includes> </resource> </resources> <finalName>producer</finalName> <plugins> <plugin> <groupId>org.springframework.boot</groupId> <artifactId>spring-boot-maven-plugin</artifactId> <version>${spring.maven.plugin.version}</version> <executions> <execution> <goals> <goal>repackage</goal> </goals> </execution> </executions> </plugin> </plugins> </build> </project>5.在 Producer 侧提供一个获取配置里面内容的接口,代码如下:
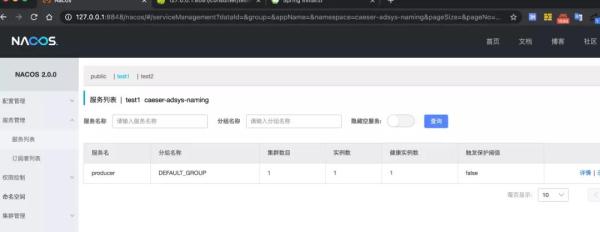
package com.ziyou.nacos.demo.producer.controller; import com.ziyou.nacos.demo.producer.config.UserConfig; import org.springframework.beans.factory.annotation.Autowired; import org.springframework.web.bind.annotation.GetMapping; import org.springframework.web.bind.annotation.RequestMapping; import org.springframework.web.bind.annotation.RestController; /** * <br> * <b>Function:</b><br> * <b>Author:</b>@author ziyou<br> * <b>Date:</b>2021-04-11 19:59<br> * <b>Desc:</b>无<br> */ @RestController @RequestMapping(value = "producer") public class ProducerController { private UserConfig userConfig; @GetMapping("/getUsername") private String getUsername() { String result = userConfig.getUsername() + "-" + userConfig.getPassword(); System.out.println(result); return result; } @Autowired public void setUserConfig(UserConfig userConfig) { this.userConfig = userConfig; } }package com.ziyou.nacos.demo.producer.config; import org.springframework.beans.factory.annotation.Value; import org.springframework.cloud.context.config.annotation.RefreshScope; import org.springframework.stereotype.Component; /** * <br> * <b>Function:</b><br> * <b>Author:</b>@author ziyou<br> * <b>Date:</b>2021-04-11 20:39<br> * <b>Desc:</b>无<br> */ @RefreshScope @Component public class UserConfig { @Value("${username}") private String username; @Value("${password}") private String password; public String getUsername() { return username; } public void setUsername(String username) { this.username = username; } public String getPassword() { return password; } public void setPassword(String password) { this.password = password; } }6.启动 Producer,并且手动调用接口,启动 Producer 过后,我们在 Nacos 的服务注册列表可以看如下所示的内容,在 test1 的命名空间下,已经有了我们创建的 Producer 服务。
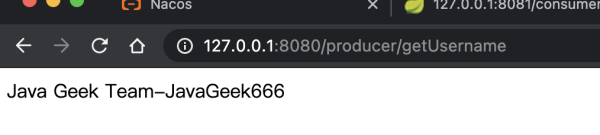
7.通过手动调用 Producer 的接口 http://127.0.0.1:8080/producer/getUsername 显示如下内容
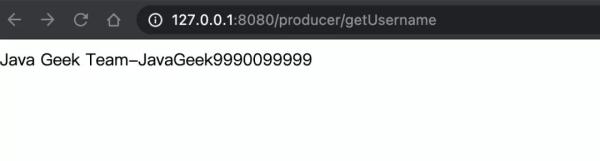
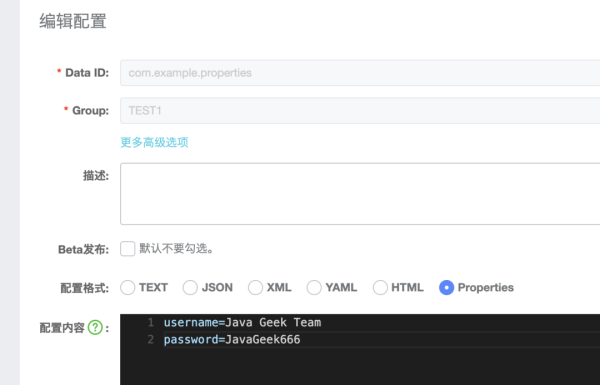
并且我们看下此时 Nacos 的配置中心里面配置文件com.example.properties 里面的内容正是这个,这个时候我们手动把配置里面password 参数的值改成JavaGeek666,再次访问接口,我们会发现接口的输出也自动改变了。
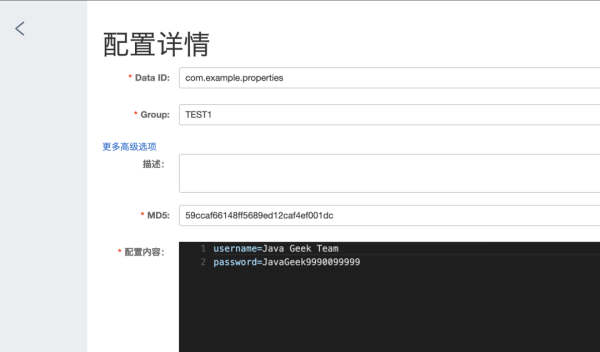
修改配置内容如下:
再次访问结果如下:
前面我们已经完成了Producer 的服务注册与配置动态生效的功能,这个时候基本已经可以使用了,不过我们还需要更进一步通过 Nacos 来实现服务发现,接下来我们创建 Consumer 的 SpringBoot 的项目,配置文件和pom.xml 文件基本一致,只要修改端口以及对应地方,下面贴一下不一样的地方
1.boostrap.properties 内容如下,因为这里我们只调用Producer 的接口,不需要接入 Nacos 的配置中心,所以这里只配置发服务注册与发现
spring.application.name=consumer ######################服务注册发现配置################################## spring.cloud.nacos.discovery.cluster-name=TEST1_GROUP spring.cloud.nacos.discovery.server-addr=127.0.0.1:8848 spring.cloud.nacos.discovery.namespace=caeser-adsys-naming
2.启动类,配置上 feignClient 需要扫描的包路径
package com.ziyou.nacos.demo.consumer; import org.springframework.boot.SpringApplication; import org.springframework.boot.autoconfigure.SpringBootApplication; import org.springframework.cache.annotation.EnableCaching; import org.springframework.cloud.openfeign.EnableFeignClients; /** * <br> * <b>Function:</b><br> * <b>Author:</b>@author ziyou<br> * <b>Date:</b>2021-04-11 17:07<br> * <b>Desc:</b>无<br> */ @SpringBootApplication(scanBasePackages = "com.ziyou.nacos") @EnableFeignClients(basePackages = {"com.ziyou.nacos.demo.consumer.rpc"}) @EnableCaching public class ConsumerApplication { public static void main(String[] args) { SpringApplication.run(ConsumerApplication.class, args); } }3.编写调用 Producer 的接口,FeignClient 里面的 value 就是 Producer 的应用名称
package com.ziyou.nacos.demo.consumer.rpc; import org.springframework.cloud.openfeign.FeignClient; import org.springframework.stereotype.Component; import org.springframework.web.bind.annotation.GetMapping; /** * <br> * <b>Function:</b><br> * <b>Author:</b>@author ziyou<br> * <b>Date:</b>2021-04-11 20:01<br> * <b>Desc:</b>无<br> */ @FeignClient(value = "producer") @Component public interface IProducerFeign { /** * 获取生产者名称接口 * * @return */ @GetMapping("/producer/getUsername") String getUsername(); }package com.ziyou.nacos.demo.consumer.controller; import com.ziyou.nacos.demo.consumer.rpc.IProducerFeign; import org.springframework.beans.factory.annotation.Autowired; import org.springframework.web.bind.annotation.GetMapping; import org.springframework.web.bind.annotation.RequestMapping; import org.springframework.web.bind.annotation.RestController; /** * <br> * <b>Function:</b><br> * <b>Author:</b>@author ziyou<br> * <b>Date:</b>2021-04-11 19:59<br> * <b>Desc:</b>无<br> */ @RestController @RequestMapping(value = "consumer") public class TestNacosController { private IProducerFeign iProducerFeign; @GetMapping("/testNacos") private String testNacos() { return iProducerFeign.getUsername(); } @Autowired public void setiProducerFeign(IProducerFeign iProducerFeign) { this.iProducerFeign = iProducerFeign; } }4.启动Consumer,我们可以看到在 Nacos 如下图所示
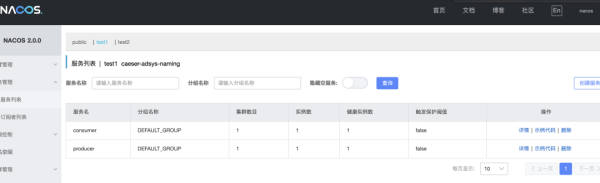
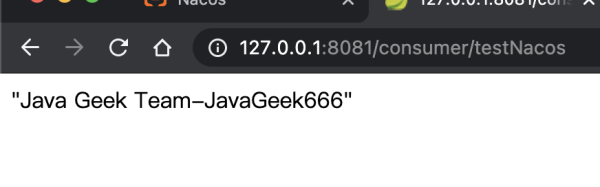
5.调用 Consumer 的接口consumer/testNacos,结果如下图所示,同样的如果此时更改了 Nacos 配置文件中的内容,Consumer 这边也是可以实时更新的,感兴趣的小伙伴可以自己试试。
今天主要给大家介绍了一下如何通过 SpringBoot 项目来接入 Naocs 实现服务注册与发现,以及配置管理和动态刷新,相关的代码已经上传到 GitHub 了。
“Springboot 项目集成 Nacos 实现服务注册发现与配置管理方法”的内容就介绍到这里了,感谢大家的阅读。如果想了解更多行业相关的知识可以关注亿速云网站,小编将为大家输出更多高质量的实用文章!
免责声明:本站发布的内容(图片、视频和文字)以原创、转载和分享为主,文章观点不代表本网站立场,如果涉及侵权请联系站长邮箱:is@yisu.com进行举报,并提供相关证据,一经查实,将立刻删除涉嫌侵权内容。