您好,登录后才能下订单哦!
密码登录
登录注册
点击 登录注册 即表示同意《亿速云用户服务条款》
Java中怎么实现单元测试与集成测试,针对这个问题,这篇文章详细介绍了相对应的分析和解答,希望可以帮助更多想解决这个问题的小伙伴找到更简单易行的方法。
Maven测试代码结构的组织
我们知道在Maven工程结构中“src/test”目录是专门用于存放测试代码的,但令人痛苦的是Maven的标准目录结构只定义了这样一个测试目录,也就是说它本身是无法单独区分单元测试代码和集成测试代码的,这也是为什么很多人会把UT和IT代码同时写到"src/test"目录而导致“mvn test”难以跑过的原因。
那么有什么办法可以友好地解决这个问题呢?在接下来的内容中我们以Maven构建Spring Boot项目为例来具体演示下在Maven中如何友好地分离UT及IT,具体步骤如下:
1)、首先我们创建一个基于Maven构建的Spring Boot项目,代码结构如下图所示:

如上图所示,在规划的目录结构中我们将IT的代码目录及资源文件目录单独分离在“src/integration-test”目录下,默认的“src/test”目录还是作为存放UT代码的目录,而Maven在构建的过程中默认只运行UT代码。这样即便IT代码由于网络、环境等原因无法正常执行,但也不至于影响到UT代码的运行。
2)、创建区分UT、IT代码的Maven Profiles文件
默认情况下Maven是无法主动识别“src/test”目录之外的测试代码的,所以当我们将IT代码抽象到"src/integration-test"目录之后,需要通过编写Maven Profiles文件来进行区分,具体示意图如下:
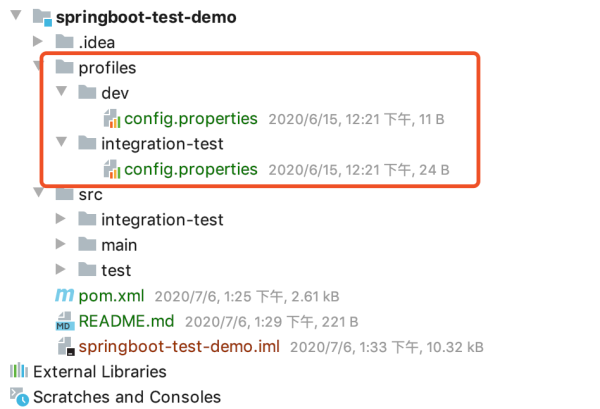
如上图所示,我们可以在与“src”目录平行创建一个“profiles”的目录,其中分别用“dev”、“integration-test”目录中的config.properties文件来进行区分,其中dev目录下的config.properties文件的内容为:
profile=dev
而integration-test目录中的config.properties文件则为:
profile=integration-test
3)、通过pom.xml文件配置上述profiles文件生效规则
为了使得这些profiles文件生效,我们还需要在pom.xml文件中进行相应的配置。具体如下:
<!--定义关于区分集成测试及单元测试代码的profiles--> <profiles> <!-- The Configuration of the development profile --> <profile> <id>dev</id> <activation> <activeByDefault>true</activeByDefault> </activation> <properties> <build.profile.id>dev</build.profile.id> <!--Only unit tests are run when the development profile is active--> <skip.integration.tests>true</skip.integration.tests> <skip.unit.tests>false</skip.unit.tests> </properties> </profile> <!-- The Configuration of the integration-test profile --> <profile> <id>integration-test</id> <properties> <build.profile.id>integration-test</build.profile.id> <!--Only integration tests are run when the integration-test profile is active--> <skip.integration.tests>false</skip.integration.tests> <skip.unit.tests>true</skip.unit.tests> </properties> </profile> </profiles>
上述内容先定义了区分dev及integration-test环境的的profile信息,接下来在build标签中定义资源信息及相关plugin,具体如下:
<build> <finalName>${project.artifactId}</finalName> <!--步骤1:单元测试代码、集成测试代码分离--> <filters> <filter>profiles/${build.profile.id}/config.properties</filter> </filters> <resources> <resource> <filtering>false</filtering> <directory>src/main/java</directory> <includes> <include>**/*.properties</include> <include>**/*.xml</include> <include>**/*.tld</include> <include>**/*.yml</include> </includes> </resource> <!--步骤2:通过Profile区分Maven集成测试代码、单元测试代码目录--> <resource> <filtering>true</filtering> <directory>src/main/resources</directory> <includes> <include>**/*.properties</include> <include>**/*.xml</include> <include>**/*.tld</include> <include>**/*.yml</include> <include>**/*.sh</include> </includes> </resource> </resources> <plugins> <plugin> <groupId>org.springframework.boot</groupId> <artifactId>spring-boot-maven-plugin</artifactId> </plugin> <!-- 步骤三:将源目录和资源目录添加到构建中 --> <plugin> <groupId>org.codehaus.mojo</groupId> <artifactId>build-helper-maven-plugin</artifactId> <version>3.1.0</version> <executions> <!-- Add a new source directory to our build --> <execution> <id>add-integration-test-sources</id> <phase>generate-test-sources</phase> <goals> <goal>add-test-source</goal> </goals> <configuration> <!-- Configures the source directory of our integration tests --> <sources> <source>src/integration-test/java</source> </sources> </configuration> </execution> <!-- Add a new resource directory to our build --> <execution> <id>add-integration-test-resources</id> <phase>generate-test-resources</phase> <goals> <goal>add-test-resource</goal> </goals> <configuration> <!-- Configures the resource directory of our integration tests --> <resources> <resource> <filtering>true</filtering> <directory>src/integration-test/resources</directory> <includes> <include>**/*.properties</include> </includes> </resource> </resources> </configuration> </execution> </executions> </plugin> <!--步骤四:Runs unit tests --> <plugin> <groupId>org.apache.maven.plugins</groupId> <artifactId>maven-surefire-plugin</artifactId> <version>2.18</version> <configuration> <!-- Skips unit tests if the value of skip.unit.tests property is true --> <skipTests>${skip.unit.tests}</skipTests> <!-- Excludes integration tests when unit tests are run --> <excludes> <exclude>**/IT*.java</exclude> </excludes> </configuration> </plugin> <!--步骤五:Runs integration tests --> <plugin> <groupId>org.apache.maven.plugins</groupId> <artifactId>maven-failsafe-plugin</artifactId> <version>2.18</version> <executions> <execution> <id>integration-tests</id> <goals> <goal>integration-test</goal> <goal>verify</goal> </goals> <configuration> <skipTests>${skip.integration.tests}</skipTests> </configuration> </execution> </executions> </plugin> </plugins> </build>到这里我们就完成了基于Maven构建的Spring Boot项目的UT及IT代码目录的分离配置,此时对UT代码的执行还是通过默认“mvn test”命令,而集成测试代码的运行则可以通过如下命令:
mvn clean verify -P integration-test
单元测试代码示例
通过前面的配置操作就完成了单元测试、集成测试代码目录的分离设置。在后续的开发过程中只需要将相应的测试代码写在对应的测试目录即可。接下来我们模拟一段业务逻辑并演示如何编写其对应的UT代码。具体如下:

如上图所示,参考MVC三层规范,我们编写了一个接口逻辑,该接口Controller层接收Http请求后调用Service层进行处理,而Service层处理逻辑时会调用Dao层操作数据库,并将具体信息插入数据库。
那么我们编写单元测试(UT)代码时,针对的是单独的某个逻辑单元的测试,而不是从头到位的整个逻辑,它的运行不应该依赖于任何网络环境或其他组件,所有依赖的组件或网络都应该先进行Mock。以单元测试TestServceImpl中的“saveTest”方法为例,其UT代码编写如下:
@RunWith(SpringRunner.class) @SpringBootTest(classes = TestServiceImpl.class) @ActiveProfiles("test") public class TestServiceImplTest { @Autowired TestServiceImpl testServiceImpl; @MockBean TestDao testDao; @Test public void saveTest() { //调用测试方法 testServiceImpl.saveTest("无敌码农微信公众号"); //验证执行测试的逻辑中是否调用过addUser方法 verify(testDao).addUser(any()); } }如上所示UT代码,我们UT测试的主要对象为TestServiceImpl类,所以可以在@SpringBootTest注解中进行范围指定。而@ActiveProfiles("test")则表示代码中所依赖的系统参数,可以从测试资源目录resouces/application-test.yml文件中获得。
单元测试的主要目的是验证单元代码内的逻辑,对于所依赖的数据库Dao组件并不是测试的范围,但是没有该Dao组件对象,UT代码在执行的过程中也会报错,所以一般会通过@MockBean注解进行组件Mock,以此解决UT测试过程中的代码依赖问题。此时运行“mvn test”命令:
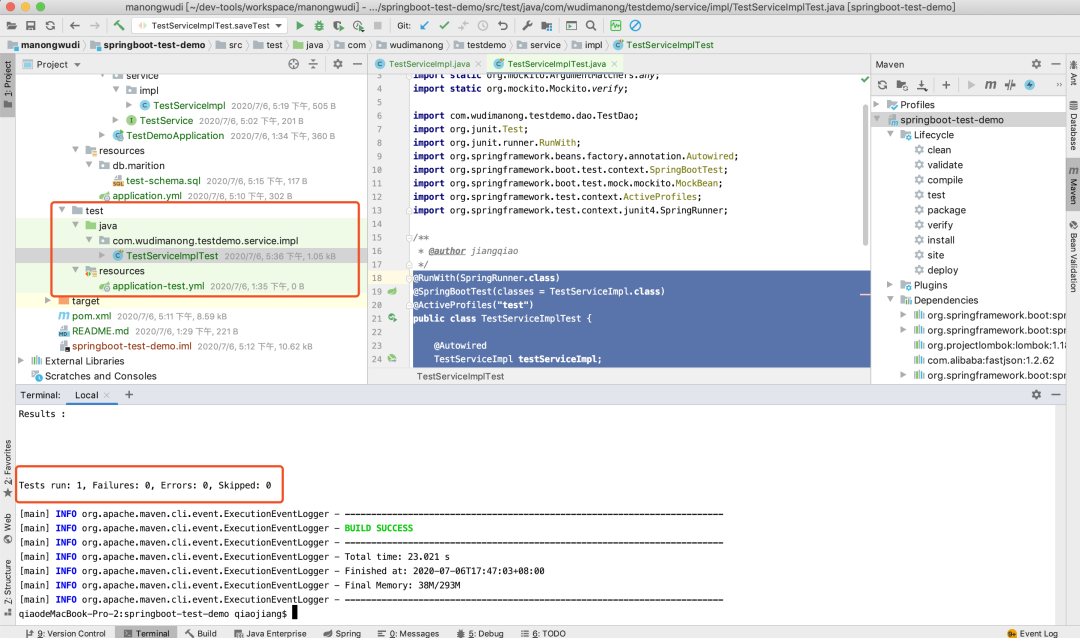
单元测试代码得以正常执行!
集成测试代码示例
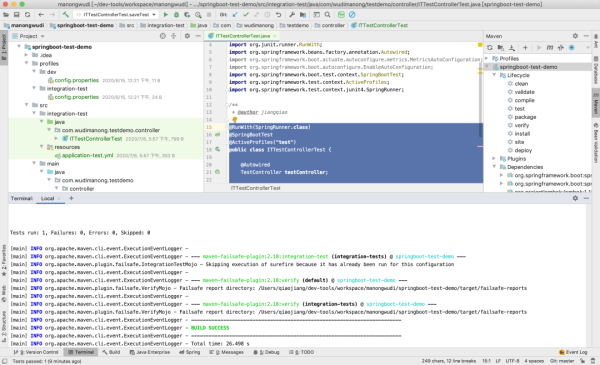
在Spring Boot中UT代码的编写方式与IT代码类似,但是其执行范围是包括了整个上下文环境。我们以模拟从Controller层发起Http接口请求为例,来完整的测试整个接口的逻辑,并最终将数据存入数据库。具体测试代码如下:
@RunWith(SpringRunner.class) @SpringBootTest @ActiveProfiles("test") public class ITTestControllerTest { @Autowired TestController testController; @Test public void saveTest() { testController.saveTest("无敌码农微信公众号"); } }可以看到对于集成测试代码在@SpringBootTest中并没有指定具体的类,它的默认执行范围为整个应用的上下文环境。而代码中的依赖组件由于整个应用上下文都会被启动,所以依赖上并不会报错,可以理解为是一个正常启动的Spring Boot应用。
需要注意的是由于IT代码的目录有独立的资源配置,所以相关的依赖配置,如数据库等需要在“src/integration-test/resouces/application-test.yml”文件中单独配置,例如:
spring: application: name: springboot-test-demo #数据库逻辑 datasource: url: jdbc:mysql://127.0.0.1:3306/test username: root password: 123456 type: com.alibaba.druid.pool.DruidDataSource driver-class-name: com.mysql.jdbc.Driver separator: // server: port: 8080
此时运行集成测试命令“mvn clean verify -P integration-test”:
关于Java中怎么实现单元测试与集成测试问题的解答就分享到这里了,希望以上内容可以对大家有一定的帮助,如果你还有很多疑惑没有解开,可以关注亿速云行业资讯频道了解更多相关知识。
免责声明:本站发布的内容(图片、视频和文字)以原创、转载和分享为主,文章观点不代表本网站立场,如果涉及侵权请联系站长邮箱:is@yisu.com进行举报,并提供相关证据,一经查实,将立刻删除涉嫌侵权内容。