您好,登录后才能下订单哦!
本篇内容主要讲解“怎么用javaweb实现在线聊天工具”,感兴趣的朋友不妨来看看。本文介绍的方法操作简单快捷,实用性强。下面就让小编来带大家学习“怎么用javaweb实现在线聊天工具”吧!
写这个玩意儿就是想练练手, 用户需要登陆才能在线聊天,不要依赖数据库, 不需要数据库的操作, 所有的数据都是保存在内存中, 如果服务器一旦重启,数据就没有了;
登录界面:

聊天界面:

左侧是在线的用户列表, 右侧是聊天的内容, 内容的格式为 “作者 : 内容”;
点击button可以发布聊天信息;
使用的是spring搭建的框架,基于tomcat的服务器;
web.xml的配置如下:
<?xml version="1.0" encoding="UTF-8"?> <web-app version="3.0" xmlns="http://java.sun.com/xml/ns/javaee" xmlns:xsi="http://www.w3.org/2001/XMLSchema-instance" xsi:schemaLocation="http://java.sun.com/xml/ns/javaee http://java.sun.com/xml/ns/javaee/web-app_3_0.xsd"> <display-name></display-name> <welcome-file-list> <welcome-file>index.htm</welcome-file> </welcome-file-list> <servlet> <servlet-name>test</servlet-name> <servlet-class>org.springframework.web.servlet.DispatcherServlet</servlet-class> <load-on-startup>1</load-on-startup> </servlet> <servlet-mapping> <servlet-name>test</servlet-name> <url-pattern>*.htm</url-pattern> </servlet-mapping> <listener> <listener-class>org.springframework.web.context.ContextLoaderListener</listener-class> </listener> <filter> <filter-name>CharacterEncodingFilter</filter-name> <filter-class>com.nono.Filter.CharacterEncodingFilter</filter-class> <init-param> <param-name>encoding</param-name> <param-value>UTF-8</param-value> </init-param> </filter> <filter> <filter-name>SecurityServlet</filter-name> <filter-class>com.nono.SecurityServlet</filter-class> </filter> <filter-mapping> <filter-name>SecurityServlet</filter-name> <url-pattern>*.htm</url-pattern> </filter-mapping> <!-- 使用Spring中的过滤器解决在请求和应答中的中文乱码问题 <filter> <filter-name>characterEncodingFilter</filter-name> <filter-class>org.springframework.web.filter.CharacterEncodingFilter</filter-class> <init-param> <param-name>encoding</param-name> <param-value>utf-8</param-value> </init-param> <init-param> 强制转换编码(request和response均适用) <param-name>ForceEncoding</param-name> <param-value>true</param-value> </init-param> </filter> --> <context-param> <param-name> contextConfigLocation </param-name> <param-value> /WEB-INF/test-servlet.xml </param-value> </context-param> </web-app>
conteConfigLocation的配置为:
<?xml version="1.0" encoding="UTF-8" ?> <beans xmlns="http://www.springframework.org/schema/beans" xmlns:xsi="http://www.w3.org/2001/XMLSchema-instance" xmlns:p="http://www.springframework.org/schema/p" xmlns:context="http://www.springframework.org/schema/context" xmlns:aop="http://www.springframework.org/schema/aop" xmlns:tx="http://www.springframework.org/schema/tx" xmlns:mvc="http://www.springframework.org/schema/mvc" xmlns:task="http://www.springframework.org/schema/task" xsi:schemaLocation="http://www.springframework.org/schema/beans http://www.springframework.org/schema/beans/spring-beans-3.0.xsd http://www.springframework.org/schema/context http://www.springframework.org/schema/context/spring-context-3.0.xsd http://www.springframework.org/schema/tx http://www.springframework.org/schema/tx/spring-tx-3.0.xsd http://www.springframework.org/schema/aop http://www.springframework.org/schema/aop/spring-aop-3.0.xsd http://www.springframework.org/schema/mvc http://www.springframework.org/schema/mvc/spring-mvc-3.0.xsd http://www.springframework.org/schema/task http://www.springframework.org/schema/task/spring-task-3.0.xsd"> <context:annotation-config> </context:annotation-config> <context:component-scan base-package="com.nono" > </context:component-scan> <bean id="viewResolver" class="org.springframework.web.servlet.view.InternalResourceViewResolver"> <property name="suffix"> <value>.jsp</value> </property> </bean> </beans>
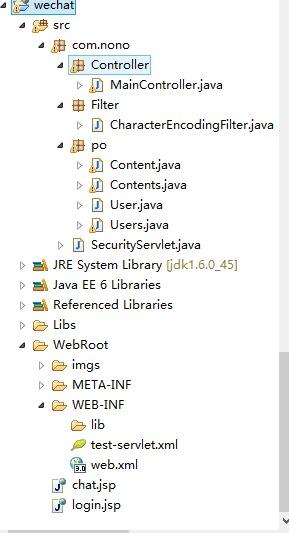
整个项目的结构为一个主路由, 四个po层, 两个过滤器:

界面的用户列表和用户内容列表用了ajax刷新, 感觉不错的说:
<!-- 修改pageEncoding为 utf-8 --> <%@ page language="java" import="java.util.*" pageEncoding="utf-8"%> <% String path = request.getContextPath(); String basePath = request.getScheme()+"://"+request.getServerName()+":"+request.getServerPort()+path+"/"; %> <!DOCTYPE HTML PUBLIC "-//W3C//DTD HTML 4.01 Transitional//EN"> <html> <head> <base href="<%=basePath%>"> <title>login</title> <meta charset="utf-8"> <link href="http://cdn.bootcss.com/bootstrap/3.3.5/css/bootstrap.min.css" rel="stylesheet"> <script src="http://cdn.bootcss.com/jquery/1.9.0/jquery.js"></script> </head> <style> html,body,.bg{ height:100%; } .bg{ background:url(imgs/bg.jpeg); } </style> <body> <div class="container-fuild bg"> <div class="row"> <div class="col-sm-4"> <div class="page-header"> <h3> list </h3> <ol id="list"> <li>name—</li> <li>name—</li> <li>name—</li> <li>name—</li> </ol> </div> </div> <div class="col-sm-8"> <h3> content </h3> <div id="con" class="page-header"> <p> <b>haha:</b> <big> say someting </big> </p> <p> <b>haha:</b> <big> say someting </big> </p> </div> <form> <div class="form-group"> <label for="text">enter text</label> <input type="text" id="answer" class="form-control" id="text" placeholder="text"> </div> <button type="button" id="sb" class="btn btn-default">Submit</button> </form> </div> </div> </div> <script> $("#sb").click(function() { $.post("chat.htm", "content="+ $("#answer").val(), function(data) { console.log(data); }); }); function Get(url , el, fn) { this.post = function() { $.post(url, function(data) { data = JSON.parse(data); var html = ""; $.each(data,function(i, e) { html += fn(i,e); }); $(el).html( html ); }); }; }; (function() { var list = new Get("getList.htm", "#list", function(i, e) { return "<li>" + e.name + "</li>"; }); var content = new Get("getContent.htm", "#con", function(i, e) { return "<p><b>"+ e.name +" : </b><big>"+ e.content +"</big></p>"; }); setInterval(function() { list.post(); content.post(); },1000); })(); </script> </body> </html>
权限控制的话我们可以用到fileter:
package com.nono; import java.io.IOException; import javax.servlet.Filter; import javax.servlet.FilterChain; import javax.servlet.FilterConfig; import javax.servlet.ServletException; import javax.servlet.ServletRequest; import javax.servlet.ServletResponse; import javax.servlet.http.HttpServlet; import javax.servlet.http.HttpServletRequest; import javax.servlet.http.HttpServletResponse; import javax.servlet.http.HttpSession; import com.nono.po.User; public class SecurityServlet extends HttpServlet implements Filter { private static final long serialVersionUID = 1L; public void doFilter(ServletRequest arg0, ServletResponse arg1, FilterChain arg2) throws IOException, ServletException { HttpServletRequest request=(HttpServletRequest)arg0; HttpServletResponse response =(HttpServletResponse) arg1; HttpSession session = request.getSession(); User user = (User) session.getAttribute("user"); String url=request.getRequestURI(); //如果用户信息不是空的, 或者要访问的是登陆的界面(get,post的方式包含了login字符串); if( user!=null || url.indexOf("login")>-1 ) { arg2.doFilter(arg0, arg1); return; }else{ //余下的全跳到登陆界面 response.sendRedirect(request.getContextPath() + "/login.htm"); return; } } public void init(FilterConfig arg0) throws ServletException { } }路由控制和服务放到了一起, 因为权限控制使用过滤器处理, 所以在路由里面我们就不用关心用户的消息, 只要处理业务逻辑就好了:
package com.nono.Controller; import java.util.ArrayList; import java.util.HashMap; import java.util.Vector; import javax.jms.Session; import javax.print.DocFlavor.STRING; import javax.print.attribute.HashAttributeSet; import javax.servlet.http.HttpServletRequest; import javax.servlet.http.HttpServletResponse; import javax.servlet.http.HttpSession; import net.sf.json.JSONArray; import org.omg.CORBA.PUBLIC_MEMBER; import org.springframework.beans.factory.annotation.Autowired; import org.springframework.stereotype.Controller; import org.springframework.web.bind.annotation.RequestMapping; import org.springframework.web.bind.annotation.RequestMethod; import org.springframework.web.bind.annotation.ResponseBody; import com.nono.po.Content; import com.nono.po.Contents; import com.nono.po.User; import com.nono.po.Users; @Controller public class MainController { //用户和用户组; @Autowired Users users; @Autowired Contents contents; @RequestMapping(value="login", method=RequestMethod.GET) public String login (HttpServletRequest request) { return "login"; } @RequestMapping(value="login", method=RequestMethod.POST) public String loginPOST ( HttpServletRequest request, HttpServletResponse response ) { String string = "login"; String name = (String) request.getParameter("name"); Boolean flag = true; //如果名字不是空的话; if( !name.equals("") ) { Vector vector = users.getList(); for(int i=0; i< vector.size(); i++) { User user = (User) vector.elementAt(i); if( user.getName().equals( name ) ) { flag = false; }; }; }; //用户名不存在 if( flag ) { User user = new User(); user.setName( name ); HttpSession session = request.getSession(true); //设置Session的过期时间为10分钟 session.setMaxInactiveInterval(600); //设置seesion中的用户信息; session.setAttribute("user", user); //添加用户; users.addUser( user ); //加入的提示; Content content = new Content(); content.setName( name ); content.setContent( "enter the chat room!" ); contents.addContent( content ); string = "chat"; return string; }else{ //用户名已经存在 request.setAttribute("info", "用户名已经存在1"); string = "login"; return string; } } @RequestMapping(value="chat", method=RequestMethod.GET) public String main (HttpServletRequest request) { String string = "chat"; return string; } @RequestMapping(value="chat", method=RequestMethod.POST) @ResponseBody public String chat(HttpServletRequest request) { String string = (String) request.getParameter("content"); HttpSession session = request.getSession(); //设置seesion中的用户信息; User user = (User) session.getAttribute("user"); String name = user.getName(); Content content = new Content(); content.setName( name ); content.setContent( string ); contents.addContent( content ); return "true"; } @RequestMapping(value="getList", method=RequestMethod.POST, produces = "text/html;charset=UTF-8") @ResponseBody public String getList( HttpServletRequest request) { return JSONArray.fromObject( users.getList() ).toString(); } @RequestMapping(value="getContent", method=RequestMethod.POST, produces = "text/html;charset=UTF-8") @ResponseBody public String getArrayList() { ArrayList list = (ArrayList) contents.getContents(); ArrayList result = new ArrayList(); for( int i= 0; i< list.size(); i++ ) { HashMap<String,String> hashMap = new HashMap(); hashMap.put("name", ((Content)list.get(i)).getName()); hashMap.put("content", ((Content)list.get(i)).getContent()); result.add( hashMap ); }; return JSONArray.fromObject( result ).toString(); } }到此,相信大家对“怎么用javaweb实现在线聊天工具”有了更深的了解,不妨来实际操作一番吧!这里是亿速云网站,更多相关内容可以进入相关频道进行查询,关注我们,继续学习!
免责声明:本站发布的内容(图片、视频和文字)以原创、转载和分享为主,文章观点不代表本网站立场,如果涉及侵权请联系站长邮箱:is@yisu.com进行举报,并提供相关证据,一经查实,将立刻删除涉嫌侵权内容。