жӮЁеҘҪпјҢзҷ»еҪ•еҗҺжүҚиғҪдёӢи®ўеҚ•е“ҰпјҒ
еҜҶз Ғзҷ»еҪ•
зҷ»еҪ•жіЁеҶҢ
зӮ№еҮ» зҷ»еҪ•жіЁеҶҢ еҚіиЎЁзӨәеҗҢж„ҸгҖҠдәҝйҖҹдә‘з”ЁжҲ·жңҚеҠЎжқЎж¬ҫгҖӢ
иҝҷзҜҮж–Үз« дё»иҰҒдёәеӨ§е®¶еұ•зӨәдәҶвҖңеҰӮдҪ•еңЁPodmanе®№еҷЁдёӯеҲӣе»әдёҖдёӘе®№еҷЁеҢ–зҡ„жңәеҷЁеӯҰд№ жЁЎеһӢвҖқпјҢеҶ…е®№з®ҖиҖҢжҳ“жҮӮпјҢжқЎзҗҶжё…жҷ°пјҢеёҢжңӣиғҪеӨҹеё®еҠ©еӨ§е®¶и§ЈеҶіз–‘жғ‘пјҢдёӢйқўи®©е°Ҹзј–еёҰйўҶеӨ§е®¶дёҖиө·з ”究并еӯҰд№ дёҖдёӢвҖңеҰӮдҪ•еңЁPodmanе®№еҷЁдёӯеҲӣе»әдёҖдёӘе®№еҷЁеҢ–зҡ„жңәеҷЁеӯҰд№ жЁЎеһӢвҖқиҝҷзҜҮж–Үз« еҗ§гҖӮ
йҰ–е…ҲпјҢдҪҝз”Ёд»ҘдёӢе‘Ҫд»Өе®үиЈ… Podmanпјҡ
sudo dnf -y install podman
жҺҘдёӢжқҘпјҢдёәе®№еҷЁеҲӣе»әдёҖдёӘж–°ж–Ү件еӨ№е№¶еҲҮжҚўеҲ°иҜҘзӣ®еҪ•гҖӮ
mkdir deployment_container && cd deployment_container
дёӢдёҖжӯҘжҳҜдёәжңәеҷЁеӯҰд№ жЁЎеһӢеҲӣе»ә REST APIгҖӮиҝҷдёӘ github д»“еә“еҢ…еҗ«дёҖдёӘйў„и®ӯз»ғжЁЎеһӢпјҢд»ҘеҸҠиғҪи®© REST API е·ҘдҪңзҡ„и®ҫзҪ®гҖӮ
дҪҝз”Ёд»ҘдёӢе‘Ҫд»ӨеңЁ deployment_container зӣ®еҪ•дёӯе…ӢйҡҶе®ғпјҡ
git clone https://github.com/svenboesiger/titanic_tf_ml_model.git
prediction.py иғҪиҝӣиЎҢ Tensorflow йў„жөӢпјҢиҖҢ 20x20x20 зҘһз»ҸзҪ‘з»ңзҡ„жқғйҮҚдҪҚдәҺж–Ү件еӨ№ ml_model/ дёӯгҖӮ
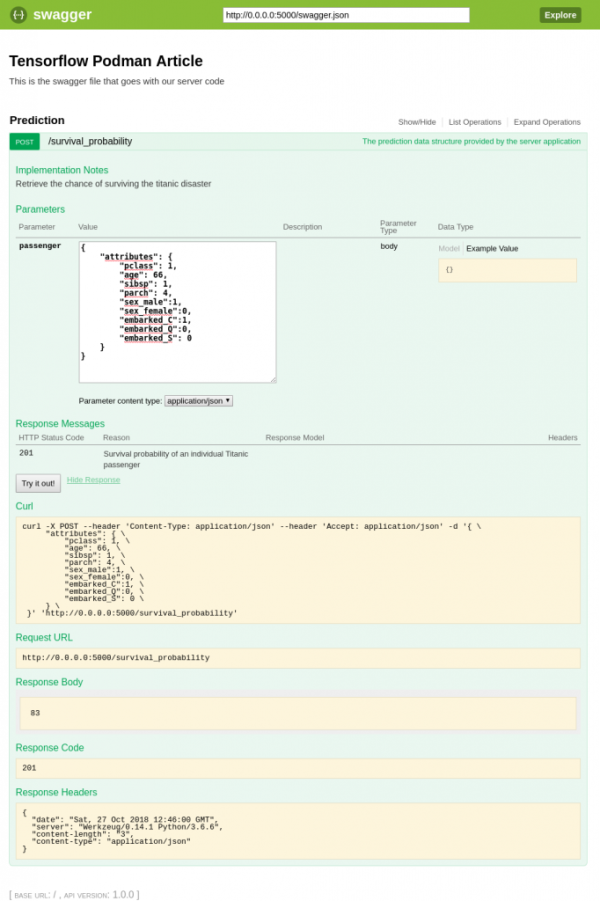
swagger.yaml дҪҝз”Ё Swagger规иҢғ е®ҡд№ү Connexion еә“зҡ„ APIгҖӮжӯӨж–Ү件еҢ…еҗ«и®©дҪ зҡ„жңҚеҠЎеҷЁжҸҗдҫӣиҫ“е…ҘеҸӮж•°йӘҢиҜҒгҖҒиҫ“еҮәе“Қеә”ж•°жҚ®йӘҢиҜҒгҖҒURL з«ҜзӮ№е®ҡд№үжүҖйңҖзҡ„жүҖжңүдҝЎжҒҜгҖӮ
йўқеӨ–ең°пјҢConnexion иҝҳе°Ҷз»ҷдҪ жҸҗдҫӣдёҖдёӘз®ҖеҚ•дҪҶжңүз”Ёзҡ„еҚ•йЎө Web еә”з”ЁпјҢе®ғжј”зӨәдәҶеҰӮдҪ•дҪҝз”Ё Javascript и°ғз”Ё API е’Ңжӣҙж–° DOMгҖӮ
swagger: "2.0"info: description: This is the swagger file that goes with our server code version: "1.0.0" title: Tensorflow Podman Articleconsumes: - "application/json"produces: - "application/json" basePath: "/" paths: /survival_probability: post: operationId: "prediction.post" tags: - "Prediction" summary: "The prediction data structure provided by the server application" description: "Retrieve the chance of surviving the titanic disaster" parameters: - in: body name: passenger required: true schema: $ref: '#/definitions/PredictionPost' responses: '201': description: 'Survival probability of an individual Titanic passenger' definitions: PredictionPost: type: object
server.py е®ҡд№үдәҶеҗҜеҠЁ Connexion жңҚеҠЎеҷЁзҡ„е…ҘеҸЈзӮ№гҖӮ
import connexion app = connexion.App(__name__, specification_dir='./') app.add_api('swagger.yaml') if __name__ == '__main__': app.run(debug=True)requirements.txt е®ҡд№үдәҶиҝҗиЎҢзЁӢеәҸжүҖйңҖзҡ„ python еҢ…гҖӮ
connexiontensorflowpandas
дёәдәҶи®© Podman жһ„е»әжҳ еғҸпјҢиҜ·еңЁдёҠйқўзҡ„еҮҶеӨҮжӯҘйӘӨдёӯеҲӣе»әзҡ„ deployment_container зӣ®еҪ•дёӯеҲӣе»әдёҖдёӘеҗҚдёә Dockerfile зҡ„ж–°ж–Ү件пјҡ
FROM fedora:28 # File Author / MaintainerMAINTAINER Sven Boesiger <donotspam@ujelang.com> # Update the sourcesRUN dnf -y update --refresh # Install additional dependenciesRUN dnf -y install libstdc++ RUN dnf -y autoremove # Copy the application folder inside the containerADD /titanic_tf_ml_model /titanic_tf_ml_model # Get pip to download and install requirements:RUN pip3 install -r /titanic_tf_ml_model/requirements.txt # Expose portsEXPOSE 5000 # Set the default directory where CMD will executeWORKDIR /titanic_tf_ml_model # Set the default command to execute# when creating a new containerCMD python3 server.py
жҺҘдёӢжқҘпјҢдҪҝз”Ёд»ҘдёӢе‘Ҫд»Өжһ„е»әе®№еҷЁй•ңеғҸпјҡ
podman build -t ml_deployment .
йҡҸзқҖе®№еҷЁй•ңеғҸзҡ„жһ„е»әе’ҢеҮҶеӨҮе°ұз»ӘпјҢдҪ еҸҜд»ҘдҪҝз”Ёд»ҘдёӢе‘Ҫд»ӨеңЁжң¬ең°иҝҗиЎҢе®ғпјҡ
podman run -p 5000:5000 ml_deployment
еңЁ Web жөҸи§ҲеҷЁдёӯиҫ“е…Ҙ http://0.0.0.0:5000/ui и®ҝй—® Swagger/Connexion UI 并жөӢиҜ•жЁЎеһӢпјҡ
еҪ“然пјҢдҪ зҺ°еңЁд№ҹеҸҜд»ҘеңЁеә”з”ЁдёӯйҖҡиҝҮ REST API и®ҝй—®жЁЎеһӢгҖӮ
д»ҘдёҠжҳҜвҖңеҰӮдҪ•еңЁPodmanе®№еҷЁдёӯеҲӣе»әдёҖдёӘе®№еҷЁеҢ–зҡ„жңәеҷЁеӯҰд№ жЁЎеһӢвҖқиҝҷзҜҮж–Үз« зҡ„жүҖжңүеҶ…е®№пјҢж„ҹи°ўеҗ„дҪҚзҡ„йҳ…иҜ»пјҒзӣёдҝЎеӨ§е®¶йғҪжңүдәҶдёҖе®ҡзҡ„дәҶи§ЈпјҢеёҢжңӣеҲҶдә«зҡ„еҶ…е®№еҜ№еӨ§е®¶жңүжүҖеё®еҠ©пјҢеҰӮжһңиҝҳжғіеӯҰд№ жӣҙеӨҡзҹҘиҜҶпјҢж¬ўиҝҺе…іжіЁдәҝйҖҹдә‘иЎҢдёҡиө„и®Ҝйў‘йҒ“пјҒ
е…ҚиҙЈеЈ°жҳҺпјҡжң¬з«ҷеҸ‘еёғзҡ„еҶ…е®№пјҲеӣҫзүҮгҖҒи§Ҷйў‘е’Ңж–Үеӯ—пјүд»ҘеҺҹеҲӣгҖҒиҪ¬иҪҪе’ҢеҲҶдә«дёәдё»пјҢж–Үз« и§ӮзӮ№дёҚд»ЈиЎЁжң¬зҪ‘з«ҷз«ӢеңәпјҢеҰӮжһңж¶үеҸҠдҫөжқғиҜ·иҒ”зі»з«ҷй•ҝйӮ®з®ұпјҡis@yisu.comиҝӣиЎҢдёҫжҠҘпјҢ并жҸҗдҫӣзӣёе…іиҜҒжҚ®пјҢдёҖз»ҸжҹҘе®һпјҢе°Ҷз«ӢеҲ»еҲ йҷӨж¶үе«ҢдҫөжқғеҶ…е®№гҖӮ
жӮЁеҘҪпјҢзҷ»еҪ•еҗҺжүҚиғҪдёӢи®ўеҚ•е“ҰпјҒ