您好,登录后才能下订单哦!
这篇文章主要讲解了“maven的exec-maven-plugin插件怎么使用”,文中的讲解内容简单清晰,易于学习与理解,下面请大家跟着小编的思路慢慢深入,一起来研究和学习“maven的exec-maven-plugin插件怎么使用”吧!
maven的exec-maven-plugin插件主要是用来执行可执行jar包命令的插件,很多工具提供命令行式的交互,例如mybatis-generator,每一次运行都会敲很长的命令,很麻烦。
还有的时候,你希望提供一个3方包给比人使用,为了让别人能够通过非常简单的命令就可以运行程序,就可以使用exec-maven-plugin插件。
当然也可以是脚本的方式来实现,但是脚本的通用性不是很好,你要提供run.bat,run.sh等脚本。通过exec-maven-plugin就可以避免这样的问题。
exec-maven-plugin插件有2个目录(goal),一个是java一个是exec。这里简单解释一下maven的goal,可以把maven的goal看做是一个特定的功能,一个maven插件可能有很多功能,一个功能就是一个goal,maven还有生命周期的概念,maven有3套生命周期,分别是clean,default,site。每一个生命周期有包含一下阶段(phase),可以把每一个阶段看做一个流程。参加后面的maven生命周期。例如执行下面的2个命令:
mvn clean package
mvn clean test
上面的2个命令都包含了2个生命周期,clean和default生命周期。clean会执行clean生命周期的pre-clean和clean阶段,mvn clean package命令会从default生命周期会从validate执行到package阶段,mvn clean test命令会从default生命周期的validate阶段执行到package阶段。
插件就是把goal绑定到生命指定阶段的上执行的。就是maven在执行相应阶段的时候会检查有那些插件的goal绑定到这个阶段上的,然后执行这些goal。
如果对这些知识有疑惑,强烈建议阅读《maven实战》。
public class App
{
    public static void main( String[] args )
    {
        for(String arg : args){
            System.out.println(arg);
        }
    }
}
上面的代码非常简单,打印main方法参数。
<project xmlns="http://maven.apache.org/POM/4.0.0" xmlns:xsi="http://www.w3.org/2001/XMLSchema-instance"
    xsi:schemaLocation="http://maven.apache.org/POM/4.0.0 http://maven.apache.org/xsd/maven-4.0.0.xsd">
    <modelVersion>4.0.0</modelVersion>

    <groupId>cn.freemethod</groupId>
    <artifactId>plugin</artifactId>
    <version>0.0.1-SNAPSHOT</version>
    <packaging>jar</packaging>

    <name>plugin</name>
    <url>http://maven.apache.org</url>

    <properties>
        <project.build.sourceEncoding>UTF-8</project.build.sourceEncoding>
        <exec_maven_plugin_version>1.2.1</exec_maven_plugin_version>
    </properties>

    <dependencies>
        <dependency>
            <groupId>junit</groupId>
            <artifactId>junit</artifactId>
            <version>4.9</version>
            <scope>test</scope>
        </dependency>
    </dependencies>

    <build>
        <plugins>
        <!-- http://www.mojohaus.org/exec-maven-plugin/ -->
            <plugin>
                <groupId>org.codehaus.mojo</groupId>
                <artifactId>exec-maven-plugin</artifactId>
                <version>${exec_maven_plugin_version}</version>
                <executions>
                    <execution>
                        <phase>test</phase>
                        <goals>
                            <goal>java</goal>
                        </goals>
                        <configuration>
                            <mainClass>cn.freemethod.plugin.App</mainClass>
                            <arguments>
                                <argument>arg0</argument>
                                <argument>arg1</argument>
                            </arguments>
                        </configuration>
                    </execution>
                </executions>
            </plugin>
        </plugins>
    </build>
</project>
看上面的配置,我们把exec-maven-plugin 插件的java模板(goal)绑定到了default生命周期的test阶段上。所以我们只需要执行下面的命令就可以了:
mvn test
import java.util.ArrayList;
import java.util.List;

public class Exec {

    public static void main(String[] args) {
        System.out.println(System.getProperty("systemProperty1"));
        System.out.println(System.getProperty("systemProperty2"));
        for(String arg:args){
            System.out.println(arg);
        }
        testGcTypeLog();
    }

    public static void testGcTypeLog(){
        List<Object> list = new ArrayList<Object>();
        while (true) {
            byte[] m = costMemory(1024*1024*10);
            list.add(m);
            if(list.size()==90){
                list.clear();
            }
        }
    }

    public static byte[] costMemory(int i) {
        byte[] m = new byte[i];
        return m;
    }

}
上面的例子就是打印指定的系统参数和不断申请内存然后释放内存,最要是为了观察打印日志。
<project xmlns="http://maven.apache.org/POM/4.0.0" xmlns:xsi="http://www.w3.org/2001/XMLSchema-instance"
    xsi:schemaLocation="http://maven.apache.org/POM/4.0.0 http://maven.apache.org/xsd/maven-4.0.0.xsd">
    <modelVersion>4.0.0</modelVersion>

    <groupId>cn.freemethod</groupId>
    <artifactId>plugin</artifactId>
    <version>0.0.1-SNAPSHOT</version>
    <packaging>jar</packaging>

    <name>plugin</name>
    <url>http://maven.apache.org</url>

    <properties>
        <project.build.sourceEncoding>UTF-8</project.build.sourceEncoding>
        <exec_maven_plugin_version>1.2.1</exec_maven_plugin_version>
    </properties>

    <dependencies>
        <dependency>
            <groupId>junit</groupId>
            <artifactId>junit</artifactId>
            <version>4.9</version>
            <scope>test</scope>
        </dependency>
    </dependencies>

    <build>
        <plugins>
        <!-- http://www.mojohaus.org/exec-maven-plugin/ -->
            <plugin>
                <groupId>org.codehaus.mojo</groupId>
                <artifactId>exec-maven-plugin</artifactId>
                <version>${exec_maven_plugin_version}</version>
                <executions>
                    <execution>
                        <phase>test</phase>
                        <goals>
                            <goal>exec</goal>
                        </goals>
                <configuration>
                    <executable>java</executable>
                    <arguments>
                        <argument>-DsystemProperty1=value1</argument>
                        <argument>-DsystemProperty2=value2</argument>
                        <argument>-XX:+PrintGCDetails</argument>
                        <argument>-classpath</argument>
                        <classpath />
                        <argument>cn.freemethod.plugin.Exec</argument>
                        <argument>arg1</argument>
                        <argument>arg2</argument>
                    </arguments>
                </configuration>
                </execution>
                </executions>
            </plugin>
        </plugins>
    </build>
</project>
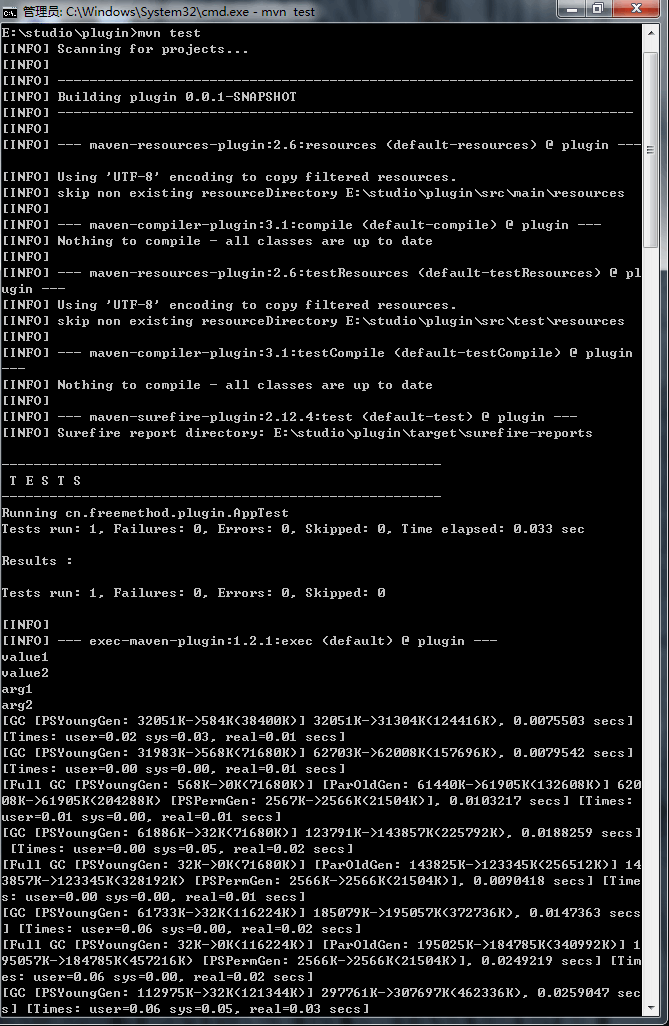
上面的配置我们也是把exec-maven-plugin插件的exec目标(goal)绑定到了default生命周期的test阶段上,我们配置了-DsystemProperty1=value1设置系统参数,配置-XX:+PrintGCDetails设置jvm参数。
还是可以通过下面的命令来执行:
mvn test

从上图可以看到打印了我们设置的系统参数,命令参数和gc日志。
当然也可以不绑定生命周期,可以像下面这样配置:
<plugin>
    <groupId>org.codehaus.mojo</groupId>
    <artifactId>exec-maven-plugin</artifactId>
    <version>${exec_maven_plugin_version}</version>
    <configuration>
        <executable>java</executable>
        <arguments>
            <argument>-DsystemProperty1=value1</argument>
            <argument>-DsystemProperty2=value2</argument>
            <argument>-XX:+PrintGCDetails</argument>
            <argument>-classpath</argument>
            <classpath />
            <argument>cn.freemethod.plugin.Exec</argument>
            <argument>arg1</argument>
            <argument>arg2</argument>
        </arguments>
    </configuration>
</plugin>
如果像上面这样配置就需要先打包,然后执行exec:
mvn clean package
mvn exec:exec
clean声明周期:(3 phase(阶段))
pre-clean
clean:清理上一次构建生成的文件
post-clean
default声明周期:(23 phase)
validate
initialize
generate-sources
process-sources:处理项目主资源文件,拷贝src/main/resources 到classpath
generate-resources
process-resources
compile:编译src/main/java代码输出到classpath
process-classes
generate-test-sources
process-test-sources:对src/test/resource目录进行变量替换,拷贝到test的classpath
generate-test-resources
process-test-resources
test-compile
process-test-classes
test
prepare-package
package
pre-integration-test
integeration-test
post-integration-test
verify
install:安装到本地仓库
deploy
site生命周期:(4 phase)
pre-site
site
post-site
site-deploy
感谢各位的阅读,以上就是“maven的exec-maven-plugin插件怎么使用”的内容了,经过本文的学习后,相信大家对maven的exec-maven-plugin插件怎么使用这一问题有了更深刻的体会,具体使用情况还需要大家实践验证。这里是亿速云,小编将为大家推送更多相关知识点的文章,欢迎关注!
免责声明:本站发布的内容(图片、视频和文字)以原创、转载和分享为主,文章观点不代表本网站立场,如果涉及侵权请联系站长邮箱:is@yisu.com进行举报,并提供相关证据,一经查实,将立刻删除涉嫌侵权内容。