您好,登录后才能下订单哦!
测试系统版本:CentOS 6.4
作用:跳板机远程被管理服务器,通常使用秘钥登录,实现此操作时,拷贝秘钥仍然需要输入一次登录密码,此脚本实现自动生成密钥对并全程无交互批量拷贝公钥到被管理服务器,并自动禁用被管理端的ssh密码登录,使其只允许秘钥登录(免密码秘钥登录实现,参考:http://lingyi.blog.51cto.com/2837715/1763747)。
实现:借助 ssh-copy-id 脚本的拷贝公钥功能和expect自动应答工具,实现无交互批量拷贝公钥的功能。(附件带ssh-copy-id脚本,expect工具需提前自行安装)
使用:两个脚本,一个是系统自带的ssh-copy-id脚本,一个是用来实现自动应答和禁用ssh密码登录的脚本。 使用时需要提供一配置文件,文件包含远程主机的 ip、用户名和密码信息。详情见演示和代码注释。
演示:

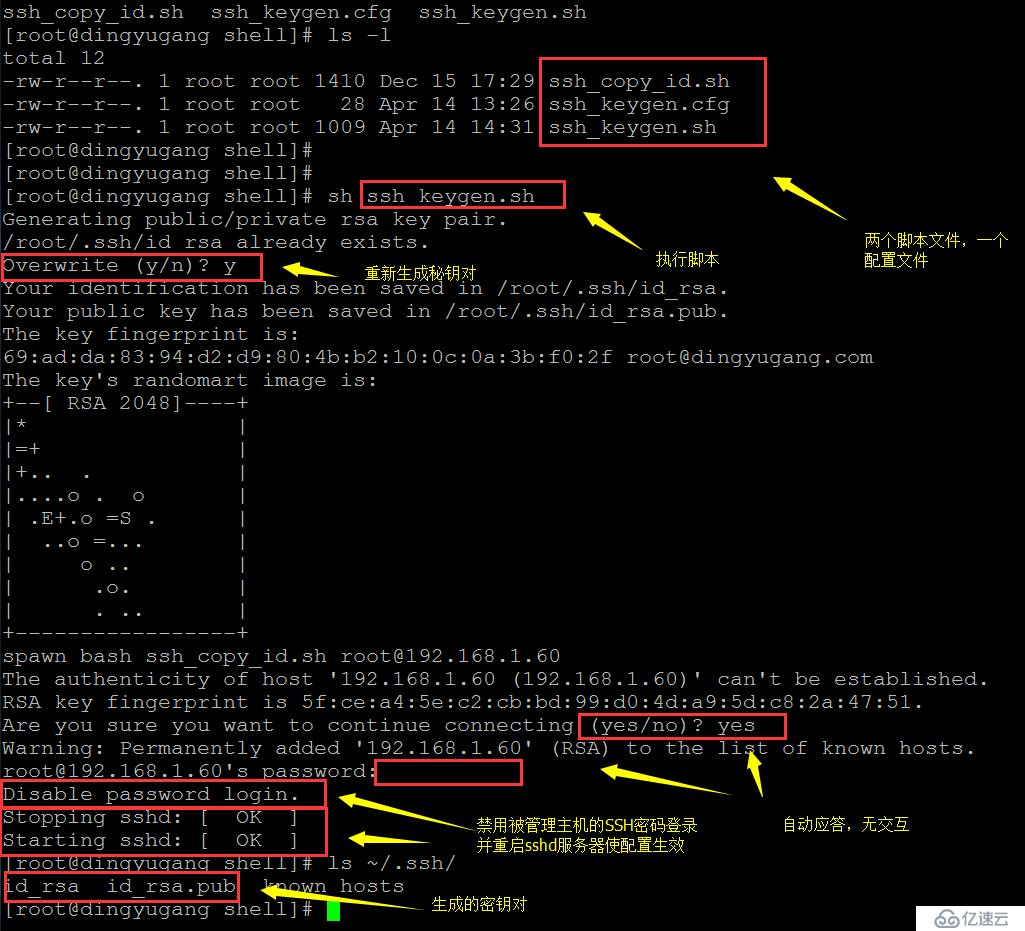
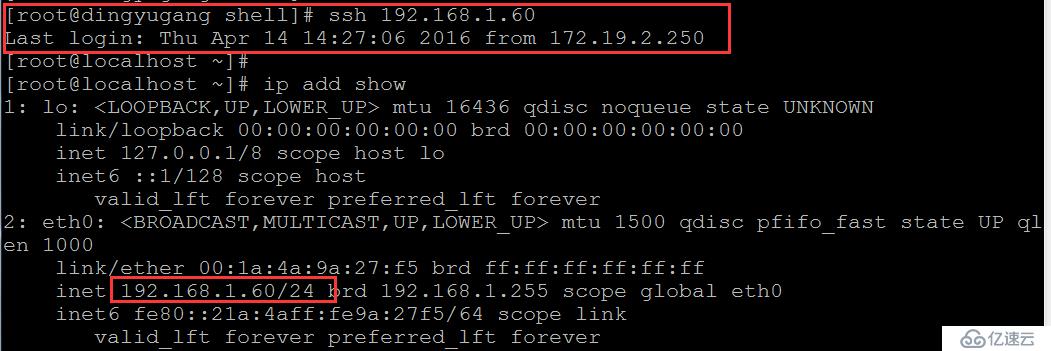
配置文件为ssh_keygen.cfg(默认, 可修改脚本),提供ip 用户名和密码信息,使用完后脚本会自动删除此文件。从上图可见,1.60主机可SSH等录但需要密码。
 由于之前已经存在一密钥对,所以会提示是否重新生成,其他操作全程无需应答。

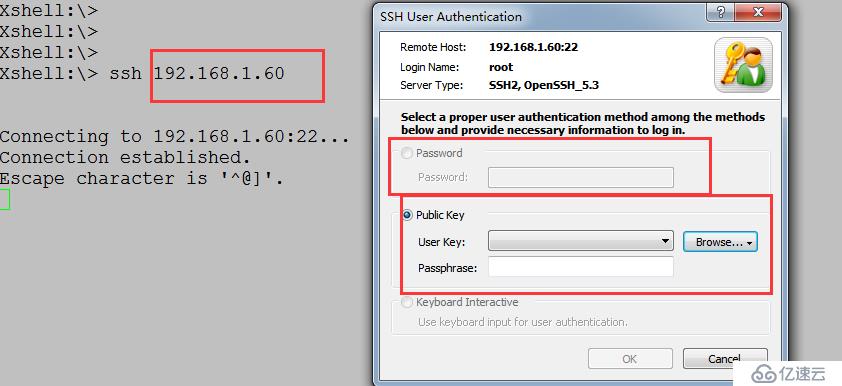
再次连接1.60主机便不再需要密码,并且已经禁用了被管理主机的SSH密码登录功能,见下图。


代码专区:
#系统自带脚本,仅仅注释了部分显示信息功能
#!/bin/sh

# Shell script to install your public key on a remote machine
# Takes the remote machine name as an argument.
# Obviously, the remote machine must accept password authentication,
# or one of the other keys in your ssh-agent, for this to work.

ID_FILE="${HOME}/.ssh/id_rsa.pub"

if [ "-i" = "$1" ]; then
  shift
  # check if we have 2 parameters left, if so the first is the new ID file
  if [ -n "$2" ]; then
    if expr "$1" : ".*\.pub" > /dev/null ; then
      ID_FILE="$1"
    else
      ID_FILE="$1.pub"
    fi
    shift         # and this should leave $1 as the target name
  fi
else
  if [ x$SSH_AUTH_SOCK != x ] ; then
    GET_ID="$GET_ID ssh-add -L"
  fi
fi

if [ -z "`eval $GET_ID`" ] && [ -r "${ID_FILE}" ] ; then
  GET_ID="cat ${ID_FILE}"
fi

if [ -z "`eval $GET_ID`" ]; then
  echo "$0: ERROR: No identities found" >&2
  exit 1
fi

if [ "$#" -lt 1 ] || [ "$1" = "-h" ] || [ "$1" = "--help" ]; then
  echo "Usage: $0 [-i [identity_file]] [user@]machine" >&2
  exit 1
fi

{ eval "$GET_ID" ; } | ssh $1 "exec sh -c 'umask 077; test -d ~/.ssh || mkdir ~/.ssh ; cat >> ~/.ssh/authorized_keys && (test -x /sbin/restorecon && /sbin/restorecon ~/.ssh ~/.ssh/authorized_keys >/dev/null 2>&1 || true)'" || exit 1

#cat <<EOF
#Now try logging into the machine, with "ssh '$1'", and check in:
#
#  .ssh/authorized_keys
#
#to make sure we haven't added extra keys that you weren't expecting.
#
#EOF
#======================
#  LY
#  ------------------
#  Copyright 2016.4.14, LingYi (lydygly@163.com) QQ:1519952564
#  "Free password login, batch copy keys"

#创建密钥对,若有其他特殊需要,请自行生成,并跳过覆盖操作或注释掉此部分代码
#create the secret key.
ssh-keygen -t rsa -f /root/.ssh/id_rsa  -N ""

#定义配置文件,没有对文件做存在检查,请自行创建并按格式输入相关信息
ssh_keygen_conf=ssh_keygen.cfg
ssh_keygen_conf_infor=$( grep -E -v '(^ *#|^$)' $ssh_keygen_conf )

#cofigure file should be like this:
# IP  USER  PWD

#拷贝秘钥的函数,其调用ssh_copy_id.sh脚本,若此脚本已经改名或改变了路径,请相应的修改此函数
function copy_secret_key()
{
        #请自行安装expect工具
	/usr/bin/expect -c "
	    #调用ssh_copy_id.sh脚本
		spawn bash ssh_copy_id.sh ${2}@$1
		expect {
			\"(yes/no)?\"
					{
						send \"yes\r\"
						exp_continue
					}
			\"password:\"
					{
						send \"${3}\r\"
						exp_continue
					}
			\"password:\"
					{
						send \"${3}\r\"
						exp_continue
					}
			\"password:\"
					{
						send \"${3}\r\"
						interact
					}
		}
	"

}

for(( i=1; i<=$( echo "$ssh_keygen_conf_infor" | wc -l ); i++ ))
do
	copy_secret_key $( echo "$ssh_keygen_conf_infor"|sed -n "${i}p" )
	[[ $? -ne 0 ]]  && continue
	#禁用被管理服务器的SSH密码登录
	ssh $(echo "$ssh_keygen_conf_infor"|sed -n "${i}p"|awk '{print $1}' ) \
	"sed -i 's/PasswordAuthentication yes/PasswordAuthentication no/' /etc/ssh/sshd_config && \
	echo Disable password login. && service sshd restart"
done
#删除配置文件
rm -f $ssh_keygen_conf
代码下载链接
免责声明:本站发布的内容(图片、视频和文字)以原创、转载和分享为主,文章观点不代表本网站立场,如果涉及侵权请联系站长邮箱:is@yisu.com进行举报,并提供相关证据,一经查实,将立刻删除涉嫌侵权内容。