您好,登录后才能下订单哦!
1.舵机原理简介
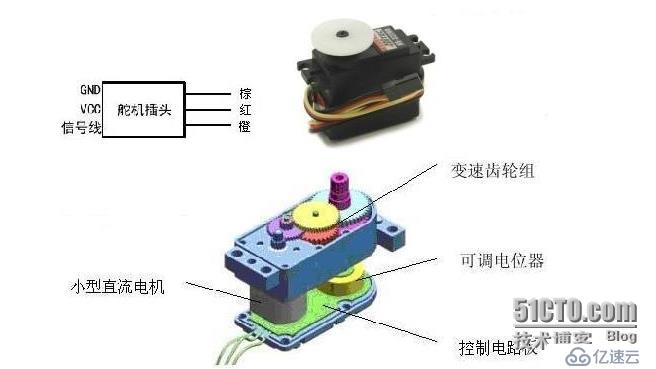
控制信号由接收机的通道进入信号调制芯片,获得直流偏置电压。它内部有一个基准电路,产生周期为20ms,宽度为1.5ms的基准信号,将获得的直流偏置电压与电位器的电压比较,获得电压差输出。最后,电压差的正负输出到电机驱动芯片决定电机的正反转。当电机转速一定时,通过级联减速齿轮带动电位器旋转,使得电压差为0,电机停止转动。
舵机的控制一般需要一个20ms左右的时基脉冲,该脉冲的高电平部分一般为0.5ms-2.5ms范围内的角度控制脉冲部分,总间隔为2ms。以180度角度伺服为例,那么对应的控制关系是这样的:
0.5ms--------------0度;
1.0ms------------45度;
1.5ms------------90度;
2.0ms-----------135度;
2.5ms-----------180度;
2.arduino下位机源码
相关源码已压缩上传,需要请下载对应附件
#include<Servo.h>  //库文件
Servo servo1;
static int v=0;
String mycommand="";
void setup()
  {
    Serial.begin(9600);//此处为串口设置的波特率 ,可以修改 必须同上位机设置的波特路一致。
    servo1.attach(3);  // 控制的端口是~3号
    servo1.write(90);
  }
void loop()
 {
    while(Serial.available()>0)
    {
      mycommand+=char(Serial.read());
      delay(2);
    }
    for(int m=0;m<mycommand.length();m++) //
       {
          char ch = mycommand[m];   //读取串口数据
          switch(ch)
             {
                 case '0'...'9':
                       v = v*10 + ch - '0';   //字符转换成十进制
                        break;
                  case 'a':   //如果数据后带a,则表示是一号舵机的数据,比如串口发送85a
                        //if(v >= 5 || v <= 175 )
                         servo1.write(v); // 让A从66度旋转到9度 (可修改角度)
                         //用于设定舵机旋转角度的语句,可设定的角度范围是0°到180°,“V”得到所输入的值而改变角度,比如85a为85度角
                         Serial.println(v+"°");//舵机角度改变后 发送改变的角度到上位机。
                         v = 0;
                          break;
                     }

          }
   mycommand="";
} 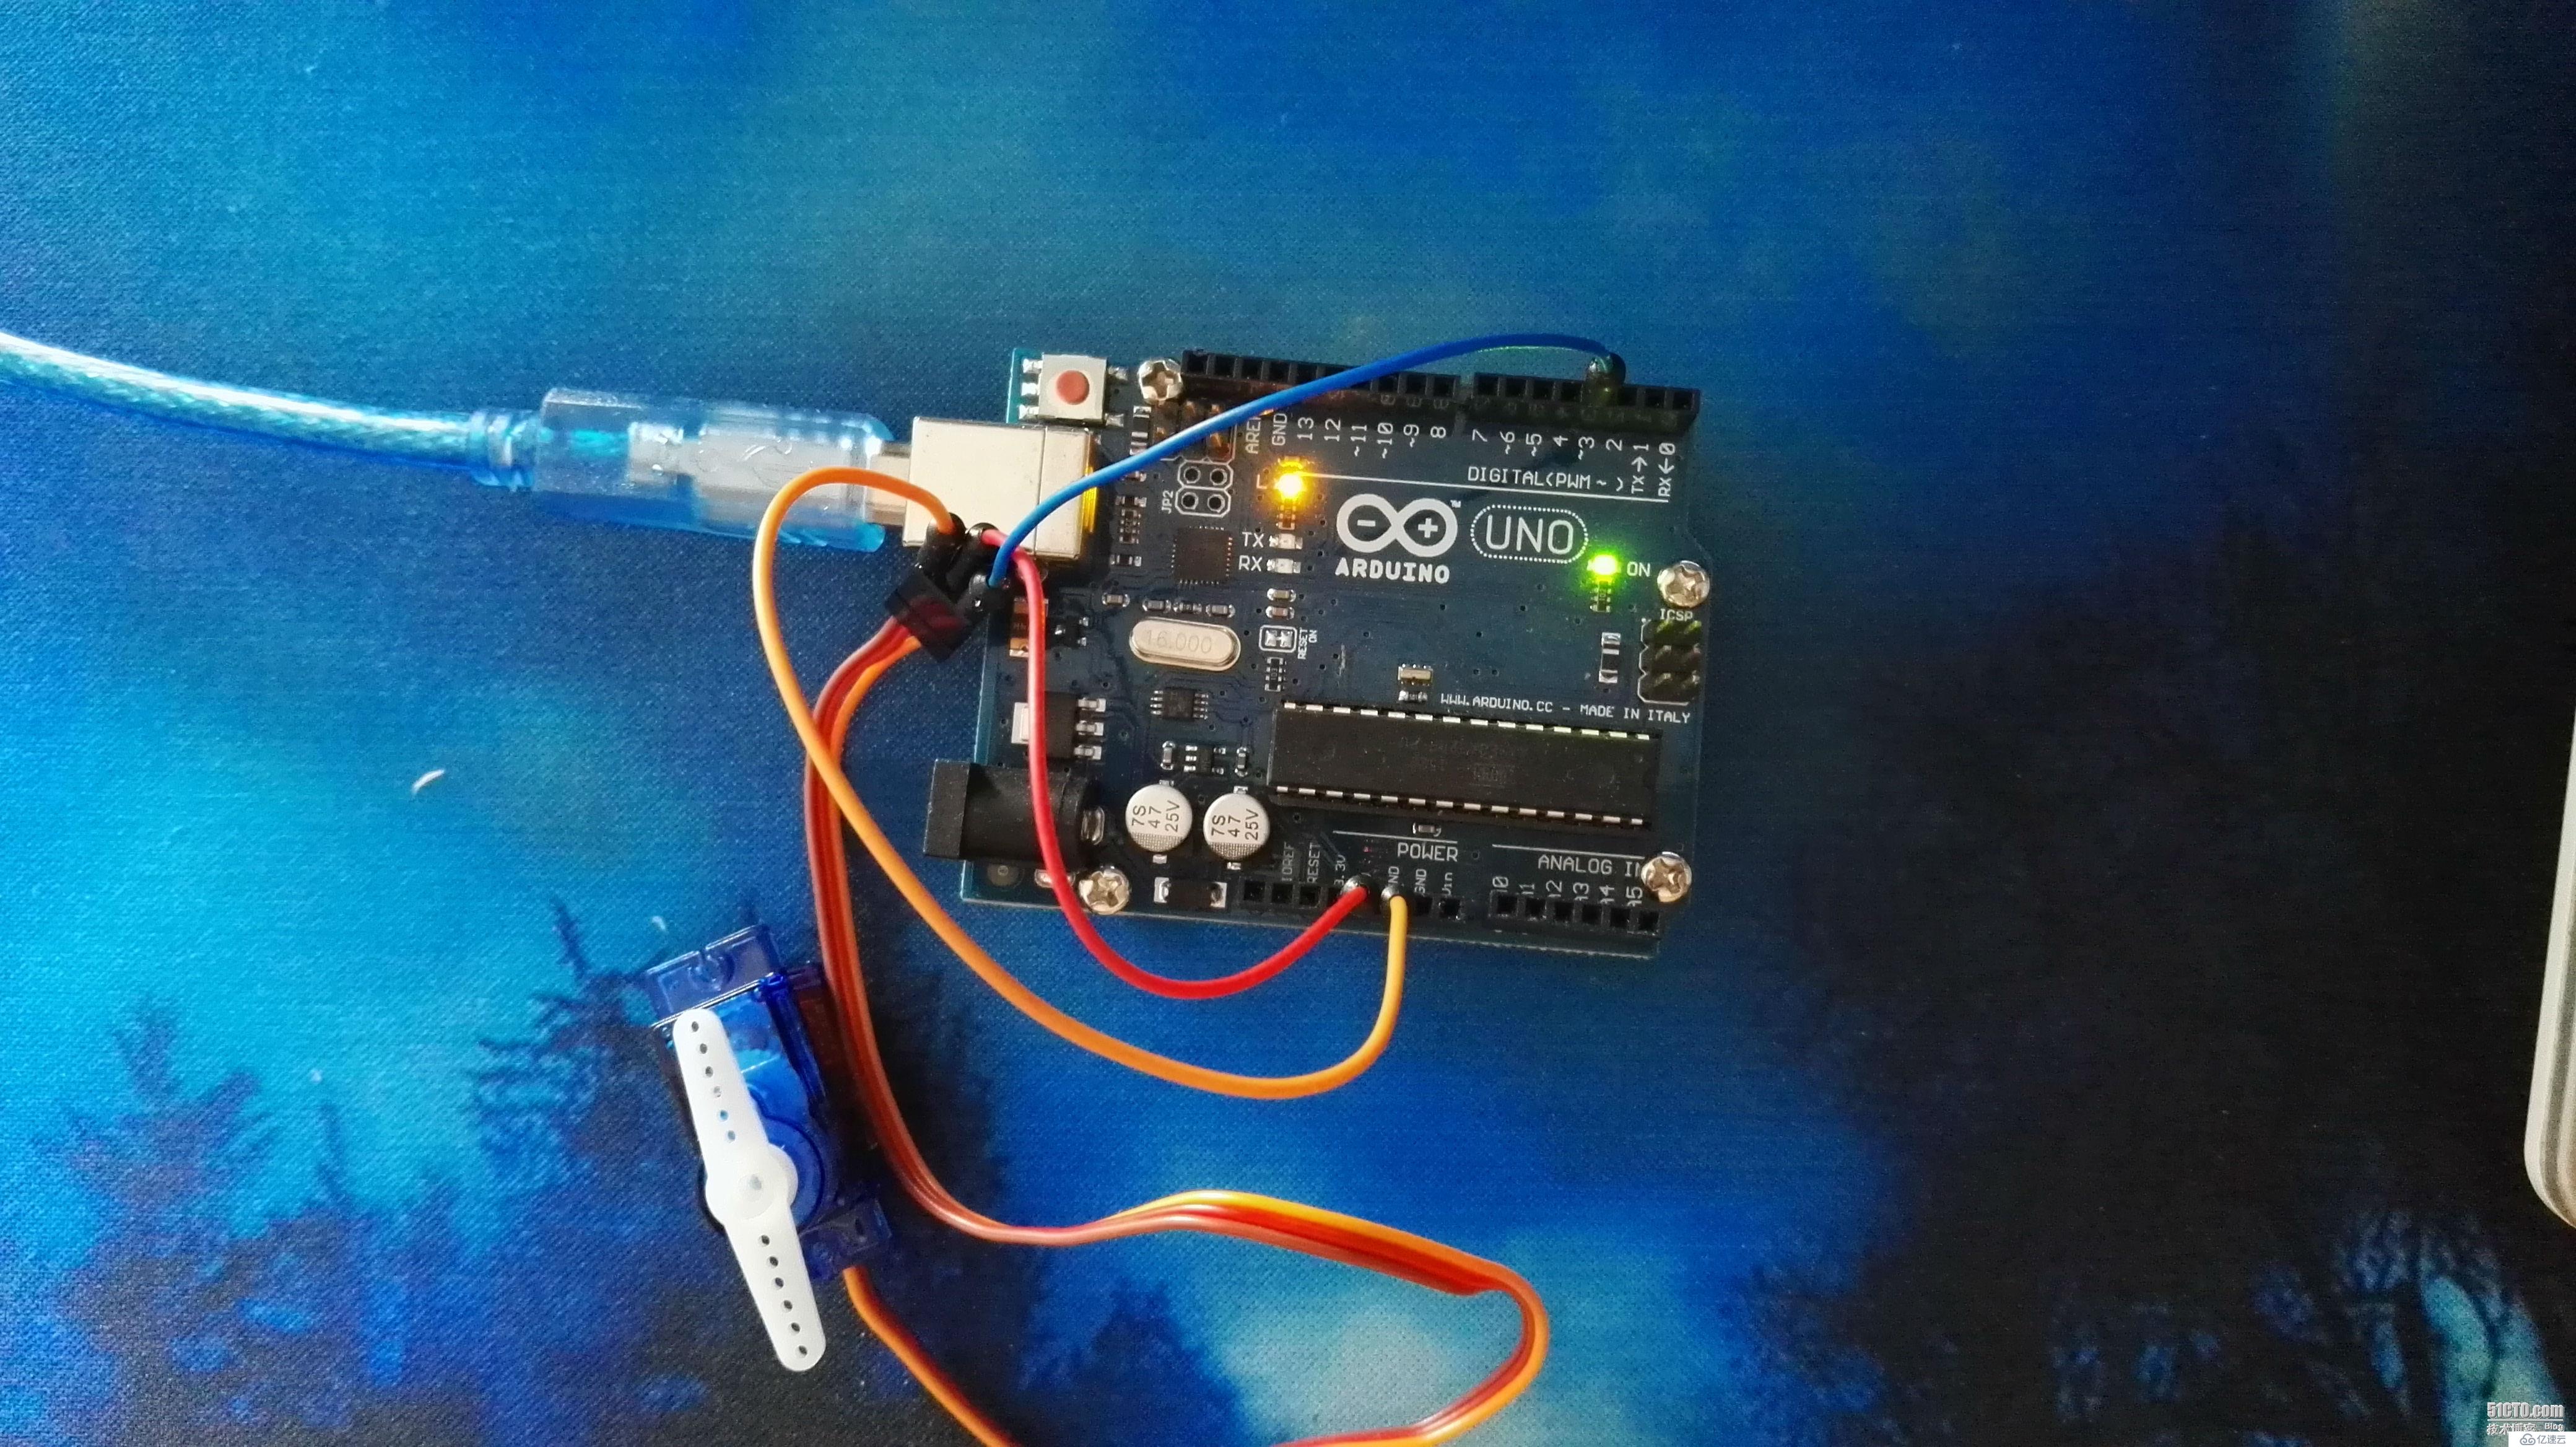
我选择我的是arduino Uno,舵机的接线方法是红色(VCC)端接控制板的5V处,棕色端接板子的GND,舵机的橙色线为信号线,接板子上的3号口;
3.C#上位机源码及界面
using System;
using System.Collections.Generic;
using System.ComponentModel;
using System.Data;
using System.Drawing;
using System.Linq;
using System.Text;
using System.Threading.Tasks;
using System.Windows.Forms;
namespace 舵机上位机源码
{
    public partial class Form1 : Form
    {
        bool open = false;
        public delegate void HandleInterfaceUpdataDelegate(string text);
        private HandleInterfaceUpdataDelegate interfaceUpdataHandle;
        int a;
        public Form1()
        {
            InitializeComponent();
        }
        private void Form1_Load(object sender, EventArgs e)
        {
            comboBox1.Items.AddRange(System.IO.Ports.SerialPort.GetPortNames());//从系统获取已有串口
            if (comboBox1.Items.Count > 0)
            {
                comboBox1.SelectedIndex = 0;//串口变量初始化
                serialPort1.RtsEnable = true;//DataReceived事件委托
                serialPort1.ReceivedBytesThreshold = 1;//设置 DataReceived 事件发生前内部输入缓冲区中的字节数
                serialPort1.DataReceived += new System.IO.Ports.SerialDataReceivedEventHandler(this.serialPort1_DataReceived);
                comboBox2.SelectedIndex = 6;
            }
            else
            {
                MessageBox.Show("未检测到设备\r\n");
            }
        }
        //监听串口
        private void serialPort1_DataReceived(object sender, System.IO.Ports.SerialDataReceivedEventArgs e)
        {
            try
            {
                string text = string.Empty;
                byte[] result = new byte[serialPort1.BytesToRead];
                serialPort1.Read(result, 0, serialPort1.BytesToRead);
                text = Encoding.UTF8.GetString(result);
            }
            catch
            {

            }
        }
        //串口刷新按钮
        private void button2_Click(object sender, EventArgs e)
        {
            comboBox1.Items.Clear();
            comboBox1.Items.AddRange(System.IO.Ports.SerialPort.GetPortNames());
            if (comboBox1.Items.Count > 0)
            {
                comboBox1.SelectedIndex = 0;
            }
            else
            {
                MessageBox.Show("未检测到串口\r\n");
            }
        }

        //打开串口
        private void btnOpen_Click(object sender, EventArgs e)
        {
            if (open == false)
            {

                if (serialPort1.IsOpen)
                {
                    MessageBox.Show("串口已经打开", "提示", MessageBoxButtons.OK, MessageBoxIcon.Information);
                    return;
                }
                //串口
                if (comboBox1.Text == string.Empty)
                {
                    MessageBox.Show("请选择串口", "提示", MessageBoxButtons.OK, MessageBoxIcon.Information);
                    return;
                }
                //波特率
                if (comboBox2.Text == string.Empty)
                {
                    MessageBox.Show("请选择波特率", "提示", MessageBoxButtons.OK, MessageBoxIcon.Information);
                    return;
                }
                serialPort1.BaudRate = int.Parse(comboBox2.Text);
                try
                {
                    serialPort1.PortName = comboBox1.SelectedItem.ToString();
                    serialPort1.Open();
                }
                catch
                {
                    try
                    {
                        comboBox1.SelectedIndex = comboBox1.SelectedIndex + 1;
                    }
                    catch
                    {
                        comboBox1.SelectedIndex = 0;
                    }
                    serialPort1.Close();
                }
                btnOpen.Text = "关闭";
                comboBox1.Enabled = false;
                comboBox2.Enabled = false;
                open = true;
                trackBarSend_Scroll(this, null);
                btnReserch.Enabled = false;
                btnsend.Enabled = true;
                tbxSend.Enabled = true;
                trackBarSend.Enabled = true;
                pictureBox1.BackColor = Color.Lime;
            }
            else
            {
                try
                {
                    serialPort1.Close();
                    btnOpen.Text = "打开";
                    open = false;
                    comboBox1.Enabled = true;
                    comboBox2.Enabled = true;
                    btnReserch.Enabled = true;
                    btnsend.Enabled = false;
                    tbxSend.Enabled = false;
                    trackBarSend.Enabled = false;
                    pictureBox1.BackColor = Color.Silver;
                }
                catch
                {
                }
            }
        }
        private void trackBarSend_Scroll(object sender, EventArgs e)
        {
            if (serialPort1.IsOpen)
            {
                a = trackBarSend.Value;
                string duojiA = trackBarSend.Value.ToString() + "a";
                try
                {
                    serialPort1.WriteLine(duojiA);
                    tbxSend.Text = a.ToString(); ; ;
                }
                catch
                {
                }
            }
        }
        private void btnsend_Click(object sender, EventArgs e)
        {
            try
            {
                byte[] SendBuf = new byte[100000];
                SendBuf = System.Text.Encoding.Default.GetBytes(tbxSend.Text+"a");
                serialPort1.Write(SendBuf, 0, SendBuf.Length);
            }
            catch (Exception err)
            {
                if (serialPort1.IsOpen)
                    serialPort1.Close();//如果是写数据时出错,此时窗口状态为开,就应关闭串口,防止下次不能使用,串口是不能重复打开和关闭的
                MessageBox.Show(err.ToString(), "错误");
            }
        }
        private void tbxSend_ValueChanged(object sender, EventArgs e)
        {
            trackBarSend.Value = (int)tbxSend.Value;
        }
    }
}
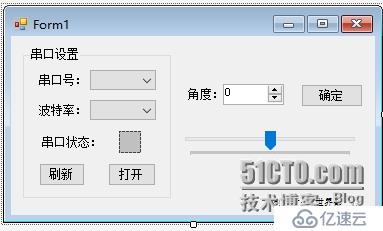
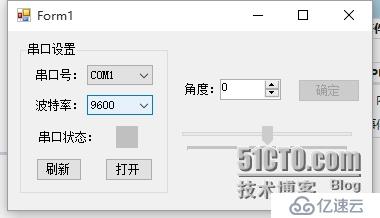
未连接设备状态
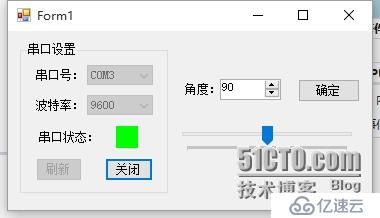
连接设备后
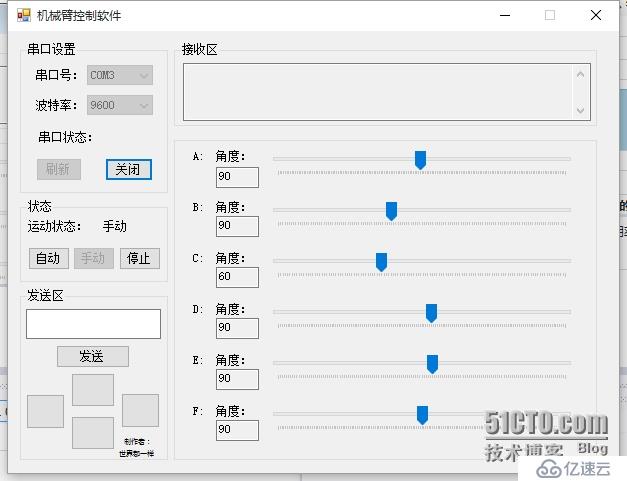
这是自己做的机械臂控制软件 相关源码也有
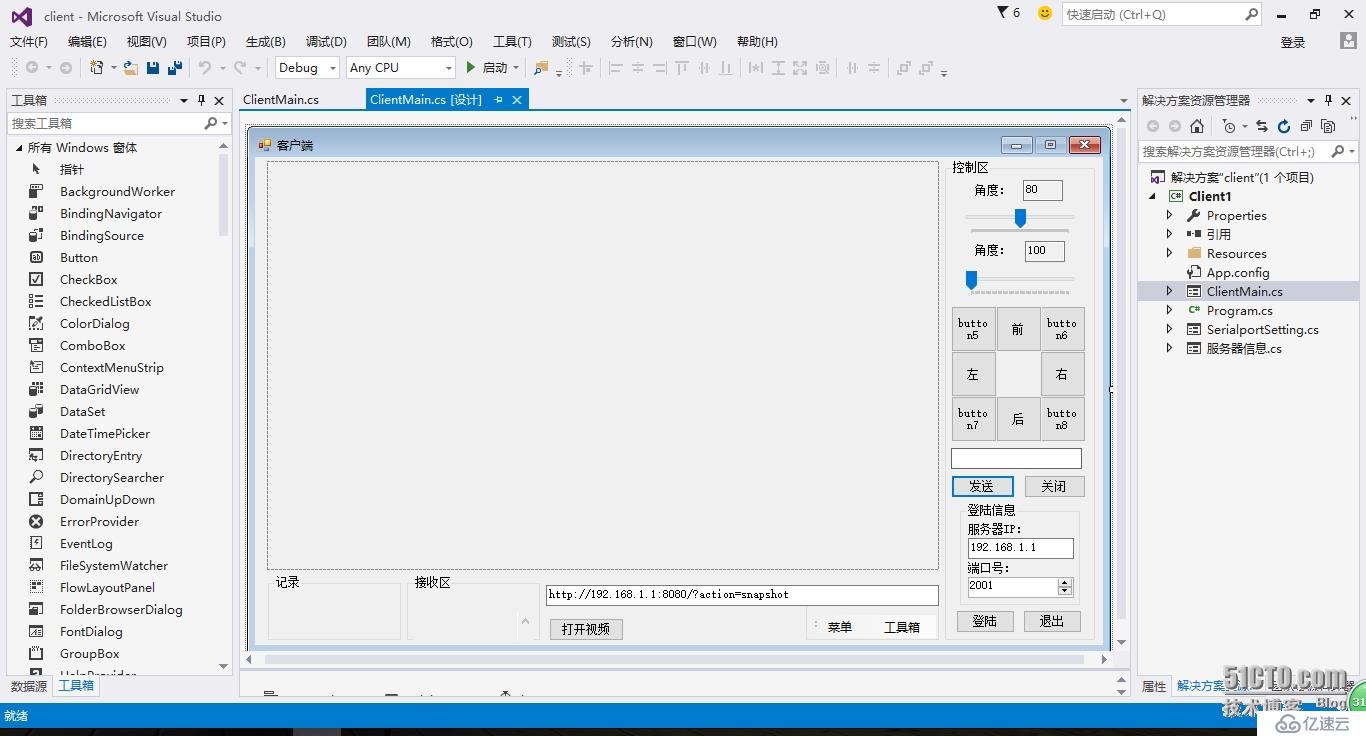
这是wifi智能小车控制软件
第一次写博文,有不好的地方还请多多包涵。
免责声明:本站发布的内容(图片、视频和文字)以原创、转载和分享为主,文章观点不代表本网站立场,如果涉及侵权请联系站长邮箱:is@yisu.com进行举报,并提供相关证据,一经查实,将立刻删除涉嫌侵权内容。